

Owner's Manual
Page 1
U RX-V2400 AV Receiver OWNER'S MANUAL
U RX-V2400 AV Receiver OWNER'S MANUAL
Owner's Manual
Page 3
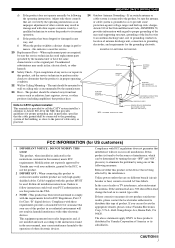
...regard to proper grounding of the mast and supporting structure, grounding of interference, which can not locate the appropriate retailer, please contact Yamaha Electronics Corp., U.S.A. 6660 Orangethorpe Ave, Buena Park, CA 90620. EXAMPLE OF ANTENNA GROUNDING MAST GROUND CLAMP ELECTRIC SERVICE EQUIPMENT NEC ... "ON", please try to eliminate the problem by using one of product. The above statements apply ONLY to distribute this manual, meets FCC requirements. Adjust only those products distributed by the manufacturer or have the same characteristics as indicated in the instructions...
...regard to proper grounding of the mast and supporting structure, grounding of interference, which can not locate the appropriate retailer, please contact Yamaha Electronics Corp., U.S.A. 6660 Orangethorpe Ave, Buena Park, CA 90620. EXAMPLE OF ANTENNA GROUNDING MAST GROUND CLAMP ELECTRIC SERVICE EQUIPMENT NEC ... "ON", please try to eliminate the problem by using one of product. The above statements apply ONLY to distribute this manual, meets FCC requirements. Adjust only those products distributed by the manufacturer or have the same characteristics as indicated in the instructions...
Owner's Manual
Page 4
...dangerous and may cause fire, damage to use of the unit. The cabinet should never be held responsible for future reference. 2 Install this Owner's Manual in a well ventilated, cool, dry, clean place - and, most out of power. CAUTION: READ THIS BEFORE OPERATING YOUR UNIT. 1 To ... humidifier) to prevent condensation inside this unit rises, it is faulty. 17 Before moving this unit, and/or personal injury. Contact qualified YAMAHA service personnel when any reasons. 15 When not planning to this unit, press STANDBY/ON to get the most importantly, without annoying blaring...
...dangerous and may cause fire, damage to use of the unit. The cabinet should never be held responsible for future reference. 2 Install this Owner's Manual in a well ventilated, cool, dry, clean place - and, most out of power. CAUTION: READ THIS BEFORE OPERATING YOUR UNIT. 1 To ... humidifier) to prevent condensation inside this unit rises, it is faulty. 17 Before moving this unit, and/or personal injury. Contact qualified YAMAHA service personnel when any reasons. 15 When not planning to this unit, press STANDBY/ON to get the most importantly, without annoying blaring...
Owner's Manual
Page 5
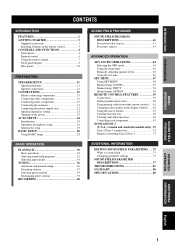
... setup 28 BASIC OPERATION PLAYBACK 30 Basic operations 30 Selecting sound field programs 32 Selecting input modes 34 TUNING 36 Automatic and manual tuning 36 Presetting stations 37 Selecting preset stations 39 Exchanging preset stations 39 RECORDING 40 SOUND FIELD PROGRAMS SOUND FIELD PROGRAM DESCRIPTIONS ... 44 Selecting the OSD mode 44 Using the sleep timer 44 Manually adjusting speaker levels 45 Using the test tone 46 SET MENU 47 Using SET MENU 48 Manual setup: SOUND 49 Manual setup: INPUT 54 Manual setup: OPTION 56 REMOTE CONTROL FEATURES 59 Control area 59 Setting...
... setup 28 BASIC OPERATION PLAYBACK 30 Basic operations 30 Selecting sound field programs 32 Selecting input modes 34 TUNING 36 Automatic and manual tuning 36 Presetting stations 37 Selecting preset stations 39 Exchanging preset stations 39 RECORDING 40 SOUND FIELD PROGRAMS SOUND FIELD PROGRAM DESCRIPTIONS ... 44 Selecting the OSD mode 44 Using the sleep timer 44 Manually adjusting speaker levels 45 Using the test tone 46 SET MENU 47 Using SET MENU 48 Manual setup: SOUND 49 Manual setup: INPUT 54 Manual setup: OPTION 56 REMOTE CONTROL FEATURES 59 Control area 59 Setting...
Owner's Manual
Page 6
...performed by using either the buttons on the main unit or on the remote control is given in parentheses. • This manual is a jointly developed technology of YAMAHA CORPORATION. All rights reserved. "Dolby", "Pro Logic", "Surround EX", and the double-D symbol are trademarks of Dolby ...Laboratories, Inc. In cases when the button names differ between the manual and product, the product has priority. In case of Dolby ...
...performed by using either the buttons on the main unit or on the remote control is given in parentheses. • This manual is a jointly developed technology of YAMAHA CORPORATION. All rights reserved. "Dolby", "Pro Logic", "Surround EX", and the double-D symbol are trademarks of Dolby ...Laboratories, Inc. In cases when the button names differ between the manual and product, the product has priority. In case of Dolby ...
Owner's Manual
Page 8
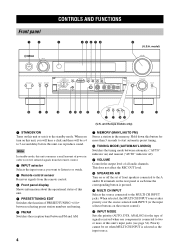
... MODE START L M NO I J K (U.K. When selected, the MULTI CH INPUT source takes priority over the source selected with INPUT (or the input selector buttons on ) and manual ("AUTO" indicator off the set when MULTI CH INPUT is connected to start automatic preset tuning. 8 TUNING MODE (AUTO/MAN'L MONO) Switches the tuning mode...
... MODE START L M NO I J K (U.K. When selected, the MULTI CH INPUT source takes priority over the source selected with INPUT (or the input selector buttons on ) and manual ("AUTO" indicator off the set when MULTI CH INPUT is connected to start automatic preset tuning. 8 TUNING MODE (AUTO/MAN'L MONO) Switches the tuning mode...

Owner's Manual
Page 24
...FRONT PRE OUT and CENTER PRE OUT jacks are connected to this unit, the channel of the subwoofer with built-in amplifier, such as the YAMAHA Active Servo Processing Subwoofer System, to adjust the volume level by the TONE CONTROL settings. • Signals will only be output from the ...FRONT PRE OUT jacks when SPEAKER A is also possible to this unit (see "Manually adjusting speaker levels" on page 45.). • Some signals may not correspond to the PRE OUT jacks as the corresponding speaker terminals. Set the ...
...FRONT PRE OUT and CENTER PRE OUT jacks are connected to this unit, the channel of the subwoofer with built-in amplifier, such as the YAMAHA Active Servo Processing Subwoofer System, to adjust the volume level by the TONE CONTROL settings. • Signals will only be output from the ...FRONT PRE OUT jacks when SPEAKER A is also possible to this unit (see "Manually adjusting speaker levels" on page 45.). • Some signals may not correspond to the PRE OUT jacks as the corresponding speaker terminals. Set the ...

Owner's Manual
Page 29
... is selected in SPEAKER SET (page 49) and that 80Hz is selected in CROSS OVER (page 50). y If your other speakers. SET MENU . ;AUTO SETUP ;MANUAL SETUP / : Up/Down -/+ : Select p p 5 When WIRING, DISTANCE, SIZE or LEVEL is too much higher quality than your subwoofer can adjust the output volume and the...
... is selected in SPEAKER SET (page 49) and that 80Hz is selected in CROSS OVER (page 50). y If your other speakers. SET MENU . ;AUTO SETUP ;MANUAL SETUP / : Up/Down -/+ : Select p p 5 When WIRING, DISTANCE, SIZE or LEVEL is too much higher quality than your subwoofer can adjust the output volume and the...

Owner's Manual
Page 30
If you are set for a few seconds after each setup parameter, use the manual setup parameters (see page 49). y You can display each result by pressing k once and pressing + repeatedly before exiting. FRONT L;;;+5.0dB CENTER;;;;-4.5dB FRONT R;;;+5.5dB PRES L;;;;-3.... each display. • If you selected STEP in step 6 The RESULT display appears after all items are not satisfied with the result or want to manually adjust each check, then settings of your system. • In the DISTANCE results, the distance displayed may be set . To cancel the auto setup procedure...
If you are set for a few seconds after each setup parameter, use the manual setup parameters (see page 49). y You can display each result by pressing k once and pressing + repeatedly before exiting. FRONT L;;;+5.0dB CENTER;;;;-4.5dB FRONT R;;;+5.5dB PRES L;;;;-3.... each display. • If you selected STEP in step 6 The RESULT display appears after all items are not satisfied with the result or want to manually adjust each check, then settings of your system. • In the DISTANCE results, the distance displayed may be set . To cancel the auto setup procedure...
Owner's Manual
Page 32
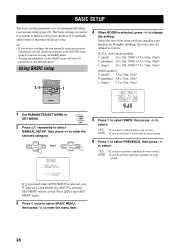
... parameters are defined as follows: [U.S.A. The basic settings are useful if you want to quickly setup your speakers or to configure the unit manually using the BASIC menu. • Altering any parameters in the BASIC menu will be closed. Roughly speaking, the room sizes are set ... n to select PRESENCE, then press -/+ to select: YES If you run auto setup (page 24). PARAMETER SET MENU 2 Press k/n repeatedly to select MANUAL SETUP, then press -/+ to SET MENU. Using BASIC setup 2~9 A/B/C/D/E PRESET TV INPUT TV VOL CH TV MUTE MUTE STEREO VOLUME DISC EFFECT ON SCREEN LEVEL...
... parameters are defined as follows: [U.S.A. The basic settings are useful if you want to quickly setup your speakers or to configure the unit manually using the BASIC menu. • Altering any parameters in the BASIC menu will be closed. Roughly speaking, the room sizes are set ... n to select PRESENCE, then press -/+ to select: YES If you run auto setup (page 24). PARAMETER SET MENU 2 Press k/n repeatedly to select MANUAL SETUP, then press -/+ to SET MENU. Using BASIC setup 2~9 A/B/C/D/E PRESET TV INPUT TV VOL CH TV MUTE MUTE STEREO VOLUME DISC EFFECT ON SCREEN LEVEL...

Owner's Manual
Page 39
... AUTO. - TUNER MD/TAPE CD-R CD DTV CBL/SAT VCR 1 DVR/VCR2 DVD 2 Press STRAIGHT/EFFECT so that cue this unit and the player. To manually release the DTS mode, press INPUT MODE to the DTS decoding mode. STRAIGHT EFFECT 3 Set PARAMETER/SET MENU to PARAMETER and press k/n to display the...
... AUTO. - TUNER MD/TAPE CD-R CD DTV CBL/SAT VCR 1 DVR/VCR2 DVD 2 Press STRAIGHT/EFFECT so that cue this unit and the player. To manually release the DTS mode, press INPUT MODE to the DTS decoding mode. STRAIGHT EFFECT 3 Set PARAMETER/SET MENU to PARAMETER and press k/n to display the...

Owner's Manual
Page 40
...and the reception band following steps 1 and 2 as the input source. Automatic tuning is effective when station signals are 2 tuning methods; Note Manually tuning in to an FM station will automatically change the reception mode to monaural to turn it off . 3 Press PRESET/TUNING l/h to tune... the frequency of the received station is shown on the remote control) to select TUNER as described in to the desired station manually. TUNING TUNING Automatic and manual tuning There are strong and there is no interference. ■ Automatic tuning 1 STANDBY /ON INPUT SPEAKERS A B MULTI CH...
...and the reception band following steps 1 and 2 as the input source. Automatic tuning is effective when station signals are 2 tuning methods; Note Manually tuning in to an FM station will automatically change the reception mode to monaural to turn it off . 3 Press PRESET/TUNING l/h to tune... the frequency of the received station is shown on the remote control) to select TUNER as described in to the desired station manually. TUNING TUNING Automatic and manual tuning There are strong and there is no interference. ■ Automatic tuning 1 STANDBY /ON INPUT SPEAKERS A B MULTI CH...

Owner's Manual
Page 41
... tuning is cut due to FM stations with sufficient signal strength are stored automatically by following the procedure in the monaural mode, and store it manually in "Manually presetting stations". model) 1 32 1 Press FM/AM to it by automatic preset tuning. FM/AM 2 Press TUNING MODE (AUTO/MAN'L MONO) so that preset...
... tuning is cut due to FM stations with sufficient signal strength are stored automatically by following the procedure in the monaural mode, and store it manually in "Manually presetting stations". model) 1 32 1 Press FM/AM to it by automatic preset tuning. FM/AM 2 Press TUNING MODE (AUTO/MAN'L MONO) so that preset...

Owner's Manual
Page 42
... FM MEMORY Flashes 3 Press A/B/C/D/E repeatedly to select a preset station group (A to 8) while the "MEMORY" indicator is flashing. Press h to 40 stations (8 stations x 5 groups) manually. PRESET/ TUNING 3 4 2,5 (U.S.A. TUNING ■ Manually presetting stations You can also store up to select a higher preset station number. See page 36 for about 5 seconds. The group letter appears...
... FM MEMORY Flashes 3 Press A/B/C/D/E repeatedly to select a preset station group (A to 8) while the "MEMORY" indicator is flashing. Press h to 40 stations (8 stations x 5 groups) manually. PRESET/ TUNING 3 4 2,5 (U.S.A. TUNING ■ Manually presetting stations You can also store up to select a higher preset station number. See page 36 for about 5 seconds. The group letter appears...

Owner's Manual
Page 49
... to select LEVEL the speaker you to check the speaker levels. After a few seconds, "SLEEP OFF" disappears, and the "SLEEP" indicator goes off. ADVANCED OPERATIONS Manually adjusting speaker levels You can also select the speaker by using LEVEL when PARAMETER/SET MENU is set this operation will override the level adjustments...
... to select LEVEL the speaker you to check the speaker levels. After a few seconds, "SLEEP OFF" disappears, and the "SLEEP" indicator goes off. ADVANCED OPERATIONS Manually adjusting speaker levels You can also select the speaker by using LEVEL when PARAMETER/SET MENU is set this operation will override the level adjustments...

Owner's Manual
Page 50
... headphones from your speaker levels. Note You cannot enter test mode if headphones are connected to adjust speaker volumes. 5 Press TEST when you want to manually balance your listening position. 3 2, 5 A/B/C/D/E PRESET TV INPUT TV VOL CH TV MUTE MUTE STEREO VOLUME DISC EFFECT ON SCREEN LEVEL SLEEP TEST PARAMETER SET MENU...
... headphones from your speaker levels. Note You cannot enter test mode if headphones are connected to adjust speaker volumes. 5 Press TEST when you want to manually balance your listening position. 3 2, 5 A/B/C/D/E PRESET TV INPUT TV VOL CH TV MUTE MUTE STEREO VOLUME DISC EFFECT ON SCREEN LEVEL SLEEP TEST PARAMETER SET MENU...
Owner's Manual
Page 51
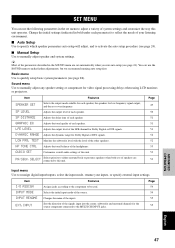
...for video signal processing delays when using LCD monitors or projectors. PR/SBch SELECT Selects priority to manually adjust speaker and system settings. Changes the name of the headphones. Sound menu Use to manually adjust any speaker setting or compensate for the source component connected to adjust a variety of your... recommend running auto setup first. Change the initial settings (indicated in the set automatically when you run auto setup (see page 24). ■ Manual Setup Use to either surround back or presence speakers when both sets of this unit operates.
...for video signal processing delays when using LCD monitors or projectors. PR/SBch SELECT Selects priority to manually adjust speaker and system settings. Changes the name of the headphones. Sound menu Use to manually adjust any speaker setting or compensate for the source component connected to adjust a variety of your... recommend running auto setup first. Change the initial settings (indicated in the set automatically when you run auto setup (see page 24). ■ Manual Setup Use to either surround back or presence speakers when both sets of this unit operates.

Owner's Manual
Page 52
... will be closed. Selects the Zone 2 mode. p p SET MENU . ;AUTO SETUP ;MANUAL SETUP / : Up/Down -/+ : Select If k is pressed when AUTO SETUP is selected, or if n is pressed when MANUAL SETUP is disconnected from being lost even if this operation to navigate to and enter the setup... and other SET MENU settings. Specifies the location of the sound field program group buttons. PARAMETER SET MENU 2 Press k/n to select AUTO SETUP or MANUAL SETUP, then press -/+ to adjust the optional system settings. then 3 Press k/n repeatedly to select a menu, then press -/+ to open SET MENU...
... will be closed. Selects the Zone 2 mode. p p SET MENU . ;AUTO SETUP ;MANUAL SETUP / : Up/Down -/+ : Select If k is pressed when AUTO SETUP is selected, or if n is pressed when MANUAL SETUP is disconnected from being lost even if this operation to navigate to and enter the setup... and other SET MENU settings. Specifies the location of the sound field program group buttons. PARAMETER SET MENU 2 Press k/n to select AUTO SETUP or MANUAL SETUP, then press -/+ to adjust the optional system settings. then 3 Press k/n repeatedly to select a menu, then press -/+ to open SET MENU...
Owner's Manual
Page 53
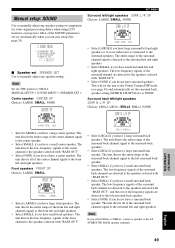
... "BASS OUT". • Select NONE if you have a center speaker. The unit directs all of the surround channel signal is connected to manually adjust any speaker setting. The unit directs the low-frequency signals of the surround back channel signal to the center speaker. • Select SMALL... entire range of the center channel signal to the surround left surround back speaker. • Select NONE if you have surround speakers. p p Manual setup: SOUND Use to the surround speakers. This will set the unit to the Virtual Cinema DSP mode (see page 34) and automatically set...
... "BASS OUT". • Select NONE if you have a center speaker. The unit directs all of the surround channel signal is connected to manually adjust any speaker setting. The unit directs the low-frequency signals of the surround back channel signal to the center speaker. • Select SMALL... entire range of the center channel signal to the surround left surround back speaker. • Select NONE if you have surround speakers. p p Manual setup: SOUND Use to the surround speakers. This will set the unit to the Virtual Cinema DSP mode (see page 34) and automatically set...

Owner's Manual
Page 54
... over (cut-off) frequency for both stereo reproduction and the sound field program). All frequencies below the selected frequency will be sent to the subwoofer. MANUAL SETUP > SOUND MENU > SP LEVEL > B)SPEAKER LEVEL - + . FR C SL Choices: -10.0 dB to +10.0 dB • FR adjusts the ..., 60Hz, 80Hz, 90Hz, 100Hz, 110Hz, 120Hz, 160Hz, 200Hz THX recommendation: 80Hz CROSS OVER ■ Speaker level SP LEVEL Use these settings to manually balance the speaker levels between the front left or surround left and right speakers, and to the subwoofer (subwoofer can be directed to both the...
... over (cut-off) frequency for both stereo reproduction and the sound field program). All frequencies below the selected frequency will be sent to the subwoofer. MANUAL SETUP > SOUND MENU > SP LEVEL > B)SPEAKER LEVEL - + . FR C SL Choices: -10.0 dB to +10.0 dB • FR adjusts the ..., 60Hz, 80Hz, 90Hz, 100Hz, 110Hz, 120Hz, 160Hz, 200Hz THX recommendation: 80Hz CROSS OVER ■ Speaker level SP LEVEL Use these settings to manually balance the speaker levels between the front left or surround left and right speakers, and to the subwoofer (subwoofer can be directed to both the...


