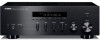

Owners Manual
Page 5
... CONNECTIONS 10 Connecting speakers and source components.......... 10 Connecting the FM and AM antennas 12 Connecting an infrared signal receiver or Yamaha component to the REMOTE IN/OUT jacks 13 Connecting power cable 13 BASIC OPERATION PLAYING AND RECORDING 14 Playing a source 14... Clearing a preset station 22 Clearing all preset stations 23 PLAYING BACK TUNES FROM YOUR iPhone/iPod/ Bluetooth™ COMPONENT 24 Using a Universal Dock for iPod 25 Using a Wireless System for iPod 26 Using a Bluetooth Wireless Audio Receiver 27 ADVANCED OPERATION SETTING THE OPTION MENU FOR EACH ...
... CONNECTIONS 10 Connecting speakers and source components.......... 10 Connecting the FM and AM antennas 12 Connecting an infrared signal receiver or Yamaha component to the REMOTE IN/OUT jacks 13 Connecting power cable 13 BASIC OPERATION PLAYING AND RECORDING 14 Playing a source 14... Clearing a preset station 22 Clearing all preset stations 23 PLAYING BACK TUNES FROM YOUR iPhone/iPod/ Bluetooth™ COMPONENT 24 Using a Universal Dock for iPod 25 Using a Wireless System for iPod 26 Using a Bluetooth Wireless Audio Receiver 27 ADVANCED OPERATION SETTING THE OPTION MENU FOR EACH ...

Owners Manual
Page 8
...) Turns on and off the power of this unit (see page 25). Note Playback information can only be displayed for an iPhone/iPod that is connected using a Universal Dock for iPod. 6 MEMORY Stores the current FM/AM station as a preset when TUNER is selected as the input source (see page 21). ... preset station when TUNER is selected as the input source (see page 22). 8 Front panel display Shows information about the song playing on the iPhone/iPod when DOCK is selected as the input source (see page 14). Choose brightness from 3 levels by pressing this unit. 9 PRESET j / i Selects a preset FM/...
...) Turns on and off the power of this unit (see page 25). Note Playback information can only be displayed for an iPhone/iPod that is connected using a Universal Dock for iPod. 6 MEMORY Stores the current FM/AM station as a preset when TUNER is selected as the input source (see page 21). ... preset station when TUNER is selected as the input source (see page 22). 8 Front panel display Shows information about the song playing on the iPhone/iPod when DOCK is selected as the input source (see page 14). Choose brightness from 3 levels by pressing this unit. 9 PRESET j / i Selects a preset FM/...
Owners Manual
Page 11
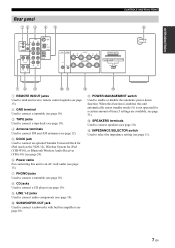
When this function is not operated for iPod (YID-W10), or Bluetooth Wireless Audio Receiver (YBA-10) (see page 24). 6 Power cable For connecting this unit automatically enters standby mode if it is ... jacks Used to connect a tape deck (see page 10). 4 Antenna terminals Used to connect FM and AM antennas (see page 12). 5 DOCK jack Used to connect an optional Yamaha Universal Dock for iPod (such as the YDS-12), Wireless System for a certain amount of time (3 settings are available; see page 10). A POWER MANAGEMENT switch...
When this function is not operated for iPod (YID-W10), or Bluetooth Wireless Audio Receiver (YBA-10) (see page 24). 6 Power cable For connecting this unit automatically enters standby mode if it is ... jacks Used to connect a tape deck (see page 10). 4 Antenna terminals Used to connect FM and AM antennas (see page 12). 5 DOCK jack Used to connect an optional Yamaha Universal Dock for iPod (such as the YDS-12), Wireless System for a certain amount of time (3 settings are available; see page 10). A POWER MANAGEMENT switch...
Owners Manual
Page 13
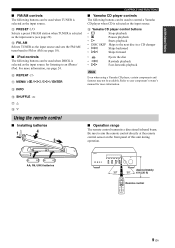
...as the input source for more information, see page 24. 0 REPEAT A MENU/ Ee / b / a / ENTER E INFO CONTROLS AND FUNCTIONS ■ Yamaha CD player controls The following buttons can be used when DOCK is selected as the input source. D FM, AM Selects TUNER as the input source and sets the FM/AM tuner... band to FM or AM (see page 18). ■ iPod controls The following buttons can be used to an iPhone/ iPod. I Yamaha CD player control buttons •...
...as the input source for more information, see page 24. 0 REPEAT A MENU/ Ee / b / a / ENTER E INFO CONTROLS AND FUNCTIONS ■ Yamaha CD player controls The following buttons can be used when DOCK is selected as the input source. D FM, AM Selects TUNER as the input source and sets the FM/AM tuner... band to FM or AM (see page 18). ■ iPod controls The following buttons can be used to an iPhone/ iPod. I Yamaha CD player control buttons •...

Owners Manual
Page 28
...; iPhone 3GS Bluetooth components iPhone/iPod charging also supported. Note If the iPhone connected to silent mode. 24 En PLAYING BACK TUNES FROM YOUR IPHONE/IPOD/BLUETOOTH™ COMPONENT PLAYING BACK TUNES FROM YOUR iPhone/iPod/ Bluetooth™ COMPONENT Once you have connected an optional Yamaha Universal Dock for iPod (such as possible from the unit...
...; iPhone 3GS Bluetooth components iPhone/iPod charging also supported. Note If the iPhone connected to silent mode. 24 En PLAYING BACK TUNES FROM YOUR IPHONE/IPOD/BLUETOOTH™ COMPONENT PLAYING BACK TUNES FROM YOUR iPhone/iPod/ Bluetooth™ COMPONENT Once you have connected an optional Yamaha Universal Dock for iPod (such as possible from the unit...
Owners Manual
Page 29
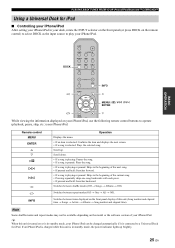
...playing or paused: Skips to a Universal Dock for iPod ■ Controlling your iPhone/iPod After setting your iPhone/iPod. If an iPhone/iPod is charged while this unit is in your dock, rotate the INPUT selector on the front panel (or press DOCK on the model or the software version of...pressed and held : Searches forward. • If a song is selected: Plays the selected song. PLAYING BACK TUNES FROM YOUR iPhone/iPod/Bluetooth™ COMPONENT Using a Universal Dock for iPod. Scroll up brightly. 25 En Scroll down. • If a song is playing: Pauses the song. • If a song...
...playing or paused: Skips to a Universal Dock for iPod ■ Controlling your iPhone/iPod After setting your iPhone/iPod. If an iPhone/iPod is charged while this unit is in your dock, rotate the INPUT selector on the front panel (or press DOCK on the model or the software version of...pressed and held : Searches forward. • If a song is selected: Plays the selected song. PLAYING BACK TUNES FROM YOUR iPhone/iPod/Bluetooth™ COMPONENT Using a Universal Dock for iPod. Scroll up brightly. 25 En Scroll down. • If a song is playing: Pauses the song. • If a song...
Owners Manual
Page 30
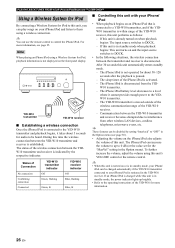
... receiver ■ Establishing a wireless connection Once the iPhone/iPod is established. During this time the wireless connection between the transmitter and receiver is not displayed on when playback begins: The input source switches to DOCK. - The iPhone/iPod is not operated for about 5 seconds for audio to ...be heard. After 30 seconds this unit with your iPhone/ iPod • When playback begins on or is in the Option menu)....
... receiver ■ Establishing a wireless connection Once the iPhone/iPod is established. During this time the wireless connection between the transmitter and receiver is not displayed on when playback begins: The input source switches to DOCK. - The iPhone/iPod is not operated for about 5 seconds for audio to ...be heard. After 30 seconds this unit with your iPhone/ iPod • When playback begins on or is in the Option menu)....
Owners Manual
Page 31
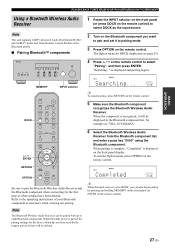
...the Bluetooth Wireless Audio Receiver and the Bluetooth component when connecting for example as "YBA-10 YAMAHA". 6 Select the Bluetooth Wireless Audio Receiver from the Bluetooth component list, and enter a ...pass key "0000" using the Bluetooth component. PLAYING BACK TUNES FROM YOUR iPhone/iPod/Bluetooth™ COMPONENT Using a Bluetooth Wireless Audio Receiver Note This unit supports A2DP (Advanced Audio...When the component is paired, the pairing settings for the device which has not been used for DOCK displayed (see page 29). 4 Press B / C on the remote control. The Option menu ...
...the Bluetooth Wireless Audio Receiver and the Bluetooth component when connecting for example as "YBA-10 YAMAHA". 6 Select the Bluetooth Wireless Audio Receiver from the Bluetooth component list, and enter a ...pass key "0000" using the Bluetooth component. PLAYING BACK TUNES FROM YOUR iPhone/iPod/Bluetooth™ COMPONENT Using a Bluetooth Wireless Audio Receiver Note This unit supports A2DP (Advanced Audio...When the component is paired, the pairing settings for the device which has not been used for DOCK displayed (see page 29). 4 Press B / C on the remote control. The Option menu ...
Owners Manual
Page 32
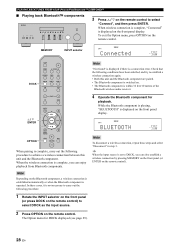
... a wireless connection by pressing MEMORY on the front panel (or ENTER on the remote control). 1 Rotate the INPUT selector on the front panel (or press DOCK on the remote control) to establish a wireless connection again. • Both this unit and the Bluetooth component are paired. • The Bluetooth component is ...the remote control to select "Connect", and then press ENTER. OPTION When pairing is displayed on the remote control. PLAYING BACK TUNES FROM YOUR iPhone/iPod/Bluetooth™ COMPONENT ■ Playing back BluetoothTM components 3 Press B / C on the remote control.
... a wireless connection by pressing MEMORY on the front panel (or ENTER on the remote control). 1 Rotate the INPUT selector on the front panel (or press DOCK on the remote control) to establish a wireless connection again. • Both this unit and the Bluetooth component are paired. • The Bluetooth component is ...the remote control to select "Connect", and then press ENTER. OPTION When pairing is displayed on the remote control. PLAYING BACK TUNES FROM YOUR iPhone/iPod/Bluetooth™ COMPONENT ■ Playing back BluetoothTM components 3 Press B / C on the remote control.
Owners Manual
Page 33
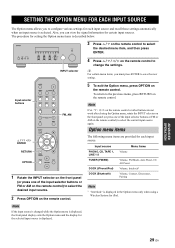
... the remote control) to save the new setting. Input source Menu items PHONO, CD, TAPE 1, LINE 1-2 Volume TUNER (FM/AM) DOCK (iPhone/iPod) Volume, FM Mode, Auto Preset, Clr All Preset Volume, Interlock* DOCK (Bluetooth) Volume, Connect, Disconnect, Pairing Note * "Interlock" is displayed in the Option menu only when using a Wireless System for...
... the remote control) to save the new setting. Input source Menu items PHONO, CD, TAPE 1, LINE 1-2 Volume TUNER (FM/AM) DOCK (iPhone/iPod) Volume, FM Mode, Auto Preset, Clr All Preset Volume, Interlock* DOCK (Bluetooth) Volume, Connect, Disconnect, Pairing Note * "Interlock" is displayed in the Option menu only when using a Wireless System for...
Owners Manual
Page 34
... MaxVol (Maximum volume) Sets the maximum volume level so that the volume will be used to +16.5dB (0.5 dB step) Sets items for iPod and DOCK is turned on. "FM Mode" is displayed in the Option menu only when TUNER is selected as the input source. MONO Receives in automatic ... to "Off", the volume level used when this parameter is automatically set it to a value lower than the "IniVol" setting, the setting for iPod, the iPhone/iPod can get a better reception in the Option menu only when using a Wireless System for "MaxVol" overrides the "IniVol" setting. STEREO Receives in ...
... MaxVol (Maximum volume) Sets the maximum volume level so that the volume will be used to +16.5dB (0.5 dB step) Sets items for iPod and DOCK is turned on. "FM Mode" is displayed in the Option menu only when TUNER is selected as the input source. MONO Receives in automatic ... to "Off", the volume level used when this parameter is automatically set it to a value lower than the "IniVol" setting, the setting for iPod, the iPhone/iPod can get a better reception in the Option menu only when using a Wireless System for "MaxVol" overrides the "IniVol" setting. STEREO Receives in ...

Owners Manual
Page 39
... in the Wireless System for iPod. When using the Universal Dock for iPod: Your iPhone/iPod is not supported by the unit. See page 4, 8 - 4, 8 - Your iPhone/iPod is stationed in the Universal Dock for iPod to the Universal Dock for iPod. Remove your iPhone/iPod is properly placed in the dock. Connect the iPhone/iPod securely to the DOCK jack of the unit...
... in the Wireless System for iPod. When using the Universal Dock for iPod: Your iPhone/iPod is not supported by the unit. See page 4, 8 - 4, 8 - Your iPhone/iPod is stationed in the Universal Dock for iPod to the Universal Dock for iPod. Remove your iPhone/iPod is properly placed in the dock. Connect the iPhone/iPod securely to the DOCK jack of the unit...

