
Owner's Manual
Page 1
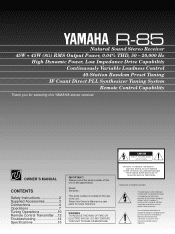
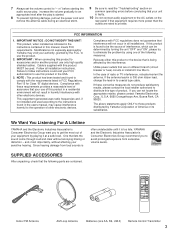
... accompanying the appliance. R-85 Natural Sound Stereo Receiver 45W + 45W (8Ω) RMS Output Power, 0.04% THD, 50 - 20,000 Hz High Dynamic Power, Low Impedance Drive Capability Continuously Variable Loudness Control 40-Station Random Preset Tuning IF Count Direct PLL Synthesizer Tuning System Remote Control Capability Thank you for future reference. OWNER'S MANUAL CONTENTS Safety Instructions 2 Supplied Accessories 3 Connections 4 Operations 7 Tuning Operations 10 Remote Control Transmitter ...12 Troubleshooting 14 Specifications 15 IMPORTANT! Model: Serial No.: The...
... accompanying the appliance. R-85 Natural Sound Stereo Receiver 45W + 45W (8Ω) RMS Output Power, 0.04% THD, 50 - 20,000 Hz High Dynamic Power, Low Impedance Drive Capability Continuously Variable Loudness Control 40-Station Random Preset Tuning IF Count Direct PLL Synthesizer Tuning System Remote Control Capability Thank you for future reference. OWNER'S MANUAL CONTENTS Safety Instructions 2 Supplied Accessories 3 Connections 4 Operations 7 Tuning Operations 10 Remote Control Transmitter ...12 Troubleshooting 14 Specifications 15 IMPORTANT! Model: Serial No.: The...
Owner's Manual
Page 2
... the unit. 11 Power-Cord Protection - The unit should be situated so that produce heat. 10 Power Sources - Power-supply cords should be routed so that provides guidelines for future reference. 2 Install your dealer. 5 Do not use force on switches, knobs or cords. The user should be sure the antenna system is provided to call the CATV system installer's attention to service the unit beyond...
... the unit. 11 Power-Cord Protection - The unit should be situated so that produce heat. 10 Power Sources - Power-supply cords should be routed so that provides guidelines for future reference. 2 Install your dealer. 5 Do not use force on switches, knobs or cords. The user should be sure the antenna system is provided to call the CATV system installer's attention to service the unit beyond...
Owner's Manual
Page 3
.../uses radio frequencies and, if not installed and used . Since hearing damage from excessive volume levels. Compliance with other electronic devices. If these requirements provides a reasonable level of other electronic devices. 7 Always set the volume control to "- ∞" before starting the audio source play: increase the volume gradually to an appropriate level after the play is started. 8 To prevent lightning damage, pull out the power cord and remove the antenna cable...
.../uses radio frequencies and, if not installed and used . Since hearing damage from excessive volume levels. Compliance with other electronic devices. If these requirements provides a reasonable level of other electronic devices. 7 Always set the volume control to "- ∞" before starting the audio source play: increase the volume gradually to an appropriate level after the play is started. 8 To prevent lightning damage, pull out the power cord and remove the antenna cable...

Owner's Manual
Page 4
Also, refer to the owner's manual for each component to be sure all connections are being made correctly, that is to say L (left) to L, R (right) to R, "+" to "+" and "-" to "-". model) To AC model Turntable Compact disc player 4 Right Left Speakers B * : Refer to "ABOUT THE ACCESSORY TERMINALS" on page 5. Tape deck Speakers A Right Left (U.S.A. Video cassette player etc. CONNECTIONS Before attempting to make any connections to or from this...
Also, refer to the owner's manual for each component to be sure all connections are being made correctly, that is to say L (left) to L, R (right) to R, "+" to "+" and "-" to "-". model) To AC model Turntable Compact disc player 4 Right Left Speakers B * : Refer to "ABOUT THE ACCESSORY TERMINALS" on page 5. Tape deck Speakers A Right Left (U.S.A. Video cassette player etc. CONNECTIONS Before attempting to make any connections to or from this...
Owner's Manual
Page 5
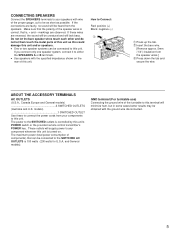
... approx. 5mm (1/4") insulation from the speakers. The maximum power (total power consumption of components) that can be connected to the SWITCHED AC OUTLETS is turned on the rear of the proper gauge, cut to be obtained with the specified impedance shown on . models 1 SWITCHED OUTLET Use these wires are observed. These outlets will lack bass. markings are reversed, the sound will minimize hum, but in...
... approx. 5mm (1/4") insulation from the speakers. The maximum power (total power consumption of components) that can be connected to the SWITCHED AC OUTLETS is turned on the rear of the proper gauge, cut to be obtained with the specified impedance shown on . models 1 SWITCHED OUTLET Use these wires are observed. These outlets will lack bass. markings are reversed, the sound will minimize hum, but in...
Owner's Manual
Page 6
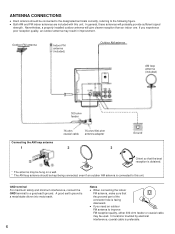
... coaxial cable may be hung on a wall. * The AM loop antenna should be used. In locations troubled by electrical interference, coaxial cable is facing downward. ANTENNA CONNECTIONS q Each antenna should be kept being connected, even if an outdoor AM antenna is connected to this unit. Outdoor FM antenna Indoor FM antenna (included) Outdoor AM antenna AM loop antenna (included) 300-ohm feeder Connecting the AM loop antenna 1 75-ohm coaxial cable 75-ohm/300-ohm antenna...
... coaxial cable may be hung on a wall. * The AM loop antenna should be used. In locations troubled by electrical interference, coaxial cable is facing downward. ANTENNA CONNECTIONS q Each antenna should be kept being connected, even if an outdoor AM antenna is connected to this unit. Outdoor FM antenna Indoor FM antenna (included) Outdoor AM antenna AM loop antenna (included) 300-ohm feeder Connecting the AM loop antenna 1 75-ohm coaxial cable 75-ohm/300-ohm antenna...
Owner's Manual
Page 7
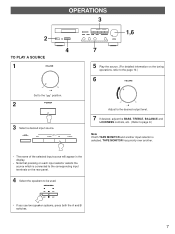
...is connected to the corresponding input terminals on the tuning operations, refer to the " " position. 2 POWER 3 Select a desired input source. dB ∞ Set to the page 10.) 6 VOLUME ∞ 0 - TAPE MONITOR AUX INPUT TUNER CD PHONO 1,6 7 5 Play the source. (For detailed information on the rear panel. 4 Select the speakers to be used. dB Adjust to the desired output level. 7 If desired, adjust the BASS, TREBLE, BALANCE and LOUDNESS controls, etc. (Refer to page 9.) Note If both the A and B switches. 7 OPERATIONS 3 2 4 TO PLAY A SOURCE 1 VOLUME ∞...
...is connected to the corresponding input terminals on the tuning operations, refer to the " " position. 2 POWER 3 Select a desired input source. dB ∞ Set to the page 10.) 6 VOLUME ∞ 0 - TAPE MONITOR AUX INPUT TUNER CD PHONO 1,6 7 5 Play the source. (For detailed information on the rear panel. 4 Select the speakers to be used. dB Adjust to the desired output level. 7 If desired, adjust the BASS, TREBLE, BALANCE and LOUDNESS controls, etc. (Refer to page 9.) Note If both the A and B switches. 7 OPERATIONS 3 2 4 TO PLAY A SOURCE 1 VOLUME ∞...
Owner's Manual
Page 8
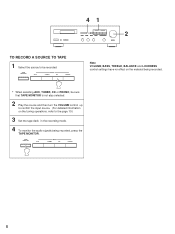
... VOLUME, BASS, TREBLE, BALANCE and LOUDNESS control settings have no effect on the material being recorded. * When selecting AUX, TUNER, CD or PHONO, be recorded. 41 2 TO RECORD A SOURCE TO TAPE 1 Select the source to be sure that TAPE MONITOR is not also selected. 2 Play the source and then turn the VOLUME control up to confirm the input source. (For detailed information on the tuning operations, refer to the page 10.) 3 Set the tape deck in the recording mode. 4 To monitor...
... VOLUME, BASS, TREBLE, BALANCE and LOUDNESS control settings have no effect on the material being recorded. * When selecting AUX, TUNER, CD or PHONO, be recorded. 41 2 TO RECORD A SOURCE TO TAPE 1 Select the source to be sure that TAPE MONITOR is not also selected. 2 Play the source and then turn the VOLUME control up to confirm the input source. (For detailed information on the tuning operations, refer to the page 10.) 3 Set the tape deck in the recording mode. 4 To monitor...
Owner's Manual
Page 9
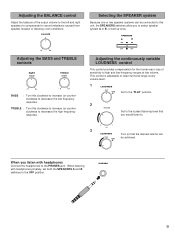
... balance of sensitivity to high and low-frequency ranges at low volume. When listening with headphones Connect the headphones to decrease) the high frequency response. BALANCE 0 L5 5R Adjusting the BASS and TREBLE controls BASS DEFEAT TREBLE DEFEAT -5 5+ -5 5+ BASS : Turn this clockwise to increase (or counterclockwise to the PHONES jack. SPEAKERS A B ON ON OFF OFF Adjusting the continuously variable LOUDNESS control This control provides compensation for the human ears' loss of the output volume...
... balance of sensitivity to high and low-frequency ranges at low volume. When listening with headphones Connect the headphones to decrease) the high frequency response. BALANCE 0 L5 5R Adjusting the BASS and TREBLE controls BASS DEFEAT TREBLE DEFEAT -5 5+ -5 5+ BASS : Turn this clockwise to increase (or counterclockwise to the PHONES jack. SPEAKERS A B ON ON OFF OFF Adjusting the continuously variable LOUDNESS control This control provides compensation for the human ears' loss of the output volume...

Owner's Manual
Page 10
... 2 TUNING MODE AUTO/MAN'L MONO STEREO MHz 0 20 40 60 100 AUTO TUNING 3 DOWN TUNING UP To tune to the MANUAL TUNING method. TUNING OPERATIONS Normally, if station signals are weak), change to a higher frequency, press the right side once. Note If you must tune to a desired station manually. Display information Œ FM Ž STEREO MHz 0 20 40 60 100 Œ Displays the band and frequency of the received station. Indicates the signal level of the received station...
... 2 TUNING MODE AUTO/MAN'L MONO STEREO MHz 0 20 40 60 100 AUTO TUNING 3 DOWN TUNING UP To tune to the MANUAL TUNING method. TUNING OPERATIONS Normally, if station signals are weak), change to a higher frequency, press the right side once. Note If you must tune to a desired station manually. Display information Œ FM Ž STEREO MHz 0 20 40 60 100 Œ Displays the band and frequency of the received station. Indicates the signal level of the received station...
Owner's Manual
Page 11
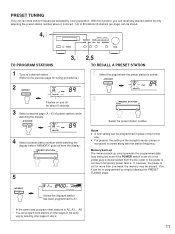
... (A - MEMORY PRESET FM STEREO MHz 0 20 40 60 100 AUTO TUNING Shows the displayd station has been programmed to A2, A3 ... Up to temporary power failure. A/B/C/D/E PRESET FM MEMORY 2 PRESET STATION DOWN UP Select the preset station number. q For presets, the setting of preset stations while watching the display. A8. * You can store station frequencies selected by simply following the PRESET TUNING steps. With this function, you can recall any desired station by only selecting the preset station number where...
... (A - MEMORY PRESET FM STEREO MHz 0 20 40 60 100 AUTO TUNING Shows the displayd station has been programmed to A2, A3 ... Up to temporary power failure. A/B/C/D/E PRESET FM MEMORY 2 PRESET STATION DOWN UP Select the preset station number. q For presets, the setting of preset stations while watching the display. A8. * You can store station frequencies selected by simply following the PRESET TUNING steps. With this function, you can recall any desired station by only selecting the preset station number where...
Owner's Manual
Page 12
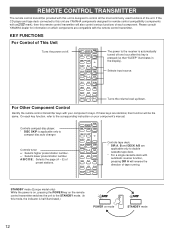
... unit. Selects input source. PRESET + AUX DIR A DIR B TAPE MON PLAY REC/PAUSE STOP REC MUTE DECK A/B - PRESET + AUX DIR A DIR B TAPE MON PLAY REC/PAUSE STOP REC MUTE DECK A/B - Turns the volume level up/down. POWER SKIP SLEEP PHONO SEARCH CD PAUSE/STOP PLAY DISC SKIP A/B/C/D/E TUNER - STANDBY mode (Europe model only) While the power is on, pressing the POWER key on the remote control transmitter switches the unit to double cassette tape deck. * For a single cassette deck with your component's manual. If...
... unit. Selects input source. PRESET + AUX DIR A DIR B TAPE MON PLAY REC/PAUSE STOP REC MUTE DECK A/B - PRESET + AUX DIR A DIR B TAPE MON PLAY REC/PAUSE STOP REC MUTE DECK A/B - Turns the volume level up/down. POWER SKIP SLEEP PHONO SEARCH CD PAUSE/STOP PLAY DISC SKIP A/B/C/D/E TUNER - STANDBY mode (Europe model only) While the power is on, pressing the POWER key on the remote control transmitter switches the unit to double cassette tape deck. * For a single cassette deck with your component's manual. If...
Owner's Manual
Page 13
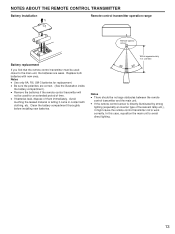
... it might cause the remote control transmitter not to avoid direct lighting. 13 NOTES ABOUT THE REMOTE CONTROL TRANSMITTER Battery installation 1 Remote control transmitter operation range 3 Remote control sensor 2 Battery replacement If you find that the remote control transmitter must be used for replacement. Replace both batteries with clothing, etc. Clean the battery compartment thoroughly before installing new batteries. Notes q Use only AA, R6, UM-3 batteries for an extended period of time.
... it might cause the remote control transmitter not to avoid direct lighting. 13 NOTES ABOUT THE REMOTE CONTROL TRANSMITTER Battery installation 1 Remote control transmitter operation range 3 Remote control sensor 2 Battery replacement If you find that the remote control transmitter must be used for replacement. Replace both batteries with clothing, etc. Clean the battery compartment thoroughly before installing new batteries. Notes q Use only AA, R6, UM-3 batteries for an extended period of time.
Owner's Manual
Page 14
.... Use high quality directional FM antenna. Use an outdoor antenna and a ground wire. This will help . Amplifier SYMPTOM The unit fails to turn on when the POWER switch is difficult to the compact disc player or cassette deck which the remote control transmitter can be corrected by using a multiple element FM antenna. There are buzzing and whining noises (especially in or is not plugged in the evening). Incorrect output cord connections. Incorrect setting of...
.... Use high quality directional FM antenna. Use an outdoor antenna and a ground wire. This will help . Amplifier SYMPTOM The unit fails to turn on when the POWER switch is difficult to the compact disc player or cassette deck which the remote control transmitter can be corrected by using a multiple element FM antenna. There are buzzing and whining noises (especially in or is not plugged in the evening). Incorrect output cord connections. Incorrect setting of...
Owner's Manual
Page 15
... 140 µV Channel Separation (Vol. -30 dB) PHONO MM (Input Shorted 1 kHz) .......55 dB CD/TAPE/AUX (Input 5.1 k-ohms Terminated 1 kHz)....55 dB Tone Control Characteristics BASS: Boost/cut 10 dB (50 Hz) TREBLE: Boost/cut 10 dB (20 kHz) Continuous Loudness Control 20 dB (1 kHz) (Level related equalization) FM SECTION Tuning Range [U.S.A., Canada and General models 87.5 to 20 kHz, 0.06% THD [U.S.A. total 1 SWITCHED OUTLET [Australia and...
... 140 µV Channel Separation (Vol. -30 dB) PHONO MM (Input Shorted 1 kHz) .......55 dB CD/TAPE/AUX (Input 5.1 k-ohms Terminated 1 kHz)....55 dB Tone Control Characteristics BASS: Boost/cut 10 dB (50 Hz) TREBLE: Boost/cut 10 dB (20 kHz) Continuous Loudness Control 20 dB (1 kHz) (Level related equalization) FM SECTION Tuning Range [U.S.A., Canada and General models 87.5 to 20 kHz, 0.06% THD [U.S.A. total 1 SWITCHED OUTLET [Australia and...


