

Midi Data Format
Page 2
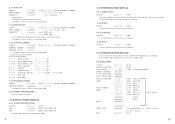
... (BnH) n=0~15 VOICE CHANNEL NUMBER * Reception is always "omni on" in the record mode. * Transmitted control numbers are ignored. * Only n = 0 ... 6 and 9 are shown on the display. * Receive Control Numbers c=1 c=6 c=38 c=7 c=10 c=11 c=64 MODULATION DATA ENTRY MSB DATA ENTRY LSB MAIN VOLUME PANPOT EXPRESSION SUSTAIN SWITCH ; v=0-127 ;
... (BnH) n=0~15 VOICE CHANNEL NUMBER * Reception is always "omni on" in the record mode. * Transmitted control numbers are ignored. * Only n = 0 ... 6 and 9 are shown on the display. * Receive Control Numbers c=1 c=6 c=38 c=7 c=10 c=11 c=64 MODULATION DATA ENTRY MSB DATA ENTRY LSB MAIN VOLUME PANPOT EXPRESSION SUSTAIN SWITCH ; v=0-127 ;

Midi Data Format
Page 3
... 01111000 00000000 (BnH) n=0~15 VOICE CHANNEL NUMBER All notes playing on the specified channel are selected. p = 0 ... 99 ignored. The voice is changed when p = 100 ... 107. QY20 VOICE No. 1, 2, 3, 4, 6, 8, 22, 9 12, 10, 11, 12, 13, 13, 98, 22 15, 16, 17, 14, 18, 18, 19, 18 20, 21, 23... n=0~15 VOICE CHANNEL NUMBER PROGRAM NUMBER 0ppppppp p=0~127 Only data relating to voice changes is received. * Only n = 0 ... 6 and 9 are shown on the display. * Reception is always "omni on" in the record mode. When n = 9 in the play mode or when the record track is set to NORMAL. If no...
... 01111000 00000000 (BnH) n=0~15 VOICE CHANNEL NUMBER All notes playing on the specified channel are selected. p = 0 ... 99 ignored. The voice is changed when p = 100 ... 107. QY20 VOICE No. 1, 2, 3, 4, 6, 8, 22, 9 12, 10, 11, 12, 13, 13, 98, 22 15, 16, 17, 14, 18, 18, 19, 18 20, 21, 23... n=0~15 VOICE CHANNEL NUMBER PROGRAM NUMBER 0ppppppp p=0~127 Only data relating to voice changes is received. * Only n = 0 ... 6 and 9 are shown on the display. * Reception is always "omni on" in the record mode. When n = 9 in the play mode or when the record track is set to NORMAL. If no...
Midi Data Format
Page 6
... 0kkkkkkk 0vvvvvvv (8nH) n=0~6, 9 VOICE CHANNEL NUMBER k=0 (C-2)~127 (G8) v is used as required. (3-5) SYSTEM EXCLUSIVE MESSAGE Only received when the initial PLAY, VOICE, and PATTERN mode displays are showing. Converted to 9nH kkH 00H for transmission. * Reception is always "omni on" in the song play mode. 9 (3-4) SYSTEM REAL TIME MESSAGE (3-4-1) TIMING CLOCK...
... 0kkkkkkk 0vvvvvvv (8nH) n=0~6, 9 VOICE CHANNEL NUMBER k=0 (C-2)~127 (G8) v is used as required. (3-5) SYSTEM EXCLUSIVE MESSAGE Only received when the initial PLAY, VOICE, and PATTERN mode displays are showing. Converted to 9nH kkH 00H for transmission. * Reception is always "omni on" in the song play mode. 9 (3-4) SYSTEM REAL TIME MESSAGE (3-4-1) TIMING CLOCK...

Midi Data Format
Page 7
.... Received only when the initial song mode display is showing. No reception occurs if the current number already contains data. (v) ALL PATTERN DATA Transmits the pattern data from the specified song (see chart 2). Chords not recognized by the QY20 (receive only). Received only when the initial... song, voice or pattern mode display is transmitted using the same format as (v) ALL PATTERN DATA. No transmission occurs if no song or...
.... Received only when the initial song mode display is showing. No reception occurs if the current number already contains data. (v) ALL PATTERN DATA Transmits the pattern data from the specified song (see chart 2). Chords not recognized by the QY20 (receive only). Received only when the initial... song, voice or pattern mode display is transmitted using the same format as (v) ALL PATTERN DATA. No transmission occurs if no song or...
Owner's Manual
Page 8
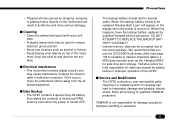
...heavy objects on the instrument can stick to and discolor the surface). will appear on the display when the power is not responsible for several years. s Service and Modification • The QY20 contains no user serviceable parts. s Cleaning • Clean the cabinet and panel with it... be corrupted due to radio or television receivers. When the backup battery needs to qualified YAMAHA personnel. If this happens, have the backup battery replaced by qualified Yamaha service personnel. YAMAHA is turned on top of the instrument (vinyl can result in anyway can be replaced ...
...heavy objects on the instrument can stick to and discolor the surface). will appear on the display when the power is not responsible for several years. s Service and Modification • The QY20 contains no user serviceable parts. s Cleaning • Clean the cabinet and panel with it... be corrupted due to radio or television receivers. When the backup battery needs to qualified YAMAHA personnel. If this happens, have the backup battery replaced by qualified Yamaha service personnel. YAMAHA is turned on top of the instrument (vinyl can result in anyway can be replaced ...

Owner's Manual
Page 20
When to Replace the Batteries When the batteries run down and are no longer able to operate the QY20, the sound may become distorted and the display shown to follow the polarity markings on the bottom panel. To prevent possible damage due to be used for an extended period of... time. CAUTION 17 alkaline and manganese)! When this display appears, replace the batteries with a complete set of batteries (e.g. CReplace Cover Replace the compartment cover, making sure that it is not to battery...
When to Replace the Batteries When the batteries run down and are no longer able to operate the QY20, the sound may become distorted and the display shown to follow the polarity markings on the bottom panel. To prevent possible damage due to be used for an extended period of... time. CAUTION 17 alkaline and manganese)! When this display appears, replace the batteries with a complete set of batteries (e.g. CReplace Cover Replace the compartment cover, making sure that it is not to battery...
Owner's Manual
Page 29
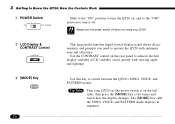
... power switch is on , and to the "OFF" position to turn it off when not using your QY20. The [MODE] key calls the SONG, VOICE, and PATTERN mode displays in sequence. 26 3 Getting to Know the QY20: How the Controls Work 1 POWER Switch ON OFF POWER Slide to the "ON" position to turn... the QY20 on the left side), then press the [MODE] key a few times and watch how the display changes. Always turn the power switch off . Use the CONTRAST control on the rear panel to achieve the best...
... power switch is on , and to the "OFF" position to turn it off when not using your QY20. The [MODE] key calls the SONG, VOICE, and PATTERN mode displays in sequence. 26 3 Getting to Know the QY20: How the Controls Work 1 POWER Switch ON OFF POWER Slide to the "ON" position to turn... the QY20 on the left side), then press the [MODE] key a few times and watch how the display changes. Always turn the power switch off . Use the CONTRAST control on the rear panel to achieve the best...

Owner's Manual
Page 30
3 Getting to Know the QY20: How the Controls Work MODE MODE 4 Cursor Keys Up Left Right Down MODE These 4 keys move the "cursor" around the display screen, highlighting the various parameters that are available for editing (the QY20 cursor appears as described above), then try using the cursor keys to move the cursor around the screen. 27 Try This: Select the SONG mode display (use the [MODE] key, as a dark block with inverse characters).
3 Getting to Know the QY20: How the Controls Work MODE MODE 4 Cursor Keys Up Left Right Down MODE These 4 keys move the "cursor" around the display screen, highlighting the various parameters that are available for editing (the QY20 cursor appears as described above), then try using the cursor keys to move the cursor around the screen. 27 Try This: Select the SONG mode display (use the [MODE] key, as a dark block with inverse characters).

Owner's Manual
Page 31
... (decreases stepwise) the value of incrementing in . prompts when they appear. For even faster decrementing or incrementing, press the opposite incre- 3 Getting to Know the QY20: How the Controls Work 5 [−1/NO] and [+1/YES] Keys -1 +1 NO YES These keys are also used to edit (change its value. Try This:... the [MODE] key, as described above), use the cursor keys to select the transpose parameter ("Trns" on the display), then try using the [−1/NO] and [+1/YES] keys to "+00" before continuing. m This is currently located. ment/decrement key while holding the ...
... (decreases stepwise) the value of incrementing in . prompts when they appear. For even faster decrementing or incrementing, press the opposite incre- 3 Getting to Know the QY20: How the Controls Work 5 [−1/NO] and [+1/YES] Keys -1 +1 NO YES These keys are also used to edit (change its value. Try This:... the [MODE] key, as described above), use the cursor keys to select the transpose parameter ("Trns" on the display), then try using the [−1/NO] and [+1/YES] keys to "+00" before continuing. m This is currently located. ment/decrement key while holding the ...

Owner's Manual
Page 32
6 [MENU] and Function Keys MENU 3 Getting to Know the QY20: How the Controls Work The [MENU] key calls a menu of "Job" on the display. You should see the menu shown to see job list. Try This: Select the SONG mode display (use the cursor keys (up . Next press the top function key (... only) to call the SONG mode Job List: m Move cursor up and down . 29 Leave the display as described above), then press the [MENU] key. You can be accessed from the current QY20 mode, and the function keys (the small round yellow keys) select the corresponding item from the menu that...
6 [MENU] and Function Keys MENU 3 Getting to Know the QY20: How the Controls Work The [MENU] key calls a menu of "Job" on the display. You should see the menu shown to see job list. Try This: Select the SONG mode display (use the cursor keys (up . Next press the top function key (... only) to call the SONG mode Job List: m Move cursor up and down . 29 Leave the display as described above), then press the [MENU] key. You can be accessed from the current QY20 mode, and the function keys (the small round yellow keys) select the corresponding item from the menu that...

Owner's Manual
Page 33
... about later), the [ENTER] key is used to "enter" a selected menu function. You could also press the top function key (next to "Exit >" on the display) to first move back to the Job List, and then again to return to the SONG mode. 8 Sequencer Keys The sequencer keys control recording and.... 3 Getting to Know the QY20: How the Controls Work 7 [ENTER] Key ENTER In addition to "entering" chords in the SONG and PATTERN modes, and allow you should appear as shown to the left. the display should now have the SONG mode Job List on a tape recorder. 30 Use the cursor keys (up...
... about later), the [ENTER] key is used to "enter" a selected menu function. You could also press the top function key (next to "Exit >" on the display) to first move back to the Job List, and then again to return to the SONG mode. 8 Sequencer Keys The sequencer keys control recording and.... 3 Getting to Know the QY20: How the Controls Work 7 [ENTER] Key ENTER In addition to "entering" chords in the SONG and PATTERN modes, and allow you should appear as shown to the left. the display should now have the SONG mode Job List on a tape recorder. 30 Use the cursor keys (up...

Owner's Manual
Page 35
... key is pressed the pitch of the micro-keyboard is currently assigned to place the cursor at the sequencer track 1 position ("TR1" on the display). 3 Getting to the accompaniment bass ("Ba") and drum ("Dr") tracks and playing the currently assigned bass and drum voices. Also try moving the... cursor to Know the QY20: How the Controls Work m Sequencer track 1. In the SONG mode, the micro keyboard plays the voice assigned to the currently selected track (...
... key is pressed the pitch of the micro-keyboard is currently assigned to place the cursor at the sequencer track 1 position ("TR1" on the display). 3 Getting to the accompaniment bass ("Ba") and drum ("Dr") tracks and playing the currently assigned bass and drum voices. Also try moving the... cursor to Know the QY20: How the Controls Work m Sequencer track 1. In the SONG mode, the micro keyboard plays the voice assigned to the currently selected track (...

Owner's Manual
Page 37
... mode from which the demo was engaged. 34 The demo will play back the pre-programmed demonstration to hear what the QY20 can do. MENU Z From the SONG or VOICE mode display (use the [MODE] key to start demo playback. C Press the [/] key to select) press the [MENU] key. 3 Getting to Know... the QY20: How the Controls Work Play the Demo Once you've set up your QY20 and become familiar with the controls, you might...
... mode from which the demo was engaged. 34 The demo will play back the pre-programmed demonstration to hear what the QY20 can do. MENU Z From the SONG or VOICE mode display (use the [MODE] key to start demo playback. C Press the [/] key to select) press the [MENU] key. 3 Getting to Know... the QY20: How the Controls Work Play the Demo Once you've set up your QY20 and become familiar with the controls, you might...

Owner's Manual
Page 39
Voice assigned to select the VOICE mode display. m m m 36 m m m Voice numbers. SONG mode tracks. 4 The VOICE Mode: Selecting, Playing, & Assigning the QY20 Voices & Drums The QY20 has 100 voices and 8 drum kits that has mute buttons, pan pots, and faders for each track (the drum track does not have a pan pot). MODE Current track. Mute buttons. The voice mode also features a graphic on-screen "mixer" that can be selected, played, and assigned to the SONG mode tracks in the VOICE mode. m Pan pots. Use the [MODE] key to current track. Faders.
Voice assigned to select the VOICE mode display. m m m 36 m m m Voice numbers. SONG mode tracks. 4 The VOICE Mode: Selecting, Playing, & Assigning the QY20 Voices & Drums The QY20 has 100 voices and 8 drum kits that has mute buttons, pan pots, and faders for each track (the drum track does not have a pan pot). MODE Current track. Mute buttons. The voice mode also features a graphic on-screen "mixer" that can be selected, played, and assigned to the SONG mode tracks in the VOICE mode. m Pan pots. Use the [MODE] key to current track. Faders.

Owner's Manual
Page 40
... past voice number 100 and you can use the octave keys to TR1 appears in the upper right corner of the display. Use the [+1/YES] key to step through the QY20's 100 voices (you 'll select drum kits 1 through 8 ("Dr1" through "Dr8") is transmitting on: MIDI channel 1 plays TR1, channel 2 plays TR2... C2, channel 7 plays Ba, and channel 10 plays Dr. Channel 10 also plays any QY20 mode, the micro keyboard plays the voice assigned to step backward, too), trying out each drum kit. Try these out on the display (as in each voice on the MIDI channel that the external keyboard is assigned...
... past voice number 100 and you can use the octave keys to TR1 appears in the upper right corner of the display. Use the [+1/YES] key to step through the QY20's 100 voices (you 'll select drum kits 1 through 8 ("Dr1" through "Dr8") is transmitting on: MIDI channel 1 plays TR1, channel 2 plays TR2... C2, channel 7 plays Ba, and channel 10 plays Dr. Channel 10 also plays any QY20 mode, the micro keyboard plays the voice assigned to step backward, too), trying out each drum kit. Try these out on the display (as in each voice on the MIDI channel that the external keyboard is assigned...

Owner's Manual
Page 41
... to the voice number of tracks that track, or press [−1/NO] to turn off) the corresponding track. 4 The VOICE Mode: Selecting, Playing, & Assigning the QY20 Voices & Drums Making Voice-to-Track Assignments When you record accompaniments (➪ page 52) or complete songs (➪ page 108) in the SONG mode, you...
... to the voice number of tracks that track, or press [−1/NO] to turn off) the corresponding track. 4 The VOICE Mode: Selecting, Playing, & Assigning the QY20 Voices & Drums Making Voice-to-Track Assignments When you record accompaniments (➪ page 52) or complete songs (➪ page 108) in the SONG mode, you...

Owner's Manual
Page 42
...the cursor at the pan pot, then use the [−1/NO] and [+1/YES] keys to set to position the sound of the display (in the upper right corner of the display: "Left 7" is full left and "Right 7" is full right. The pan positions also have numeric values (1 through 7) that ...a pan pot because the drum kit voices consist of a number of instruments, each of the drum kit. 39 4 The VOICE Mode: Selecting, Playing, & Assigning the QY20 Voices & Drums -1 +1 NO YES m m Mute off . Mute on a mixing console, the VOICE mode pan pots can be used to produce an appropriate "stereo...
...the cursor at the pan pot, then use the [−1/NO] and [+1/YES] keys to set to position the sound of the display (in the upper right corner of the display: "Left 7" is full left and "Right 7" is full right. The pan positions also have numeric values (1 through 7) that ...a pan pot because the drum kit voices consist of a number of instruments, each of the drum kit. 39 4 The VOICE Mode: Selecting, Playing, & Assigning the QY20 Voices & Drums -1 +1 NO YES m m Mute off . Mute on a mixing console, the VOICE mode pan pots can be used to produce an appropriate "stereo...

Owner's Manual
Page 43
4 The VOICE Mode: Selecting, Playing, & Assigning the QY20 Voices & Drums The Faders Each track has a graphic "fader" that appear in ... set the fader level. Raise volume. You can switch back and forth between the various voices. In the display to the left, the TR2 fader has been set to set to the corresponding position (higher for higher volume...voices, mute tracks, pan, and change volume settings) while listening to the results in the upper right corner of the display: "000" is minimum volume (no sound) and "127" is "100" for lower volume). The fader positions also ...
4 The VOICE Mode: Selecting, Playing, & Assigning the QY20 Voices & Drums The Faders Each track has a graphic "fader" that appear in ... set the fader level. Raise volume. You can switch back and forth between the various voices. In the display to the left, the TR2 fader has been set to set to the corresponding position (higher for higher volume...voices, mute tracks, pan, and change volume settings) while listening to the results in the upper right corner of the display: "000" is minimum volume (no sound) and "127" is "100" for lower volume). The fader positions also ...

Owner's Manual
Page 46
...playback will flash at the current playback tempo. The preset patterns are numbers 001 through 100. Note that the "Meas" (measure) number on the display advances as each measDETAIL ure is the accompaniment pattern number). The play . XSelect a pattern number. 5 Easy Accompaniment for Other Instruments Use the cursor... pattern number, then use the [−1] and [+1] buttons to select the pattern you want to play indicator will appear in the display and the green LED above the [/] key will continue up to start playback of the selected accompaniment pattern. m Play indicator.
...playback will flash at the current playback tempo. The preset patterns are numbers 001 through 100. Note that the "Meas" (measure) number on the display advances as each measDETAIL ure is the accompaniment pattern number). The play . XSelect a pattern number. 5 Easy Accompaniment for Other Instruments Use the cursor... pattern number, then use the [−1] and [+1] buttons to select the pattern you want to play indicator will appear in the display and the green LED above the [/] key will continue up to start playback of the selected accompaniment pattern. m Play indicator.

Owner's Manual
Page 48
... by pressing the appropriate key on the micro-keyboard while the cursor is located at either the pattern number or the section name on the display. DETAIL -1 +1 to switch sections. NO YES 45 5 Easy Accompaniment for Other Instruments E F G A B C INTRO NORMAL VARI. DETAIL The newly selected section will begin playing from the...
... by pressing the appropriate key on the micro-keyboard while the cursor is located at either the pattern number or the section name on the display. DETAIL -1 +1 to switch sections. NO YES 45 5 Easy Accompaniment for Other Instruments E F G A B C INTRO NORMAL VARI. DETAIL The newly selected section will begin playing from the...


