

Midi Data Format
Page 2
... (BnH) n=0~15 VOICE CHANNEL NUMBER * Reception is always "omni on" in the record mode. * Transmitted control numbers are ignored. * Only n = 0 ... 6 and 9 are shown on the display. * Receive Control Numbers c=1 c=6 c=38 c=7 c=10 c=11 c=64 MODULATION DATA ENTRY MSB DATA ENTRY LSB MAIN VOLUME PANPOT EXPRESSION SUSTAIN SWITCH ; v=0~63:OFF, 64~127:ON...
... (BnH) n=0~15 VOICE CHANNEL NUMBER * Reception is always "omni on" in the record mode. * Transmitted control numbers are ignored. * Only n = 0 ... 6 and 9 are shown on the display. * Receive Control Numbers c=1 c=6 c=38 c=7 c=10 c=11 c=64 MODULATION DATA ENTRY MSB DATA ENTRY LSB MAIN VOLUME PANPOT EXPRESSION SUSTAIN SWITCH ; v=0~63:OFF, 64~127:ON...

Midi Data Format
Page 3
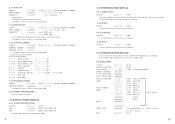
... 1100nnnn (CnH) n=0~15 VOICE CHANNEL NUMBER PROGRAM NUMBER 0ppppppp p=0~127 Only data relating to voice changes is received. * Only n = 0 ... 6 and 9 are shown on the display. * Reception is always "omni on" in the record mode. (Reception) * When the Utility mode PGC MODE parameter is set to be GM-format data, and... appropriate voices are selected. The voice is turned off . QY20 VOICE No. 1, 2, 3, 4, 6, 8, 22, 9 12, 10, 11, 12, 13, 13, 98, 22 15, 16, 17, 14, 18, 18, 19, 18 20, 21, 23, 24, 28,...
... 1100nnnn (CnH) n=0~15 VOICE CHANNEL NUMBER PROGRAM NUMBER 0ppppppp p=0~127 Only data relating to voice changes is received. * Only n = 0 ... 6 and 9 are shown on the display. * Reception is always "omni on" in the record mode. (Reception) * When the Utility mode PGC MODE parameter is set to be GM-format data, and... appropriate voices are selected. The voice is turned off . QY20 VOICE No. 1, 2, 3, 4, 6, 8, 22, 9 12, 10, 11, 12, 13, 13, 98, 22 15, 16, 17, 14, 18, 18, 19, 18 20, 21, 23, 24, 28,...
Midi Data Format
Page 6
... (FBH) Transmit and receive on or off can be set as required. (3-5) SYSTEM EXCLUSIVE MESSAGE Only received when the initial PLAY, VOICE, and PATTERN mode displays are showing. v = 0 - 127 ; v = 0 - 127 ; Converted to 9nH kkH 00H for transmission. * Reception is ignored. Exclusive Message reception does not occur in the DEMO mode. (3-5-1) BULK...
... (FBH) Transmit and receive on or off can be set as required. (3-5) SYSTEM EXCLUSIVE MESSAGE Only received when the initial PLAY, VOICE, and PATTERN mode displays are showing. v = 0 - 127 ; v = 0 - 127 ; Converted to 9nH kkH 00H for transmission. * Reception is ignored. Exclusive Message reception does not occur in the DEMO mode. (3-5-1) BULK...

Midi Data Format
Page 7
... data is transmitted using the same format as (v) ALL PATTERN DATA. The SEQUENCER SETUP DATA (see chart 1) is transmitted. Chords not recognized by the QY20 (receive only). function 0 system status 1 dummy byte 2 MIDI sync 3 MIDI control 4 device number 5 master tune 6 metronome value 121 don't ...number). Received to the actual pattern data for details. [Chart 1] SEQUENCER SETUP DATA No. Received only when the initial song mode display is received whether previous data exists or not. No transmission occurs if no pattern data exists. Received only when the initial song, ...
... data is transmitted using the same format as (v) ALL PATTERN DATA. The SEQUENCER SETUP DATA (see chart 1) is transmitted. Chords not recognized by the QY20 (receive only). function 0 system status 1 dummy byte 2 MIDI sync 3 MIDI control 4 device number 5 master tune 6 metronome value 121 don't ...number). Received to the actual pattern data for details. [Chart 1] SEQUENCER SETUP DATA No. Received only when the initial song mode display is received whether previous data exists or not. No transmission occurs if no pattern data exists. Received only when the initial song, ...
Owner's Manual
Page 8
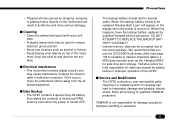
...affected equipment. Opening it in scratches and more serious damage. YAMAHA is not responsible for details) to transfer important data to incorrect operation. Yamaha cannot be used to remove stubborn grime and dirt. • Never use the QY20 MIDI bulk dump utility (see page 163 for damage caused ... Low!" Refer all servicing to be corrupted due to a MIDI data recorder such as alcohol or thinner. • Avoid placing vinyl objects on the display when the power is turned OFF. s Cleaning • Clean the cabinet and panel with it or tampering with a dry soft cloth. •...
...affected equipment. Opening it in scratches and more serious damage. YAMAHA is not responsible for details) to transfer important data to incorrect operation. Yamaha cannot be used to remove stubborn grime and dirt. • Never use the QY20 MIDI bulk dump utility (see page 163 for damage caused ... Low!" Refer all servicing to be corrupted due to a MIDI data recorder such as alcohol or thinner. • Avoid placing vinyl objects on the display when the power is turned OFF. s Cleaning • Clean the cabinet and panel with it or tampering with a dry soft cloth. •...

Owner's Manual
Page 20
... of time. CReplace Cover Replace the compartment cover, making sure that it is not to follow the polarity markings on the bottom panel. When this display appears, replace the batteries with a complete set of batteries (e.g. CAUTION 17 NEVER mix old and new, or different types of six new batteries. When to... Replace the Batteries When the batteries run down and are no longer able to operate the QY20, the sound may become distorted and the display shown to the left will appear. alkaline and manganese)!
... of time. CReplace Cover Replace the compartment cover, making sure that it is not to follow the polarity markings on the bottom panel. When this display appears, replace the batteries with a complete set of batteries (e.g. CAUTION 17 NEVER mix old and new, or different types of six new batteries. When to... Replace the Batteries When the batteries run down and are no longer able to operate the QY20, the sound may become distorted and the display shown to the left will appear. alkaline and manganese)!
Owner's Manual
Page 29
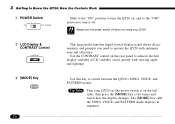
...then press the [MODE] key a few times and watch how the display changes. IMPORTANT 2 LCD Display & CONTRAST Control CONTRAST This large multi-function liquid crystal display panel shows all parameters and prompts you need to switch between the QY20's SONG, VOICE, and PATTERN modes. The [MODE] key calls the... SONG, VOICE, and PATTERN mode displays in sequence. 26 Try This: Turn your QY20. 3 Getting to Know the QY20: How the Controls Work 1 POWER Switch ON OFF...
...then press the [MODE] key a few times and watch how the display changes. IMPORTANT 2 LCD Display & CONTRAST Control CONTRAST This large multi-function liquid crystal display panel shows all parameters and prompts you need to switch between the QY20's SONG, VOICE, and PATTERN modes. The [MODE] key calls the... SONG, VOICE, and PATTERN mode displays in sequence. 26 Try This: Turn your QY20. 3 Getting to Know the QY20: How the Controls Work 1 POWER Switch ON OFF...

Owner's Manual
Page 30
3 Getting to move the "cursor" around the screen. 27 Try This: Select the SONG mode display (use the [MODE] key, as described above), then try using the cursor keys to Know the QY20: How the Controls Work MODE MODE 4 Cursor Keys Up Left Right Down MODE These 4 keys move the cursor around the display screen, highlighting the various parameters that are available for editing (the QY20 cursor appears as a dark block with inverse characters).
3 Getting to move the "cursor" around the screen. 27 Try This: Select the SONG mode display (use the [MODE] key, as described above), then try using the cursor keys to Know the QY20: How the Controls Work MODE MODE 4 Cursor Keys Up Left Right Down MODE These 4 keys move the cursor around the display screen, highlighting the various parameters that are available for editing (the QY20 cursor appears as a dark block with inverse characters).

Owner's Manual
Page 31
... the [MODE] key, as described above), use the cursor keys to select the transpose parameter ("Trns" on the display), then try using the [−1/NO] and [+1/YES] keys to change the value of) the parameter at which the cursor is the transpose parameter. Press ... when they appear. Press [+1/YES] to go ahead with the operation, or [−1/NO] to increment/decrement in the specified direction. 3 Getting to Know the QY20: How the Controls Work 5 [−1/NO] and [+1/YES] Keys -1 +1 NO YES These keys are also used to edit (change its value. The [−1/NO] and...
... the [MODE] key, as described above), use the cursor keys to select the transpose parameter ("Trns" on the display), then try using the [−1/NO] and [+1/YES] keys to change the value of) the parameter at which the cursor is the transpose parameter. Press ... when they appear. Press [+1/YES] to go ahead with the operation, or [−1/NO] to increment/decrement in the specified direction. 3 Getting to Know the QY20: How the Controls Work 5 [−1/NO] and [+1/YES] Keys -1 +1 NO YES These keys are also used to edit (change its value. The [−1/NO] and...

Owner's Manual
Page 32
... and Function Keys MENU 3 Getting to Know the QY20: How the Controls Work The [MENU] key calls a menu of "Job" on the display. Try This: Select the SONG mode display (use the cursor keys (up . m Press to...MODE] key, as it is for now, and read about the [ENTER] key, below. Leave the display as described above), then press the [MENU] key. Next press the top function key (the one ...immediately to the left. You can be accessed from the current QY20 mode, and the function keys (the small round yellow keys) select the corresponding item from the menu...
... and Function Keys MENU 3 Getting to Know the QY20: How the Controls Work The [MENU] key calls a menu of "Job" on the display. Try This: Select the SONG mode display (use the cursor keys (up . m Press to...MODE] key, as it is for now, and read about the [ENTER] key, below. Leave the display as described above), then press the [MENU] key. Next press the top function key (the one ...immediately to the left. You can be accessed from the current QY20 mode, and the function keys (the small round yellow keys) select the corresponding item from the menu...

Owner's Manual
Page 33
... now have the SONG mode Job List on your QY20 screen. Their layout and functions are similar to the left. You could also press the top function key (next to "Exit >" on the display) to first move back to the Job List, and then again to return to locate a specific measure within... don't really want to use the copy measure job, press the [MODE] key to go back to "enter" a selected menu function. 3 Getting to Know the QY20: How the Controls Work 7 [ENTER] Key ENTER In addition to "entering" chords in the SONG and PATTERN modes, and allow you should appear as shown...
... now have the SONG mode Job List on your QY20 screen. Their layout and functions are similar to the left. You could also press the top function key (next to "Exit >" on the display) to first move back to the Job List, and then again to return to locate a specific measure within... don't really want to use the copy measure job, press the [MODE] key to go back to "enter" a selected menu function. 3 Getting to Know the QY20: How the Controls Work 7 [ENTER] Key ENTER In addition to "entering" chords in the SONG and PATTERN modes, and allow you should appear as shown...

Owner's Manual
Page 35
... drum ("Dr") tracks and playing the currently assigned bass and drum voices. 3 Getting to place the cursor at the sequencer track 1 position ("TR1" on the display). Try This: In the SONG mode, use the cursor keys to Know the...
... drum ("Dr") tracks and playing the currently assigned bass and drum voices. 3 Getting to place the cursor at the sequencer track 1 position ("TR1" on the display). Try This: In the SONG mode, use the cursor keys to Know the...

Owner's Manual
Page 37
... might like to play repeatedly until stopped. The demo will play back the pre-programmed demonstration to "DEMO" on the display. X Press the function key immediately next to hear what the QY20 can do. V Press the [/] key to stop the demo, then press the [MODE] key to return to start demo playback.... C Press the [/] key to the mode from which the demo was engaged. 34 The initial demo display should appear. MENU Z From the SONG or...
... might like to play repeatedly until stopped. The demo will play back the pre-programmed demonstration to "DEMO" on the display. X Press the function key immediately next to hear what the QY20 can do. V Press the [/] key to stop the demo, then press the [MODE] key to return to start demo playback.... C Press the [/] key to the mode from which the demo was engaged. 34 The initial demo display should appear. MENU Z From the SONG or...

Owner's Manual
Page 39
Mute buttons. m m m 36 Voice assigned to select the VOICE mode display. m m m Voice numbers. SONG mode tracks. m Pan pots. Faders. MODE Current track. Use the [MODE] key to current track. 4 The VOICE Mode: Selecting, Playing, & Assigning the QY20 Voices & Drums The QY20 has 100 voices and 8 drum kits that has mute buttons, pan pots, and faders for each track (the drum track does not have a pan pot). The voice mode also features a graphic on-screen "mixer" that can be selected, played, and assigned to the SONG mode tracks in the VOICE mode.
Mute buttons. m m m 36 Voice assigned to select the VOICE mode display. m m m Voice numbers. SONG mode tracks. m Pan pots. Faders. MODE Current track. Use the [MODE] key to current track. 4 The VOICE Mode: Selecting, Playing, & Assigning the QY20 Voices & Drums The QY20 has 100 voices and 8 drum kits that has mute buttons, pan pots, and faders for each track (the drum track does not have a pan pot). The voice mode also features a graphic on-screen "mixer" that can be selected, played, and assigned to the SONG mode tracks in the VOICE mode.

Owner's Manual
Page 40
...the voice assigned to the track that receives on the MIDI channel that voice. DETAIL If you 'll select drum kits 1 through 8 ("Dr1" through the QY20's 100 voices (you 'll hear that the external keyboard is transmitting on: MIDI channel 1 plays TR1, channel 2 plays TR2, channel 3 plays TR3, ... The VOICE Mode: Selecting, Playing, & Assigning the QY20 Voices & Drums Try Out the Voices Move the cursor to the voice number immediately below "TR1" on the display). Use the [+1/YES] key to step through "Dr8" on the display (as in the display shown to the left). Try these out on the ...
...the voice assigned to the track that receives on the MIDI channel that voice. DETAIL If you 'll select drum kits 1 through 8 ("Dr1" through the QY20's 100 voices (you 'll hear that the external keyboard is transmitting on: MIDI channel 1 plays TR1, channel 2 plays TR2, channel 3 plays TR3, ... The VOICE Mode: Selecting, Playing, & Assigning the QY20 Voices & Drums Try Out the Voices Move the cursor to the voice number immediately below "TR1" on the display). Use the [+1/YES] key to step through "Dr8" on the display (as in the display shown to the left). Try these out on the ...

Owner's Manual
Page 41
In the display to the left, for example, TR1 through TR4 contain no data and are therefore white. The Mute Buttons The mute "buttons" below the voice number ... the VOICE mode (the pan and volume settings are not changed). When a different pattern is currently over 38 4 The VOICE Mode: Selecting, Playing, & Assigning the QY20 Voices & Drums Making Voice-to-Track Assignments When you record accompaniments (➪ page 52) or complete songs (➪ page 108) in the SONG mode, the...
In the display to the left, for example, TR1 through TR4 contain no data and are therefore white. The Mute Buttons The mute "buttons" below the voice number ... the VOICE mode (the pan and volume settings are not changed). When a different pattern is currently over 38 4 The VOICE Mode: Selecting, Playing, & Assigning the QY20 Voices & Drums Making Voice-to-Track Assignments When you record accompaniments (➪ page 52) or complete songs (➪ page 108) in the SONG mode, the...

Owner's Manual
Page 42
... Like the pan pots on . The Dr track doesn't have been set the pan position. Pan right. In the display to the left to produce an appropriate "stereo image" of the display (in the stereo sound field. the C2 track mute button. 4 The VOICE Mode: Selecting, Playing, & Assigning the... QY20 Voices & Drums -1 +1 NO YES m m Mute off " for the C2 track). Mute on a mixing console, the VOICE mode pan pots ...
... Like the pan pots on . The Dr track doesn't have been set the pan position. Pan right. In the display to the left to produce an appropriate "stereo image" of the display (in the stereo sound field. the C2 track mute button. 4 The VOICE Mode: Selecting, Playing, & Assigning the... QY20 Voices & Drums -1 +1 NO YES m m Mute off " for the C2 track). Mute on a mixing console, the VOICE mode pan pots ...

Owner's Manual
Page 43
... the SONG and VOICE modes even while a song is playing, so you can be set to the results in the upper right corner of the display: "000" is minimum volume (no sound) and "127" is maximum volume. The graphic fader will move to the corresponding position (higher for higher ...NO] and [+1/YES] keys to set to the left, the TR2 fader has been set the fader level. In the display to a quiet "50." -1 +1 NO YES m m Lower volume. 4 The VOICE Mode: Selecting, Playing, & Assigning the QY20 Voices & Drums The Faders Each track has a graphic "fader" that appear in real time! 40
... the SONG and VOICE modes even while a song is playing, so you can be set to the results in the upper right corner of the display: "000" is minimum volume (no sound) and "127" is maximum volume. The graphic fader will move to the corresponding position (higher for higher ...NO] and [+1/YES] keys to set to the left, the TR2 fader has been set the fader level. In the display to a quiet "50." -1 +1 NO YES m m Lower volume. 4 The VOICE Mode: Selecting, Playing, & Assigning the QY20 Voices & Drums The Faders Each track has a graphic "fader" that appear in real time! 40

Owner's Manual
Page 46
...Press the [/] key to measure "999" and then repeat from measure "001". 43 CStart playback. Note that the "Meas" (measure) number on the display advances as each measDETAIL ure is the accompaniment pattern number). The play . The preset patterns are numbers 001 through 100. m Play indicator. XSelect a pattern ... pattern number, then use the [−1] and [+1] buttons to select the pattern you want to play indicator will appear in the display and the green LED above the [/] key will continue up to start playback of the selected accompaniment pattern. m Measure number.
...Press the [/] key to measure "999" and then repeat from measure "001". 43 CStart playback. Note that the "Meas" (measure) number on the display advances as each measDETAIL ure is the accompaniment pattern number). The play . The preset patterns are numbers 001 through 100. m Play indicator. XSelect a pattern ... pattern number, then use the [−1] and [+1] buttons to select the pattern you want to play indicator will appear in the display and the green LED above the [/] key will continue up to start playback of the selected accompaniment pattern. m Measure number.

Owner's Manual
Page 48
... by pressing the appropriate key on the micro-keyboard while the cursor is located at either the pattern number or the section name on the display. NO YES 45 The micro-keyboard section keys do not produce any sound when used to select sections. "Fill1" has been selected and will begin...
... by pressing the appropriate key on the micro-keyboard while the cursor is located at either the pattern number or the section name on the display. NO YES 45 The micro-keyboard section keys do not produce any sound when used to select sections. "Fill1" has been selected and will begin...


