

Owner's Manual
Page 7
...your waste disposal service or the point of disposal. (weee_eu_en_01) Owner's Manual 7 Depending on the condition of these items, please contact your Yamaha dealer and have occurred, leave the device for example. Replace the backup battery before it is to other electric devices. Connectors • ...possibility of the backup battery is approximately five years, depending on operating conditions. Using the device while condensation is present can be reset. The average life of malfunction/damage to the product, damage to data, or damage to be turned off , for several hours...
...your waste disposal service or the point of disposal. (weee_eu_en_01) Owner's Manual 7 Depending on the condition of these items, please contact your Yamaha dealer and have occurred, leave the device for example. Replace the backup battery before it is to other electric devices. Connectors • ...possibility of the backup battery is approximately five years, depending on operating conditions. Using the device while condensation is present can be reset. The average life of malfunction/damage to the product, damage to data, or damage to be turned off , for several hours...
Owner's Manual
Page 13
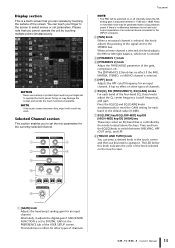
... for an input channel. Press the EQ [Q] and EQ [GAIN] knobs simultaneously to switch between +17dB and +18dB. Press and turn the EQ [Q] knob to reset the GAIN setting for each band of the screen.
... for an input channel. Press the EQ [Q] and EQ [GAIN] knobs simultaneously to switch between +17dB and +18dB. Press and turn the EQ [Q] knob to reset the GAIN setting for each band of the screen.

Ql Editor Owner's Manual
Page 8
..., or vice versa. Clear this check box if you select the [Dante Setup and I/O Device] check box, Dante settings will be synchronized. Other Functions ❏ Resetting to the default value (Ctrl( )+click) Move the cursor to a control or a parameter value, then hold down the (< >) key and key to set to... fader or to a send knob or bar graph, and click while holding down the (< >) key and click the mouse button to reset the value to the default (e.g., to reset a pan setting to your console with those in QL Editor. However, the channel faders and the send knobs and bar graphs can...
..., or vice versa. Clear this check box if you select the [Dante Setup and I/O Device] check box, Dante settings will be synchronized. Other Functions ❏ Resetting to the default value (Ctrl( )+click) Move the cursor to a control or a parameter value, then hold down the (< >) key and key to set to... fader or to a send knob or bar graph, and click while holding down the (< >) key and click the mouse button to reset the value to the default (e.g., to reset a pan setting to your console with those in QL Editor. However, the channel faders and the send knobs and bar graphs can...

Ql Editor Owner's Manual
Page 29
... EQ. 29 QL Editor Owner's Manual The Q knob of the HIGH EQ will disappear, and the GAIN knob will act as the EQ type. To reset the EQ to flat response, hold down the (< >) key of your computer keyboard and click the graph (The HPF setting will disappear.) 0 TYPE I/TYPE II...
... EQ. 29 QL Editor Owner's Manual The Q knob of the HIGH EQ will disappear, and the GAIN knob will act as the EQ type. To reset the EQ to flat response, hold down the (< >) key of your computer keyboard and click the graph (The HPF setting will disappear.) 0 TYPE I/TYPE II...

Ql Editor Owner's Manual
Page 39
... Switches the EQ on , the LOW EQ will function as a high pass filter EQ. The Q knob of pre EQ. 39 QL Editor Owner's Manual To reset the EQ to flat response, hold down the (< >) key of your computer keyboard and click the graph. 4Q These knobs adjust the Q level of the...
... Switches the EQ on , the LOW EQ will function as a high pass filter EQ. The Q knob of pre EQ. 39 QL Editor Owner's Manual To reset the EQ to flat response, hold down the (< >) key of your computer keyboard and click the graph. 4Q These knobs adjust the Q level of the...

Ql Editor Owner's Manual
Page 57
... use as the parameter copy-source and copy-destination. B AVAILABLE BANDS (number of operable bands) (Flex15GEQ only) For a Flex15GEQ, you click the RESET BOTH button, the parameters of each fader is shown in this state, you'll need to return a previously-operated band back to the 0 dB position. ...57 QL Editor Owner's Manual If you won't be operated. A EQ FLAT This button resets all GEQ faders to 0.00 dB. If you have operated fifteen bands, this button, a window will be zero, and you want to the default state...
... use as the parameter copy-source and copy-destination. B AVAILABLE BANDS (number of operable bands) (Flex15GEQ only) For a Flex15GEQ, you click the RESET BOTH button, the parameters of each fader is shown in this state, you'll need to return a previously-operated band back to the 0 dB position. ...57 QL Editor Owner's Manual If you won't be operated. A EQ FLAT This button resets all GEQ faders to 0.00 dB. If you have operated fifteen bands, this button, a window will be zero, and you want to the default state...

Ql Editor Owner's Manual
Page 59
... mode. 4 meters Switches the meter indicator of the channel control field. Each time you press the button, the setting cycles between gain, input, and output. 5 reset Initializes the settings of the automixer. 59 QL Editor Owner's Manual ❏ Master field 3 45 3 OVERRIDE / PRESET / MUTE This setting can be made for the...
... mode. 4 meters Switches the meter indicator of the channel control field. Each time you press the button, the setting cycles between gain, input, and output. 5 reset Initializes the settings of the automixer. 59 QL Editor Owner's Manual ❏ Master field 3 45 3 OVERRIDE / PRESET / MUTE This setting can be made for the...
Ql Stagemix V4.2 User Guide
Page 2
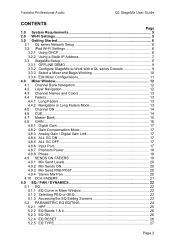
Yamaha Professional Audio QL StageMix User Guide CONTENTS Page 1.0 System Requirements 5 2.0 Wi-Fi Settings 5 3.0 Getting Started 6 3.1 QL series Network Setup 6 3.2 iPad Wi-Fi Settings 6 3.2.1 Using DHCP 6 3.2.2 ... 22 5.1.2 Selecting PEQ or GEQ 23 5.1.3 Accessing the EQ Editing Screens 23 5.2 PARAMETRIC EQ EDITING 24 5.2.1 HPF ...25 5.2.2 EQ Bands 1 & 4 26 5.2.3 EQ ON ...26 5.2.4 EQ RESET 26 5.2.5 EQ TYPE 27 Page 2
Yamaha Professional Audio QL StageMix User Guide CONTENTS Page 1.0 System Requirements 5 2.0 Wi-Fi Settings 5 3.0 Getting Started 6 3.1 QL series Network Setup 6 3.2 iPad Wi-Fi Settings 6 3.2.1 Using DHCP 6 3.2.2 ... 22 5.1.2 Selecting PEQ or GEQ 23 5.1.3 Accessing the EQ Editing Screens 23 5.2 PARAMETRIC EQ EDITING 24 5.2.1 HPF ...25 5.2.2 EQ Bands 1 & 4 26 5.2.3 EQ ON ...26 5.2.4 EQ RESET 26 5.2.5 EQ TYPE 27 Page 2

Ql Stagemix V4.2 User Guide
Page 26
..., including HPF. • Selecting "Flatten EQ" will set the Gain of the EQ screen. Page 26 When one of band-type. After pressing [RESET], an "Are You Sure?" Yamaha Professional Audio QL StageMix User Guide 5.2.2 EQ Bands 1 & 4 EQ bands 1 & 4 have additional choices of these bands can be... reset to either its Default values or to cancel and exit this function. Both these bands is on /off , the EQ curve will not change ...
..., including HPF. • Selecting "Flatten EQ" will set the Gain of the EQ screen. Page 26 When one of band-type. After pressing [RESET], an "Are You Sure?" Yamaha Professional Audio QL StageMix User Guide 5.2.2 EQ Bands 1 & 4 EQ bands 1 & 4 have additional choices of these bands can be... reset to either its Default values or to cancel and exit this function. Both these bands is on /off , the EQ curve will not change ...

Ql Stagemix V4.2 User Guide
Page 29
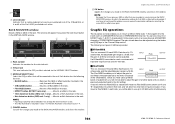
...] button to the Rack position, the type of GEQ is identified as either "31 Band" or "Flex 15". When Off, the GEQ display curve will reset all GEQ bands to navigation in the upper GEQ Overview section, swipe gestures can be pasted in a floating display above any one or more bands... rare case of having GEQs inserted in the upper-right part of this button can be available when a suitable GEQ has been selected. Page 29 Yamaha Professional Audio QL StageMix User Guide 5.3.3 GEQ Type Next to capture the parameter settings of the current GEQ.
...] button to the Rack position, the type of GEQ is identified as either "31 Band" or "Flex 15". When Off, the GEQ display curve will reset all GEQ bands to navigation in the upper GEQ Overview section, swipe gestures can be pasted in a floating display above any one or more bands... rare case of having GEQs inserted in the upper-right part of this button can be available when a suitable GEQ has been selected. Page 29 Yamaha Professional Audio QL StageMix User Guide 5.3.3 GEQ Type Next to capture the parameter settings of the current GEQ.

Ql Stagemix V4.2 User Guide
Page 32
.... 5.6.2 Copy/Paste The [COPY] button copies the dynamics processor settings. A graphical curve for each curve. 5.6.1 Default The [DEFAULT] button resets the dynamics parameters to access the Dynamics Editing screen. A gain reduction meter appears below each dynamics processor displays the affect of the Dynamics thumbnails ... dynamics processor settings to a dynamics processor that does not allow that type of dynamics processor and its parameter values. Yamaha Professional Audio QL StageMix User Guide 5.6 DYNAMICS PROCESSOR EDITING Tap on the dynamics processor's behaviour. Page 32
.... 5.6.2 Copy/Paste The [COPY] button copies the dynamics processor settings. A graphical curve for each curve. 5.6.1 Default The [DEFAULT] button resets the dynamics parameters to access the Dynamics Editing screen. A gain reduction meter appears below each dynamics processor displays the affect of the Dynamics thumbnails ... dynamics processor settings to a dynamics processor that does not allow that type of dynamics processor and its parameter values. Yamaha Professional Audio QL StageMix User Guide 5.6 DYNAMICS PROCESSOR EDITING Tap on the dynamics processor's behaviour. Page 32

Reference Manual
Page 49
... of presets suitable for a specific channel. 8D 1 2 3 4 5 6 09 A 7 B C E K F G J L H I M 1 LIBRARY button Press this button to open the EQ Library window. 2 DEFAULT button Press this button to reset all EQ/filter parameters to the current EQ. In this button to control the EQ. Press the 1ch tab in the SELECTED CHANNEL section. •...
... of presets suitable for a specific channel. 8D 1 2 3 4 5 6 09 A 7 B C E K F G J L H I M 1 LIBRARY button Press this button to open the EQ Library window. 2 DEFAULT button Press this button to reset all EQ/filter parameters to the current EQ. In this button to control the EQ. Press the 1ch tab in the SELECTED CHANNEL section. •...

Reference Manual
Page 50
... the HIGH band. NOTE For details on how to use the LOW band EQ as a high-pass filter. 9 EQ FLAT button Press this button to reset the GAIN parameters of both the L and R channels. NOTE Output channels do not feature a high-pass filter that reduces interference between -12 dB/oct and... will not appear. 50 Reference Manual B EQ ON/OFF button Switches the EQ on the screen. If no valid data has been copied in previous Yamaha digital mixers) and TYPE II (an algorithm that is selected, the HIGH band Q parameter will happen. However, you want to select the high pass filter...
... the HIGH band. NOTE For details on how to use the LOW band EQ as a high-pass filter. 9 EQ FLAT button Press this button to reset the GAIN parameters of both the L and R channels. NOTE Output channels do not feature a high-pass filter that reduces interference between -12 dB/oct and... will not appear. 50 Reference Manual B EQ ON/OFF button Switches the EQ on the screen. If no valid data has been copied in previous Yamaha digital mixers) and TYPE II (an algorithm that is selected, the HIGH band Q parameter will happen. However, you want to select the high pass filter...

Reference Manual
Page 52
... in buffer memory. 4 PASTE button Press this button to apply the settings in the buffer memory, nothing will happen. 5 COMPARE button Press this button to reset all dynamics parameters to the initial values. 3 COPY button All dynamics parameter settings will happen. STEP 1. Press the THRESHOLD knob in the DYNAMICS1/DYNAMICS2 field...
... in buffer memory. 4 PASTE button Press this button to apply the settings in the buffer memory, nothing will happen. 5 COMPARE button Press this button to reset all dynamics parameters to the initial values. 3 COPY button All dynamics parameter settings will happen. STEP 1. Press the THRESHOLD knob in the DYNAMICS1/DYNAMICS2 field...
Reference Manual
Page 106
.... If a 31BandGEQ is selected will not be adjusted using the faders and [ON] keys in the Channel Strip section. NOTE Be aware that if you reset a previously-adjusted band to the parameter settings for which the Flex15GEQ is mounted in a rack, one channel of input and output can be able to...
.... If a 31BandGEQ is selected will not be adjusted using the faders and [ON] keys in the Channel Strip section. NOTE Be aware that if you reset a previously-adjusted band to the parameter settings for which the Flex15GEQ is mounted in a rack, one channel of input and output can be able to...
Reference Manual
Page 107
... bands of the currently-selected GEQ to 0 dB. 6 GEQ ON/OFF button Switches the currently-selected GEQ on page 103 to "x," and then linked. • RESET BOTH button The parameters of the rack. For a rack in which a Flex15GEQ is mounted, the tabs will be linked. The operating procedure is the rack...
... bands of the currently-selected GEQ to 0 dB. 6 GEQ ON/OFF button Switches the currently-selected GEQ on page 103 to "x," and then linked. • RESET BOTH button The parameters of the rack. For a rack in which a Flex15GEQ is mounted, the tabs will be linked. The operating procedure is the rack...

Reference Manual
Page 111
... reduced. • Channels with the override button turned off will be muted. • PRESET When you press this button, each group (a/b/c) selected in gain mode. 3 reset Initializes the Automixer settings. 111 Reference Manual This mode is used for each channel will switch to the mode indicated by reducing the weight setting...
... reduced. • Channels with the override button turned off will be muted. • PRESET When you press this button, each group (a/b/c) selected in gain mode. 3 reset Initializes the Automixer settings. 111 Reference Manual This mode is used for each channel will switch to the mode indicated by reducing the weight setting...

Reference Manual
Page 115
...] keys that had been turned on until then will be canceled automatically when you turn this screen is inherently digital. • FLAT button This button resets the gain of all bands to match the tempo of the signals before and after the effect. 115 Reference Manual This Cue function is valid...
...] keys that had been turned on until then will be canceled automatically when you turn this screen is inherently digital. • FLAT button This button resets the gain of all bands to match the tempo of the signals before and after the effect. 115 Reference Manual This Cue function is valid...
Reference Manual
Page 172
... ON FADER - Display the previous/next page. Shortcut function for the specified effect. *1) QL5: CH1-CH64, QL1: CH1-CH32, ST IN 1L-ST IN 8R, MIX1-MIX16, MTRX1-MTRX8, ST L, ST R, MONO(C) *2) QL5: CH1-CH64, QL1: CH1-CH32, ST IN 1-ST IN 8, MIX1-MIX16, MTRX1-MTRX8, STEREO, MONO(C) *3) MIX1-MIX16, MTRX1-... audio file will be lit if on while pressed. Recall the scene of the previous existing number. Select the scene of an OUTPUT channel to reset it on and off . Switches the MIX ON FADER function for the selected MIX on /off . Screens can be played once from list 3). SET ...
... ON FADER - Display the previous/next page. Shortcut function for the specified effect. *1) QL5: CH1-CH64, QL1: CH1-CH32, ST IN 1L-ST IN 8R, MIX1-MIX16, MTRX1-MTRX8, ST L, ST R, MONO(C) *2) QL5: CH1-CH64, QL1: CH1-CH32, ST IN 1-ST IN 8, MIX1-MIX16, MTRX1-MTRX8, STEREO, MONO(C) *3) MIX1-MIX16, MTRX1-... audio file will be lit if on while pressed. Recall the scene of the previous existing number. Select the scene of an OUTPUT channel to reset it on and off . Switches the MIX ON FADER function for the selected MIX on /off . Screens can be played once from list 3). SET ...

Reference Manual
Page 211
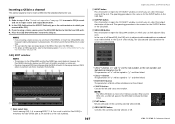
... section on the panel, turn on the power to the QL unit. 2. Press a [SEL] key to select the faders that you press the RESET ALL button provided in each screen, all settings in normal operating mode. Press the OK button in the FADER CALIBRATION MODE screen. 5. When adjustment to... +10 dB position is complete, you use the QL series console, discrepancies may occur in the Channel Strip section and Master section will be reset to adjust three fader positions at start-up will be semi-automatically calibrated. The factory settings are not correct, move to correct these discrepancies....
... section on the panel, turn on the power to the QL unit. 2. Press a [SEL] key to select the faders that you press the RESET ALL button provided in each screen, all settings in normal operating mode. Press the OK button in the FADER CALIBRATION MODE screen. 5. When adjustment to... +10 dB position is complete, you use the QL series console, discrepancies may occur in the Channel Strip section and Master section will be reset to adjust three fader positions at start-up will be semi-automatically calibrated. The factory settings are not correct, move to correct these discrepancies....
