
Firmware Update Guide
Page 7
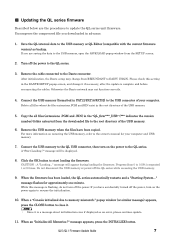
...8. Progress from the SETUP screen. 2. When the firmware has been loaded, the QL series automatically restarts and a "Starting System..." When a "Console initialized due to update the QL series unit firmware. popup window (or similar message) appears, press the CLOSE button to start loading the firmware....2 times. Copy the all files when the files extensions.PGM and.BIN exist in the root directory of the USB memory. 6. QL5/QL1 Firmware Update Guide 7 Turn off the QL series while accessing the USB memory. 9. Please check this message is a message about initialization even...
...8. Progress from the SETUP screen. 2. When the firmware has been loaded, the QL series automatically restarts and a "Starting System..." When a "Console initialized due to update the QL series unit firmware. popup window (or similar message) appears, press the CLOSE button to start loading the firmware....2 times. Copy the all files when the files extensions.PGM and.BIN exist in the root directory of the USB memory. 6. QL5/QL1 Firmware Update Guide 7 Turn off the QL series while accessing the USB memory. 9. Please check this message is a message about initialization even...

Owner's Manual
Page 4
... OF AMERICA. (Perchlorate) COMPLIANCE INFORMATION STATEMENT (DECLARATION OF CONFORMITY PROCEDURE) Responsible Party: Yamaha Corporation of America Address: 6600 Orangethorpe Ave., Buena Park, Calif. 90620 Telephone: 714-522-9011 Type of Equipment: Digital Mixing Console Model Name: QL5/QL1 This device complies with the requirements listed in FCC Regulations, Part 15 for memory back...
... OF AMERICA. (Perchlorate) COMPLIANCE INFORMATION STATEMENT (DECLARATION OF CONFORMITY PROCEDURE) Responsible Party: Yamaha Corporation of America Address: 6600 Orangethorpe Ave., Buena Park, Calif. 90620 Telephone: 714-522-9011 Type of Equipment: Digital Mixing Console Model Name: QL5/QL1 This device complies with the requirements listed in FCC Regulations, Part 15 for memory back...
Owner's Manual
Page 8
...place. http://www.yamahaproaudio.com/ • QL Editor This software application enables you to set console parameters without connecting the unit. • Console File Converter This software application enables you to convert between Yamaha PM5D, M7CL, LS9, CL and QL series setting files. • QL StageMix This software... or set up the software applications is available on the panel are available for choosing a Yamaha QL series QL5/QL1 Digital Mixing Console. Details on updating the firmware are available on the screen are called "buttons," and virtual knobs are called "keys."...
...place. http://www.yamahaproaudio.com/ • QL Editor This software application enables you to set console parameters without connecting the unit. • Console File Converter This software application enables you to convert between Yamaha PM5D, M7CL, LS9, CL and QL series setting files. • QL StageMix This software... or set up the software applications is available on the panel are available for choosing a Yamaha QL series QL5/QL1 Digital Mixing Console. Details on updating the firmware are available on the screen are called "buttons," and virtual knobs are called "keys."...

Owner's Manual
Page 9
...offers easy visual identification. Consequently, no other CL series and QL series consoles, allowing QL series consoles to select various combinations of channels, regardless of the QL series Features QL series digital mixing consoles create high-quality, refined, live-sound environments. Integration of mixer and ...faders can use effects or the graphic EQ, you can be reproduced immediately. Sonic flexibility from another CL series or QL series console. The channel name appears on the screen. This includes a 31-band graphic EQ, a Flex15GEQ, and an Automixer function-...
...offers easy visual identification. Consequently, no other CL series and QL series consoles, allowing QL series consoles to select various combinations of channels, regardless of the QL series Features QL series digital mixing consoles create high-quality, refined, live-sound environments. Integration of mixer and ...faders can use effects or the graphic EQ, you can be reproduced immediately. Sonic flexibility from another CL series or QL series console. The channel name appears on the screen. This includes a 31-band graphic EQ, a Flex15GEQ, and an Automixer function-...
Owner's Manual
Page 10
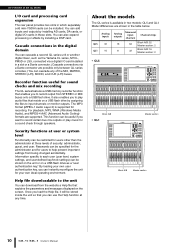
...Media Audio), and MPEG-4 AAC (Advanced Audio Coding) formats are possible only between QL series consoles.) You can cascade any time. Information specific to each user (user level, system settings, and...audio files that explains the parameters and messages displayed on a USB flash drive as the Yamaha CL series, M7CL, PM5D or LS9, connected via a Dante connector are supported. ... QL5 32 16 64 Block A/B: 32 Master section: 2 QL1 16 8 32 Block A/B: 16 Master section: 2 • QL5 Block A/B • QL1 Master section Block A/B Master section 10 Owner's Manual Passwords ...
...Media Audio), and MPEG-4 AAC (Advanced Audio Coding) formats are possible only between QL series consoles.) You can cascade any time. Information specific to each user (user level, system settings, and...audio files that explains the parameters and messages displayed on a USB flash drive as the Yamaha CL series, M7CL, PM5D or LS9, connected via a Dante connector are supported. ... QL5 32 16 64 Block A/B: 32 Master section: 2 QL1 16 8 32 Block A/B: 16 Master section: 2 • QL5 Block A/B • QL1 Master section Block A/B Master section 10 Owner's Manual Passwords ...
Owner's Manual
Page 16
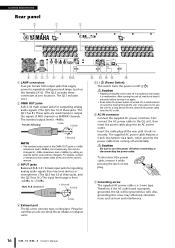
The QL1 has 8.) These jacks are used is properly grounded, the QL will be charged). For details, contact a Yamaha service center listed at two locations. Caution • Rapidly turning the unit on the plug. 7 Grounding screw The supplied AC power cable is flowing ... pressing the latch on and off , a small amount of current is a 3-wire type. Male XLR connector 1 (Ground) 3 (Cold) 2 (Hot) 4 Exhaust port The QL series consoles have cooling fans. B CDE F 5 | / (Power Switch) This switch turns the power on again. • Even when the power switch is from -62dBu to +10dBu. First...
The QL1 has 8.) These jacks are used is properly grounded, the QL will be charged). For details, contact a Yamaha service center listed at two locations. Caution • Rapidly turning the unit on the plug. 7 Grounding screw The supplied AC power cable is flowing ... pressing the latch on and off , a small amount of current is a 3-wire type. Male XLR connector 1 (Ground) 3 (Cold) 2 (Hot) 4 Exhaust port The QL series consoles have cooling fans. B CDE F 5 | / (Power Switch) This switch turns the power on again. • Even when the power switch is from -62dBu to +10dBu. First...

Owner's Manual
Page 20
... of the user who is currently logged in (i.e., is being cue-monitored (IN/OUT/DCA/KEY IN/EFFECT) is broadly divided into the QL series console from their last stored or recalled state, an "E" symbol will be canceled. NOTICE An ACCESS indicator appears in the function access area while data is...
... of the user who is currently logged in (i.e., is being cue-monitored (IN/OUT/DCA/KEY IN/EFFECT) is broadly divided into the QL series console from their last stored or recalled state, an "E" symbol will be canceled. NOTICE An ACCESS indicator appears in the function access area while data is...
Owner's Manual
Page 22
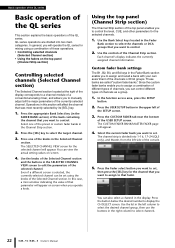
... Strip section) Controlling selected channels (Selected Channel section) The Selected Channel section located at the right of the display corresponds to a channel module of the console. 5. Use the Bank Select keys located in the Fader Bank section to select the channels or DCA groups that you to display the CH SELECT...
... Strip section) Controlling selected channels (Selected Channel section) The Selected Channel section located at the right of the display corresponds to a channel module of the console. 5. Use the Bank Select keys located in the Fader Bank section to select the channels or DCA groups that you to display the CH SELECT...
Owner's Manual
Page 30
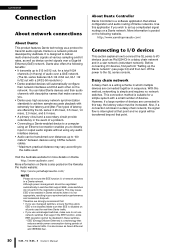
...audio interface devices. • Audio can label Dante devices and their network interfaces and find each other on the Yamaha Pro Audio website: http://www.yamahaproaudio.com/ NOTE Please do not perform the negotiation properly. Make sure that allows ...bit rates, as well as device control signals over a GbE network. (The QL series features QL5: 64 in/64 out, QL1: 32 in a star network (redundant network). With this application if you . • Dante uses high accuracy network synchronization ...About Dante This product features Dante technology as a protocol to the QL series console.
...audio interface devices. • Audio can label Dante devices and their network interfaces and find each other on the Yamaha Pro Audio website: http://www.yamahaproaudio.com/ NOTE Please do not perform the negotiation properly. Make sure that allows ...bit rates, as well as device control signals over a GbE network. (The QL series features QL5: 64 in/64 out, QL1: 32 in a star network (redundant network). With this application if you . • Dante uses high accuracy network synchronization ...About Dante This product features Dante technology as a protocol to the QL series console.

Owner's Manual
Page 31
... this topology, it is better for increasing communication stability compared to a daisy chain network. Connecting QL series consoles and I/O devices Use the Dante connectors on the QL series console and I/O devices to connect them as follows. However, if the primary connection is connected to a central switch. Normally...3 4 5 6 7 8 Star network (redundant network) In a star network, each device is broken, the secondary circuit will automatically take over communications. Connecting QL series consoles and I/O devices Use the Dante connectors on the QL series...
... this topology, it is better for increasing communication stability compared to a daisy chain network. Connecting QL series consoles and I/O devices Use the Dante connectors on the QL series console and I/O devices to connect them as follows. However, if the primary connection is connected to a central switch. Normally...3 4 5 6 7 8 Star network (redundant network) In a star network, each device is broken, the secondary circuit will automatically take over communications. Connecting QL series consoles and I/O devices Use the Dante connectors on the QL series...
Owner's Manual
Page 32
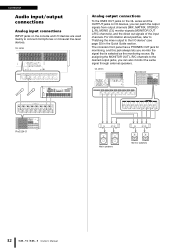
...) in the Quick Guide section. QL series Analog output connections To the OMNI OUT jacks on the QL series and the OUTPUT jacks on the console and I/O devices are used mainly to the I /O devices, you can also monitor the same signal through external speakers. QL series Rio3224-D 789A ...23456 23456 EF 01 BCD BCD 789A Rio3224-D EF 01 Main speakers Monitor speakers 32 Owner's Manual The console's front panel has a PHONES OUT jack for monitoring, and this jack always lets you can patch the output signals from output channels [MIX, MATRIX...
...) in the Quick Guide section. QL series Analog output connections To the OMNI OUT jacks on the QL series and the OUTPUT jacks on the console and I/O devices are used mainly to the I /O devices, you can also monitor the same signal through external speakers. QL series Rio3224-D 789A ...23456 23456 EF 01 BCD BCD 789A Rio3224-D EF 01 Main speakers Monitor speakers 32 Owner's Manual The console's front panel has a PHONES OUT jack for monitoring, and this jack always lets you can patch the output signals from output channels [MIX, MATRIX...

Owner's Manual
Page 33
... the guide rails inside the slot. Card Installing an optional card Before you install I /O cards in slots 1-2, you to verify the total number of Yamaha or third-party cards that can be installed in a safe place for future use. You can achieve both edges of the card is compatible with....com/ Follow the steps below to an external digital audio device. Caution Before connecting a separately sold mini-YGDAI I /O cards in the slot of the console's power supply. Push the card all the way into the slot. With this jack to the AES/EBU jack on the side of the STEREO...
... the guide rails inside the slot. Card Installing an optional card Before you install I /O cards in slots 1-2, you to verify the total number of Yamaha or third-party cards that can be installed in a safe place for future use. You can achieve both edges of the card is compatible with....com/ Follow the steps below to an external digital audio device. Caution Before connecting a separately sold mini-YGDAI I /O cards in the slot of the console's power supply. Push the card all the way into the slot. With this jack to the AES/EBU jack on the side of the STEREO...

Owner's Manual
Page 34
... in the touch screen. 5. Set the ID of the DANTE SETUP screen. 4. Turn on the functions and their parameters, refer to the Reference Manual. Set CONSOLE ID to #1, and SECONDARY PORT to the Reference Manual pdf document. 6. Otherwise, communication with I /O device's ID to use an Ethernet cable to connect the Dante...
... in the touch screen. 5. Set the ID of the DANTE SETUP screen. 4. Turn on the functions and their parameters, refer to the Reference Manual. Set CONSOLE ID to #1, and SECONDARY PORT to the Reference Manual pdf document. 6. Otherwise, communication with I /O device's ID to use an Ethernet cable to connect the Dante...

Owner's Manual
Page 35
... section. Owner's Manual 35 Press the [SEL] key for the channel that is the output destination. 3. GAIN knob 3. We also recommend setting all digital mixing console output controls to speakers, make sure that you want to output to the corresponding INPUT connectors. Adjusting the analog gain 1. While checking the sound level...
... section. Owner's Manual 35 Press the [SEL] key for the channel that is the output destination. 3. GAIN knob 3. We also recommend setting all digital mixing console output controls to speakers, make sure that you want to output to the corresponding INPUT connectors. Adjusting the analog gain 1. While checking the sound level...

Owner's Manual
Page 46
... key for Fader B in normal operating mode. Press the OK button in the Master section on the panel while turning the power on. The console will be returned to its initial settings, except DANTE SETUP. 3. NOTE Alternatively, you adjust the fader position, press the [NEXT] button. Press... and hold the [SEL] key for which you can use the console, discrepancies may occur in step 3 moves to -∞ (all the way down ). 7. After the opening screen, the startup menu screen will proceed ...
... key for Fader B in normal operating mode. Press the OK button in the Master section on the panel while turning the power on. The console will be returned to its initial settings, except DANTE SETUP. 3. NOTE Alternatively, you adjust the fader position, press the [NEXT] button. Press... and hold the [SEL] key for which you can use the console, discrepancies may occur in step 3 moves to -∞ (all the way down ). 7. After the opening screen, the startup menu screen will proceed ...

Owner's Manual
Page 47
... start up ), in order. Press the RESTART button to the +10dB position is complete, calibration starts. 9. 8. If the RESTART button appears, calibration has failed. The console will be saved in normal operating mode. Adjusting the faders (Calibration function) Owner's Manual 47 Press the EXIT button. When calibration has been completed, press...
... start up ), in order. Press the RESTART button to the +10dB position is complete, calibration starts. 9. 8. If the RESTART button appears, calibration has failed. The console will be saved in normal operating mode. Adjusting the faders (Calibration function) Owner's Manual 47 Press the EXIT button. When calibration has been completed, press...

Ql Editor Installation Guide
Page 3
QL Editor The QL Editor enables you to the PDF manual from the [HELP] menu in software program. For subsequent operations, refer to prepare the QL mixing console (QL5 and QL1: subsequently called QL) settings beforehand by editing the parameters offline, and also remotely monitor/control the QL online. page 4 page 4 page 6 QL Editor Installation Guide 3 Installing the Software Procedures 1 Verify that your system meets the operating requirements of each software program. 2 Install the Editor. 3 Configure the network settings.
QL Editor The QL Editor enables you to the PDF manual from the [HELP] menu in software program. For subsequent operations, refer to prepare the QL mixing console (QL5 and QL1: subsequently called QL) settings beforehand by editing the parameters offline, and also remotely monitor/control the QL online. page 4 page 4 page 6 QL Editor Installation Guide 3 Installing the Software Procedures 1 Verify that your system meets the operating requirements of each software program. 2 Install the Editor. 3 Configure the network settings.

Ql Editor Installation Guide
Page 5
QL Editor LAN cable Network switch or LAN cable LAN cable Computer Network connector QL console NOTE You cannot simultaneously control one QL unit from two computers running QL Editor. QL Editor Installation Guide 5 Connecting the computer to the QL The following diagram shows how to connect the computer to the QL through a dedicated network. However, you can control the QL unit using QL Editor on a computer along with the QL StageMix application installed on an iPad that is connected via WiFi.
QL Editor LAN cable Network switch or LAN cable LAN cable Computer Network connector QL console NOTE You cannot simultaneously control one QL unit from two computers running QL Editor. QL Editor Installation Guide 5 Connecting the computer to the QL The following diagram shows how to connect the computer to the QL through a dedicated network. However, you can control the QL unit using QL Editor on a computer along with the QL StageMix application installed on an iPad that is connected via WiFi.
Ql Editor Installation Guide
Page 9
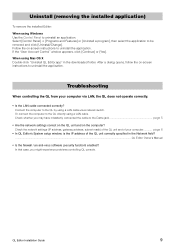
... instructions to uninstall the application. After a dialog opens, follow the on -screen instructions to uninstall the application. Check whether you might experience problems controlling QL console. If the "User Account Control" window appears, click [Continue] or [Yes]. Uninstall (removing the installed application) To remove the installed Editor: When using a LAN cable...
... instructions to uninstall the application. After a dialog opens, follow the on -screen instructions to uninstall the application. Check whether you might experience problems controlling QL console. If the "User Account Control" window appears, click [Continue] or [Yes]. Uninstall (removing the installed application) To remove the installed Editor: When using a LAN cable...
Ql Editor Owner's Manual
Page 2
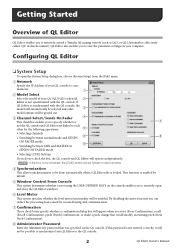
...Editor windows. 6 Level Meter This option specifies whether the level meter functionality will appear when you to remotely control a Yamaha QL mixing console (such as QL5, or QL1; If this document). municate. 1 2 Model Select Select the model of QL Editor QL Editor enables you store (...). 8 Administrator Password Enter the Administrator password that was specified on your QL console to com- Getting Started Overview of your QL (QL5/QL1) when QL 2 Editor is not synchronized with the QL console, the model will automatically be selected and other 3 model options will be ...
...Editor windows. 6 Level Meter This option specifies whether the level meter functionality will appear when you to remotely control a Yamaha QL mixing console (such as QL5, or QL1; If this document). municate. 1 2 Model Select Select the model of QL Editor QL Editor enables you store (...). 8 Administrator Password Enter the Administrator password that was specified on your QL console to com- Getting Started Overview of your QL (QL5/QL1) when QL 2 Editor is not synchronized with the QL console, the model will automatically be selected and other 3 model options will be ...


