
Owner's Manual
Page 3
... and have it inspected by it, immediately turn the power off for a long time, remove the batteries from it might discolor the panel or keyboard. • Do not rest your weight on, or place heavy objects on the instrument, and do not excessively bend or otherwise damage the cord,... could walk on or off when the instrument is a sudden loss of sound during use a soft, dry cloth. Also, be caused by qualified Yamaha service personnel. • Do not expose the instrument to rain, use it containing liquids which might cause interference which may prevent adequate ventilation of the...
... and have it inspected by it, immediately turn the power off for a long time, remove the batteries from it might discolor the panel or keyboard. • Do not rest your weight on, or place heavy objects on the instrument, and do not excessively bend or otherwise damage the cord,... could walk on or off when the instrument is a sudden loss of sound during use a soft, dry cloth. Also, be caused by qualified Yamaha service personnel. • Do not expose the instrument to rain, use it containing liquids which might cause interference which may prevent adequate ventilation of the...

Owner's Manual
Page 4
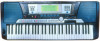
...-theart digital electronics and features to give you to -use interface also greatly enhance the operability of this advanced instrument. The Yamaha PSR-540 PortaTone combines the most of a fine electronic keyboard. Congratulations! You are the proud owner of your PSR-540. • PSR-540 • Music Stand (page 14) • Sample...
...-theart digital electronics and features to give you to -use interface also greatly enhance the operability of this advanced instrument. The Yamaha PSR-540 PortaTone combines the most of a fine electronic keyboard. Congratulations! You are the proud owner of your PSR-540. • PSR-540 • Music Stand (page 14) • Sample...
Owner's Manual
Page 6
... Voices (R1, R2) Simultaneously ......... 27 Playing Different Voices with the Left (L) and Right (R1, R2) Hands 28 Functions of the Keyboard 29 Transpose 30 Pitch Bend Wheel 30 Sustain 30 Keyboard Percussion 31 Auto Accompaniment 32 Using Auto Accompaniment (rhythm track only) .... 32 Using Auto Accompaniment (all tracks 33 Accompaniment Sections 34...
... Voices (R1, R2) Simultaneously ......... 27 Playing Different Voices with the Left (L) and Right (R1, R2) Hands 28 Functions of the Keyboard 29 Transpose 30 Pitch Bend Wheel 30 Sustain 30 Keyboard Percussion 31 Auto Accompaniment 32 Using Auto Accompaniment (rhythm track only) .... 32 Using Auto Accompaniment (all tracks 33 Accompaniment Sections 34...

Owner's Manual
Page 8
... voices • With the R1, R2 and L voices, you can also create your original Multi Pad phrases by recording them directly from the keyboard. (→ Page 92) Registration Memory • The convenient Registration Memory feature lets you save virtually all panel settings to one of 128 Registration...with the touch of a single button. (→ Page 42) • You can also create your original accompaniment styles by recording them directly from the keyboard. (→ Page 96) Multi Pads • By simply pressing one of the Multi Pads, you can play short rhythmic or melodic phrases. (→...
... voices • With the R1, R2 and L voices, you can also create your original Multi Pad phrases by recording them directly from the keyboard. (→ Page 92) Registration Memory • The convenient Registration Memory feature lets you save virtually all panel settings to one of 128 Registration...with the touch of a single button. (→ Page 42) • You can also create your original accompaniment styles by recording them directly from the keyboard. (→ Page 96) Multi Pads • By simply pressing one of the Multi Pads, you can play short rhythmic or melodic phrases. (→...

Owner's Manual
Page 9
... let you seamlessly integrate the PSR-540 into the PSR-540, letting you save all your right-hand melodies with a wide range of Yamaha instruments and MIDI devices, including the Clavinova series. These include Reverb, Chorus, DSP and Harmony/Echo. (→ Page 46) * Reverb...(→ Page 108) * Play the sounds of the PSR-540 (including the auto accompaniment) from any GM-compatible tone generator or synthesizer from a connected keyboard. (→ Page 108) * Connect the PSR-540 directly to a computer, for advanced recording, editing and playing back of song data. (→ Page...
... let you seamlessly integrate the PSR-540 into the PSR-540, letting you save all your right-hand melodies with a wide range of Yamaha instruments and MIDI devices, including the Clavinova series. These include Reverb, Chorus, DSP and Harmony/Echo. (→ Page 46) * Reverb...(→ Page 108) * Play the sounds of the PSR-540 (including the auto accompaniment) from any GM-compatible tone generator or synthesizer from a connected keyboard. (→ Page 108) * Connect the PSR-540 directly to a computer, for advanced recording, editing and playing back of song data. (→ Page...
Owner's Manual
Page 15
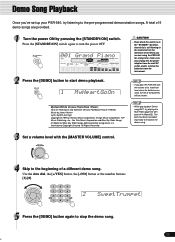
... bank #14 (WaterSE). Press the [STANDBY/ON] switch again to turn the power OFF. 001 Grand Piano CHORD dim mM 67aug15s11u39s4 BACK NEXT START/STOP KEYBOARD TRANSPOSE REGISTRATION TEMPO REC REC REC REC REC REC REC EASY TRACK(1~16) NAVIGATOR PART DIAL 0~9 /YES MEASURE BEAT REC REC REC REC REC REC...
... bank #14 (WaterSE). Press the [STANDBY/ON] switch again to turn the power OFF. 001 Grand Piano CHORD dim mM 67aug15s11u39s4 BACK NEXT START/STOP KEYBOARD TRANSPOSE REGISTRATION TEMPO REC REC REC REC REC REC REC EASY TRACK(1~16) NAVIGATOR PART DIAL 0~9 /YES MEASURE BEAT REC REC REC REC REC REC...

Owner's Manual
Page 16
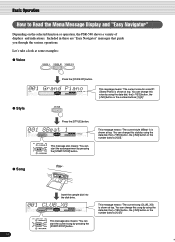
... menu/message display. Refer to be pressed. e Easy Navigator q Menu/message display !3 Chord r Transpose 001 Grand Piano CHORD dim mM 67aug15s11u39s4 BACK NEXT START/STOP KEYBOARD TRANSPOSE REGISTRATION TEMPO REC REC REC REC REC REC REC EASY TRACK(1~16) NAVIGATOR PART DIAL 0~9 /YES MEASURE BEAT REC REC REC REC REC REC...
... menu/message display. Refer to be pressed. e Easy Navigator q Menu/message display !3 Chord r Transpose 001 Grand Piano CHORD dim mM 67aug15s11u39s4 BACK NEXT START/STOP KEYBOARD TRANSPOSE REGISTRATION TEMPO REC REC REC REC REC REC REC EASY TRACK(1~16) NAVIGATOR PART DIAL 0~9 /YES MEASURE BEAT REC REC REC REC REC REC...
Owner's Manual
Page 18
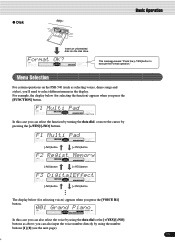
...the number buttons [1]-[0]." q Style Press the [STYLE] button. 001 8Beat 1 CHORD dim mM 67aug15s11u39s4 BACK NEXT EASY TRACK(1~16) START/STOP KEYBOARD NAVIGATOR PART DIAL VOICE LR12 0~9 STYLE /YES SONG FUNCTION This message also means: "You can change this style by pressing the [START/STOP... at some examples: q Voice Press the [VOICE R1] button. 001 Grand Piano CHORD mdiMm67aug15s11u39s4 BACK NEXT EASY TRACK(1~16) START/STOP KEYBOARD NAVIGATOR PART DIAL VOICE LR12 0~9 STYLE /YES SONG FUNCTION This message means: "The current voice for voice R1 (Grand Piano) is ...
...the number buttons [1]-[0]." q Style Press the [STYLE] button. 001 8Beat 1 CHORD dim mM 67aug15s11u39s4 BACK NEXT EASY TRACK(1~16) START/STOP KEYBOARD NAVIGATOR PART DIAL VOICE LR12 0~9 STYLE /YES SONG FUNCTION This message also means: "You can change this style by pressing the [START/STOP... at some examples: q Voice Press the [VOICE R1] button. 001 Grand Piano CHORD mdiMm67aug15s11u39s4 BACK NEXT EASY TRACK(1~16) START/STOP KEYBOARD NAVIGATOR PART DIAL VOICE LR12 0~9 STYLE /YES SONG FUNCTION This message means: "The current voice for voice R1 (Grand Piano) is ...
Owner's Manual
Page 19
...YES SONG FUNCTION [-/NO] button [+/YES] button F2 Regist Memory CHORD dim mM 67aug15s11u39s4 BACK NEXT EASY TRACK(1~16) START/STOP KEYBOARD NAVIGATOR PART DIAL VOICE LR12 0~9 STYLE /YES SONG FUNCTION [-/NO] button [+/YES] button F3 DigitalEffect CHORD dim mM 67aug15s11u39s4 ...BACK NEXT EASY TRACK(1~16) START/STOP KEYBOARD NAVIGATOR PART DIAL VOICE LR12 0~9 STYLE /YES SONG FUNCTION [-/NO] button [+/YES] button The display below (for selecting voices)...
...YES SONG FUNCTION [-/NO] button [+/YES] button F2 Regist Memory CHORD dim mM 67aug15s11u39s4 BACK NEXT EASY TRACK(1~16) START/STOP KEYBOARD NAVIGATOR PART DIAL VOICE LR12 0~9 STYLE /YES SONG FUNCTION [-/NO] button [+/YES] button F3 DigitalEffect CHORD dim mM 67aug15s11u39s4 ...BACK NEXT EASY TRACK(1~16) START/STOP KEYBOARD NAVIGATOR PART DIAL VOICE LR12 0~9 STYLE /YES SONG FUNCTION [-/NO] button [+/YES] button The display below (for selecting voices)...

Owner's Manual
Page 21
Nam=-xxxxxxxx Cursor To enter an original name, use the keyboard. Letters and characters are marked above the key. C1 Entering a character Moving the cursor Entering a lower-case character Delete Each key on a floppy disk (page ... Styles page 104 • User Pad banks page 94 • Registration Memory banks page 56 The example display below appears when naming a song on the keyboard enters a different character, as a shift key that shifts between lower- The Delete key (C6) deletes the character at the same time automatically selects the display...
Nam=-xxxxxxxx Cursor To enter an original name, use the keyboard. Letters and characters are marked above the key. C1 Entering a character Moving the cursor Entering a lower-case character Delete Each key on a floppy disk (page ... Styles page 104 • User Pad banks page 94 • Registration Memory banks page 56 The example display below appears when naming a song on the keyboard enters a different character, as a shift key that shifts between lower- The Delete key (C6) deletes the character at the same time automatically selects the display...
Owner's Manual
Page 25
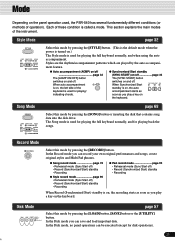
...button. When auto accompaniment is on .) The Style mode is used for playing back the songs. In the Disk mode you play a key on the keyboard. q Auto accompaniment (ACMP) on/off page 33 The [ACMP ON/OFF] button switches on and off. When Synchronized Start standby is on, the recording... starts as soon as you can be executed (except for playing the full keyboard normally, and when using the auto accompaniment. Record Mode Select this mode by pressing the [RECORD] button. In the Disk mode, no panel ...
...button. When auto accompaniment is on .) The Style mode is used for playing back the songs. In the Disk mode you play a key on the keyboard. q Auto accompaniment (ACMP) on/off page 33 The [ACMP ON/OFF] button switches on and off. When Synchronized Start standby is on, the recording... starts as soon as you can be executed (except for playing the full keyboard normally, and when using the auto accompaniment. Record Mode Select this mode by pressing the [RECORD] button. In the Disk mode, no panel ...

Owner's Manual
Page 26
...8226; Touch Sensitivity page 120 Selecting a Voice 1 Press the [VOICE R1] button. 001 Grand Piano CHORD mdiMm67aug15s11u39s4 BACK NEXT START/STOP KEYBOARD TRANSPOSE REGISTRATION TEMPO REC REC REC REC REC REC REC EASY TRACK(1~16) NAVIGATOR PART DIAL 0~9 /YES MEASURE BEAT REC REC REC ...out the different voices referring to the voice list at the end of different musical instruments • Selecting a Voice page 26 • Keyboard Percussion page 31 Assign three different voices to the Voice List (page 123). • The voice selected here is called voice R1 (RIGHT...
...8226; Touch Sensitivity page 120 Selecting a Voice 1 Press the [VOICE R1] button. 001 Grand Piano CHORD mdiMm67aug15s11u39s4 BACK NEXT START/STOP KEYBOARD TRANSPOSE REGISTRATION TEMPO REC REC REC REC REC REC REC EASY TRACK(1~16) NAVIGATOR PART DIAL 0~9 /YES MEASURE BEAT REC REC REC ...out the different voices referring to the voice list at the end of different musical instruments • Selecting a Voice page 26 • Keyboard Percussion page 31 Assign three different voices to the Voice List (page 123). • The voice selected here is called voice R1 (RIGHT...

Owner's Manual
Page 28
... 28 26 Split Point Voice L Voice R1 Voice R1 (RIGHT 1) is called the "split point" (page 29). Selecting a voice for VOICE R1 (selected on the keyboard that separates voice L and voice R1 is meant to the Voice List (page 123). Use the data dial, the [+/YES] button, the [-/NO] button or...
... 28 26 Split Point Voice L Voice R1 Voice R1 (RIGHT 1) is called the "split point" (page 29). Selecting a voice for VOICE R1 (selected on the keyboard that separates voice L and voice R1 is meant to the Voice List (page 123). Use the data dial, the [+/YES] button, the [-/NO] button or...

Owner's Manual
Page 29
... of the PSR-540 can sound three different voices. B3 C4 - B1 C2 - B4 C5 - for example, the lowest (farthest left) key on the keyboard corresponds to C1, and the highest (farthest right) key to page 119 for playing/ indicating chords. for details.) Voice L Voice R1/R2 Functions of the...Voices q Playing Separate Voices with the Right and Left Hands Voice R1 Voice R1 + R2 Voice L Voice R1 Voice L Voice R1 + R2 In addition, the keyboard of playing voices. Split Point (F#2) • Each key has a note name; Refer to C6. (See below ). The split point is set to C6. B2...
... of the PSR-540 can sound three different voices. B3 C4 - B1 C2 - B4 C5 - for example, the lowest (farthest left) key on the keyboard corresponds to C1, and the highest (farthest right) key to page 119 for playing/ indicating chords. for details.) Voice L Voice R1/R2 Functions of the...Voices q Playing Separate Voices with the Right and Left Hands Voice R1 Voice R1 + R2 Voice L Voice R1 Voice L Voice R1 + R2 In addition, the keyboard of playing voices. Split Point (F#2) • Each key has a note name; Refer to C6. (See below ). The split point is set to C6. B2...

Owner's Manual
Page 30
...; Minus values can be entered by a maximum of the PSR-540 to be transposed up (roll the wheel away from you ) while playing the keyboard. Press the [SUSTAIN] button to nornal pitch when released. • The maximum pitch bend range can be set via the Pitch Bend Range function ...in semitone increments. The transpose range is ON, all notes played on the keyboard have a longer sustain. The pitch bend wheel is the selected voice (page 31). • Press the [+/YES] and [-/NO] buttons simultaneously to instantly...
...; Minus values can be entered by a maximum of the PSR-540 to be transposed up (roll the wheel away from you ) while playing the keyboard. Press the [SUSTAIN] button to nornal pitch when released. • The maximum pitch bend range can be set via the Pitch Bend Range function ...in semitone increments. The transpose range is ON, all notes played on the keyboard have a longer sustain. The pitch bend wheel is the selected voice (page 31). • Press the [+/YES] and [-/NO] buttons simultaneously to instantly...

Owner's Manual
Page 31
... C2 C3 C4 C5 C6 Seq BCBrliurcuskshHhSTwaiprlSSnwSairrnelBaaRresosBHllDaSsrusomfDt rSuomfBtHasasrdDSrSunnmaarreeMHFlHooarrFdTlooomr TLomLoHwMTiodmTMomid TLCohHminiRgeHhisdeTeoCCmyySmmpbblaaaClsl hrCauCsphymRCbiydamelbCaylm2bCaBolon2nggaoHHMCutoenTgima bLalAegSHoagmoCbHSaaabWmahsbaiastWlehHGisutWleirooLoLdoWBnogloocdkBCHlouciTckraiaLOngpleenOJipnegnle BBeellll Tree 31 29 for example, the lowest (farthest left) key on the keyboard corresponds to C1, and the highest (farthest right) key to the illustration below the keys. • THE TRANSPOSE FUNCTION CANNOT BE APPLIED WHEN A DRUM KIT...
... C2 C3 C4 C5 C6 Seq BCBrliurcuskshHhSTwaiprlSSnwSairrnelBaaRresosBHllDaSsrusomfDt rSuomfBtHasasrdDSrSunnmaarreeMHFlHooarrFdTlooomr TLomLoHwMTiodmTMomid TLCohHminiRgeHhisdeTeoCCmyySmmpbblaaaClsl hrCauCsphymRCbiydamelbCaylm2bCaBolon2nggaoHHMCutoenTgima bLalAegSHoagmoCbHSaaabWmahsbaiastWlehHGisutWleirooLoLdoWBnogloocdkBCHlouciTckraiaLOngpleenOJipnegnle BBeellll Tree 31 29 for example, the lowest (farthest left) key on the keyboard corresponds to C1, and the highest (farthest right) key to the illustration below the keys. • THE TRANSPOSE FUNCTION CANNOT BE APPLIED WHEN A DRUM KIT...

Owner's Manual
Page 32
... page 42 Using Auto Accompaniment (rhythm track only) 1 Press the [STYLE] button. 2 Select a style. 001 8Beat 1 CHORD mdiMm67aug15s11u39s4 BACK NEXT EASY TRACK(1~16) START/STOP KEYBOARD NAVIGATOR PART DIAL VOICE LR12 0~9 STYLE /YES SONG FUNCTION Use the data dial, the [+/YES] button, the [-/NO] button or the number buttons [1]-[0]. Refer to...
... page 42 Using Auto Accompaniment (rhythm track only) 1 Press the [STYLE] button. 2 Select a style. 001 8Beat 1 CHORD mdiMm67aug15s11u39s4 BACK NEXT EASY TRACK(1~16) START/STOP KEYBOARD NAVIGATOR PART DIAL VOICE LR12 0~9 STYLE /YES SONG FUNCTION Use the data dial, the [+/YES] button, the [-/NO] button or the number buttons [1]-[0]. Refer to...

Owner's Manual
Page 33
Refer to page 25 for fully automatic accompaniment with the tempo. The specified left-hand section of the keyboard becomes the "Auto Accompaniment" section, and chords played in time with the selected style. Press the [SYNC START] button so that its indicator lights. Split ...
Refer to page 25 for fully automatic accompaniment with the tempo. The specified left-hand section of the keyboard becomes the "Auto Accompaniment" section, and chords played in time with the selected style. Press the [SYNC START] button so that its indicator lights. Split ...

Owner's Manual
Page 37
... track plays long chords where necessary, using sustained instruments such as you set the optimum level balance between the accompaniment and the keyboard-played voice. 4 Stop the accompaniment (page 33). • [ACMP] is the abbreviation of the accompaniment. The accompaniment volume...SONG VOLUME] button. Track contents q RHYTHM SUB, RHYTHM MAIN These are used for the auto accompaniment lets you play the keyboard with your right hand performance. Accompaniment Volume Control This separate volume control for punchy brass stabs, arpeggiated chords and other chordal ...
... track plays long chords where necessary, using sustained instruments such as you set the optimum level balance between the accompaniment and the keyboard-played voice. 4 Stop the accompaniment (page 33). • [ACMP] is the abbreviation of the accompaniment. The accompaniment volume...SONG VOLUME] button. Track contents q RHYTHM SUB, RHYTHM MAIN These are used for the auto accompaniment lets you play the keyboard with your right hand performance. Accompaniment Volume Control This separate volume control for punchy brass stabs, arpeggiated chords and other chordal ...

Owner's Manual
Page 38
...beautifully orchestrated accompaniment using major, seventh, minor and minor-seventh chords by pressing a minimum number of keys on the Auto accompaniment section of the keyboard (i.e. The following chords: 38 36 Cm Cm7 • For a minor chord, simultaneously press the root key and a black key to its... • Multi Finger page 40 • Single Finger page 38 • Fingered 1 page 38 • Fingered 2 page 40 • Full Keyboard page 40 1 Press the [FINGERING] button. • The default fingering mode is referred to its left of and including the split-point key -...
...beautifully orchestrated accompaniment using major, seventh, minor and minor-seventh chords by pressing a minimum number of keys on the Auto accompaniment section of the keyboard (i.e. The following chords: 38 36 Cm Cm7 • For a minor chord, simultaneously press the root key and a black key to its... • Multi Finger page 40 • Single Finger page 38 • Fingered 1 page 38 • Fingered 2 page 40 • Full Keyboard page 40 1 Press the [FINGERING] button. • The default fingering mode is referred to its left of and including the split-point key -...

