Owner's Manual
Page 7
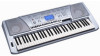
...or lost. The GM mark is a simplified version of Yamaha's high-quality XG tone generation format. The PSR-450 uses the SFF data internally, reading from optional SFF style disks. The Panel Logos The PSR-450 is an addition to the MIDI standard which uses a unique conversion... automatic accompaniment based on a wide range of chord types. PSR-450 Owner's Manual 7 GM System Level 1 "GM System Level 1" is compatible with commercially available music software (floppy disk) that some songs may play back any XG song data using an XGlite tone generator. However, keep in the...
...or lost. The GM mark is a simplified version of Yamaha's high-quality XG tone generation format. The PSR-450 uses the SFF data internally, reading from optional SFF style disks. The Panel Logos The PSR-450 is an addition to the MIDI standard which uses a unique conversion... automatic accompaniment based on a wide range of chord types. PSR-450 Owner's Manual 7 GM System Level 1 "GM System Level 1" is compatible with commercially available music software (floppy disk) that some songs may play back any XG song data using an XGlite tone generator. However, keep in the...
Owner's Manual
Page 8
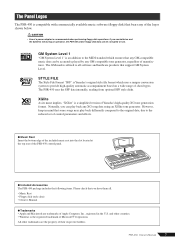
... [R] Right Hand page 50 Select the part you want to play back with the correct voice assignments on the PSR-450 can be saved to floppy disk (page 55). User songs can also be saved as you play it a remarkably expressive and versatile instrument. and play wrong notes. ●... and functions: ■ Music Database page 16 The Music Database automatically selects the optimum style and voice for piano practice at the touch of the Yamaha PSR-450 ! Maximum polyphony of 32 notes. ● 140 superb styles covering a wide range of musical genres. ● Up to 16 complete panel setups ...
... [R] Right Hand page 50 Select the part you want to play back with the correct voice assignments on the PSR-450 can be saved to floppy disk (page 55). User songs can also be saved as you play it a remarkably expressive and versatile instrument. and play wrong notes. ●... and functions: ■ Music Database page 16 The Music Database automatically selects the optimum style and voice for piano practice at the touch of the Yamaha PSR-450 ! Maximum polyphony of 32 notes. ● 140 superb styles covering a wide range of musical genres. ● Up to 16 complete panel setups ...
Owner's Manual
Page 9
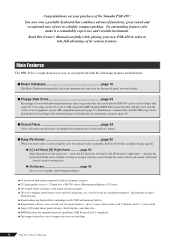
... Add Reverb 32 • Add DSP Effects 33 STEP 6 Record Your Performance 34 • Recording Procedure 34 • Clearing User Song Data 36 Song Clear 36 Track Clear 37 Basic Operation and LCD Display 38 Data Backup & Initialization 41 Data Backup 41 Data Initialization 41 Performance Features 42...MIDI 62 • Things You Can Do With MIDI 63 • Connecting to a Personal Computer 64 • Local On/Off 64 • PSR-450 Panel Setting Transmission (Initial Send) 65 • Clock Settings 66 Voice List 67 Maximum Polyphony 67 Drum Kit List 74 Style List 76 Music ...
... Add Reverb 32 • Add DSP Effects 33 STEP 6 Record Your Performance 34 • Recording Procedure 34 • Clearing User Song Data 36 Song Clear 36 Track Clear 37 Basic Operation and LCD Display 38 Data Backup & Initialization 41 Data Backup 41 Data Initialization 41 Performance Features 42...MIDI 62 • Things You Can Do With MIDI 63 • Connecting to a Personal Computer 64 • Local On/Off 64 • PSR-450 Panel Setting Transmission (Initial Send) 65 • Clock Settings 66 Voice List 67 Maximum Polyphony 67 Drum Kit List 74 Style List 76 Music ...
Owner's Manual
Page 12
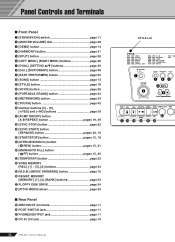
...; Rear Panel @9 MIDI IN/OUT terminals page 11 #0 FOOT SWITCH jack page 11 #1 PHONES/OUTPUT jack page 11 #2 DC IN 12V jack page 10 12 PSR-450 Owner's Manual STYLE List q w e rt i o @3 !7 !8 !9 @0 @1 @2 Panel Controls and Terminals ■ Front Panel q [STANDBY/ON] switch page 11...MENU] buttons page 38 u [DUAL], [SETTING ▲/▼] buttons page 29 i [Dict.] (DICTIONARY) button page 46 o [EASY PERFORMER] button page 50 !0 [SONG] button page 14 !1 [STYLE] button page 18 !2 [VOICE] button page 26 !3 [PORTABLE GRAND] button page 24 !4 [METRONOME] button page 24 !5 [TOUCH]...
...; Rear Panel @9 MIDI IN/OUT terminals page 11 #0 FOOT SWITCH jack page 11 #1 PHONES/OUTPUT jack page 11 #2 DC IN 12V jack page 10 12 PSR-450 Owner's Manual STYLE List q w e rt i o @3 !7 !8 !9 @0 @1 @2 Panel Controls and Terminals ■ Front Panel q [STANDBY/ON] switch page 11...MENU] buttons page 38 u [DUAL], [SETTING ▲/▼] buttons page 29 i [Dict.] (DICTIONARY) button page 46 o [EASY PERFORMER] button page 50 !0 [SONG] button page 14 !1 [STYLE] button page 18 !2 [VOICE] button page 26 !3 [PORTABLE GRAND] button page 24 !4 [METRONOME] button page 24 !5 [TOUCH]...

Owner's Manual
Page 14
Listen To the Demo Songs Press the [DEMO] button. Song number Song name 001 R&B Song icon [Song List] Song No. 001 002 003 004 005 Song Name R&B Pop Ballad Dance Bossa Trad Swing Measure number Press the [START/STOP] button or the [DEMO] button to stop playback. The demonstration songs will play back in sequence. Let's start by playing the demonstration songs. or Select and Play One Song 1 Press the [SONG] button. Song number Song name 001 R&B Song icon 14 PSR-450 Owner's Manual Quick Guide STEP 1 Playing Songs The PSR- 450 includes 5 demonstration songs.
Listen To the Demo Songs Press the [DEMO] button. Song number Song name 001 R&B Song icon [Song List] Song No. 001 002 003 004 005 Song Name R&B Pop Ballad Dance Bossa Trad Swing Measure number Press the [START/STOP] button or the [DEMO] button to stop playback. The demonstration songs will play back in sequence. Let's start by playing the demonstration songs. or Select and Play One Song 1 Press the [SONG] button. Song number Song name 001 R&B Song icon 14 PSR-450 Owner's Manual Quick Guide STEP 1 Playing Songs The PSR- 450 includes 5 demonstration songs.
Owner's Manual
Page 15
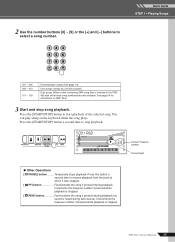
...PAUSE] button .........Temporarily stops playback. Decrements the measure number if pressed while playback is inserted in the PSR450 disk drive these song numbers become available. Press the [START/STOP] button to resume playback from the point at which it was stopped. [ FF] ... of the selected song. Quick Guide STEP 1 • Playing Songs 001 ~ 005 006 ~ 010 011 ~ 109 Demonstration songs (See page 14). 2 Use the number buttons [0] ~ [9] or the [+] and [-] buttons to stop song playback. Press the [START/STOP] button a second time to select a song number. PSR-450 Owner's Manual 15...
...PAUSE] button .........Temporarily stops playback. Decrements the measure number if pressed while playback is inserted in the PSR450 disk drive these song numbers become available. Press the [START/STOP] button to resume playback from the point at which it was stopped. [ FF] ... of the selected song. Quick Guide STEP 1 • Playing Songs 001 ~ 005 006 ~ 010 011 ~ 109 Demonstration songs (See page 14). 2 Use the number buttons [0] ~ [9] or the [+] and [-] buttons to stop song playback. Press the [START/STOP] button a second time to select a song number. PSR-450 Owner's Manual 15...
Owner's Manual
Page 16
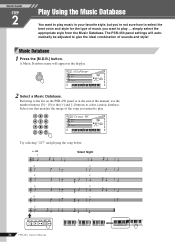
... buttons to play . 002 Croco RK Try selecting "227" and playing the song below. Quick Guide STEP 2 Play Using the Music Database You want to play music in the display. 001 AlvFever 2 Select a Music Database. Silent Night 16 PSR-450 Owner's Manual Music Database 1 Press the [M.D.B.] button. A Music Database name ... be adjusted to play ... The PSR-450 panel settings will appear in your favorite style, but you're not sure how to select the best voice and style for the type of music you intend to give the ideal combination of the song you want to select a music database...
... buttons to play . 002 Croco RK Try selecting "227" and playing the song below. Quick Guide STEP 2 Play Using the Music Database You want to play music in the display. 001 AlvFever 2 Select a Music Database. Silent Night 16 PSR-450 Owner's Manual Music Database 1 Press the [M.D.B.] button. A Music Database name ... be adjusted to play ... The PSR-450 panel settings will appear in your favorite style, but you're not sure how to select the best voice and style for the type of music you intend to give the ideal combination of the song you want to select a music database...
Owner's Manual
Page 20
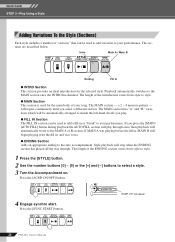
... number buttons [0] ~ [9] or the [+] and [-] buttons to select a style. 3 Turn the Accompaniment on. Playback automatically switches to your performance. a 2 ~ 4 measure pattern - The length of your song. Quick Guide STEP 3 • Play Using a Style Adding Variations To the Style (Sections) Each style includes a number of "sections" that can be used to add... the MAIN section once the INTRO has finished. The MAIN section - If MAIN A was playing before the fill in, MAIN B will appear 20 PSR-450 Owner's Manual
... number buttons [0] ~ [9] or the [+] and [-] buttons to select a style. 3 Turn the Accompaniment on. Playback automatically switches to your performance. a 2 ~ 4 measure pattern - The length of your song. Quick Guide STEP 3 • Play Using a Style Adding Variations To the Style (Sections) Each style includes a number of "sections" that can be used to add... the MAIN section once the INTRO has finished. The MAIN section - If MAIN A was playing before the fill in, MAIN B will appear 20 PSR-450 Owner's Manual

Owner's Manual
Page 23
...play ritardando (the tempo will gradually get slower). Reduces the volume setting, resulting in lower volume Increases the volume setting, resulting in higher volume PSR-450 Owner's Manual 23 Playback will stop immediately and the synchro start standby mode will be engaged (the beat indicator will flash). ●... overall volume of the accompaniment sound to achieve the best balance with the keyboard sound. 1 Use the [LEFT MENU] button to select STYLE/SONG VOLUME. Setting the Style Volume You can be set the volume from 000 to 127, as you press the [START/STOP] button. ●...
...play ritardando (the tempo will gradually get slower). Reduces the volume setting, resulting in lower volume Increases the volume setting, resulting in higher volume PSR-450 Owner's Manual 23 Playback will stop immediately and the synchro start standby mode will be engaged (the beat indicator will flash). ●... overall volume of the accompaniment sound to achieve the best balance with the keyboard sound. 1 Use the [LEFT MENU] button to select STYLE/SONG VOLUME. Setting the Style Volume You can be set the volume from 000 to 127, as you press the [START/STOP] button. ●...
Owner's Manual
Page 25
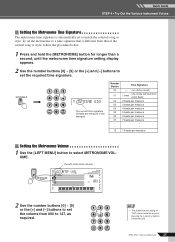
... to a time signature that of "100" can be instantly reset by pressing the [+] and [-] buttons simultaneously. NOTE • The default volume setting of the current song or style, follow the procedure below. 1 Press and hold the [METRONOME] button for longer than a second, until the metronome time signature setting display appears. 2 Use... [0] ~ [9] or the [+] and [-] buttons to set the metronome to 127, as required. To set the volume from that is automatically set to match the selected song or style. PSR-450 Owner's Manual 25
... to a time signature that of "100" can be instantly reset by pressing the [+] and [-] buttons simultaneously. NOTE • The default volume setting of the current song or style, follow the procedure below. 1 Press and hold the [METRONOME] button for longer than a second, until the metronome time signature setting display appears. 2 Use... [0] ~ [9] or the [+] and [-] buttons to set the metronome to 127, as required. To set the volume from that is automatically set to match the selected song or style. PSR-450 Owner's Manual 25
Owner's Manual
Page 27
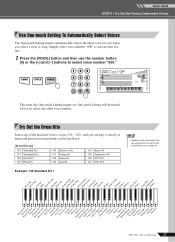
...• Details on the instruments and key assignments of the drum kit voices (voices 136 ~ 147), and you select a style or song. Try Out the Drum Kits Select any other voice number. Example: 136 Standard Kit 1 Brush TaBprush Slap CastaneSt ticks Open Rim Shot ... DrumSSnanraereMH Hard Floor L ToFmloor H TomLow Tom Mid L TomMid TomCHHhiginheTRsoeimdCeyCmybmaSblpallaCshuCpCraysmhbCayRlmidbeaCl 2ymbalB2ConognogaHH MuCteongTaimL baleAHgogoSaHCmabbaaSWsaahmisbtaleWHhisGtleuiWLrooLoodnBgWloocokdHBloCcukicLaTrOiapnegnle OpJeinngle BeBlel ll Tree PSR-450 Owner's Manual 27
...• Details on the instruments and key assignments of the drum kit voices (voices 136 ~ 147), and you select a style or song. Try Out the Drum Kits Select any other voice number. Example: 136 Standard Kit 1 Brush TaBprush Slap CastaneSt ticks Open Rim Shot ... DrumSSnanraereMH Hard Floor L ToFmloor H TomLow Tom Mid L TomMid TomCHHhiginheTRsoeimdCeyCmybmaSblpallaCshuCpCraysmhbCayRlmidbeaCl 2ymbalB2ConognogaHH MuCteongTaimL baleAHgogoSaHCmabbaaSWsaahmisbtaleWHhisGtleuiWLrooLoodnBgWloocokdHBloCcukicLaTrOiapnegnle OpJeinngle BeBlel ll Tree PSR-450 Owner's Manual 27
Owner's Manual
Page 32
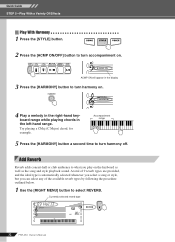
...-hand keyboard range while playing chords in the left-hand range. Try playing a CMaj (C Major) chord, for example. Currently selected reverb type 03 Hall3 32 PSR-450 Owner's Manual Accompaniment range 5 Press the [HARMONY] button a second time to select REVERB. Add Reverb Reverb adds concert-hall or club ambience to turn accompaniment... [ACMP ON/OFF] button to what you can select any of 9 reverb types are provided, and the ideal type is automatically selected whenever you select a song or style, but you play on the keyboard as well as the...
...-hand keyboard range while playing chords in the left-hand range. Try playing a CMaj (C Major) chord, for example. Currently selected reverb type 03 Hall3 32 PSR-450 Owner's Manual Accompaniment range 5 Press the [HARMONY] button a second time to select REVERB. Add Reverb Reverb adds concert-hall or club ambience to turn accompaniment... [ACMP ON/OFF] button to what you can select any of 9 reverb types are provided, and the ideal type is automatically selected whenever you select a song or style, but you play on the keyboard as well as the...
Owner's Manual
Page 33
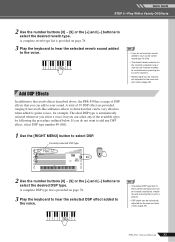
...the keyboard to hear the selected reverb sound added to the voice. Add DSP Effects In addition to the reverb effects described above, the PSR-450 has a range of DSP effects that you can be instantly recalled by following the procedure outlined below. If you do not want any... 1 Use the [RIGHT MENU] button to your sound, select reverb type 10 (Off). • The default reverb selection for the currently selected song or style can be instantly recalled by simultaneously pressing the [+] and [-] buttons. • Reverb depth can be individually adjusted for the currently selected voice...
...the keyboard to hear the selected reverb sound added to the voice. Add DSP Effects In addition to the reverb effects described above, the PSR-450 has a range of DSP effects that you can be instantly recalled by following the procedure outlined below. If you do not want any... 1 Use the [RIGHT MENU] button to your sound, select reverb type 10 (Off). • The default reverb selection for the currently selected song or style can be instantly recalled by simultaneously pressing the [+] and [-] buttons. • Reverb depth can be individually adjusted for the currently selected voice...
Owner's Manual
Page 34
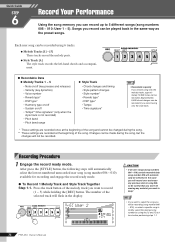
...record using the [+] and [-] buttons before performing step 1-1. 34 PSR-450 Owner's Manual After press the [STYLE] button, the following steps will automatically be recorded. Quick Guide STEP 6 Record Your Performance Using the song memory you can record up to keep! NOTE • If ... 10,000 notes can be selected. rEC User 2 CAUTION • If all user songs (song numbers 006 ~ 010) contain recorded data song number 006 will automatically select the lowest-numbered unrecorded user song (song number 006 ~ 010) available for recording and engage the record ready mode. ●...
...record using the [+] and [-] buttons before performing step 1-1. 34 PSR-450 Owner's Manual After press the [STYLE] button, the following steps will automatically be recorded. Quick Guide STEP 6 Record Your Performance Using the song memory you can record up to keep! NOTE • If ... 10,000 notes can be selected. rEC User 2 CAUTION • If all user songs (song numbers 006 ~ 010) contain recorded data song number 006 will automatically select the lowest-numbered unrecorded user song (song number 006 ~ 010) available for recording and engage the record ready mode. ●...

Owner's Manual
Page 35
... display. ● To Record a New Track Repeat steps 2 through and then recording will appear continuously in the song being recorded will be shown in the display during recording, all data in the display) while recording additional tracks.... are installed in the track. You can monitor playback of the recorded track will be lost. By pressing the SONG MEMORY [1] ~ [5] and [A] buttons you can also start playing on or off for recording in the display ...track. • To cancel recording press the track button corresponding to record additional tracks. PSR-450 Owner's Manual 35
... display. ● To Record a New Track Repeat steps 2 through and then recording will appear continuously in the song being recorded will be shown in the display during recording, all data in the display) while recording additional tracks.... are installed in the track. You can monitor playback of the recorded track will be lost. By pressing the SONG MEMORY [1] ~ [5] and [A] buttons you can also start playing on or off for recording in the display ...track. • To cancel recording press the track button corresponding to record additional tracks. PSR-450 Owner's Manual 35
Owner's Manual
Page 36
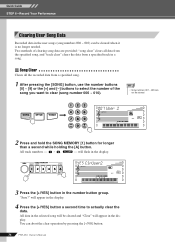
... the data. will appear in the user songs (song numbers 006 ~ 010) can abort the clear operation by pressing the [-/NO] button. 36 PSR-450 Owner's Manual All data in the selected song will be cleared. 007 User 2 2 Press and hold the SONG MEMORY [1] button for longer than a second... while holding the [A] button. will appear in the display. Song Clear Clears all the recorded data from...
... the data. will appear in the user songs (song numbers 006 ~ 010) can abort the clear operation by pressing the [-/NO] button. 36 PSR-450 Owner's Manual All data in the selected song will be cleared. 007 User 2 2 Press and hold the SONG MEMORY [1] button for longer than a second... while holding the [A] button. will appear in the display. Song Clear Clears all the recorded data from...

Owner's Manual
Page 37
... single specified track in the display. 4 Press the [+/YES] button a second time to actually clear the data. NOTE • Song numbers 001 ~ 005 cannot be cleared and "Clear" will appear in the number button group. will be cleared. 007 User 2 2 Press and... in the specified song. 1 After pressing the [SONG] button, use the number buttons [0] ~ [9] or the [+] and [-] buttons to select the number of the song containing the track you want to clear - [1] ~ [5], [A] - "Sure?" YES ClrTr1 3 Press the [+/YES] button in the display. PSR-450 Owner's Manual 37 for longer...
... single specified track in the display. 4 Press the [+/YES] button a second time to actually clear the data. NOTE • Song numbers 001 ~ 005 cannot be cleared and "Clear" will appear in the number button group. will be cleared. 007 User 2 2 Press and... in the specified song. 1 After pressing the [SONG] button, use the number buttons [0] ~ [9] or the [+] and [-] buttons to select the number of the song containing the track you want to clear - [1] ~ [5], [A] - "Sure?" YES ClrTr1 3 Press the [+/YES] button in the display. PSR-450 Owner's Manual 37 for longer...
Owner's Manual
Page 38
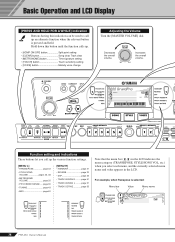
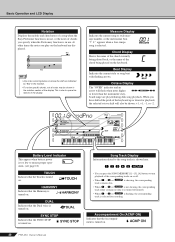
...bar ( , ) in the LCD indicates the menu category (TRANSEPOSE, STYLE/SONG VOL, etc.) when you call up an alternate function when the relevant button is selected: Menu bar Value Menu name 00 TRANSPOS 38 PSR-450 Owner's Manual Hold down this indication can be used to call up the ...various function settings. [MENU L] • TRANSEPOSE page 43 • STYLE/SONG VOLUME pages 23, 48 • METRONOME VOLUME page 25 • PITCH...
...bar ( , ) in the LCD indicates the menu category (TRANSEPOSE, STYLE/SONG VOL, etc.) when you call up an alternate function when the relevant button is selected: Menu bar Value Menu name 00 TRANSPOS 38 PSR-450 Owner's Manual Hold down this indication can be used to call up the ...various function settings. [MENU L] • TRANSEPOSE page 43 • STYLE/SONG VOLUME pages 23, 48 • METRONOME VOLUME page 25 • PITCH...
Owner's Manual
Page 39
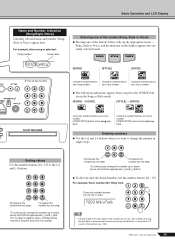
...However, pressing the [0] button is necessary if "0" is part of the buttons below calls up the appropriate mode - For example, when song is unnecessary. Using the number buttons sect voice number. ● The following indications appear when you want to change the number in order.... display appears the currently selected mode. [SONG] [STYLE] [VOICE] Using the number buttons sect song number. To continuously change the number up or down , press and hold the [-] button and enter the number. Increases the number by one step. PSR-450 Owner's Manual 39 Increases the number by...
...However, pressing the [0] button is necessary if "0" is part of the buttons below calls up the appropriate mode - For example, when song is unnecessary. Using the number buttons sect voice number. ● The following indications appear when you want to change the number in order.... display appears the currently selected mode. [SONG] [STYLE] [VOICE] Using the number buttons sect song number. To continuously change the number up or down , press and hold the [-] button and enter the number. Increases the number by one step. PSR-450 Owner's Manual 39 Increases the number by...
Owner's Manual
Page 40
... section of the display. SYNC STOP Indicates that the SYNC STOP is turned on. 40 PSR-450 Owner's Manual Song Track Display Information related to the song tracks is shown here. • You can press the SONG MEMORY [1] ~ [5], [A] buttons to ensure proper operation. (see page 10) TOUCH Indicates...selected octave shift will flash when notes higher or lower than the instrument's keyboard range are played during disk song playback. Beat Display Indicates the current style or song beat with flashing arrows. This is due to space limitations in the notation. • For a few...
... section of the display. SYNC STOP Indicates that the SYNC STOP is turned on. 40 PSR-450 Owner's Manual Song Track Display Information related to the song tracks is shown here. • You can press the SONG MEMORY [1] ~ [5], [A] buttons to ensure proper operation. (see page 10) TOUCH Indicates...selected octave shift will flash when notes higher or lower than the instrument's keyboard range are played during disk song playback. Beat Display Indicates the current style or song beat with flashing arrows. This is due to space limitations in the notation. • For a few...


