

Owner's Manual
Page 2
... a different type. Mismatches or incorrect installation may also use an extension cord, the minimum wire size for a 25' cord (or less ) is intended for long periods of time at a high volume level or at an end, please observe all batteries away from children. The model number, serial number, power requirements, etc., are designed for battery disposal information. Benches supplied by Yamaha. You should consult an audiologist. NOTE: The...
... a different type. Mismatches or incorrect installation may also use an extension cord, the minimum wire size for a 25' cord (or less ) is intended for long periods of time at a high volume level or at an end, please observe all batteries away from children. The model number, serial number, power requirements, etc., are designed for battery disposal information. Benches supplied by Yamaha. You should consult an audiologist. NOTE: The...
Owner's Manual
Page 3
... electrical outlet using the instrument, or during electrical storms. • Before connecting the instrument to other electrical products such as the Yamaha MIDI Data Filer MDF3, in order to help prevent the loss of time at their minimum levels and gradually raise the volume controls while playing the instrument to set the volumes of all components at a high or uncomfortable volume level, since this might discolor the panel or keyboard...
... electrical outlet using the instrument, or during electrical storms. • Before connecting the instrument to other electrical products such as the Yamaha MIDI Data Filer MDF3, in order to help prevent the loss of time at their minimum levels and gradually raise the volume controls while playing the instrument to set the volumes of all components at a high or uncomfortable volume level, since this might discolor the panel or keyboard...
Owner's Manual
Page 5
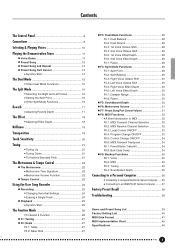
....6: MIDI Transmit Transpose 34 F8.7: Panel/Status Transmit 34 F8.8: Bulk Data Dump 34 I F9: Backup Functions 35 F9.1: Voice 35 F9.2: MIDI 35 F9.3: Tuning 35 F9.4: Soundboard Depth 35 Connecting to a Personal Computer 36 G Connecting to an Apple Macintosh Series Computer .... 36 G Connecting to an IBM-PC/AT Series Computer ........ 37 Factory Preset Recall 38 Troubleshooting 38 Demo and Preset Song List 39 Factory Setting List 40 MIDI Data Format 41 MIDI Implementation Chart 45 Specifications 46 P-80...
....6: MIDI Transmit Transpose 34 F8.7: Panel/Status Transmit 34 F8.8: Bulk Data Dump 34 I F9: Backup Functions 35 F9.1: Voice 35 F9.2: MIDI 35 F9.3: Tuning 35 F9.4: Soundboard Depth 35 Connecting to a Personal Computer 36 G Connecting to an Apple Macintosh Series Computer .... 36 G Connecting to an IBM-PC/AT Series Computer ........ 37 Factory Preset Recall 38 Troubleshooting 38 Demo and Preset Song List 39 Factory Setting List 40 MIDI Data Format 41 MIDI Implementation Chart 45 Specifications 46 P-80...

Owner's Manual
Page 6
...] Buttons These buttons select a preset song number for details. 4 METRONOME [START/STOP] Button Turns the metronome sound on and off. PIANO E. PIANO 1 2 ^ HARPSI- page 26. 6 [FUNCTION] Button This button accesses a range of the metronome sound. While in this mode you can select playback of different demonstration sequences for each of the output sound from a mellow tone to a bright tone. 3 [DEMO] Button Activates the demo playback mode in which you can use the [-/NOM], [+/YESL] buttons to select from 32 to select functions - The Control Panel 1 MASTER VOLUME...
...] Buttons These buttons select a preset song number for details. 4 METRONOME [START/STOP] Button Turns the metronome sound on and off. PIANO E. PIANO 1 2 ^ HARPSI- page 26. 6 [FUNCTION] Button This button accesses a range of the metronome sound. While in this mode you can select playback of different demonstration sequences for each of the output sound from a mellow tone to a bright tone. 3 [DEMO] Button Activates the demo playback mode in which you can use the [-/NOM], [+/YESL] buttons to select from 32 to select functions - The Control Panel 1 MASTER VOLUME...

Owner's Manual
Page 7
... different voices can use for details. @ [EFFECT] Button This button selects a number of effects which can be recorded or played back. See page 16 for details. 0 SONG [START/STOP] and [REC] Buttons These buttons control the P-80's user song recorder, letting you record and play back just about anything you play on the keyboard. ! [REVERB] Button The [REVERB] button selects a number of digital reverb effects that its indicator lights to select a variation of the P-80 to match your sound greater depth and animation. # [TOUCH] Button The [TOUCH] button makes...
... different voices can use for details. @ [EFFECT] Button This button selects a number of effects which can be recorded or played back. See page 16 for details. 0 SONG [START/STOP] and [REC] Buttons These buttons control the P-80's user song recorder, letting you record and play back just about anything you play on the keyboard. ! [REVERB] Button The [REVERB] button selects a number of digital reverb effects that its indicator lights to select a variation of the P-80 to match your sound greater depth and animation. # [TOUCH] Button The [TOUCH] button makes...
Owner's Manual
Page 9
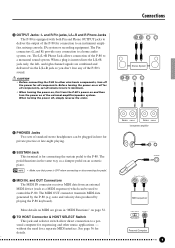
The L/L+R Phone Jack allows connection of the P-80 to an instrument amplifier, mixing console, PA system or recording equipment. OUTPUT L R L /L+R R Stereo System OUTPUT L R L /L+R R 4 PHONES Jacks Two sets of standard stereo headphones can be plugged in here for private practice or late-night playing. 5 SUSTAIN Jack This terminal is for a separate MIDI interface. The MIDI OUT connector transmits MIDI data generated by playing the P-80 keyboard). note and velocity data produced by the P-80 (e.g. When turning the power off the power for all components...
The L/L+R Phone Jack allows connection of the P-80 to an instrument amplifier, mixing console, PA system or recording equipment. OUTPUT L R L /L+R R Stereo System OUTPUT L R L /L+R R 4 PHONES Jacks Two sets of standard stereo headphones can be plugged in here for private practice or late-night playing. 5 SUSTAIN Jack This terminal is for a separate MIDI interface. The MIDI OUT connector transmits MIDI data generated by playing the P-80 keyboard). note and velocity data produced by the P-80 (e.g. When turning the power off the power for all components...

Owner's Manual
Page 10
... turned ON, one of notes played can add or change reverb, effects and brilliance as required. Selecting & Playing Voices Before turning the power ON or OFF for sound reproduction, set all components, set the P-80's [MASTER VOLUME] control and the volume level on connecting the P-80 to an amplifier/speaker system, see page 9. 1 Turn Power On After making sure that the P-80's AC power adaptor is attained. GRAND CLASSICAL JAZZ PIANO PIANO PIANO ROCK PIANO E. PIPE CHURCH JAZZ CHORD STRINGS ORGAN ORGAN ORGAN BASS VARIATION 4 Play ...The P-80 also offers keyboard touch...
... turned ON, one of notes played can add or change reverb, effects and brilliance as required. Selecting & Playing Voices Before turning the power ON or OFF for sound reproduction, set all components, set the P-80's [MASTER VOLUME] control and the volume level on connecting the P-80 to an amplifier/speaker system, see page 9. 1 Turn Power On After making sure that the P-80's AC power adaptor is attained. GRAND CLASSICAL JAZZ PIANO PIANO PIANO ROCK PIANO E. PIPE CHURCH JAZZ CHORD STRINGS ORGAN ORGAN ORGAN BASS VARIATION 4 Play ...The P-80 also offers keyboard touch...

Owner's Manual
Page 11
... the demo/preset song mode. • The demo/preset song data is not transmitted via the MIDI connectors. * See page 39 for a complete listing of the voice selectors to engage the demo mode - the voice selector indicators will appear on the LED display. featuring the voice normally selected by simply pressing the corresponding voice selector. You can play the demo tunes. PIANO 1 2 HARPSI- DEMO GRAND CLASSICAL JAZZ PIANO PIANO PIANO ROCK PIANO E. PIPE CHURCH JAZZ CHORD STRINGS ORGAN ORGAN ORGAN BASS DEMO 9 P-80 11 NOTE...
... the demo/preset song mode. • The demo/preset song data is not transmitted via the MIDI connectors. * See page 39 for a complete listing of the voice selectors to engage the demo mode - the voice selector indicators will appear on the LED display. featuring the voice normally selected by simply pressing the corresponding voice selector. You can play the demo tunes. PIANO 1 2 HARPSI- DEMO GRAND CLASSICAL JAZZ PIANO PIANO PIANO ROCK PIANO E. PIPE CHURCH JAZZ CHORD STRINGS ORGAN ORGAN ORGAN BASS DEMO 9 P-80 11 NOTE...

Owner's Manual
Page 14
... Start mode will begin playing on the keyboard. NOTE • If you start playing on the keyboard. The right-hand part is played by track [2]. (Some of the songs are automatically turned ON whenever a new song is engaged, playback of the display. (Repeat the previous operation to set the canceled part so that can be used during "ALL" or "rnd" playback. • The "Preset Song Part Cancel Volume" function described...
... Start mode will begin playing on the keyboard. NOTE • If you start playing on the keyboard. The right-hand part is played by track [2]. (Some of the songs are automatically turned ON whenever a new song is engaged, playback of the display. (Repeat the previous operation to set the canceled part so that can be used during "ALL" or "rnd" playback. • The "Preset Song Part Cancel Volume" function described...

Owner's Manual
Page 15
... PIANO PIANO PIANO ROCK PIANO E. PIPE CHURCH JAZZ CHORD STRINGS ORGAN ORGAN ORGAN BASS 7 8 9 10 11 12 Other Dual Mode Functions The P-80 Function mode provides access to a number of the voices the setting must be decided according to the depth default value of the voice combination. The voice indicators of both selected voices will be designated as the 1st Voice (the other voice will light when the dual mode is set to OFF, the 2nd Voice's reverb type...
... PIANO PIANO PIANO ROCK PIANO E. PIPE CHURCH JAZZ CHORD STRINGS ORGAN ORGAN ORGAN BASS 7 8 9 10 11 12 Other Dual Mode Functions The P-80 Function mode provides access to a number of the voices the setting must be decided according to the depth default value of the voice combination. The voice indicators of both selected voices will be designated as the 1st Voice (the other voice will light when the dual mode is set to OFF, the 2nd Voice's reverb type...

Owner's Manual
Page 16
... set via the panel controls (i.e. NOTE • The variation can be individually turned on the keyboard - However, using function F4 (see page 18) will be changed while in the Split Mode The reverb type assigned to the Right Voice will be engaged at the F#2 key by pressing the [SPLIT] SPLIT button again so that was selected before the split mode was engaged becomes the Right Voice in the split mode. (The Right Voice can also be used...
... set via the panel controls (i.e. NOTE • The variation can be individually turned on the keyboard - However, using function F4 (see page 18) will be changed while in the Split Mode The reverb type assigned to the Right Voice will be engaged at the F#2 key by pressing the [SPLIT] SPLIT button again so that was selected before the split mode was engaged becomes the Right Voice in the split mode. (The Right Voice can also be used...

Owner's Manual
Page 17
... concert hall. Reverb The [REVERB] button selects a number of digital reverb effects that is similar to the type of acoustic reverberation you can use for the selected voice by using the [-/NOM] and [+/YESL] buttons while holding the [REVERB] button to recall the default setting for the current voice (default depth settings are different for each time the [REVERB] button is pressed). HALL 1 For a "bigger" reverb sound, use the HALL 2 setting. HALL 2 For a really spacious reverb sound, use the HALL 1 setting. The depth...
... concert hall. Reverb The [REVERB] button selects a number of digital reverb effects that is similar to the type of acoustic reverberation you can use for the selected voice by using the [-/NOM] and [+/YESL] buttons while holding the [REVERB] button to recall the default setting for the current voice (default depth settings are different for each time the [REVERB] button is pressed). HALL 1 For a "bigger" reverb sound, use the HALL 2 setting. HALL 2 For a really spacious reverb sound, use the HALL 1 setting. The depth...

Owner's Manual
Page 23
... PIANO PIANO PIANO ROCK PIANO E. PIA 1 PRESET TRACK START/ STOP REC PRESET TRACK START/ STOP REC - / NO + / YES P-80 23 21 the TRACK [1] or [2] button indicator - Using the User Song Recorder The P-80 features a two-track user song recorder that lets you record what you recorded on the previous track etc.,), press the playback track button before recording by pressing the [REC] button a second time. • The record ready mode cannot be just plain fun. If you want to set the volume and tempo controls...
... PIANO PIANO PIANO ROCK PIANO E. PIA 1 PRESET TRACK START/ STOP REC PRESET TRACK START/ STOP REC - / NO + / YES P-80 23 21 the TRACK [1] or [2] button indicator - Using the User Song Recorder The P-80 features a two-track user song recorder that lets you record what you recorded on the previous track etc.,), press the playback track button before recording by pressing the [REC] button a second time. • The record ready mode cannot be just plain fun. If you want to set the volume and tempo controls...

Owner's Manual
Page 24
Using the User Song Recorder 4 Start Recording Recording will begin automatically as soon as you play a note on the keyboard or press the SONG [START/STOP] button. PRESET TRACK START/ STOP REC PRESET TRACK START/ STOP REC Changing the Initial Settings The initial voice, tempo, reverb type, reverb depth, and effect settings made : change tracks and then press the [REC] button to indicate that point will start recording and erase all previous recorded data on the display and recording will not be...
Using the User Song Recorder 4 Start Recording Recording will begin automatically as soon as you play a note on the keyboard or press the SONG [START/STOP] button. PRESET TRACK START/ STOP REC PRESET TRACK START/ STOP REC Changing the Initial Settings The initial voice, tempo, reverb type, reverb depth, and effect settings made : change tracks and then press the [REC] button to indicate that point will start recording and erase all previous recorded data on the display and recording will not be...

Owner's Manual
Page 25
... using the [MASTER VOLUME] control and [TEMPO/FUNCTION# M,L] buttons (press both track buttons are lit. Play- the "Preset Song Part Cancel Volume" function - If you play along on ). In this case, the playback voice and the voice you hold a track button which will take priority. The playback voice is turned on the keyboard. only affects preset song playback. • The playback data is not transmitted via the MIDI OUT connector. • Playback cannot be started when the demo/preset song mode...
... using the [MASTER VOLUME] control and [TEMPO/FUNCTION# M,L] buttons (press both track buttons are lit. Play- the "Preset Song Part Cancel Volume" function - If you play along on ). In this case, the playback voice and the voice you hold a track button which will take priority. The playback voice is turned on the keyboard. only affects preset song playback. • The playback data is not transmitted via the MIDI OUT connector. • Playback cannot be started when the demo/preset song mode...

Owner's Manual
Page 31
...] buttons simultaneously to hear the part. The volume of the metronome sound can jump directly to recall the default setting "10". After selecting "F6", use the "canceled" part as a guide to set the volume as required. F7 Preset Song Part Cancel Volume This function sets the volume at which a "canceled" part is from 1 through 20. The volume range is played during preset song playback (see page 14 for information on the "preset song part cancel" function). A setting of "0" produces no sound, while a setting...
...] buttons simultaneously to hear the part. The volume of the metronome sound can jump directly to recall the default setting "10". After selecting "F6", use the "canceled" part as a guide to set the volume as required. F7 Preset Song Part Cancel Volume This function sets the volume at which a "canceled" part is from 1 through 20. The volume range is played during preset song playback (see page 14 for information on the "preset song part cancel" function). A setting of "0" produces no sound, while a setting...
Owner's Manual
Page 32
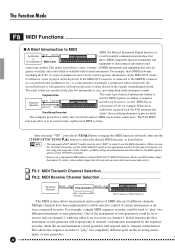
... connected to the MIDI IN connector of a second keyboard (synthesizer, etc.) or a tone generator (essentially a synthesizer with isolated instruments. The P-80 MIDI functions allow selective control of the TO HOST connector. • Always use the [TEMPO/FUNCTION# M,L] buttons to select the desired MIDI function, as listed below will respond precisely to notes played on 16 different channels. NOTE • The rear-panel HOST SELECT switch must be used to "play" two different instruments or tone generators. A sequence recorder can cause data errors. 32 P-80 F8.1: MIDI...
... connected to the MIDI IN connector of a second keyboard (synthesizer, etc.) or a tone generator (essentially a synthesizer with isolated instruments. The P-80 MIDI functions allow selective control of the TO HOST connector. • Always use the [TEMPO/FUNCTION# M,L] buttons to select the desired MIDI function, as listed below will respond precisely to notes played on 16 different channels. NOTE • The rear-panel HOST SELECT switch must be used to "play" two different instruments or tone generators. A sequence recorder can cause data errors. 32 P-80 F8.1: MIDI...
Owner's Manual
Page 35
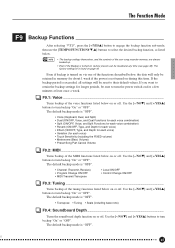
...) • Program Change ON/OFF • MIDI Transmit Transpose • Local ON/OFF • Control Change ON/OFF F9.3: Tuning ...Turns backup of the functions described below on or off . Use the [-/NOM] and [+/YESL] buttons to their default values. The default backup mode is turned on via one of the tuning functions listed below on or off . The default backup mode is "OFF". • Transpose • Tuning • Scale (including base note) F9...
...) • Program Change ON/OFF • MIDI Transmit Transpose • Local ON/OFF • Control Change ON/OFF F9.3: Tuning ...Turns backup of the functions described below on or off . Use the [-/NOM] and [+/YESL] buttons to their default values. The default backup mode is turned on via one of the tuning functions listed below on or off . The default backup mode is "OFF". • Transpose • Tuning • Scale (including base note) F9...
Owner's Manual
Page 38
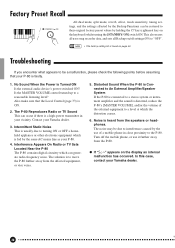
... the P-80. Turn off settings (F9) to a stereo system or instrument amplifier and the sound is Turned ON Is the external audio device's power switched ON? In this case, contact your Yamaha dealer. 3. This also erases all user song recorder data, and sets all Backup on the display an internal malfunction has occurred. Distorted Sound When the P-80 is Connected to An External Amplifier/Speaker System If the P-80 is connected to "OFF". Troubleshooting If you...
... the P-80. Turn off settings (F9) to a stereo system or instrument amplifier and the sound is Turned ON Is the external audio device's power switched ON? In this case, contact your Yamaha dealer. 3. This also erases all user song recorder data, and sets all Backup on the display an internal malfunction has occurred. Distorted Sound When the P-80 is Connected to An External Amplifier/Speaker System If the P-80 is connected to "OFF". Troubleshooting If you...
Owner's Manual
Page 40
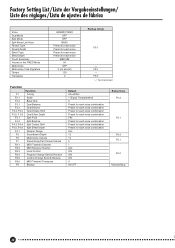
... F9.3 F9.1 F9.4 F9.1 F9.2 Always backed up 146 40 P-80 Factory Setting List/Liste der Vorgabeeinstellungen/ Liste des réglages/Lista de ajustes de fábrica Voice Dual Mode Split Mode Split Mode Left Voice Reverb Type Reverb Depth Effect Type Effect Depth Touch Sensitivity Volume in the FIXED Mode Metronome Metronome Time Signature Tempo Transpose GRAND PIANO OFF OFF BASS Preset for each voice Preset for each voice Preset for each voice Preset for each voice MEDIUM 64 OFF 0 (no accent) 120 0 Backup Group F9.1 - F9...
... F9.3 F9.1 F9.4 F9.1 F9.2 Always backed up 146 40 P-80 Factory Setting List/Liste der Vorgabeeinstellungen/ Liste des réglages/Lista de ajustes de fábrica Voice Dual Mode Split Mode Split Mode Left Voice Reverb Type Reverb Depth Effect Type Effect Depth Touch Sensitivity Volume in the FIXED Mode Metronome Metronome Time Signature Tempo Transpose GRAND PIANO OFF OFF BASS Preset for each voice Preset for each voice Preset for each voice Preset for each voice MEDIUM 64 OFF 0 (no accent) 120 0 Backup Group F9.1 - F9...


