
Owner's Manual
Page 2
SPECIAL MESSAGE SECTION This product utilizes batteries or an external power supply (adapter). If you must use "household" type batteries. This product should record the model number, serial number, and the date of purchase in the spaces provided below and retain this manual is soldered in your area. IMPORTANT: The louder the sound, the shorter the time period before requesting service. No other than one described in...
SPECIAL MESSAGE SECTION This product utilizes batteries or an external power supply (adapter). If you must use "household" type batteries. This product should record the model number, serial number, and the date of purchase in the spaces provided below and retain this manual is soldered in your area. IMPORTANT: The louder the sound, the shorter the time period before requesting service. No other than one described in...
Owner's Manual
Page 3
...: Electronic products should always be disconnected when there is not recommended! PLEASE KEEP THIS MANUAL 92-469-2 P-70 Owner's Manual 3 Main Power Supply Verification: Yamaha products are manufactured specifically for enclosed installations, should be taken that do not significantly contribute to insert the plug into the outlet, turn the plug over power or connecting cords of time at a high volume level...
...: Electronic products should always be disconnected when there is not recommended! PLEASE KEEP THIS MANUAL 92-469-2 P-70 Owner's Manual 3 Main Power Supply Verification: Yamaha products are manufactured specifically for enclosed installations, should be taken that do not significantly contribute to insert the plug into the outlet, turn the plug over power or connecting cords of time at a high volume level...
Owner's Manual
Page 4
...may generate noise. • Do not place the instrument in a safe place for future reference. Do not open • Do not open the instrument or attempt to disassemble the internal parts or modify them in damage to the instrument or overheating. • Check the electric plug ... outlet. • Use only the stand specified for the instrument. If some trouble or malfunction occurs, immediately turn off the power switch and disconnect the plug from electrical shock, short-circuiting, damages, fire or other cables. • When setting up the instrument, make sure that the AC...
...may generate noise. • Do not place the instrument in a safe place for future reference. Do not open • Do not open the instrument or attempt to disassemble the internal parts or modify them in damage to the instrument or overheating. • Check the electric plug ... outlet. • Use only the stand specified for the instrument. If some trouble or malfunction occurs, immediately turn off the power switch and disconnect the plug from electrical shock, short-circuiting, damages, fire or other cables. • When setting up the instrument, make sure that the AC...
Owner's Manual
Page 7
... • Owner's Manual This manual contains complete instructions for the P-70's various functions. Introduction (page 6): Please read this Owner's Manual This manual consists of the commercially available musical data including but not limited to use others' copyrights. Any violation of simplicity, both models P-70 and P-70S are hereafter referred to make detailed settings for operating your P-70. • Quick Operation Guide • Yamaha PA-5D Power Adaptor * • Pedal (FC5) • Music Rest * May...
... • Owner's Manual This manual contains complete instructions for the P-70's various functions. Introduction (page 6): Please read this Owner's Manual This manual consists of the commercially available musical data including but not limited to use others' copyrights. Any violation of simplicity, both models P-70 and P-70S are hereafter referred to make detailed settings for operating your P-70. • Quick Operation Guide • Yamaha PA-5D Power Adaptor * • Pedal (FC5) • Music Rest * May...
Owner's Manual
Page 8
.../Receive Channel Selection 22 Local Control ON/OFF 22 Program Change ON/OFF 23 Control Change ON/OFF 23 Troubleshooting 24 Optional Equipment 24 Index...25 Appendix Preset Song List 26 MIDI Data Format 27 MIDI Implementation Chart 31 Specifications 32 8 P-70 Owner's Manual Reverb 17 Transposition...18 Fine tuning of Contents Introduction Main Features 6 About this Owner's Manual 7 Accessories 7 Application Index 9 Panel Controls and Terminals 10 Before Using the P-70 11 Turning the Power On 11 Setting the Volume ...11 Using the Pedal ...12 Using Headphones ...12 Music Rest...
.../Receive Channel Selection 22 Local Control ON/OFF 22 Program Change ON/OFF 23 Control Change ON/OFF 23 Troubleshooting 24 Optional Equipment 24 Index...25 Appendix Preset Song List 26 MIDI Data Format 27 MIDI Implementation Chart 31 Specifications 32 8 P-70 Owner's Manual Reverb 17 Transposition...18 Fine tuning of Contents Introduction Main Features 6 About this Owner's Manual 7 Accessories 7 Application Index 9 Panel Controls and Terminals 10 Before Using the P-70 11 Turning the Power On 11 Setting the Volume ...11 Using the Pedal ...12 Using Headphones ...12 Music Rest...
Owner's Manual
Page 10
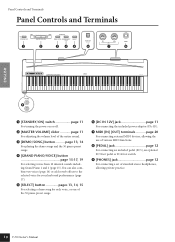
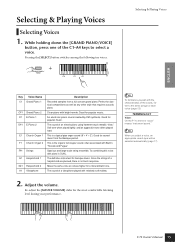
...] jack page 12 For connecting a set of the entire sound. 3 [DEMO/SONG] button .......... page 13, 14 For playing the demo songs and the 50 piano preset songs. 4 [GRAND PIANO/VOICE] button page 15-17, 19 For selecting voices from 10 internal sounds including Grand Piano 1 and 2 (page 15). Panel Controls and Terminals Panel Controls and Terminals 1 2 3 45 6 7 8 ENGLISH 9 1 [STANDBY/ON] switch page 11 For turning the power on or off. 2 [MASTER VOLUME] slider page 11 For adjusting the volume level of standard stereo headphones...
...] jack page 12 For connecting a set of the entire sound. 3 [DEMO/SONG] button .......... page 13, 14 For playing the demo songs and the 50 piano preset songs. 4 [GRAND PIANO/VOICE] button page 15-17, 19 For selecting voices from 10 internal sounds including Grand Piano 1 and 2 (page 15). Panel Controls and Terminals Panel Controls and Terminals 1 2 3 45 6 7 8 ENGLISH 9 1 [STANDBY/ON] switch page 11 For turning the power on or off. 2 [MASTER VOLUME] slider page 11 For adjusting the volume level of standard stereo headphones...
Owner's Manual
Page 11
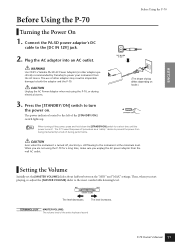
... other adaptor specifically recommended by Yamaha) to the instrument at the minimum level. CAUTION Even when the instrument is still flowing to power your instrument from being inadvertently turned off during electrical storms. (The shape of the entire keyboard sound P-70 Owner's Manual 11 Setting the Volume Initially set the [MASTER VOLUME] slider about halfway between the "MIN" and "MAX" settings. Connect the PA-5D power adaptor's DC cable to...
... other adaptor specifically recommended by Yamaha) to the instrument at the minimum level. CAUTION Even when the instrument is still flowing to power your instrument from being inadvertently turned off during electrical storms. (The shape of the entire keyboard sound P-70 Owner's Manual 11 Setting the Volume Initially set the [MASTER VOLUME] slider about halfway between the "MIN" and "MAX" settings. Connect the PA-5D power adaptor's DC cable to...
Owner's Manual
Page 12
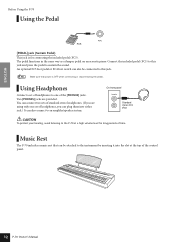
... provided. Using Headphones Connect a set of headphones to this jack. NOTE Make sure that can connect two sets of time. ENGLISH Before Using the P-70 Using the Pedal FC5 [PEDAL] jack (Sustain Pedal) This jack is OFF when connecting or disconnecting the pedal. An optional FC3 foot pedal or FC4 foot switch can also be attached to sustain the sound. You can be connected to this jack and press the pedal to the instrument by inserting it into either jack.) It can plug them...
... provided. Using Headphones Connect a set of headphones to this jack. NOTE Make sure that can connect two sets of time. ENGLISH Before Using the P-70 Using the Pedal FC5 [PEDAL] jack (Sustain Pedal) This jack is OFF when connecting or disconnecting the pedal. An optional FC3 foot pedal or FC4 foot switch can also be attached to sustain the sound. You can be connected to this jack and press the pedal to the instrument by inserting it into either jack.) It can plug them...

Owner's Manual
Page 14
... 50 piano preset songs are not transmitted via MIDI. 14 P-70 Owner's Manual To continue playing other songs, see step 1 above. TERMINOLOGY Song: On the P-70, performance data is selected during chained playback), an appropriate reverb type will be selected accordingly. You can play the keyboard along with the internal memory of the P-70 shipped from the factory. While holding down the [DEMO/SONG] button, press the D6 key to play back. NOTE You can change to change the voice playing on the keyboard. Preset: Preset Data supplied...
... 50 piano preset songs are not transmitted via MIDI. 14 P-70 Owner's Manual To continue playing other songs, see step 1 above. TERMINOLOGY Song: On the P-70, performance data is selected during chained playback), an appropriate reverb type will be selected accordingly. You can play the keyboard along with the internal memory of the P-70 shipped from the factory. While holding down the [DEMO/SONG] button, press the D6 key to play back. NOTE You can change to change the voice playing on the keyboard. Preset: Preset Data supplied...
Owner's Manual
Page 15
... level during your performance. An electronic piano sound created by FM synthesis. Soft tone when played lightly, and an aggressive tone when played hard. Since the strings of an electric piano using hammer-struck metallic "tines." NOTE When you select a voice, an appropriate reverb type will be selected automatically (page 17). P-70 Owner's Manual 15 Good for sacred music from a full concert grand piano. Good for popular music. The definitive instrument for classical...
... level during your performance. An electronic piano sound created by FM synthesis. Soft tone when played lightly, and an aggressive tone when played hard. Since the strings of an electric piano using hammer-struck metallic "tines." NOTE When you select a voice, an appropriate reverb type will be selected automatically (page 17). P-70 Owner's Manual 15 Good for sacred music from a full concert grand piano. Good for popular music. The definitive instrument for classical...
Owner's Manual
Page 16
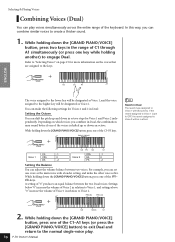
... voice assigned to Voice 2. While holding another) to engage Dual. For example, you can adjust the volume balance between the two Dual voices. F#6 keys. Settings below "0" increase the volume of Voice 2 in relation to Voice 1, and settings above "0" increase the volume of the F#5- Voice1 Voice2 NOTE Reverb in Dual The reverb type assigned to Voice 1 will take priority. Selecting & Playing Voices Combining Voices (Dual) You can set to OFF, the reverb assigned to Voice 2 will be in effect...
... voice assigned to Voice 2. While holding another) to engage Dual. For example, you can adjust the volume balance between the two Dual voices. F#6 keys. Settings below "0" increase the volume of Voice 2 in relation to Voice 1, and settings above "0" increase the volume of the F#5- Voice1 Voice2 NOTE Reverb in Dual The reverb type assigned to Voice 1 will take priority. Selecting & Playing Voices Combining Voices (Dual) You can set to OFF, the reverb assigned to Voice 2 will be in effect...
Owner's Manual
Page 17
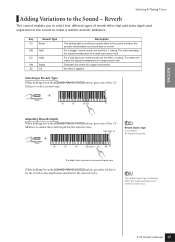
... PIANO/VOICE] button, press the A4 key to set the reverb to adjust the reverb depth for the selected voice. ENGLISH Selecting & Playing Voices Adding Variations to the acoustic reverberation you would hear in a room. For a "bigger" reverb sound, use the HALL 2 setting. Simulates the reverb of a small-size concert hall. For a truly spacious reverb sound, use the HALL 1 setting. No effect is applied. NOTE The default reverb type (including OFF) and depth settings are different for each voice. Key Reverb Type...
... PIANO/VOICE] button, press the A4 key to set the reverb to adjust the reverb depth for the selected voice. ENGLISH Selecting & Playing Voices Adding Variations to the acoustic reverberation you would hear in a room. For a "bigger" reverb sound, use the HALL 2 setting. Simulates the reverb of a small-size concert hall. For a truly spacious reverb sound, use the HALL 1 setting. No effect is applied. NOTE The default reverb type (including OFF) and depth settings are different for each voice. Key Reverb Type...
Owner's Manual
Page 18
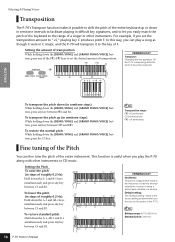
... standard pitch: Hold down the [DEMO/SONG] and [GRAND PIANO/VOICE] buttons, press one of the F#2-F#3 keys to set the transposition amount to the range of transposition. Default setting: The "Default setting" refers to the factory setting obtained when you first turn on the power to the frequency of a sound and represents the number of F. F#2 F#3 TERMINOLOGY Transpose: Changing the key signature. NOTE Setting range: 427.0-453.0 Hz Standard pitch: 440.0 Hz 18 P-70 Owner's Manual To...
... standard pitch: Hold down the [DEMO/SONG] and [GRAND PIANO/VOICE] buttons, press one of the F#2-F#3 keys to set the transposition amount to the range of transposition. Default setting: The "Default setting" refers to the factory setting obtained when you first turn on the power to the frequency of a sound and represents the number of F. F#2 F#3 TERMINOLOGY Transpose: Changing the key signature. NOTE Setting range: 427.0-453.0 Hz Standard pitch: 440.0 Hz 18 P-70 Owner's Manual To...
Owner's Manual
Page 20
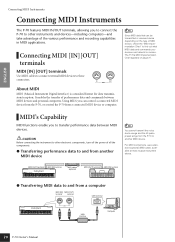
.... The P-70's MIDI Implementation Chart appears on the type of performance data and commands between MIDI devices. MIDI's Capability MIDI functions enable you to find out what MIDI data and commands your devices can transmit or receive. ENGLISH Connecting MIDI Instruments Connecting MIDI Instruments The P-70 features MIDI IN/OUT terminals, allowing you to connect the P-70 to and from a computer MIDI [IN] MIDI [OUT] terminal terminal USB terminal Instrument USB interface Computer 20 P-70 Owner's Manual NOTE Since MIDI data that can control a connected MIDI device...
.... The P-70's MIDI Implementation Chart appears on the type of performance data and commands between MIDI devices. MIDI's Capability MIDI functions enable you to find out what MIDI data and commands your devices can transmit or receive. ENGLISH Connecting MIDI Instruments Connecting MIDI Instruments The P-70 features MIDI IN/OUT terminals, allowing you to connect the P-70 to and from a computer MIDI [IN] MIDI [OUT] terminal terminal USB terminal Instrument USB interface Computer 20 P-70 Owner's Manual NOTE Since MIDI data that can control a connected MIDI device...
Owner's Manual
Page 22
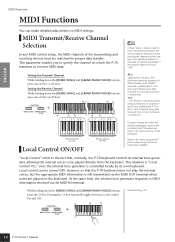
... piano preset songs cannot be matched for proper data transfer. Local control can make detailed adjustments to the specified channel. C6 C7 Default setting: ON 22 P-70 Owner's Manual MIDI Transmit/Receive Channel Selection In any MIDI control setup, the MIDI channels of the C1-E2 keys. Pressing the C6 key repeatedly toggles between Local Control On and Off. Setting the Transmit Channel While holding down the [DEMO/SONG] and [GRAND PIANO/VOICE] buttons, press the C6 key. At the same time, the internal tone generator...
... piano preset songs cannot be matched for proper data transfer. Local control can make detailed adjustments to the specified channel. C6 C7 Default setting: ON 22 P-70 Owner's Manual MIDI Transmit/Receive Channel Selection In any MIDI control setup, the MIDI channels of the C1-E2 keys. Pressing the C6 key repeatedly toggles between Local Control On and Off. Setting the Transmit Channel While holding down the [DEMO/SONG] and [GRAND PIANO/VOICE] buttons, press the C6 key. At the same time, the internal tone generator...
Owner's Manual
Page 23
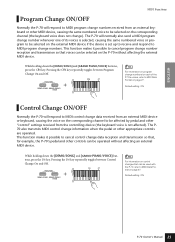
... between Program Change On and Off. Default setting: ON P-70 Owner's Manual 23 While holding down the [DEMO/SONG] and [GRAND PIANO/VOICE] buttons, press the C#6 key. Pressing the C#6 key repeatedly toggles between Control Change On and Off. The P70 also transmits MIDI control change data reception and transmission so that, for each of its voices is selected, causing the same numbered voice or program to be selected on page 27. This function makes it possible to cancel control change...
... between Program Change On and Off. Default setting: ON P-70 Owner's Manual 23 While holding down the [DEMO/SONG] and [GRAND PIANO/VOICE] buttons, press the C#6 key. Pressing the C#6 key repeatedly toggles between Control Change On and Off. The P70 also transmits MIDI control change data reception and transmission so that, for each of its voices is selected, causing the same numbered voice or program to be selected on page 27. This function makes it possible to cancel control change...
Owner's Manual
Page 24
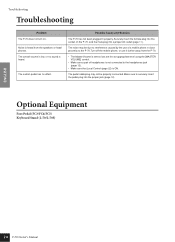
... P-70. Turn off the mobile phone, or use of headphones is not connected to the headphones jack (page 12). • Make sure that Local Control (page 22) is set it further away from the speakers or headphones. Optional Equipment Foot Pedal (FC3/FC4/FC5) Keyboard Stand (L-70/L-70S) ENGLISH 24 P-70 Owner's Manual set too low; Noise is heard from the P-70. • The Master Volume is ON. The pedal cable/plug may be properly connected. The overall volume is heard. The sustain pedal...
... P-70. Turn off the mobile phone, or use of headphones is not connected to the headphones jack (page 12). • Make sure that Local Control (page 22) is set it further away from the speakers or headphones. Optional Equipment Foot Pedal (FC3/FC4/FC5) Keyboard Stand (L-70/L-70S) ENGLISH 24 P-70 Owner's Manual set too low; Noise is heard from the P-70. • The Master Volume is ON. The pedal cable/plug may be properly connected. The overall volume is heard. The sustain pedal...
Owner's Manual
Page 25
... 11 MIDI [IN] [OUT 20 MIDI Data Format 27 MIDI Implementation Chart 31 MIDI terminals 20 Music Rest 12 O Optional Equipment 24 P Panel Controls and Terminals 10 [PEDAL] jack 12 [PHONES] jack 12 PRECAUTIONS 4, 5 Preset songs ➝ 50 Piano Preset Songs 14 R Reverb 17 S [SELECT] button 13, 14, 15 Song 14 Specifications 32 [STANDBY/ON] switch 11 Start/stop playback 14 50 Piano Preset Song 14 Demo songs 13 Sustain pedal 12 T Touch Sensitivity 19 Transposition 18 Troubleshooting 24 Tuning ➝Fine tuning of the Pitch 18 V Voice 15 P-70 Owner's Manual...
... 11 MIDI [IN] [OUT 20 MIDI Data Format 27 MIDI Implementation Chart 31 MIDI terminals 20 Music Rest 12 O Optional Equipment 24 P Panel Controls and Terminals 10 [PEDAL] jack 12 [PHONES] jack 12 PRECAUTIONS 4, 5 Preset songs ➝ 50 Piano Preset Songs 14 R Reverb 17 S [SELECT] button 13, 14, 15 Song 14 Specifications 32 [STANDBY/ON] switch 11 Start/stop playback 14 50 Piano Preset Song 14 Demo songs 13 Sustain pedal 12 T Touch Sensitivity 19 Transposition 18 Troubleshooting 24 Tuning ➝Fine tuning of the Pitch 18 V Voice 15 P-70 Owner's Manual...
Owner's Manual
Page 27
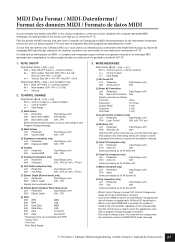
... control the P-70. MIDI Data Format / MIDI-Datenformat / Format des données MIDI / Formato de datos MIDI If you're already very familiar with MIDI, or are using a computer to control your music hardware with "All Note Off" transmission). • When a voice bank MSB/LSB is received, the number is stored in this section can help you to select the appropriate voice when a program change when the instrument receives a MONO/POLY mode...
... control the P-70. MIDI Data Format / MIDI-Datenformat / Format des données MIDI / Formato de datos MIDI If you're already very familiar with MIDI, or are using a computer to control your music hardware with "All Note Off" transmission). • When a voice bank MSB/LSB is received, the number is stored in this section can help you to select the appropriate voice when a program change when the instrument receives a MONO/POLY mode...
Owner's Manual
Page 30
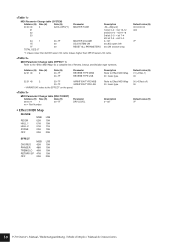
... (=Effect off) 00 Default value (H) 7F EFFECT MSB LSB CHORUS 42H 10H PHASER 48H 10H TREMOLO 46H 10H ROTARY SP 47H 10H OFF 00H 00H 30 P-70 Owner's Manual / Bedienungsanleitung / Mode d'emploi / Manual de instrucciones MIDI Parameter Change table (SYSTEM) Address (H) Size (H) Data (H) 00 00 00 4 020C-05F4(*1) 01 02 03 04 1 7E 7F TOTAL SIZE 07 00-7F 00 00 Parameter MASTER TUNE MASTER VOLUME...
... (=Effect off) 00 Default value (H) 7F EFFECT MSB LSB CHORUS 42H 10H PHASER 48H 10H TREMOLO 46H 10H ROTARY SP 47H 10H OFF 00H 00H 30 P-70 Owner's Manual / Bedienungsanleitung / Mode d'emploi / Manual de instrucciones MIDI Parameter Change table (SYSTEM) Address (H) Size (H) Data (H) 00 00 00 4 020C-05F4(*1) 01 02 03 04 1 7E 7F TOTAL SIZE 07 00-7F 00 00 Parameter MASTER TUNE MASTER VOLUME...


