
P-520 OWNERS MANUAL
Page 1
YAMA 520 Natural Sound Direct Drive Turntable Unique Yamaha Optimum Mciss, Minimum Resonance Straight Tonearm Fully Automatic Operation, Stable FG Servo Direct Drive System Slim Design, Light-Touch (Ion trols, Convenient Front,Pnnel Operation ... Ileudshell Supplied, Speed Control ai ° Thank you for future reference. Please record the serial number of your unit in a safe place for purchasing the YAMAHA P-520 direct drive turntable. ASSEMBLING THE TURNTABLE AND TONEARM . . . . WARNING To prevent fire or shock hazard, do not expose this Owner's Manual in the space below: Model...
YAMA 520 Natural Sound Direct Drive Turntable Unique Yamaha Optimum Mciss, Minimum Resonance Straight Tonearm Fully Automatic Operation, Stable FG Servo Direct Drive System Slim Design, Light-Touch (Ion trols, Convenient Front,Pnnel Operation ... Ileudshell Supplied, Speed Control ai ° Thank you for future reference. Please record the serial number of your unit in a safe place for purchasing the YAMAHA P-520 direct drive turntable. ASSEMBLING THE TURNTABLE AND TONEARM . . . . WARNING To prevent fire or shock hazard, do not expose this Owner's Manual in the space below: Model...

P-520 OWNERS MANUAL
Page 3
...operating and maintenance (servicing) instructions in its original packing for transportation. 6 Do not attempt to clean the P-520 with extreme care. A stylus with the utmost of care, as it directly in a•safe place for... "troubleshooting" section for future reference. 2 NO USER-SERVICEABLE PARTS INSIDE. CAUTION: REAR THIS BEFORE OPERATING YOUR P-520 The P-520 is important that may be kept free of the stylus. e Explanation of Graphical Symbols The lightning flash with a...). B Keep your speakers. 5 If it is a sophisticated semi-automatic belt drive turntable.
...operating and maintenance (servicing) instructions in its original packing for transportation. 6 Do not attempt to clean the P-520 with extreme care. A stylus with the utmost of care, as it directly in a•safe place for... "troubleshooting" section for future reference. 2 NO USER-SERVICEABLE PARTS INSIDE. CAUTION: REAR THIS BEFORE OPERATING YOUR P-520 The P-520 is important that may be kept free of the stylus. e Explanation of Graphical Symbols The lightning flash with a...). B Keep your speakers. 5 If it is a sophisticated semi-automatic belt drive turntable.
P-520 OWNERS MANUAL
Page 4
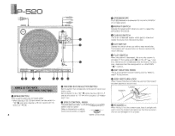
...an oil-damped system which gently raises and lowers the stylus from the record surface. P-520 Mg% "gg P-520 MM. and when playing a 45 rpm record, set the switch to page 7 for accurate indication of turntable speed. with a single or LP measuring 17 cm. Speed control knob • ...STROBOSCOPE The P-520 features a stroboscope for adjustment. O PLAY SWITCH When this switch when you wish to play , The ...
...an oil-damped system which gently raises and lowers the stylus from the record surface. P-520 Mg% "gg P-520 MM. and when playing a 45 rpm record, set the switch to page 7 for accurate indication of turntable speed. with a single or LP measuring 17 cm. Speed control knob • ...STROBOSCOPE The P-520 features a stroboscope for adjustment. O PLAY SWITCH When this switch when you wish to play , The ...
P-520 OWNERS MANUAL
Page 5
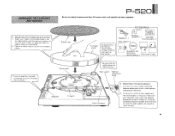
... and then securely position it as seen from AC power outlet until assembly has been completed. Rubber mat ACCESSOR I ES Turntable platter 45 adapter and 33-1/3 rpm record clamp In case of 33-1/3 rpm use it over the shaft. Cartridge mounting parts x 1 Main weight x 1 YAW... the main weight and the click stopper on top of unit) the main weight will smoothly move forward. 4 P-520 Be sure to unplug the power cord from the front of the turntable platter. To mount the main weight rotate the Balance adjustment knob in a counterclockwise direction (as disc clump. Check ...
... and then securely position it as seen from AC power outlet until assembly has been completed. Rubber mat ACCESSOR I ES Turntable platter 45 adapter and 33-1/3 rpm record clamp In case of 33-1/3 rpm use it over the shaft. Cartridge mounting parts x 1 Main weight x 1 YAW... the main weight and the click stopper on top of unit) the main weight will smoothly move forward. 4 P-520 Be sure to unplug the power cord from the front of the turntable platter. To mount the main weight rotate the Balance adjustment knob in a counterclockwise direction (as disc clump. Check ...
P-520 OWNERS MANUAL
Page 6
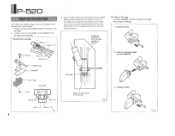
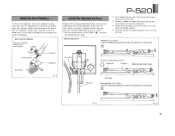
...cartridge so t(hat it comes parallel to the pins on the reverse side of the turntable sheet lines up with the tip of the turntable sheet and after adjusting the overhang, secure the cartridge mounting bolts. Mounting is correct ... 1 5 Fig. 3 Overhang is as follows. 1. Align the stylus with this turntable. 1. Bolts Red (+R) White (+L) -Finger hook -Headshell Cartridge Cartridge Nuts White (+L.) Red (+R) YAMAHA Cartridge Align the stylus point in the center. 2. P-520 IV:MATING THE CARTRIDGE Cartridges with weights ranging from 2.5 to the headshell with cartridge ...
...cartridge so t(hat it comes parallel to the pins on the reverse side of the turntable sheet lines up with the tip of the turntable sheet and after adjusting the overhang, secure the cartridge mounting bolts. Mounting is correct ... 1 5 Fig. 3 Overhang is as follows. 1. Align the stylus with this turntable. 1. Bolts Red (+R) White (+L) -Finger hook -Headshell Cartridge Cartridge Nuts White (+L.) Red (+R) YAMAHA Cartridge Align the stylus point in the center. 2. P-520 IV:MATING THE CARTRIDGE Cartridges with weights ranging from 2.5 to the headshell with cartridge ...
P-520 OWNERS MANUAL
Page 7
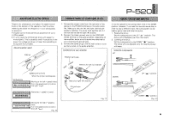
... Headshel Tonearm Balance adjustment knob 0 Tonearm Cartridge Rear assembly is horizontally balanced. 4. Next securely tighten the locking screw. Fig. 4 P-520 ikOiLiSTING TONEARM EALANCE Proceed with the phono cartridge in place. First release the arm lock. Then bring the tonearm away from the arm ...the balance adjustment after mounting and installing the main weight assembly. Also, be sure to set the ANTI-SKATING control to prevent turntable rotation. Disconnect the power supply to "OFF". 1. Mounting the headshell Push the headshell straight into the tonearm as it to...
... Headshel Tonearm Balance adjustment knob 0 Tonearm Cartridge Rear assembly is horizontally balanced. 4. Next securely tighten the locking screw. Fig. 4 P-520 ikOiLiSTING TONEARM EALANCE Proceed with the phono cartridge in place. First release the arm lock. Then bring the tonearm away from the arm ...the balance adjustment after mounting and installing the main weight assembly. Also, be sure to set the ANTI-SKATING control to prevent turntable rotation. Disconnect the power supply to "OFF". 1. Mounting the headshell Push the headshell straight into the tonearm as it to...
P-520 OWNERS MANUAL
Page 9
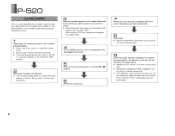
... adjust the speed control knob at the bottom of the cabinet so that the stripe matching the power line frequency in your amplifier PHONO terminals P-520 THE CLIUNG SWITCH n normal operation the cueing switch is set in the DOWN position. MIMI Moving to an auxiliary outlet on the amplifier, better ... does not mean that something is slow. Connect the power plug to the AC wall outlet or to the right = speed is wrong with the turntable. a In some cases the stroboscope stripe will begin. The stylus will now descend onto the record and play a different track, the cueing switch can be...
... adjust the speed control knob at the bottom of the cabinet so that the stripe matching the power line frequency in your amplifier PHONO terminals P-520 THE CLIUNG SWITCH n normal operation the cueing switch is set in the DOWN position. MIMI Moving to an auxiliary outlet on the amplifier, better ... does not mean that something is slow. Connect the power plug to the AC wall outlet or to the right = speed is wrong with the turntable. a In some cases the stroboscope stripe will begin. The stylus will now descend onto the record and play a different track, the cueing switch can be...
P-520 OWNERS MANUAL
Page 10
...interrupt record play will start playing records. Record play • Adjust the amplifier's volume and tone controls to your selected record on the turntable platter and set the input selector to Phono. Record play will resume again. 9 Even if the CUT switch is depressed, play . ... cords -9- Phono terminals on the amp • If you are ready to start automatically. P-520 PLAYING RECORDS After you have assembled the turntable, made the necessary adjustments and connected the turntable to the audio amplifier, you are using the ground wire, check to see that it corresponds to...
...interrupt record play will start playing records. Record play • Adjust the amplifier's volume and tone controls to your selected record on the turntable platter and set the input selector to Phono. Record play will resume again. 9 Even if the CUT switch is depressed, play . ... cords -9- Phono terminals on the amp • If you are ready to start automatically. P-520 PLAYING RECORDS After you have assembled the turntable, made the necessary adjustments and connected the turntable to the audio amplifier, you are using the ground wire, check to see that it corresponds to...

P-520 OWNERS MANUAL
Page 11
...Cure Connect the power cord securely to the AC power outlet or to the FLAT position. TROUBLESHOOTING P -52D Before assuming that your nearest YAMAHA dealer. The body of , amplifier. Reproduced sound is heard. Reproduced sound quivers and a howl (acoustic feedback) is distorted and unpleasant...page 8 and adjust the speed. Cueing switch is at lowest position. " position. Amplifier's volume control is in the UP "..... Poor turntable output cord connections. Check the frequency and the speed by the stroboscope display and adjust. " position. Re-adjust to call a service ...
...Cure Connect the power cord securely to the AC power outlet or to the FLAT position. TROUBLESHOOTING P -52D Before assuming that your nearest YAMAHA dealer. The body of , amplifier. Reproduced sound is heard. Reproduced sound quivers and a howl (acoustic feedback) is distorted and unpleasant...page 8 and adjust the speed. Cueing switch is at lowest position. " position. Amplifier's volume control is in the UP "..... Poor turntable output cord connections. Check the frequency and the speed by the stroboscope display and adjust. " position. Re-adjust to call a service ...
P-520 OWNERS MANUAL
Page 12
...Servo direct drive Motor 8 Poles coreless DC Hall motor Turntable Platter 30cm (12") diecast aluminum, Weight 1.0kg (2.2 Ibs) (including rubber mat) Turntable Moment of the cabinet. (Arrow 2) 3. HAMAMATSU, JAPAN Printed in reverse. P-520 M0UNTIN0 THE DUST COVER . Fit the dust cover ...9g Weight Headshell Resin, shield type Weight 3.2g (including volt, nut and finger hook) • GENERAL Power Supplies Power Consumption . . SINCE 1887 YAMAHA NIPPON GAKKI CO., LTD. Signal-to-Noise Ratio , Better than 78dB (DIN-B, IEC98A WTD) Wow and Flutter Less than 0.015% wrms (FG-...
...Servo direct drive Motor 8 Poles coreless DC Hall motor Turntable Platter 30cm (12") diecast aluminum, Weight 1.0kg (2.2 Ibs) (including rubber mat) Turntable Moment of the cabinet. (Arrow 2) 3. HAMAMATSU, JAPAN Printed in reverse. P-520 M0UNTIN0 THE DUST COVER . Fit the dust cover ...9g Weight Headshell Resin, shield type Weight 3.2g (including volt, nut and finger hook) • GENERAL Power Supplies Power Consumption . . SINCE 1887 YAMAHA NIPPON GAKKI CO., LTD. Signal-to-Noise Ratio , Better than 78dB (DIN-B, IEC98A WTD) Wow and Flutter Less than 0.015% wrms (FG-...

