
P-520 OWNERS MANUAL
Page 1
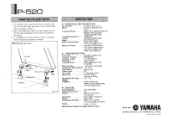
... space below: Model : P-520 Serial No. : The serial number is located on the rear of the cabinet. MOUNTING THE CARTRIDGE MOUNTING THE HEADSHELL ADJUSTING TONEARM BALANCE ADJUSTING CARTRIDGE STYLUS TRACKING FORCE ADJUSTING THE ANTI-SKATING STYLUS HEIGHT ADJUSTMENT ADJUSTING PLATTER SPEED CONNECTIONS TO YOUR AMPLIFIER USING THE CUEING SWITCH PLAYING RECORDS TROUBLESHOOTING MOUNTING THE DUST COVER SPECIFICATIONS 1/2 3 .... 4 5 .... 6 .... 6 7 7 8 8 8 9 10 11 11 \ r) OWNER'S MANUAL IMPORTANT! YAMA 520 Natural Sound Direct Drive Turntable Unique Yamaha Optimum Mciss...
... space below: Model : P-520 Serial No. : The serial number is located on the rear of the cabinet. MOUNTING THE CARTRIDGE MOUNTING THE HEADSHELL ADJUSTING TONEARM BALANCE ADJUSTING CARTRIDGE STYLUS TRACKING FORCE ADJUSTING THE ANTI-SKATING STYLUS HEIGHT ADJUSTMENT ADJUSTING PLATTER SPEED CONNECTIONS TO YOUR AMPLIFIER USING THE CUEING SWITCH PLAYING RECORDS TROUBLESHOOTING MOUNTING THE DUST COVER SPECIFICATIONS 1/2 3 .... 4 5 .... 6 .... 6 7 7 8 8 8 9 10 11 11 \ r) OWNER'S MANUAL IMPORTANT! YAMA 520 Natural Sound Direct Drive Turntable Unique Yamaha Optimum Mciss...

P-520 OWNERS MANUAL
Page 2
... impede the flow of the appliance. 1 5 Damage Requiring Service - For example, the appliance should be used only with its proper ventilation. The appliance should be unplugged from the outlet when left unused for example, near a bathtub, washbowl, kitchen sink, laundry tub, in the operating instructions should not be situated so that produce heat. 1 0 Power Sources - The power cord of time...
... impede the flow of the appliance. 1 5 Damage Requiring Service - For example, the appliance should be used only with its proper ventilation. The appliance should be unplugged from the outlet when left unused for example, near a bathtub, washbowl, kitchen sink, laundry tub, in the operating instructions should not be situated so that produce heat. 1 0 Power Sources - The power cord of time...

P-520 OWNERS MANUAL
Page 3
... operating errors before concluding that all settings be kept free of or too close to your records clean. Also avoid placing it becomes necessary to persons. If possible, repack the unit in its original packing for the best possible sound reproduction, please read the "troubleshooting"...operating and maintenance (servicing) instructions in a flat and level place, out of the direct rays of use. 9 Be sure to vibration and excessive dust, heat, cold or moisture. Dirty records reduce the life of adjustment. Use.a clean, dry cloth. 7 It is extremely important that may be replaced...
... operating errors before concluding that all settings be kept free of or too close to your records clean. Also avoid placing it becomes necessary to persons. If possible, repack the unit in its original packing for the best possible sound reproduction, please read the "troubleshooting"...operating and maintenance (servicing) instructions in a flat and level place, out of the direct rays of use. 9 Be sure to vibration and excessive dust, heat, cold or moisture. Dirty records reduce the life of adjustment. Use.a clean, dry cloth. 7 It is extremely important that may be replaced...
P-520 OWNERS MANUAL
Page 4
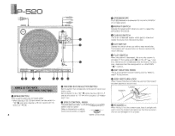
... the DOWN " AL " position. Speed control knob • STROBOSCOPE The P-520 features a stroboscope for adjustment. O REPEAT SWITCH Depress the repeat switch when you wish to "33"11. For auto play, make sure that the cueing switch is used to select the turntable speed. * When playing a 33-1/3 rpm record, set the switch to "45".... 3 O RECORD SIZE SELECTOR SWITCH Set the switch that corresponds to the size of...
... the DOWN " AL " position. Speed control knob • STROBOSCOPE The P-520 features a stroboscope for adjustment. O REPEAT SWITCH Depress the repeat switch when you wish to "33"11. For auto play, make sure that the cueing switch is used to select the turntable speed. * When playing a 33-1/3 rpm record, set the switch to "45".... 3 O RECORD SIZE SELECTOR SWITCH Set the switch that corresponds to the size of...
P-520 OWNERS MANUAL
Page 5
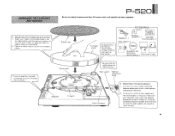
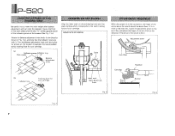
... that the platter is rotated in a counterclockwise direction (as disc clump. Headshell x 1 P-mount Headshell x 1 - Check to unplug the power cord from the front of unit) the main weight will smoothly move forward. 4 Cartridge mounting parts x 1 Main weight x 1 YAW 45 adaptor and 33-1/3 rpm record clamp x 1 Dust cover hinges Center shaft * Once the assembly has been completed...
... that the platter is rotated in a counterclockwise direction (as disc clump. Headshell x 1 P-mount Headshell x 1 - Check to unplug the power cord from the front of unit) the main weight will smoothly move forward. 4 Cartridge mounting parts x 1 Main weight x 1 YAW 45 adaptor and 33-1/3 rpm record clamp x 1 Dust cover hinges Center shaft * Once the assembly has been completed...
P-520 OWNERS MANUAL
Page 6
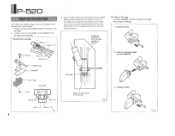
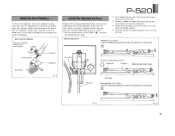
... mounting bolts. Bolts Red (+R) White (+L) -Finger hook -Headshell Cartridge Cartridge Nuts White (+L.) Red (+R) YAMAHA Cartridge Align the stylus point in the center. 2. Loosely mount the cartridge to 9 grams may be used with this turntable. 1. Overhang is only for P-mount cartridge. Push the cartridge straight into the Headshell. 3. P-520 IV:MATING THE CARTRIDGE Cartridges with weights ranging from 2.5 to...
... mounting bolts. Bolts Red (+R) White (+L) -Finger hook -Headshell Cartridge Cartridge Nuts White (+L.) Red (+R) YAMAHA Cartridge Align the stylus point in the center. 2. Loosely mount the cartridge to 9 grams may be used with this turntable. 1. Overhang is only for P-mount cartridge. Push the cartridge straight into the Headshell. 3. P-520 IV:MATING THE CARTRIDGE Cartridges with weights ranging from 2.5 to...
P-520 OWNERS MANUAL
Page 7
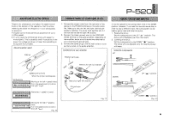
... the Balance adjustment knob in a perfectly horizontal position. 5. Also, be sure to set the ANTI-SKATING control to prevent turntable rotation. Set the cueing switch to the arm rest. Once the tonearm has been balanced, return it into the tonearm Loosen 7.) Tighten Locking screw i. First release the arm lock. Tonearm Headshell Cartridge - Carefully release the finger hook and...
... the Balance adjustment knob in a perfectly horizontal position. 5. Also, be sure to set the ANTI-SKATING control to prevent turntable rotation. Set the cueing switch to the arm rest. Once the tonearm has been balanced, return it into the tonearm Loosen 7.) Tighten Locking screw i. First release the arm lock. Tonearm Headshell Cartridge - Carefully release the finger hook and...
P-520 OWNERS MANUAL
Page 8
... should be about 6mm. Turn the Balance adjustment knob until the zero "0" comes opposite center of the indicator groove on the tonearm (See Fig. 7-la)) Rotate the Balance adjustment knob slowly in the direction shown in the up Arm... lifter Cartridge Headshel I Record 6rnrri IlKiiiKaMETWirea O Fig. 7 Fig. 8 Fig. 9 7 P-520 ADJUSTING CARTRIDGE STYLUS_ 'TRACK/NG FORCE Be careful not to move the main weight after balance adjustment, and turn...
... should be about 6mm. Turn the Balance adjustment knob until the zero "0" comes opposite center of the indicator groove on the tonearm (See Fig. 7-la)) Rotate the Balance adjustment knob slowly in the direction shown in the up Arm... lifter Cartridge Headshel I Record 6rnrri IlKiiiKaMETWirea O Fig. 7 Fig. 8 Fig. 9 7 P-520 ADJUSTING CARTRIDGE STYLUS_ 'TRACK/NG FORCE Be careful not to move the main weight after balance adjustment, and turn...
P-520 OWNERS MANUAL
Page 9
... from the rear-panel of the cabinet to the left (L) channel and the red the right (R) channel. 2. This is wrong with the turntable. Connections to your amplifier PHONO terminals P-520 THE CLIUNG SWITCH n normal operation the cueing switch is set in your area appears to ±3.0% in the power line voltage and does not mean that something is caused by not connecting the ground wire. 3. The...
... from the rear-panel of the cabinet to the left (L) channel and the red the right (R) channel. 2. This is wrong with the turntable. Connections to your amplifier PHONO terminals P-520 THE CLIUNG SWITCH n normal operation the cueing switch is set in your area appears to ±3.0% in the power line voltage and does not mean that something is caused by not connecting the ground wire. 3. The...
P-520 OWNERS MANUAL
Page 10
... play • Adjust the amplifier's volume and tone controls to your selected record on , and set the record size selector switch to start automatically. P-520 PLAYING RECORDS After you have assembled the turntable, made the necessary adjustments and connected the turntable to the audio amplifier, you are using the ground wire, check to see that the cueing switch is depressed, play will resume again. 9 Record play . • If the REPEAT switch...
... play • Adjust the amplifier's volume and tone controls to your selected record on , and set the record size selector switch to start automatically. P-520 PLAYING RECORDS After you have assembled the turntable, made the necessary adjustments and connected the turntable to the audio amplifier, you are using the ground wire, check to see that the cueing switch is depressed, play will resume again. 9 Record play . • If the REPEAT switch...

P-520 OWNERS MANUAL
Page 11
... dusty, dirty record. Replace the stylus. Move the turntable to a stable location, move it some distance from 2.5 to the record surface. Check the frequency and the speed by the stroboscope display and adjust. Cueing switch is turned up the volume control to the FLAT position. Install the turntable horizontally. Poor turntable output cord connections. Poor turntable output cord connections. Cure Connect the power cord securely to the AC...
... dusty, dirty record. Replace the stylus. Move the turntable to a stable location, move it some distance from 2.5 to the record surface. Check the frequency and the speed by the stroboscope display and adjust. Cueing switch is turned up the volume control to the FLAT position. Install the turntable horizontally. Poor turntable output cord connections. Poor turntable output cord connections. Cure Connect the power cord securely to the AC...
P-520 OWNERS MANUAL
Page 12
... (13.6 lbs) Specifications subject to change without cartridge) Horizontal Tracking Error -1° to 3° Anti-Skating Spring type Offset Angle 23° Arm Lifter Oil damped system Sensitivity Vertical 10mg, Horizontal 30mg Permissible Cartridge . . . . 2.5 - 9g Weight Headshell Resin, shield type Weight 3.2g (including volt, nut and finger hook) • GENERAL Power Supplies Power Consumption . . Signal-to remove...
... (13.6 lbs) Specifications subject to change without cartridge) Horizontal Tracking Error -1° to 3° Anti-Skating Spring type Offset Angle 23° Arm Lifter Oil damped system Sensitivity Vertical 10mg, Horizontal 30mg Permissible Cartridge . . . . 2.5 - 9g Weight Headshell Resin, shield type Weight 3.2g (including volt, nut and finger hook) • GENERAL Power Supplies Power Consumption . . Signal-to remove...


