Owner's Manual
Page 2
.... 12 Use only with the cart, stand, tripod, bracket, or table specified by the manufacturer, or sold with the apparatus. Install in a safe place for your outlet, consult an electrician for replacement of the obsolete outlet. 10 Protect the power cord from being walked on the rear of this apparatus near any heat sources such as power-supply cord or plug is...
.... 12 Use only with the cart, stand, tripod, bracket, or table specified by the manufacturer, or sold with the apparatus. Install in a safe place for your outlet, consult an electrician for replacement of the obsolete outlet. 10 Protect the power cord from being walked on the rear of this apparatus near any heat sources such as power-supply cord or plug is...
Owner's Manual
Page 3
... breaker or fuse) circuits or install AC line filter/ s. Information for Class "B" digital devices. Follow all installations. If these items, please contact your national legislation and the Directives 2002/96/ EC. Utilize power outlets that used electrical and electronic products should not be determined by turning the unit "OFF" and "ON", please try to coaxial type cable. For more information about collection and...
... breaker or fuse) circuits or install AC line filter/ s. Information for Class "B" digital devices. Follow all installations. If these items, please contact your national legislation and the Directives 2002/96/ EC. Utilize power outlets that used electrical and electronic products should not be determined by turning the unit "OFF" and "ON", please try to coaxial type cable. For more information about collection and...
Owner's Manual
Page 4
... speakers. When moving the unit, first disconnect the power plug and the wires connected to rain or water. • Never open the cabinet. If the object falls or drops as it may cause fire, damage to rain or moisture. • Do not use force on switches, controls or connection wires. YAMAHA shall not be liable for any accident caused by improper placement or installation...
... speakers. When moving the unit, first disconnect the power plug and the wires connected to rain or water. • Never open the cabinet. If the object falls or drops as it may cause fire, damage to rain or moisture. • Do not use force on switches, controls or connection wires. YAMAHA shall not be liable for any accident caused by improper placement or installation...
Owner's Manual
Page 5
.... MODEL CONNECTIONS 6 1 Connecting to line output (pin jack) terminals of the amplifier 6 2 Connecting to speaker output terminals of the amplifier 8 Connecting to the INPUT1/OUTPUT terminals of the subwoofer 10 Plug in the subwoofer to the AC outlet 10 AUTOMATIC POWER-SWITCHING FUNCTION ...11 Changing the AUTO STANDBY setting 11 ADJUSTING THE SUBWOOFER BEFORE USE ......12 Frequency characteristics 13 ADVANCED YAMAHA ACTIVE SERVO TECHNOLOGY II 14 IMPORTANT: THE WIRES IN MAINS LEAD ARE COLOURED IN ACCORDANCE WITH THE FOLLOWING CODE: Blue...
.... MODEL CONNECTIONS 6 1 Connecting to line output (pin jack) terminals of the amplifier 6 2 Connecting to speaker output terminals of the amplifier 8 Connecting to the INPUT1/OUTPUT terminals of the subwoofer 10 Plug in the subwoofer to the AC outlet 10 AUTOMATIC POWER-SWITCHING FUNCTION ...11 Changing the AUTO STANDBY setting 11 ADJUSTING THE SUBWOOFER BEFORE USE ......12 Frequency characteristics 13 ADVANCED YAMAHA ACTIVE SERVO TECHNOLOGY II 14 IMPORTANT: THE WIRES IN MAINS LEAD ARE COLOURED IN ACCORDANCE WITH THE FOLLOWING CODE: Blue...
Owner's Manual
Page 6
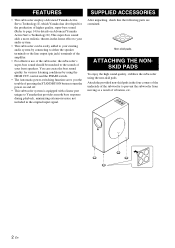
... subwoofer using the HIGH CUT control and the PHASE switch. • The Automatic power-switching function saves you the trouble of your front speakers. FEATURES • This subwoofer employs Advanced Yamaha Active Servo Technology II, which Yamaha has developed for the production of higher quality, super-bass sound. (Refer to page 14 for various listening conditions by connecting to either the speaker terminals or the line output (pin jack...
... subwoofer using the HIGH CUT control and the PHASE switch. • The Automatic power-switching function saves you the trouble of your front speakers. FEATURES • This subwoofer employs Advanced Yamaha Active Servo Technology II, which Yamaha has developed for the production of higher quality, super-bass sound. (Refer to page 14 for various listening conditions by connecting to either the speaker terminals or the line output (pin jack...

Owner's Manual
Page 7
... either the right or the left front speaker. (See fig. This is placed directly facing the wall, the bass effect may suffer due to the wall. C ( : subwoofer, : front speaker) English 3 En C is also possible, however, if the subwoofer is because "standing waves" have a good effect on your audio A system, however, the use of two subwoofers is recommended to break up the parallel...
... either the right or the left front speaker. (See fig. This is placed directly facing the wall, the bass effect may suffer due to the wall. C ( : subwoofer, : front speaker) English 3 En C is also possible, however, if the subwoofer is because "standing waves" have a good effect on your audio A system, however, the use of two subwoofers is recommended to break up the parallel...
Owner's Manual
Page 8
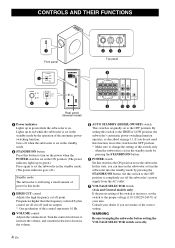
... subwoofer into the standby mode by this control are unsure of power in the standby mode by the operation of this control represents 10 Hz. Set this mode. HIGH CUT control Adjusts the high frequency cut off point. By setting this switch in the standby mode. (The power indicator goes off when the subwoofer is set in this switch to the OFF position to the OFF position. Turn the control clockwise to increase the volume...
... subwoofer into the standby mode by this control are unsure of power in the standby mode by the operation of this control represents 10 Hz. Set this mode. HIGH CUT control Adjusts the high frequency cut off point. By setting this switch in the standby mode. (The power indicator goes off when the subwoofer is set in this switch to the OFF position to the OFF position. Turn the control clockwise to increase the volume...
Owner's Manual
Page 9
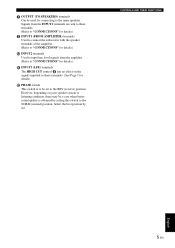
... input line level signals from the amplifier. (Refer to "CONNECTIONS" for details.) INPUT3 (LFE) terminals The HIGH CUT control has no effect on your speaker system or listening condition, there may be a case when better sound quality is to be set to the main speakers. OUTPUT (TO SPEAKERS) terminals Can be used for connecting to the REV (reverse) position. Select the best position by setting this switch...
... input line level signals from the amplifier. (Refer to "CONNECTIONS" for details.) INPUT3 (LFE) terminals The HIGH CUT control has no effect on your speaker system or listening condition, there may be a case when better sound quality is to be set to the main speakers. OUTPUT (TO SPEAKERS) terminals Can be used for connecting to the REV (reverse) position. Select the best position by setting this switch...
Owner's Manual
Page 10
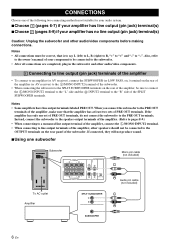
... outlet Amplifier Audio pin cable (not included) 6 En If connected, they will not produce sound. ■Using one set of the subwoofer. Instead, connect the subwoofer to the speaker output terminals of the amplifier. (Refer to pages 8-9.) • When connecting to a monaural line output terminal of the amplifier, connect the L /MONO INPUT2 terminal. • When connecting to line output terminals of the amplifier, other audio/video components before making connections. Also, refer to the owner's manual of...
... outlet Amplifier Audio pin cable (not included) 6 En If connected, they will not produce sound. ■Using one set of the subwoofer. Instead, connect the subwoofer to the speaker output terminals of the amplifier. (Refer to pages 8-9.) • When connecting to a monaural line output terminal of the amplifier, connect the L /MONO INPUT2 terminal. • When connecting to line output terminals of the amplifier, other audio/video components before making connections. Also, refer to the owner's manual of...

Owner's Manual
Page 11
English 7 En ■Using two subwoofers CONNECTIONS Mono pin cable (not included) Subwoofer Subwoofer Mono pin cable (not included) Amplifier To AC outlet To AC outlet ■Connecting to the LFE (INPUT3) terminal(s) If your amplifier can cut off high frequencies from the signals for sending to the subwoofer, connect the amplifier to the subwoofer's LFE (INPUT3) terminal(s).This will bring you higher sound quality because the signal routing in the subwoofer is shortened by passing the built-in HIGH CUT circuit.
English 7 En ■Using two subwoofers CONNECTIONS Mono pin cable (not included) Subwoofer Subwoofer Mono pin cable (not included) Amplifier To AC outlet To AC outlet ■Connecting to the LFE (INPUT3) terminal(s) If your amplifier can cut off high frequencies from the signals for sending to the subwoofer, connect the amplifier to the subwoofer's LFE (INPUT3) terminal(s).This will bring you higher sound quality because the signal routing in the subwoofer is shortened by passing the built-in HIGH CUT circuit.
Owner's Manual
Page 12
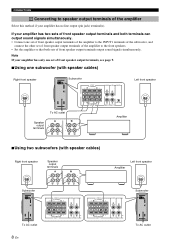
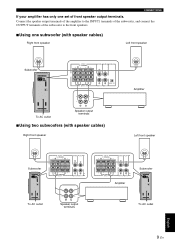
... line output (pin jack) terminal(s). Note If your amplifier has only one set of front speaker output terminals, see page 9. ■Using one set of front speaker output terminals of the amplifier to the INPUT1 terminals of the subwoofer, and connect the other set of front speaker output terminals of the amplifier to speaker output terminals of the amplifier Select this method if your amplifier has two sets of front speaker output terminals output sound signals simultaneously. CONNECTIONS 2 Connecting...
... line output (pin jack) terminal(s). Note If your amplifier has only one set of front speaker output terminals, see page 9. ■Using one set of front speaker output terminals of the amplifier to the INPUT1 terminals of the subwoofer, and connect the other set of front speaker output terminals of the amplifier to speaker output terminals of the amplifier Select this method if your amplifier has two sets of front speaker output terminals output sound signals simultaneously. CONNECTIONS 2 Connecting...
Owner's Manual
Page 13
... amplifier has only one subwoofer (with speaker cables) Right front speaker Left front speaker Subwoofer To AC outlet Speaker output terminals ■Using two subwoofers (with speaker cables) Right front speaker Amplifier Left front speaker Subwoofer To AC outlet Speaker output terminals Amplifier Subwoofer To AC outlet 9 En English Connect the speaker output terminals of the amplifier to the front speakers. ■Using one set of the subwoofer to the INPUT1 terminals of the subwoofer, and connect the OUTPUT terminals of front speaker output...
... amplifier has only one subwoofer (with speaker cables) Right front speaker Left front speaker Subwoofer To AC outlet Speaker output terminals ■Using two subwoofers (with speaker cables) Right front speaker Amplifier Left front speaker Subwoofer To AC outlet Speaker output terminals Amplifier Subwoofer To AC outlet 9 En English Connect the speaker output terminals of the amplifier to the front speakers. ■Using one set of the subwoofer to the INPUT1 terminals of the subwoofer, and connect the OUTPUT terminals of front speaker output...

Owner's Manual
Page 14
... cable's wire end. 4 Test the firmness of the connection by pulling lightly on the cable at the terminal. Red: positive (+) Black: negative (-) + 1 2 - 10 En If these cables are faulty, no sound will be heard from the subwoofer or the speakers, or both of them. If the connections are reversed, the sound will be unnatural and lack bass. polarity markings of the speaker cables are completed, plug...
... cable's wire end. 4 Test the firmness of the connection by pulling lightly on the cable at the terminal. Red: positive (+) Black: negative (-) + 1 2 - 10 En If these cables are faulty, no sound will be heard from the subwoofer or the speakers, or both of them. If the connections are reversed, the sound will be unnatural and lack bass. polarity markings of the speaker cables are completed, plug...

Owner's Manual
Page 15
... power indicator lights red.) When the subwoofer detects a bass signal input of below 200 Hz, it automatically places itself in standby mode if it does not receive an input signal for example, when the subwoofer switches the power on mode. (The power indicator lights green.) Notes • This function is available only when the POWER switch and STANDBY/ON button are set to activate this position so that the subwoofer detects input signals...
... power indicator lights red.) When the subwoofer detects a bass signal input of below 200 Hz, it automatically places itself in standby mode if it does not receive an input signal for example, when the subwoofer switches the power on mode. (The power indicator lights green.) Notes • This function is available only when the POWER switch and STANDBY/ON button are set to activate this position so that the subwoofer detects input signals...
Owner's Manual
Page 16
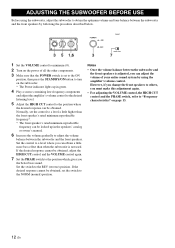
... adjusting the VOLUME control, the HIGH CUT control and the PHASE switch, refer to "Frequency characteristics" on the subwoofer. * The Power indicator lights up in green. 4 Play a source containing low-frequency components and adjust the amplifier's volume control to the desired listening level. 5 Adjust the HIGH CUT control to the position where the desired response can adjust the volume of your entire sound system by using the amplifier's volume control. ADJUSTING THE SUBWOOFER BEFORE USE Before using the subwoofer, adjust the subwoofer to...
... adjusting the VOLUME control, the HIGH CUT control and the PHASE switch, refer to "Frequency characteristics" on the subwoofer. * The Power indicator lights up in green. 4 Play a source containing low-frequency components and adjust the amplifier's volume control to the desired listening level. 5 Adjust the HIGH CUT control to the position where the desired response can adjust the volume of your entire sound system by using the amplifier's volume control. ADJUSTING THE SUBWOOFER BEFORE USE Before using the subwoofer, adjust the subwoofer to...

Owner's Manual
Page 17
ADJUSTING THE SUBWOOFER BEFORE USE Frequency characteristics This subwoofer's frequency characteristics dB HIGH CUT 50 Hz HIGH CUT 100 Hz 90 HIGH CUT 150 Hz 80 70 60 50 40 20 50 100 200 500Hz The figures below show the optimum adjustment of each control and the frequency characteristics when this subwoofer is combined with a typical front speaker system. ■ EX.1 When...
ADJUSTING THE SUBWOOFER BEFORE USE Frequency characteristics This subwoofer's frequency characteristics dB HIGH CUT 50 Hz HIGH CUT 100 Hz 90 HIGH CUT 150 Hz 80 70 60 50 40 20 50 100 200 500Hz The figures below show the optimum adjustment of each control and the frequency characteristics when this subwoofer is combined with a typical front speaker system. ■ EX.1 When...
Owner's Manual
Page 18
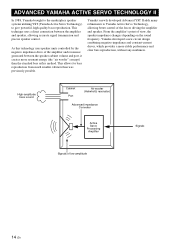
... marketplace speaker systems utilizing YST (Yamaha Active Servo Technology) to Yamaha Active Servo Technology, allowing better control of low amplitude 14 En High-amplitude bass sound Cabinet Port Air woofer (Helmholtz resonator) Advanced impedance Converter Active Servo Processing Amplifier Signals Signals of the forces driving the amplifier and speaker. As this technology uses speaker units controlled by the negative impedance drive of view, the speaker impedance changes depending on the sound frequency. From the amplifier's point...
... marketplace speaker systems utilizing YST (Yamaha Active Servo Technology) to Yamaha Active Servo Technology, allowing better control of low amplitude 14 En High-amplitude bass sound Cabinet Port Air woofer (Helmholtz resonator) Advanced impedance Converter Active Servo Processing Amplifier Signals Signals of the forces driving the amplifier and speaker. As this technology uses speaker units controlled by the negative impedance drive of view, the speaker impedance changes depending on the sound frequency. From the amplifier's point...
Owner's Manual
Page 19
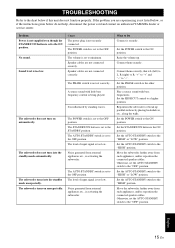
... connected speaker cables. Set the AUTO STANDBY switch to the ON position. Cause The power plug is too low. Speaker cables are not connected securely. The PHASE switch is being played. The subwoofer does not turn into the standby mode unexpectedly. Play a source sound with little bass frequency content is not set the AUTO STANDBY switch to the "OFF" position. Set the POWER switch to the "HIGH" or "LOW" position. Set the AUTO STANDBY switch to the ON position. The STANDBY/ON button is set...
... connected speaker cables. Set the AUTO STANDBY switch to the ON position. Cause The power plug is too low. Speaker cables are not connected securely. The PHASE switch is being played. The subwoofer does not turn into the standby mode unexpectedly. Play a source sound with little bass frequency content is not set the AUTO STANDBY switch to the "OFF" position. Set the POWER switch to the "HIGH" or "LOW" position. Set the AUTO STANDBY switch to the ON position. The STANDBY/ON button is set...
Owner's Manual
Page 20
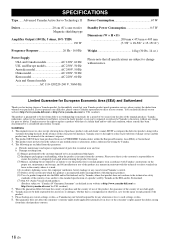
... for U.K. Advanced Yamaha Active Servo Technology II Power Consumption 67 W Driver 20 cm (8") cone woofer Magnetic shielding type Amplifier Output (100 Hz, 5 ohms, 10% THD 130 W Standby Power Consumption 0.5 W Dimensions (W × H × D 200 mm × 473 mm × 405 mm (7-7/8" × 18-5/8" × 15-15/16") Frequency Response 26 Hz - 160 Hz Weight 14 kg (30 lbs. 14 oz.) Power Supply USA and Canada models AC 120V, 60...
... for U.K. Advanced Yamaha Active Servo Technology II Power Consumption 67 W Driver 20 cm (8") cone woofer Magnetic shielding type Amplifier Output (100 Hz, 5 ohms, 10% THD 130 W Standby Power Consumption 0.5 W Dimensions (W × H × D 200 mm × 473 mm × 405 mm (7-7/8" × 18-5/8" × 15-15/16") Frequency Response 26 Hz - 160 Hz Weight 14 kg (30 lbs. 14 oz.) Power Supply USA and Canada models AC 120V, 60...


