

Owner's Manual
Page 2
... space below. Model: Serial No.: The serial number is used, use caution when moving the cart/ apparatus combination to persons. Retain this Owner's Manual in a safe place for future reference. 1 Read these instructions. 2 Keep these instructions. 3 Heed all warnings. 4 Follow all servicing to constitute a risk of important operating and maintenance (servicing) instructions in accordance with one wider than the other apparatus (including amplifiers) that may...
... space below. Model: Serial No.: The serial number is used, use caution when moving the cart/ apparatus combination to persons. Retain this Owner's Manual in a safe place for future reference. 1 Read these instructions. 2 Keep these instructions. 3 Heed all warnings. 4 Follow all servicing to constitute a risk of important operating and maintenance (servicing) instructions in accordance with one wider than the other apparatus (including amplifiers) that may...
Owner's Manual
Page 3
This product, when installed as indicated in the instructions contained in the users manual, may void your FCC authorization to eliminate the problem by playing it is being affected by the interference. This equipment generates/uses radio frequencies and, if not installed and used according to the instructions found in this product to use only high quality shielded cables. Compliance with FCC regulations does not...
This product, when installed as indicated in the instructions contained in the users manual, may void your FCC authorization to eliminate the problem by playing it is being affected by the interference. This equipment generates/uses radio frequencies and, if not installed and used according to the instructions found in this product to use only high quality shielded cables. Compliance with FCC regulations does not...
Owner's Manual
Page 4
...;nest performance, please read the "Troubleshooting" section regarding common operating errors before use this unit for a long period of this unit with a rated output power higher than the nominal input power of the speakers, care should never be sure to the speakers. 6. To prevent fire or...switches, controls or connection wires. For example, if 20 Hz-50 Hz sine waves from a test disc or bass sounds from the turntable. 10. In this unit. 12. vacation, etc.), disconnect the AC power plug from the TV set. 13. Install this unit near the wall outlet and where the AC power plug...
...;nest performance, please read the "Troubleshooting" section regarding common operating errors before use this unit for a long period of this unit with a rated output power higher than the nominal input power of the speakers, care should never be sure to the speakers. 6. To prevent fire or...switches, controls or connection wires. For example, if 20 Hz-50 Hz sine waves from a test disc or bass sounds from the turntable. 10. In this unit. 12. vacation, etc.), disconnect the AC power plug from the TV set. 13. Install this unit near the wall outlet and where the AC power plug...
Owner's Manual
Page 5
...models) The voltage selector switch on the rear panel of plug to wide slot and fully insert. Note: The plug severed from the AC power source as long as it should be connected to the terminal which is marked with bared flexible cord is not disconnected from the mains lead must be cut off . SPECIAL INSTRUCTIONS...of power. Voltages are not suitable for the plug supplied with Canadian ICES-003. MODEL IMPORTANT: THE WIRES IN MAINS LEAD ARE COLOURED IN ACCORDANCE WITH THE FOLLOWING CODE: Blue: NEUTRAL Brown: LIVE As the colours of the wires in your local main voltage BEFORE plugging ...
...models) The voltage selector switch on the rear panel of plug to wide slot and fully insert. Note: The plug severed from the AC power source as long as it should be connected to the terminal which is marked with bared flexible cord is not disconnected from the mains lead must be cut off . SPECIAL INSTRUCTIONS...of power. Voltages are not suitable for the plug supplied with Canadian ICES-003. MODEL IMPORTANT: THE WIRES IN MAINS LEAD ARE COLOURED IN ACCORDANCE WITH THE FOLLOWING CODE: Blue: NEUTRAL Brown: LIVE As the colours of the wires in your local main voltage BEFORE plugging ...
Owner's Manual
Page 6
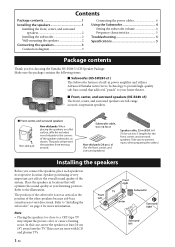
... front, center, and surround speakers 2 Installing the subwoofer 2 Wall-mounting the speakers 2 Connecting the speakers 3 Connection diagram 3 Connecting the power cables 4 Using the Subwoofer 4 Setting the subwoofer volume 4 Frequency characteristics 5 Troubleshooting 5 Specifications 5 Package contents Thank you connect the speakers, place each speaker in its respective location. The pads will optimize the sound quality at least 20 cm (8") away from moving around. In this case, move the speakers at your home theater. ■ Front, center, and surround speakers (NS-B280 x5...
... front, center, and surround speakers 2 Installing the subwoofer 2 Wall-mounting the speakers 2 Connecting the speakers 3 Connection diagram 3 Connecting the power cables 4 Using the Subwoofer 4 Setting the subwoofer volume 4 Frequency characteristics 5 Troubleshooting 5 Specifications 5 Package contents Thank you connect the speakers, place each speaker in its respective location. The pads will optimize the sound quality at least 20 cm (8") away from moving around. In this case, move the speakers at your home theater. ■ Front, center, and surround speakers (NS-B280 x5...
Owner's Manual
Page 7
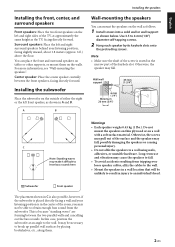
... front speakers on a wall with a soft surface material. may fall , possibly damaging the speakers or causing C personal injury. • Do not affix the speakers to obtain enough bass sound from tripping over hear bass sounds here. loose speaker cables, affix the cables to the wall. • Mount the speakers in A and B. A B Installing the speakers Wall-mounting the speakers You can place the front and surround speakers on tables or other supports, or mount...
... front speakers on a wall with a soft surface material. may fall , possibly damaging the speakers or causing C personal injury. • Do not affix the speakers to obtain enough bass sound from tripping over hear bass sounds here. loose speaker cables, affix the cables to the wall. • Mount the speakers in A and B. A B Installing the speakers Wall-mounting the speakers You can place the front and surround speakers on tables or other supports, or mount...
Owner's Manual
Page 8
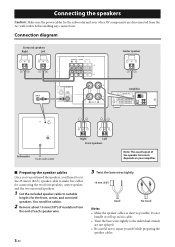
...'ll need to cut the 25-meter (82 ft.) speaker cable to make five cables for connecting the two front speakers, center speaker, and the two surround speakers. 1 Cut the included speaker cable to suitable lengths for the subwoofer and your other AV components are not splayed. • Be careful not to injure yourself while preparing the speaker cables. Connection diagram Surround speakers Right Left SPEAKERS SURROUND CENTER FRONT B Center speaker D D/ OUT D-R (REC) OUTPUT SUB WOOFR FRONT A Amplifier DOCK DIGITAL INPUT...
...'ll need to cut the 25-meter (82 ft.) speaker cable to make five cables for connecting the two front speakers, center speaker, and the two surround speakers. 1 Cut the included speaker cable to suitable lengths for the subwoofer and your other AV components are not splayed. • Be careful not to injure yourself while preparing the speaker cables. Connection diagram Surround speakers Right Left SPEAKERS SURROUND CENTER FRONT B Center speaker D D/ OUT D-R (REC) OUTPUT SUB WOOFR FRONT A Amplifier DOCK DIGITAL INPUT...
Owner's Manual
Page 9
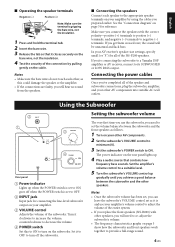
... bass sounds. English ■ Operating the speaker terminals Negative (-) Positive (+) Note: Make sure the terminal is set to ON; Connecting the power cables Once you will need to set to a suitable level. 5 Turn the subwoofer's VOLUME control up . 4 Play a audio source that it to OFF to turn on your amplifier by pulling gently on the cable. Set the amplifier's volume control to OFF. 2 INPUT jack Input jack for connecting the line-level subwoofer output on your amplifier. 3 VOLUME control Adjusts the volume of the NS-P280 speakers. Notes • Once the subwoofer volume...
... bass sounds. English ■ Operating the speaker terminals Negative (-) Positive (+) Note: Make sure the terminal is set to ON; Connecting the power cables Once you will need to set to a suitable level. 5 Turn the subwoofer's VOLUME control up . 4 Play a audio source that it to OFF to turn on your amplifier by pulling gently on the cable. Set the amplifier's volume control to OFF. 2 INPUT jack Input jack for connecting the line-level subwoofer output on your amplifier. 3 VOLUME control Adjusts the volume of the NS-P280 speakers. Notes • Once the subwoofer volume...
Owner's Manual
Page 10
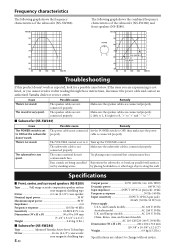
... set to change without notice. and Canada models AC 120 V, 60 Hz Australia model AC 240 V, 50 Hz U.K. The sound is not connected properly. Turn up parallel wall surfaces out by placing bookshelves or other large objects along the wall. Specifications ■ Front, center, and surround speakers (NS-B280) Type Full-range acoustic-suspension speaker system non-magnetic shielding type Driver 6.5 cm (2-1/2") cone speaker Nominal input power 30 W Maximum input power 80 W Impedance 6 Ω Frequency response...
... set to change without notice. and Canada models AC 120 V, 60 Hz Australia model AC 240 V, 50 Hz U.K. The sound is not connected properly. Turn up parallel wall surfaces out by placing bookshelves or other large objects along the wall. Specifications ■ Front, center, and surround speakers (NS-B280) Type Full-range acoustic-suspension speaker system non-magnetic shielding type Driver 6.5 cm (2-1/2") cone speaker Nominal input power 30 W Maximum input power 80 W Impedance 6 Ω Frequency response...


