

Owner's Manual
Page 1
U B NS-P230/ NS-P236 (NS-P230/NS-P236: NX-230P + NX-C230 + YST-SW005) HOME CINEMA 5.1CH SPEAKER PACKAGE/ HOME CINEMA 6.1CH SPEAKER PACKAGE OWNER'S MANUAL I
U B NS-P230/ NS-P236 (NS-P230/NS-P236: NX-230P + NX-C230 + YST-SW005) HOME CINEMA 5.1CH SPEAKER PACKAGE/ HOME CINEMA 6.1CH SPEAKER PACKAGE OWNER'S MANUAL I
Owner's Manual
Page 4
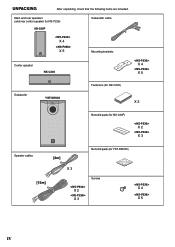
Main and rear speakers (and rear center speaker for NS-P236) NX-230P X 4 X 5 Subwoofer cable Mounting brackets Center speaker NX-C230 X 4 X 5 Subwoofer YST-SW005 SSUUPBEWROWOOFOEFRESRYSSYTSETMEMYSYTSSTW -S0W00505 Fasteners (for NX-C230) X 2 Nonskid pads (for NX-230P) X 2 X 3 Speaker cables [4m] Nonskid pads (for YST-SW005) [15m] X 3 Screws X 2 X 3 X 4 X 5 IV UNPACKING After unpacking, check that the following items are included.
Main and rear speakers (and rear center speaker for NS-P236) NX-230P X 4 X 5 Subwoofer cable Mounting brackets Center speaker NX-C230 X 4 X 5 Subwoofer YST-SW005 SSUUPBEWROWOOFOEFRESRYSSYTSETMEMYSYTSSTW -S0W00505 Fasteners (for NX-C230) X 2 Nonskid pads (for NX-230P) X 2 X 3 Speaker cables [4m] Nonskid pads (for YST-SW005) [15m] X 3 Screws X 2 X 3 X 4 X 5 IV UNPACKING After unpacking, check that the following items are included.
Owner's Manual
Page 5
... cabinet should be opened for any service is designed to prevent fire or damage. For YST-SW005 ● Do not operate this YAMAHA NS-P230/NS-P236 Speaker Package. Never pull the wires themselves. ● Since this unit may cause a turntable to be used must be set . &#... regarding common operating errors before operating your amplifier to liquid dripping or splashing. Contact qualified YAMAHA service personnel when any reason. ● Be sure to modify or fix the speakers. Be sure to allow your local main voltage BEFORE plugging this unit or avoiding excess humidification...
... cabinet should be opened for any service is designed to prevent fire or damage. For YST-SW005 ● Do not operate this YAMAHA NS-P230/NS-P236 Speaker Package. Never pull the wires themselves. ● Since this unit may cause a turntable to be used must be set . &#... regarding common operating errors before operating your amplifier to liquid dripping or splashing. Contact qualified YAMAHA service personnel when any reason. ● Be sure to modify or fix the speakers. Be sure to allow your local main voltage BEFORE plugging this unit or avoiding excess humidification...
Owner's Manual
Page 6
... are not suitable for use 12 Frequency characteristics 13 ADVANCED YAMAHA ACTIVE SERVO TECHNOLOGY (for details on Advanced YAMAHA Active Servo Technology.) This super-bass sound adds a more realistic, theater-in a live socket outlet. COMPONENTS OF THE PACKAGE The speaker package "NS-P230 and NS-P236" is hazardous if engaged in -the-home effect to your...
... are not suitable for use 12 Frequency characteristics 13 ADVANCED YAMAHA ACTIVE SERVO TECHNOLOGY (for details on Advanced YAMAHA Active Servo Technology.) This super-bass sound adds a more realistic, theater-in a live socket outlet. COMPONENTS OF THE PACKAGE The speaker package "NS-P230 and NS-P236" is hazardous if engaged in -the-home effect to your...
Owner's Manual
Page 7
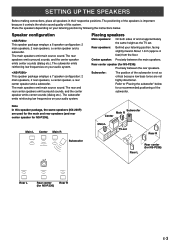
... system. Note In this system. English SETTING UP THE SPEAKERS Before making connections, place all speakers in their respective positions. The main speakers emit main source sound. The main speakers emit main source sound. Rear center speaker (for NS-P236). This speaker package employs a 7 speaker configuration: 2 main speakers, 2 rear speakers, a center speaker, a rear center speaker and a subwoofer. The positioning of the subwoofer. The...
... system. Note In this system. English SETTING UP THE SPEAKERS Before making connections, place all speakers in their respective positions. The main speakers emit main source sound. The main speakers emit main source sound. Rear center speaker (for NS-P236). This speaker package employs a 7 speaker configuration: 2 main speakers, 2 rear speakers, a center speaker, a rear center speaker and a subwoofer. The positioning of the subwoofer. The...
Owner's Manual
Page 8
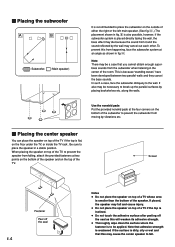
...in a stable position. Screen Fastener Peel off the seal as shown in fig. Å. Ⅵ Placing the subwoofer Å ı ( : Subwoofer, : Main speaker) It is recommended to break up the parallel surfaces by placing bookshelves etc. This is dirty, oily or wet and that you cannot obtain enough...if the top is inclined. ● Do not touch the adhesive surface after peeling off the seal E-4 Notes ● Do not place the speaker on top of the TV. Note that adhesive strength is weakened if the surface is because "standing waves" have been developed between two parallel walls...
...in a stable position. Screen Fastener Peel off the seal as shown in fig. Å. Ⅵ Placing the subwoofer Å ı ( : Subwoofer, : Main speaker) It is recommended to break up the parallel surfaces by placing bookshelves etc. This is dirty, oily or wet and that you cannot obtain enough...if the top is inclined. ● Do not touch the adhesive surface after peeling off the seal E-4 Notes ● Do not place the speaker on top of the TV. Note that adhesive strength is weakened if the surface is because "standing waves" have been developed between two parallel walls...
Owner's Manual
Page 9
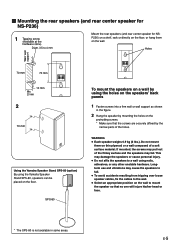
...using nails, adhesives, or any other unstable hardware. Do not mount them on the wall. SPS-80 To mount the speakers on a wall by using the Yamaha Speaker Stand SPS-80, speakers can be placed on the protruding screws. * Make sure that no one will injure his/her head or face. *... affixed by mounting the holes on the floor. English Ⅵ Mounting the rear speakers (and rear center speaker for NS-P236) 1 Tapping screw (Available at the hardware store) Diam. 3.5 to 4 mm Mount the rear speakers (and rear center speaker for NSP236) on a shelf, rack or directly on the floor, or hang ...
...using nails, adhesives, or any other unstable hardware. Do not mount them on the wall. SPS-80 To mount the speakers on a wall by using the Yamaha Speaker Stand SPS-80, speakers can be placed on the protruding screws. * Make sure that no one will injure his/her head or face. *... affixed by mounting the holes on the floor. English Ⅵ Mounting the rear speakers (and rear center speaker for NS-P236) 1 Tapping screw (Available at the hardware store) Diam. 3.5 to 4 mm Mount the rear speakers (and rear center speaker for NSP236) on a shelf, rack or directly on the floor, or hang ...
Owner's Manual
Page 10
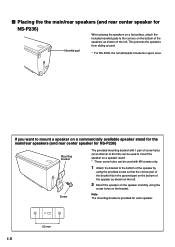
... a flat surface, attach the included nonskid pads to the corners on the bottom of the speaker as shown on the bracket. Note The mounting bracket is provided for NS-P236) Mounting bracket Screw The provided mounting bracket with 1 pair of screw holes (at an interval of 60 mm) can be used to ...mount the speaker on a speaker stand. * Those screw holes can be used with M4 screws only. 1 Attach the...
... a flat surface, attach the included nonskid pads to the corners on the bottom of the speaker as shown on the bracket. Note The mounting bracket is provided for NS-P236) Mounting bracket Screw The provided mounting bracket with 1 pair of screw holes (at an interval of 60 mm) can be used to ...mount the speaker on a speaker stand. * Those screw holes can be used with M4 screws only. 1 Attach the...
Owner's Manual
Page 11
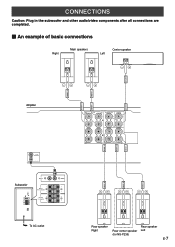
...and other audio/video components after all connections are completed. Ⅵ An example of basic connections Right Main speakers Center speaker Left CENTER FRONT L FRONT R FRONT L FRONT R Amplifier SUB WOOFER OUTPUT Subwoofer VOLUME AUTO STANDBY HIGH ...TO SPEAKERS POWER ON OFF INPUT2 INPUT1 FROM AMPLIFIER OUTPUT TO SPEAKERS To AC outlet /MONO CENTER SPEAKERS R MAIN L REAR CENTER CENTER + + + A - - - - - B + + R L R REAR (SURROUND) L REAR R REAR C REAR L REAR R REAR C REAR L Rear speaker Rear speaker Right Rear center speaker Left (for NS-P236) ...
...and other audio/video components after all connections are completed. Ⅵ An example of basic connections Right Main speakers Center speaker Left CENTER FRONT L FRONT R FRONT L FRONT R Amplifier SUB WOOFER OUTPUT Subwoofer VOLUME AUTO STANDBY HIGH ...TO SPEAKERS POWER ON OFF INPUT2 INPUT1 FROM AMPLIFIER OUTPUT TO SPEAKERS To AC outlet /MONO CENTER SPEAKERS R MAIN L REAR CENTER CENTER + + + A - - - - - B + + R L R REAR (SURROUND) L REAR R REAR C REAR L REAR R REAR C REAR L Rear speaker Rear speaker Right Rear center speaker Left (for NS-P236) ...
Owner's Manual
Page 12
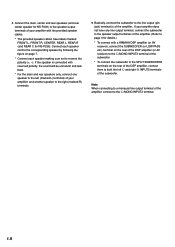
● Connect the main, center and rear speakers (and rear center speaker for NS-P236). If the speaker is connected with reversed polarity, the sound will be unnatural and lack bass. * For the main and rear speakers only, connect one speaker to the left L and right R INPUT2 terminals of the ...amplifier, connect to a monaural line output terminal of the subwoofer. Note When connecting to the L/MONO INPUT2 terminal. E-8 If your amplifier with a YAMAHA DSP amplifier (or AV ...
● Connect the main, center and rear speakers (and rear center speaker for NS-P236). If the speaker is connected with reversed polarity, the sound will be unnatural and lack bass. * For the main and rear speakers only, connect one speaker to the left L and right R INPUT2 terminals of the ...amplifier, connect to a monaural line output terminal of the subwoofer. Note When connecting to the L/MONO INPUT2 terminal. E-8 If your amplifier with a YAMAHA DSP amplifier (or AV ...
Owner's Manual
Page 13
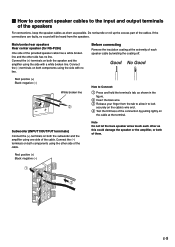
... side of the cable. Before connecting Remove the insulation coating at the terminal. Main/center/rear speakers Rear center speaker (for NS-P236) One side of each other as this could damage the speaker or the amplifier, or both components using the side with no line. Note Do not let ...the bare speaker wires touch each speaker cable by pulling lightly on both the speaker and the amplifier using the...
... side of the cable. Before connecting Remove the insulation coating at the terminal. Main/center/rear speakers Rear center speaker (for NS-P236) One side of each other as this could damage the speaker or the amplifier, or both components using the side with no line. Note Do not let ...the bare speaker wires touch each speaker cable by pulling lightly on both the speaker and the amplifier using the...
Owner's Manual
Page 14
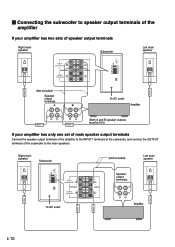
...MONO INPUT1 FROM AMPLIFIER OUTPUT TO SPEAKERS POWER ON OFF INPUT1 FROM AMPLIFIER OUTPUT TO SPEAKERS To AC outlet (Not included) Speaker output terminals Left main speaker Amplifier FRONT R FRONT R FRONT L FRONT L E-10 Ⅵ Connecting the subwoofer to speaker output terminals of the amplifier If... LOW HIGH CUT INPUT2 /MONO INPUT1 FROM AMPLIFIER OUTPUT TO SPEAKERS POWER ON OFF Left main speaker FRONT R FRONT L (Not included) Speaker output terminals A B To AC outlet Amplifier FRONT R FRONT L (Both A and B speaker outputs must be ON.) If your amplifier has only one ...
...MONO INPUT1 FROM AMPLIFIER OUTPUT TO SPEAKERS POWER ON OFF INPUT1 FROM AMPLIFIER OUTPUT TO SPEAKERS To AC outlet (Not included) Speaker output terminals Left main speaker Amplifier FRONT R FRONT R FRONT L FRONT L E-10 Ⅵ Connecting the subwoofer to speaker output terminals of the amplifier If... LOW HIGH CUT INPUT2 /MONO INPUT1 FROM AMPLIFIER OUTPUT TO SPEAKERS POWER ON OFF Left main speaker FRONT R FRONT L (Not included) Speaker output terminals A B To AC outlet Amplifier FRONT R FRONT L (Both A and B speaker outputs must be ON.) If your amplifier has only one ...

Owner's Manual
Page 15
... OFF 3 110V-120V 220V-240V VOLTAGE SELECTOR VOLUME AUTO STANDBY HIGH LOW OFF 0 10 HIGH LOW HIGH CUT INPUT2 /MONO INPUT1 FROM AMPLIFIER OUTPUT TO SPEAKERS POWER ON OFF 220V-240V 110V-120V VOLTAGE SELECTOR 4 5 VOLUME AUTO STANDBY HIGH LOW OFF 0 10 HIGH LOW HIGH CUT 8 9 INPUT2 /MONO... 6 INPUT1 FROM AMPLIFIER 7 OUTPUT TO SPEAKERS 1 Power indicator Lights up GREEN when the POWER switch (2) is pressed in to the ON position and goes off when set to the OFF position...
... OFF 3 110V-120V 220V-240V VOLTAGE SELECTOR VOLUME AUTO STANDBY HIGH LOW OFF 0 10 HIGH LOW HIGH CUT INPUT2 /MONO INPUT1 FROM AMPLIFIER OUTPUT TO SPEAKERS POWER ON OFF 220V-240V 110V-120V VOLTAGE SELECTOR 4 5 VOLUME AUTO STANDBY HIGH LOW OFF 0 10 HIGH LOW HIGH CUT 8 9 INPUT2 /MONO... 6 INPUT1 FROM AMPLIFIER 7 OUTPUT TO SPEAKERS 1 Power indicator Lights up GREEN when the POWER switch (2) is pressed in to the ON position and goes off when set to the OFF position...

Owner's Manual
Page 16
...appliances. Rear panel POWER ON 3 OFF VOLUME AUTO STANDBY HIGH LOW OFF 0 10 HIGH LOW HIGH CUT INPUT2 /MONO INPUT1 FROM AMPLIFIER OUTPUT TO SPEAKERS POWER ON OFF AUTO STANDBY HIGH LOW OFF VOLUME 1, 6 0 10 HIGH LOW HIGH CUT 5 INPUT2 /MONO INPUT1 FROM AMPLIFIER OUTPUT TO... This function is not switched to ON or STANDBY smoothly, set the AUTO STANDBY switch to switch the power between the subwoofer and the main speakers by sensing a certain level of low frequency input signal. This function will turn on (by pressing the POWER switch). Ⅵ Adjusting the subwoofer ...
...appliances. Rear panel POWER ON 3 OFF VOLUME AUTO STANDBY HIGH LOW OFF 0 10 HIGH LOW HIGH CUT INPUT2 /MONO INPUT1 FROM AMPLIFIER OUTPUT TO SPEAKERS POWER ON OFF AUTO STANDBY HIGH LOW OFF VOLUME 1, 6 0 10 HIGH LOW HIGH CUT 5 INPUT2 /MONO INPUT1 FROM AMPLIFIER OUTPUT TO... This function is not switched to ON or STANDBY smoothly, set the AUTO STANDBY switch to switch the power between the subwoofer and the main speakers by sensing a certain level of low frequency input signal. This function will turn on (by pressing the POWER switch). Ⅵ Adjusting the subwoofer ...
Owner's Manual
Page 17
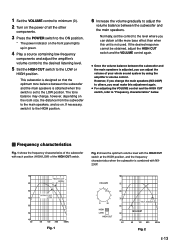
... , however, depending on the room size, the distance from the subwoofer to adjust the volume balance between the subwoofer and the main speakers is set the control to the level where you must make this unit is combined with the HIGH CUT switch at the HIGH position,... and the frequency characteristics when the subwoofer is not used. The tone balance may change the main speakers (NX-230P) to "Frequency characteristics" below. Ⅵ Frequency characteristics Fig. 1 shows the frequency characteristics of the subwoofer with each position (HIGH/...
... , however, depending on the room size, the distance from the subwoofer to adjust the volume balance between the subwoofer and the main speakers is set the control to the level where you must make this unit is combined with the HIGH CUT switch at the HIGH position,... and the frequency characteristics when the subwoofer is not used. The tone balance may change the main speakers (NX-230P) to "Frequency characteristics" below. Ⅵ Frequency characteristics Fig. 1 shows the frequency characteristics of the subwoofer with each position (HIGH/...
Owner's Manual
Page 18
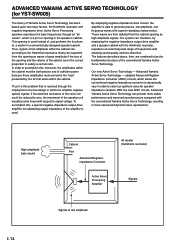
... presented by employing the negative-impedance output drive amplifier and a speaker cabinet with the Helmholtz resonator, reproduce an extremely wide range of the conventional Yamaha Active Servo Technology. Our new Active Servo Technology - Advanced Yamaha Active Servo Technology - The features described above, then, are ... is used instead of, and performs the functions of the cabinet are in the speaker's cabinet. ADVANCED YAMAHA ACTIVE SERVO TECHNOLOGY (for YST-SW005) The theory of the speaker unit would become linear with respect to signal voltage. Thus it is this new ANIC...
... presented by employing the negative-impedance output drive amplifier and a speaker cabinet with the Helmholtz resonator, reproduce an extremely wide range of the conventional Yamaha Active Servo Technology. Our new Active Servo Technology - Advanced Yamaha Active Servo Technology - The features described above, then, are ... is used instead of, and performs the functions of the cabinet are in the speaker's cabinet. ADVANCED YAMAHA ACTIVE SERVO TECHNOLOGY (for YST-SW005) The theory of the speaker unit would become linear with respect to signal voltage. Thus it is this new ANIC...
Owner's Manual
Page 19
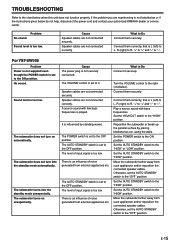
...to the "HIGH" position. English TROUBLESHOOTING Refer to the chart below do not help, disconnect the power cord and contact your authorized YAMAHA dealer or service center. Sound level is set to the OFF position. No sound. Play a source sound with few bass frequencies... this unit does not function properly. Turn the VOLUME control to Do Connect it securely. Otherwise, set the AUTO STANDBY switch to 0. Speaker cables are not connected securely. Connect them correctly, that is set to "-". The subwoofer does not turn on unexpectedly. The VOLUME control is...
...to the "HIGH" position. English TROUBLESHOOTING Refer to the chart below do not help, disconnect the power cord and contact your authorized YAMAHA dealer or service center. Sound level is set to the OFF position. No sound. Play a source sound with few bass frequencies... this unit does not function properly. Turn the VOLUME control to Do Connect it securely. Otherwise, set the AUTO STANDBY switch to 0. Speaker cables are not connected securely. Connect them correctly, that is set to "-". The subwoofer does not turn on unexpectedly. The VOLUME control is...

Owner's Manual
Page 20
SPECIFICATIONS Ⅵ NX-230P, NX-C230 Type ......... Full range acoustic-suspension speaker system Magnetic shielding type Driver 5 cm (2") full range cone speaker x 2 Nominal Input Power 30W Maximum Input Power 100W Impedance 6Ω Frequency Response
SPECIFICATIONS Ⅵ NX-230P, NX-C230 Type ......... Full range acoustic-suspension speaker system Magnetic shielding type Driver 5 cm (2") full range cone speaker x 2 Nominal Input Power 30W Maximum Input Power 100W Impedance 6Ω Frequency Response


