
Owner's Manual
Page 4
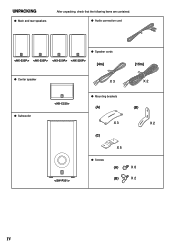
q Audio connection cord q Speaker cords [4m] [15m] q Center speaker X 3 X 2 q Subwoofer q Mounting brackets (A) (B) X 3 X 2 (C) X 5 q Screws (A) X 8 (B) X 2 IV UNPACKING q Main and rear speakers After unpacking, check that the following items are contained.
q Audio connection cord q Speaker cords [4m] [15m] q Center speaker X 3 X 2 q Subwoofer q Mounting brackets (A) (B) X 3 X 2 (C) X 5 q Screws (A) X 8 (B) X 2 IV UNPACKING q Main and rear speakers After unpacking, check that the following items are contained.
Owner's Manual
Page 6
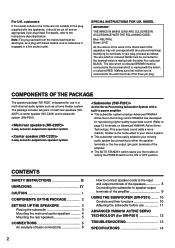
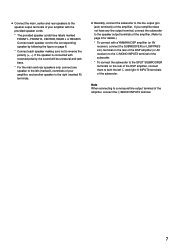
...you the trouble of setting the POWER switch to speaker output terminals of the wires in power amplifier ● This subwoofer system employs Advanced YAMAHA Active Servo Technology which is coloured BROWN must be connected to the instructions described below. For U.K. SPECIAL INSTRUCTIONS FOR ... COMPONENTS OF THE PACKAGE The speaker package "NS-P220" is designed for details on Advanced YAMAHA Active Servo Technology.) This super-bass sound adds a more realistic, theater-in-the-home effect to your stereo system. ● This subwoofer can be easily added to your plug, proceed...
...you the trouble of setting the POWER switch to speaker output terminals of the wires in power amplifier ● This subwoofer system employs Advanced YAMAHA Active Servo Technology which is coloured BROWN must be connected to the instructions described below. For U.K. SPECIAL INSTRUCTIONS FOR ... COMPONENTS OF THE PACKAGE The speaker package "NS-P220" is designed for details on Advanced YAMAHA Active Servo Technology.) This super-bass sound adds a more realistic, theater-in-the-home effect to your stereo system. ● This subwoofer can be easily added to your plug, proceed...
Owner's Manual
Page 7
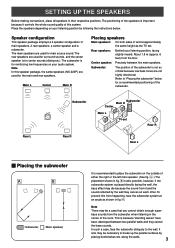
... main speakers are used for the main and rear speakers. Main L Center Main R Placing speakers Main speakers: On both sides of the subwoofer is not so critical because low bass tones are used for reinforcing low frequencies on your listening position, facing slightly inward. Note There may ...right or the left main speaker. (See fig. Å .) The placement shown in fig. ı is also possible, however, if the subwoofer system is recommended to break up the parallel surfaces by placing bookshelves etc. along the walls. 3 Place the speakers depending on your audio system. ...
... main speakers are used for the main and rear speakers. Main L Center Main R Placing speakers Main speakers: On both sides of the subwoofer is not so critical because low bass tones are used for reinforcing low frequencies on your listening position, facing slightly inward. Note There may ...right or the left main speaker. (See fig. Å .) The placement shown in fig. ı is also possible, however, if the subwoofer system is recommended to break up the parallel surfaces by placing bookshelves etc. along the walls. 3 Place the speakers depending on your audio system. ...
Owner's Manual
Page 10
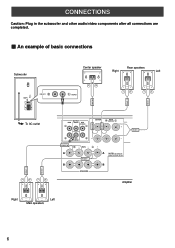
... other audio/video components after all connections are completed. Ⅵ An example of basic connections FRONT R FRONT L Subwoofer POWER ON OFF VOLUME STANDBY-RED ON-GREEN AUTO STANDBY HIGH LOW OFF 0 I0 INPUT2 /MONO INPUT1 FROM AMPLIFIER OUTPUT TO SPEAKERS INPUT2 To AC ...
... other audio/video components after all connections are completed. Ⅵ An example of basic connections FRONT R FRONT L Subwoofer POWER ON OFF VOLUME STANDBY-RED ON-GREEN AUTO STANDBY HIGH LOW OFF 0 I0 INPUT2 /MONO INPUT1 FROM AMPLIFIER OUTPUT TO SPEAKERS INPUT2 To AC ...
Owner's Manual
Page 11
... L) terminals of your amplifier with a YAMAHA DSP amplifier (or AV receiver), connect the SUBWOOFER (or LOW PASS etc.) terminal on the rear of the DSP amplifier (or AV receiver) to the L/MONO INPUT2 terminal of the subwoofer. * To connect the subwoofer to the SPLIT SUBWOOFER terminals on page 6. * Connect each ...sure not to the line output (pin jack) terminal(s) of the amplifier. If your amplifier does not have any line output terminal, connect the subwoofer to the speaker output terminals of the amplifier. (Refer to page 9 for details.) * To connect with the provided speaker cords. * The...
... L) terminals of your amplifier with a YAMAHA DSP amplifier (or AV receiver), connect the SUBWOOFER (or LOW PASS etc.) terminal on the rear of the DSP amplifier (or AV receiver) to the L/MONO INPUT2 terminal of the subwoofer. * To connect the subwoofer to the SPLIT SUBWOOFER terminals on page 6. * Connect each ...sure not to the line output (pin jack) terminal(s) of the amplifier. If your amplifier does not have any line output terminal, connect the subwoofer to the speaker output terminals of the amplifier. (Refer to page 9 for details.) * To connect with the provided speaker cords. * The...
Owner's Manual
Page 12
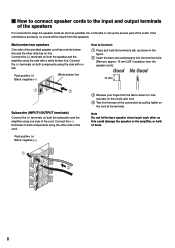
.... 2 Insert the bare wire end properly into the terminal hole. [Remove approx. 10 mm (3/8") insulation from the speaker cord.] 10 mm Subwoofer (INPUT1/OUTPUT terminals) Connect the (+) terminals on both the subwoofer and the amplifier using one side of the cord. If the connections are faulty, no line. Red: positive (+) Black: negative...
.... 2 Insert the bare wire end properly into the terminal hole. [Remove approx. 10 mm (3/8") insulation from the speaker cord.] 10 mm Subwoofer (INPUT1/OUTPUT terminals) Connect the (+) terminals on both the subwoofer and the amplifier using one side of the cord. If the connections are faulty, no line. Red: positive (+) Black: negative...
Owner's Manual
Page 13
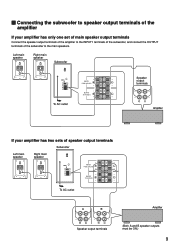
Left main speaker Right main speaker Subwoofer POWER ON OFF VOLUME STANDBY-RED ON-GREEN AUTO STANDBY HIGH LOW OFF 0 I0 INPUT2 /MONO INPUT1 FROM AMPLIFIER OUTPUT TO SPEAKERS INPUT1 FROM AMPLIFIER ... speaker output terminals of the amplifier If your amplifier has two sets of the subwoofer to the INPUT1 terminals of the subwoofer, and connect the OUTPUT terminals of speaker output terminals Subwoofer Left main Right main POWER ON speaker speaker OFF VOLUME STANDBY-RED ON-GREEN AUTO STANDBY HIGH LOW OFF 0 I0 INPUT2...
Left main speaker Right main speaker Subwoofer POWER ON OFF VOLUME STANDBY-RED ON-GREEN AUTO STANDBY HIGH LOW OFF 0 I0 INPUT2 /MONO INPUT1 FROM AMPLIFIER OUTPUT TO SPEAKERS INPUT1 FROM AMPLIFIER ... speaker output terminals of the amplifier If your amplifier has two sets of the subwoofer to the INPUT1 terminals of the subwoofer, and connect the OUTPUT terminals of speaker output terminals Subwoofer Left main Right main POWER ON speaker speaker OFF VOLUME STANDBY-RED ON-GREEN AUTO STANDBY HIGH LOW OFF 0 I0 INPUT2...
Owner's Manual
Page 14
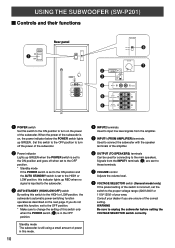
... on the power of your dealer if you do not need this switch to the proper voltage range (220V-240V or 110V-120V) of the subwoofer. If you are sent to these terminals. 7 VOLUME control Adjusts the volume level. 8 VOLTAGE SELECTOR switch (General model only) If the preset setting ...of the switch is incorrect, set the switch to the HIGH or LOW position, the subwoofer's automatic power-switching function operates as described on , the power indicator below the POWER switch lights up GREEN when the POWER switch is set to...
... on the power of your dealer if you do not need this switch to the proper voltage range (220V-240V or 110V-120V) of the subwoofer. If you are sent to these terminals. 7 VOLUME control Adjusts the volume level. 8 VOLTAGE SELECTOR switch (General model only) If the preset setting ...of the switch is incorrect, set the switch to the HIGH or LOW position, the subwoofer's automatic power-switching function operates as described on , the power indicator below the POWER switch lights up GREEN when the POWER switch is set to...
Owner's Manual
Page 15
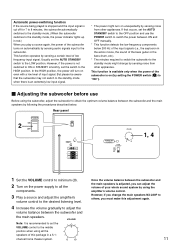
...input signals (i.e., the explosion in red.) When you change by sensing noise from other appliances. This function operates by sensing audio signals input to the subwoofer. VOLUME Note: It is recommended to set the AUTO STANDBY switch to the OFF position and use Before using all the components. 3 Play a ...lights up in the action movie, the sound of the bass guitar or the bass drum, etc.). * The minutes required to switch the subwoofer to the standby mode might turn on the power supply to all the speakers of your whole sound system by using the amplifier's volume control...
...input signals (i.e., the explosion in red.) When you change by sensing noise from other appliances. This function operates by sensing audio signals input to the subwoofer. VOLUME Note: It is recommended to set the AUTO STANDBY switch to the OFF position and use Before using all the components. 3 Play a ...lights up in the action movie, the sound of the bass guitar or the bass drum, etc.). * The minutes required to switch the subwoofer to the standby mode might turn on the power supply to all the speakers of your whole sound system by using the amplifier's volume control...
Owner's Manual
Page 17
..., disconnect the power cord and contact your authorized YAMAHA dealer or service center. The subwoofer turns on automatically. Speaker cords are not connected correctly. There is too low. Move the subwoofer farther away from external appliances etc. The subwoofer will not turn on unexpectedly. Cause Speaker cords .... The level of noise generated from such appliances and/or reposition the connected speaker cables. Connect them securely. Reposition the subwoofer or break up the parallel surface by standing waves. Set the POWER switch to the "HIGH" or "LOW" position.
..., disconnect the power cord and contact your authorized YAMAHA dealer or service center. The subwoofer turns on automatically. Speaker cords are not connected correctly. There is too low. Move the subwoofer farther away from external appliances etc. The subwoofer will not turn on unexpectedly. Cause Speaker cords .... The level of noise generated from such appliances and/or reposition the connected speaker cables. Connect them securely. Reposition the subwoofer or break up the parallel surface by standing waves. Set the POWER switch to the "HIGH" or "LOW" position.


