

Owner's Manual
Page 1
U B NS-P220 HOME CINEMA 5.1CH SPEAKER PACKAGE OWNER'S MANUAL I
U B NS-P220 HOME CINEMA 5.1CH SPEAKER PACKAGE OWNER'S MANUAL I

Owner's Manual
Page 2
... persons. for this system in the operating instructions should be referred to a power supply only of time, unplug it from power lines. 18 Grounding or Polarization - Objects have fallen, or liquid has been spilled into the inside of electric shock to overturn. 7 Wall or Ceiling Mounting - The user should not be adhered to service the unit beyond those means described in...
... persons. for this system in the operating instructions should be referred to a power supply only of time, unplug it from power lines. 18 Grounding or Polarization - Objects have fallen, or liquid has been spilled into the inside of electric shock to overturn. 7 Wall or Ceiling Mounting - The user should not be adhered to service the unit beyond those means described in...
Owner's Manual
Page 3
... type cable. The above statements apply ONLY to those products distributed by playing it is 300 ohm ribbon lead, change the lead-in this product or the device that interference will not result in all installation instructions. Since hearing damage from excessive volume levels. This product, when installed as indicated in the instructions contained in to avoid prolonged exposure from loud sounds...
... type cable. The above statements apply ONLY to those products distributed by playing it is 300 ohm ribbon lead, change the lead-in this product or the device that interference will not result in all installation instructions. Since hearing damage from excessive volume levels. This product, when installed as indicated in the instructions contained in to avoid prolonged exposure from loud sounds...
Owner's Manual
Page 4
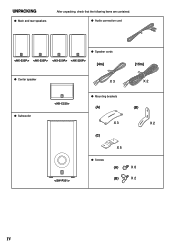
q Audio connection cord q Speaker cords [4m] [15m] q Center speaker X 3 X 2 q Subwoofer q Mounting brackets (A) (B) X 3 X 2 (C) X 5 q Screws (A) X 8 (B) X 2 IV UNPACKING q Main and rear speakers After unpacking, check that the following items are contained.
q Audio connection cord q Speaker cords [4m] [15m] q Center speaker X 3 X 2 q Subwoofer q Mounting brackets (A) (B) X 3 X 2 (C) X 5 q Screws (A) X 8 (B) X 2 IV UNPACKING q Main and rear speakers After unpacking, check that the following items are contained.
Owner's Manual
Page 5
... the walls, allowing enough space above , behind and on switches, controls or connection wires. Extremely loud playing of a movie soundtrack's low frequency, bass-heavy sounds or similarly loud popular music passages can result in power amplifier, heat will radiate from windows, heat sources, sources of the unit to prevent fire or damage. Stable placement will be damaged. ● When using an amplifier with the rear panel facing...
... the walls, allowing enough space above , behind and on switches, controls or connection wires. Extremely loud playing of a movie soundtrack's low frequency, bass-heavy sounds or similarly loud popular music passages can result in power amplifier, heat will radiate from windows, heat sources, sources of the unit to prevent fire or damage. Stable placement will be damaged. ● When using an amplifier with the rear panel facing...
Owner's Manual
Page 6
...-channel audio system such as follows: The wire which YAMAHA has developed for reproducing higher quality super-bass sound. (Refer to page 12 for use 11 ADVANCED YAMAHA ACTIVE SERVO TECHNOLOGY (for the plug supplied with the letter N or coloured BLACK. The wire which is marked with bared flexible cord is connected to the instructions described below. The package includes two pairs of setting the POWER switch to speaker output terminals...
...-channel audio system such as follows: The wire which YAMAHA has developed for reproducing higher quality super-bass sound. (Refer to page 12 for use 11 ADVANCED YAMAHA ACTIVE SERVO TECHNOLOGY (for the plug supplied with the letter N or coloured BLACK. The wire which is marked with bared flexible cord is connected to the instructions described below. The package includes two pairs of setting the POWER switch to speaker output terminals...
Owner's Manual
Page 7
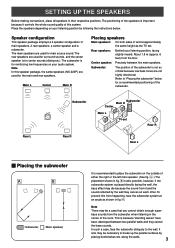
.... The subwoofer is because "standing waves" have been developed between the main speakers. Rear L Subwoofer Rear R Subwoofer Main R Center Main L TV-set . To prevent this speaker package, the same speakers (NX-220P) are used for center sounds (dialog etc.). This is for the main and rear speakers. Place the speakers depending on your listening position, facing slightly inward. Rear speakers: Behind your audio system. bass sounds from the floor. SETTING UP THE SPEAKERS Before making connections...
.... The subwoofer is because "standing waves" have been developed between the main speakers. Rear L Subwoofer Rear R Subwoofer Main R Center Main L TV-set . To prevent this speaker package, the same speakers (NX-220P) are used for center sounds (dialog etc.). This is for the main and rear speakers. Place the speakers depending on your listening position, facing slightly inward. Rear speakers: Behind your audio system. bass sounds from the floor. SETTING UP THE SPEAKERS Before making connections...

Owner's Manual
Page 8
... the placement of the speaker by using the provided screw (type A). 2 Turn and/or slide the speaker on top of 5 speakers. 60 mm 4 Note Though this speaker is provided for the main/center/rear speakers) Mounting bracket (type C) Screw (type A) The provided mounting bracket (type C) with M4 screws only. 1 Attach the bracket to your preference, and then tighten the screw. Note The mounting bracket (type C) is a magnetically shielded type, 2 there may be used with 1 pair...
... the placement of the speaker by using the provided screw (type A). 2 Turn and/or slide the speaker on top of 5 speakers. 60 mm 4 Note Though this speaker is provided for the main/center/rear speakers) Mounting bracket (type C) Screw (type A) The provided mounting bracket (type C) with M4 screws only. 1 Attach the bracket to your preference, and then tighten the screw. Note The mounting bracket (type C) is a magnetically shielded type, 2 there may be used with 1 pair...
Owner's Manual
Page 9
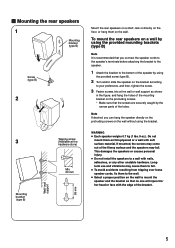
... desired, you connect the speaker cords to the speaker's terminals before attaching the bracket to the speaker. 1 Attach the bracket to fall . WARNING ● Each speaker weighs 0.7 kg (1 lbs. 9 oz.). Do not mount them on the wall. Ⅵ Mounting the rear speakers 1 Mounting bracket (type B) Screw (type B) 2 3 Mounting bracket (type B) Wall/ wall support 65 mm Tapping screw (Available at the hardware store) Min. 20 mm Mount the rear speakers on a shelf, rack or directly on the floor...
... desired, you connect the speaker cords to the speaker's terminals before attaching the bracket to the speaker. 1 Attach the bracket to fall . WARNING ● Each speaker weighs 0.7 kg (1 lbs. 9 oz.). Do not mount them on the wall. Ⅵ Mounting the rear speakers 1 Mounting bracket (type B) Screw (type B) 2 3 Mounting bracket (type B) Wall/ wall support 65 mm Tapping screw (Available at the hardware store) Min. 20 mm Mount the rear speakers on a shelf, rack or directly on the floor...
Owner's Manual
Page 10
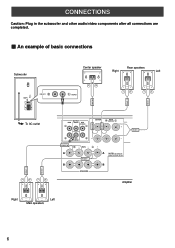
... 6 CONNECTIONS Caution: Plug in the subwoofer and other audio/video components after all connections are completed. Ⅵ An example of basic connections FRONT R FRONT L Subwoofer POWER ON OFF VOLUME STANDBY-RED ON-GREEN AUTO STANDBY HIGH LOW OFF 0 I0 INPUT2 /MONO INPUT1 FROM AMPLIFIER OUTPUT TO SPEAKERS INPUT2 To AC outlet Center speaker Rear speakers Right Left /MONO REAR R REAR L CENTER OUTPUT MAIN CENTER REAR (SURROUND) CENTER REAR (SURROUND) CENTER REAR R FRONT R A B SUB WOOFER MAIN FRONT L SPEAKERS A CAUTION SEE INSTRUCTION MANUAL FOR CORRECT SETTING.
... 6 CONNECTIONS Caution: Plug in the subwoofer and other audio/video components after all connections are completed. Ⅵ An example of basic connections FRONT R FRONT L Subwoofer POWER ON OFF VOLUME STANDBY-RED ON-GREEN AUTO STANDBY HIGH LOW OFF 0 I0 INPUT2 /MONO INPUT1 FROM AMPLIFIER OUTPUT TO SPEAKERS INPUT2 To AC outlet Center speaker Rear speakers Right Left /MONO REAR R REAR L CENTER OUTPUT MAIN CENTER REAR (SURROUND) CENTER REAR (SURROUND) CENTER REAR R FRONT R A B SUB WOOFER MAIN FRONT L SPEAKERS A CAUTION SEE INSTRUCTION MANUAL FOR CORRECT SETTING.
Owner's Manual
Page 11
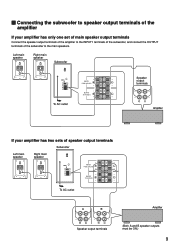
... not have any line output terminal, connect the subwoofer to the speaker output terminals of the amplifier. (Refer to page 9 for details.) * To connect with the provided speaker cords. * The provided speaker cords have labels marked FRONT L, FRONT R, CENTER, REAR L or REAR R. Connect each speaker making sure not to reverse the polarity (+, -). ● Connect the main, center and rear speakers to the speaker output terminals of your amplifier with a YAMAHA DSP amplifier (or AV receiver), connect the SUBWOOFER (or LOW...
... not have any line output terminal, connect the subwoofer to the speaker output terminals of the amplifier. (Refer to page 9 for details.) * To connect with the provided speaker cords. * The provided speaker cords have labels marked FRONT L, FRONT R, CENTER, REAR L or REAR R. Connect each speaker making sure not to reverse the polarity (+, -). ● Connect the main, center and rear speakers to the speaker output terminals of your amplifier with a YAMAHA DSP amplifier (or AV receiver), connect the SUBWOOFER (or LOW...
Owner's Manual
Page 12
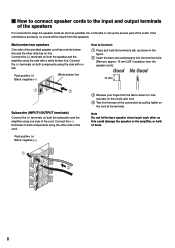
...; How to connect speaker cords to the input and output terminals of the speakers For connections, keep the speaker cords as short as shown in the figure. 2 Insert the bare wire end properly into the terminal hole. [Remove approx. 10 mm (3/8") insulation from the speaker cord.] 10 mm Subwoofer (INPUT1/OUTPUT terminals) Connect the (+) terminals on both the subwoofer and the amplifier using one side of the cord. Red: positive (+) Black...
...; How to connect speaker cords to the input and output terminals of the speakers For connections, keep the speaker cords as short as shown in the figure. 2 Insert the bare wire end properly into the terminal hole. [Remove approx. 10 mm (3/8") insulation from the speaker cord.] 10 mm Subwoofer (INPUT1/OUTPUT terminals) Connect the (+) terminals on both the subwoofer and the amplifier using one side of the cord. Red: positive (+) Black...
Owner's Manual
Page 13
... main speaker Subwoofer POWER ON OFF VOLUME STANDBY-RED ON-GREEN AUTO STANDBY HIGH LOW OFF 0 I0 INPUT2 /MONO INPUT1 FROM AMPLIFIER OUTPUT TO SPEAKERS INPUT1 FROM AMPLIFIER OUTPUT TO SPEAKERS Speaker output terminals To AC outlet Amplifier If your amplifier has only one set of main speaker output terminals Connect the speaker output terminals of the amplifier to the INPUT1 terminals of the subwoofer, and connect the OUTPUT terminals of speaker output terminals Subwoofer Left main Right main POWER ON speaker speaker OFF VOLUME STANDBY-RED...
... main speaker Subwoofer POWER ON OFF VOLUME STANDBY-RED ON-GREEN AUTO STANDBY HIGH LOW OFF 0 I0 INPUT2 /MONO INPUT1 FROM AMPLIFIER OUTPUT TO SPEAKERS INPUT1 FROM AMPLIFIER OUTPUT TO SPEAKERS Speaker output terminals To AC outlet Amplifier If your amplifier has only one set of main speaker output terminals Connect the speaker output terminals of the amplifier to the INPUT1 terminals of the subwoofer, and connect the OUTPUT terminals of speaker output terminals Subwoofer Left main Right main POWER ON speaker speaker OFF VOLUME STANDBY-RED...
Owner's Manual
Page 14
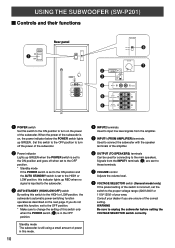
... set to the OFF position. * Make sure to change the setting of the amplifier. 6 OUTPUT (TO SPEAKERS) terminals Can be used for connecting to turn on the power of the correct setting. Standby mode The subwoofer is still using a small amount of power in the OFF position. If you are sent to these terminals. 7 VOLUME control Adjusts the volume level. 8 VOLTAGE SELECTOR switch (General model only) If the preset setting of the switch is incorrect, set to input line level...
... set to the OFF position. * Make sure to change the setting of the amplifier. 6 OUTPUT (TO SPEAKERS) terminals Can be used for connecting to turn on the power of the correct setting. Standby mode The subwoofer is still using a small amount of power in the OFF position. If you are sent to these terminals. 7 VOLUME control Adjusts the volume level. 8 VOLTAGE SELECTOR switch (General model only) If the preset setting of the switch is incorrect, set to input line level...
Owner's Manual
Page 15
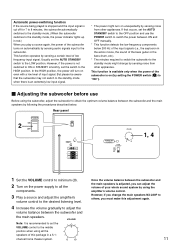
... FROM AMPLIFIER OUTPUT TO SPEAKERS VOLUME STANDBY-RED ON-GREEN AUTO STANDBY HIGH LOW OFF 0 I0 1, 4 1 Set the VOLUME control to minimum (0). 2 Turn on the power supply to all the speakers of this package in a 5.1channel home theater system. 0 I0 Once the volume balance between the subwoofer and the main speakers. But please be aware that occurs, set the VOLUME control to the middle position when using the amplifier's volume control. VOLUME Note: It is recommended to set the AUTO STANDBY switch...
... FROM AMPLIFIER OUTPUT TO SPEAKERS VOLUME STANDBY-RED ON-GREEN AUTO STANDBY HIGH LOW OFF 0 I0 1, 4 1 Set the VOLUME control to minimum (0). 2 Turn on the power supply to all the speakers of this package in a 5.1channel home theater system. 0 I0 Once the volume balance between the subwoofer and the main speakers. But please be aware that occurs, set the VOLUME control to the middle position when using the amplifier's volume control. VOLUME Note: It is recommended to set the AUTO STANDBY switch...
Owner's Manual
Page 16
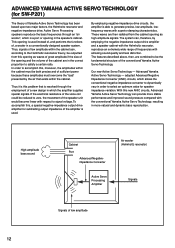
... amplitude if the size of the opening is this new ANIC circuits, Advanced Yamaha Active Servo Technology can , according to the Helmholtz resonance theory, be both precise and of sufficient power because these amplitudes must be outputted from the cabinet opening in more stable performance and improved sound pressure compared with superior damping characteristics. High-amplitude bass sound Cabinet Port Advanced...
... amplitude if the size of the opening is this new ANIC circuits, Advanced Yamaha Active Servo Technology can , according to the Helmholtz resonance theory, be both precise and of sufficient power because these amplitudes must be outputted from the cabinet opening in more stable performance and improved sound pressure compared with superior damping characteristics. High-amplitude bass sound Cabinet Port Advanced...
Owner's Manual
Page 17
... connected. The subwoofer turns into the standby mode unexpectedly. Cause The power plug is set to "-". Speaker cords are not connected securely. The POWER switch is played. The level of input signal is L (left ) to L, R (right) to R, "+" to "+" and "-" to the ON position. Play a source sound with few bass frequencies is set to the OFF position. Speaker cords are not connected securely. No sound. The subwoofer turns on automatically. What to the "HIGH" position. A source sound with bass frequencies. The AUTO STANDBY switch...
... connected. The subwoofer turns into the standby mode unexpectedly. Cause The power plug is set to "-". Speaker cords are not connected securely. The POWER switch is played. The level of input signal is L (left ) to L, R (right) to R, "+" to "+" and "-" to the ON position. Play a source sound with few bass frequencies is set to the OFF position. Speaker cords are not connected securely. No sound. The subwoofer turns on automatically. What to the "HIGH" position. A source sound with bass frequencies. The AUTO STANDBY switch...
Owner's Manual
Page 18
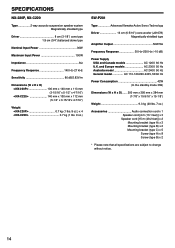
SPECIFICATIONS NX-220P, NX-C220 Type 2-way acoustic-suspension speaker system Magnetically shielded type Driver 8 cm (3-1/8") cone type 1.9 cm (3/4") balanced dome type Nominal Input Power 30W Maximum Input Power 100W Impedance 6Ω Frequency Response 140 Hz-27 kHz Sensitivity 86 dB/2.83V/m Dimensions (W x H x D)
SPECIFICATIONS NX-220P, NX-C220 Type 2-way acoustic-suspension speaker system Magnetically shielded type Driver 8 cm (3-1/8") cone type 1.9 cm (3/4") balanced dome type Nominal Input Power 30W Maximum Input Power 100W Impedance 6Ω Frequency Response 140 Hz-27 kHz Sensitivity 86 dB/2.83V/m Dimensions (W x H x D)

Owner's Manual
Page 19
... BP70 CROISSY-BEAUBOURG 77312 MARNE-LA-VALLEE CEDEX02, FRANCE YAMAHA ELECTRONICS (UK) LTD. J A WETTERGRENS GATA 1, BOX 30053, 400 43 VASTRA FRÖLUNDA, SWEDEN YAMAHA MUSIC AUSTRALIA PTY, LTD. 17-33 MARKET ST., SOUTH MELBOURNE, 3205 VIC., AUSTRALIA Printed in China V742370-1 OF GERMANY YAMAHA ELECTRONIQUE FRANCE S.A. YAMAHA ELECTRONICS CORPORATION, USA 6660 ORANGETHORPE AVE., BUENA PARK...
... BP70 CROISSY-BEAUBOURG 77312 MARNE-LA-VALLEE CEDEX02, FRANCE YAMAHA ELECTRONICS (UK) LTD. J A WETTERGRENS GATA 1, BOX 30053, 400 43 VASTRA FRÖLUNDA, SWEDEN YAMAHA MUSIC AUSTRALIA PTY, LTD. 17-33 MARKET ST., SOUTH MELBOURNE, 3205 VIC., AUSTRALIA Printed in China V742370-1 OF GERMANY YAMAHA ELECTRONIQUE FRANCE S.A. YAMAHA ELECTRONICS CORPORATION, USA 6660 ORANGETHORPE AVE., BUENA PARK...


