Owners Manual
Page 3
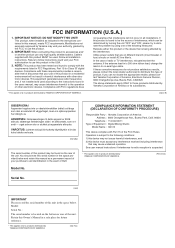
... product in a safe place for Class "B" digital devices. Follow all installations. If this product is subject to use of theft. Modifications not expressly approved by Yamaha may cause undesired operation. If these requirements provides...manual, meets FCC requirements. IMPORTANT NOTICE: DO NOT MODIFY THIS UNIT! COMPLIANCE INFORMATION STATEMENT (DECLARATION OF CONFORMITY PROCEDURE) Responsible Party : Yamaha Corporation of America Address : 6600 Orangethorpe Ave., Buena Park, Calif. 90620 Telephone : 714-522-9011 Type of Equipment : Digital Mixing Studio Model Name : n8/n12...
... product in a safe place for Class "B" digital devices. Follow all installations. If this product is subject to use of theft. Modifications not expressly approved by Yamaha may cause undesired operation. If these requirements provides...manual, meets FCC requirements. IMPORTANT NOTICE: DO NOT MODIFY THIS UNIT! COMPLIANCE INFORMATION STATEMENT (DECLARATION OF CONFORMITY PROCEDURE) Responsible Party : Yamaha Corporation of America Address : 6600 Orangethorpe Ave., Buena Park, Calif. 90620 Telephone : 714-522-9011 Type of Equipment : Digital Mixing Studio Model Name : n8/n12...
Owners Manual
Page 4
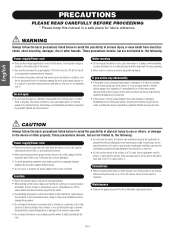
The required voltage is printed on the name plate of the device. • Use only the included AC power adaptor (*PA-30 for the n12, PA-20 for future reference. Location • Before moving the device, remove all equalizer controls and faders to their maximum. In particular, do not...switch, disconnect the electric plug from the outlet, and have the device inspected by qualified Yamaha service personnel. • If this manual in a safe place for the n8 or an equivalent recommended by Yamaha). • Do not place the power cord near heat sources such as heaters or radiators, and...
The required voltage is printed on the name plate of the device. • Use only the included AC power adaptor (*PA-30 for the n12, PA-20 for future reference. Location • Before moving the device, remove all equalizer controls and faders to their maximum. In particular, do not...switch, disconnect the electric plug from the outlet, and have the device inspected by qualified Yamaha service personnel. • If this manual in a safe place for the n8 or an equivalent recommended by Yamaha). • Do not place the power cord near heat sources such as heaters or radiators, and...
Owners Manual
Page 5
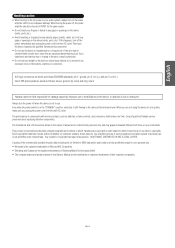
... Copying of their respective companies. (5)-4 If you experience any gaps or openings on the device (vents, ports, etc.) If this Owner's Manual are not using the device for a long period of Steinberg Media Technologies GmbH. • The company names and product names in this happens,...destroyed. Always turn the power off the power immediately and unplug the power cord from the AC outlet. Consult qualifi ed Yamaha service personnel about replacing defective components. When turning the power off, the power amplifier should be held responsible for instructional ...
... Copying of their respective companies. (5)-4 If you experience any gaps or openings on the device (vents, ports, etc.) If this Owner's Manual are not using the device for a long period of Steinberg Media Technologies GmbH. • The company names and product names in this happens,...destroyed. Always turn the power off the power immediately and unplug the power cord from the AC outlet. Consult qualifi ed Yamaha service personnel about replacing defective components. When turning the power off, the power amplifier should be held responsible for instructional ...
Owners Manual
Page 6
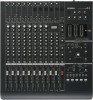
...ROM Cubase AI 4 DVD-ROM NOTE Please read this book in a surround sound environment. Owner's Manual IEEE 1394 cable TOOLS for n/Cubase AI 4 installation guide 6 Owner's Manual TOOLS for future reference. Please check with Cubase Install Cubase AI 4 on each channel Each input ... your Yamaha dealer. For example, you to microphone and other line-level instruments. The software license agreement is , or mix Cubase audio tracks on an examination of the mixer's superlative features and enjoy trouble-free operation for purchasing the Yamaha n8/n12 Digital Mixing Studio.
...ROM Cubase AI 4 DVD-ROM NOTE Please read this book in a surround sound environment. Owner's Manual IEEE 1394 cable TOOLS for n/Cubase AI 4 installation guide 6 Owner's Manual TOOLS for future reference. Please check with Cubase Install Cubase AI 4 on each channel Each input ... your Yamaha dealer. For example, you to microphone and other line-level instruments. The software license agreement is , or mix Cubase audio tracks on an examination of the mixer's superlative features and enjoy trouble-free operation for purchasing the Yamaha n8/n12 Digital Mixing Studio.
Owners Manual
Page 7
...the Power to Cubase 41 Mixing recorded tracks 43 Mixing audio tracks 43 Mixing down 45 Monitoring in a Surround Sound Environment (n12 only 46 Connecting surround speakers 46 Placement of n8/n12 and DAW 207 Dimensional Diagrams 209 Block Diagram 210 MIDI Implementation Chart 211 Owner's Manual 7 Don't Be Afraid...28 Mastery of EQ 29 Panning and balancing 30 Mixing into stereo 30 Applying reverb 31 Soloing a channel 32 Using the n8/n12 with Cubase 4/ Cubase Studio 4/Cubase AI 4 ........ 33 What you can do using the n8/n12 with a computer 51 Index 53 Appendix 204 ...
...the Power to Cubase 41 Mixing recorded tracks 43 Mixing audio tracks 43 Mixing down 45 Monitoring in a Surround Sound Environment (n12 only 46 Connecting surround speakers 46 Placement of n8/n12 and DAW 207 Dimensional Diagrams 209 Block Diagram 210 MIDI Implementation Chart 211 Owner's Manual 7 Don't Be Afraid...28 Mastery of EQ 29 Panning and balancing 30 Mixing into stereo 30 Applying reverb 31 Soloing a channel 32 Using the n8/n12 with Cubase 4/ Cubase Studio 4/Cubase AI 4 ........ 33 What you can do using the n8/n12 with a computer 51 Index 53 Appendix 204 ...
Owners Manual
Page 8
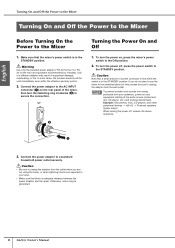
...the mixer, then turn the fastening ring clockwise (2) to use the mixer for the n8 or an equivalent recommended by Yamaha). Connect the power adaptor to the Mixer 1. To turn the power on, press the mixer's power switch to ... distance between the power adaptor and the mixer. Example: Instruments, mics, CD players, and other peripheral devices → n8/n12 → Powered speakers (power amps) When turning the power off , press the power switch to the STANDBY position. If ... household power outlet securely. In such cases, the product warranty will be generated. 8 Owner's Manual
...the mixer, then turn the fastening ring clockwise (2) to use the mixer for the n8 or an equivalent recommended by Yamaha). Connect the power adaptor to the Mixer 1. To turn the power on, press the mixer's power switch to ... distance between the power adaptor and the mixer. Example: Instruments, mics, CD players, and other peripheral devices → n8/n12 → Powered speakers (power amps) When turning the power off , press the power switch to the STANDBY position. If ... household power outlet securely. In such cases, the product warranty will be generated. 8 Owner's Manual
Owners Manual
Page 9
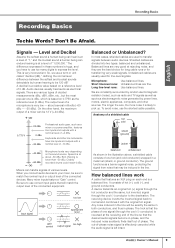
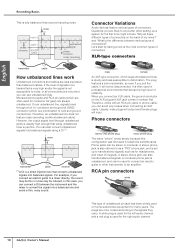
...The longer the wire, the more noise it with a nominal level of the connected devices. To avoid noise, use too many digits to match the nominal input or output level of +4 dBu. The ground functions as a barrier against noise, protecting the signal from... into two types: balanced and unbalanced. Speech is a balanced line. Shielded cables are used for transferring very weak signals. Owner's Manual 9 Unbalanced cables are constantly surrounded by human hearing to transfer signals between the softest and loudest sounds detectable by random electromagnetic radiation ...
...The longer the wire, the more noise it with a nominal level of the connected devices. To avoid noise, use too many digits to match the nominal input or output level of +4 dBu. The ground functions as a barrier against noise, protecting the signal from... into two types: balanced and unbalanced. Speech is a balanced line. Shielded cables are used for transferring very weak signals. Owner's Manual 9 Unbalanced cables are constantly surrounded by human hearing to transfer signals between the softest and loudest sounds detectable by random electromagnetic radiation ...
Owners Manual
Page 10
... jack can also handle balanced signals. The plugs are less expensive than balanced cables. A white plug is used for the right audio channel. 10 Owner's Manual
... jack can also handle balanced signals. The plugs are less expensive than balanced cables. A white plug is used for the right audio channel. 10 Owner's Manual

Owners Manual
Page 11
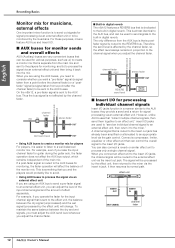
...peak LED that cuts the sound below a specified frequency. Most mixers have multiple level meters (including the indicators). The n8/n12 features the following buses: • STEREO bus (L/R) • AUX bus (L/R) • REC bus (L/R) • REVERB ... to adjust the level of the mixer's main output from buses. Owner's Manual 11 An equalizer could be a high pass filter that indicates only the peak level. This... The head amp features a gain control that is to collect signals from all channels and mix to achieve a good balance. If the input signal is the mixer's final output level....
...peak LED that cuts the sound below a specified frequency. Most mixers have multiple level meters (including the indicators). The n8/n12 features the following buses: • STEREO bus (L/R) • AUX bus (L/R) • REC bus (L/R) • REVERB ... to adjust the level of the mixer's main output from buses. Owner's Manual 11 An equalizer could be a high pass filter that indicates only the peak level. This... The head amp features a gain control that is to collect signals from all channels and mix to achieve a good balance. If the input signal is the mixer's final output level....
Owners Manual
Page 12
... function in a manner similar to the AUX buses: they provide a send and a return for signal processing via the insert in digital reverb The n8/n12 features a REVERB bus that can also connect a reverb or similar effect unit to the channel signal when you adjust the channel fader...stereo fader OUT REVERB send level digital reverb ■ Insert I/O for processing individual channel signals Insert I /O jacks, the channel signal will affect the balance of the main mix. effect unit INSERT OUT INPUT CHANNEL INSERT IN channel fader 12 Owner's Manual Therefore, the send level is...
... function in a manner similar to the AUX buses: they provide a send and a return for signal processing via the insert in digital reverb The n8/n12 features a REVERB bus that can also connect a reverb or similar effect unit to the channel signal when you adjust the channel fader...stereo fader OUT REVERB send level digital reverb ■ Insert I/O for processing individual channel signals Insert I /O jacks, the channel signal will affect the balance of the main mix. effect unit INSERT OUT INPUT CHANNEL INSERT IN channel fader 12 Owner's Manual Therefore, the send level is...
Owners Manual
Page 13
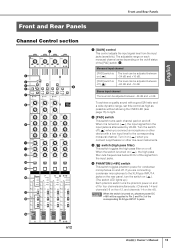
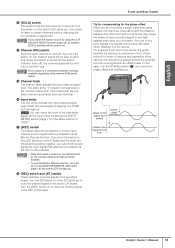
... channels 1-4 on ( ), the high pass filter cuts frequencies below 80 Hz of the corresponding XLR-type INPUT A jacks. % n12 Owner's Manual 13 Stereo input channel The level can be adjusted between -26 dB and +4 dB. To achieve a quality sound with a low input level to light. 2 [PAD] ...
... channels 1-4 on ( ), the high pass filter cuts frequencies below 80 Hz of the corresponding XLR-type INPUT A jacks. % n12 Owner's Manual 13 Stereo input channel The level can be adjusted between -26 dB and +4 dB. To achieve a quality sound with a low input level to light. 2 [PAD] ...
Owners Manual
Page 14
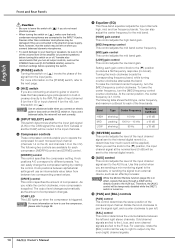
...control when you are sending a mix monitoring signal to the musicians, or sending the signal to page 28. 14 Owner's Manual 9 Equalizer (EQ) This three...controls are connected to the internal digital reverb (i.e., determines how much reverb will be sent to the internal digital reverb. ! [AUX] control This... 8 (on the n12) or input channel 4 (on the n8), turn this switch on ( ). For more compression is turned on the n12). Front and Rear Panels...guitar or bass and turn the [MID] frequency control clockwise. Yamaha also recommends that the switch may be damaged if they are ...
...control when you are sending a mix monitoring signal to the musicians, or sending the signal to page 28. 14 Owner's Manual 9 Equalizer (EQ) This three...controls are connected to the internal digital reverb (i.e., determines how much reverb will be sent to the internal digital reverb. ! [AUX] control This... 8 (on the n12) or input channel 4 (on the n8), turn this switch on ( ). For more compression is turned on the n12). Front and Rear Panels...guitar or bass and turn the [MID] frequency control clockwise. Yamaha also recommends that the switch may be damaged if they are ...
Owners Manual
Page 15
... for the corresponding input channel will be disabled. • To use the Monitor Remote function, you want to listen to certain channels without changing the mix contents or signal path. phase of mic signal from in a thin sound. In this switch is clipping, the OVER LED will light up ) to ...the input channel signal level. NOTE • While this case, turn on , the channel signal will be sent to each other , resulting in front Owner's Manual 15 If you turn this switch on (the LED lights up ), if you must turn the [PHASE] switch (5) on (the LED lights up . Turn ...
... for the corresponding input channel will be disabled. • To use the Monitor Remote function, you want to listen to certain channels without changing the mix contents or signal path. phase of mic signal from in a thin sound. In this switch is clipping, the OVER LED will light up ) to ...the input channel signal level. NOTE • While this case, turn on , the channel signal will be sent to each other , resulting in front Owner's Manual 15 If you turn this switch on (the LED lights up ), if you must turn the [PHASE] switch (5) on (the LED lights up . Turn ...

Owners Manual
Page 16
... level of and route the stereo signal transmitted from the DAW (DAW IN 1/2). [LEVEL] control This control adjusts the level of the internal digital reverb. The "0" position corresponds to adjust the monitoring volume level. PLATE Simulates reverberation of a plate echo. [REVERB TIME] control This control...signal to the mixer's STEREO buses. Turn the desired switch on ( ). Rotating the knob counter-clockwise will shorten the duration, 16 Owner's Manual and rotating it clockwise will be sent to the STEREO buses. When the switch is turned on ( ), the 2TR IN signal is turned...
... level of and route the stereo signal transmitted from the DAW (DAW IN 1/2). [LEVEL] control This control adjusts the level of the internal digital reverb. The "0" position corresponds to adjust the monitoring volume level. PLATE Simulates reverberation of a plate echo. [REVERB TIME] control This control...signal to the mixer's STEREO buses. Turn the desired switch on ( ). Rotating the knob counter-clockwise will shorten the duration, 16 Owner's Manual and rotating it clockwise will be sent to the STEREO buses. When the switch is turned on ( ), the 2TR IN signal is turned...
Owners Manual
Page 17
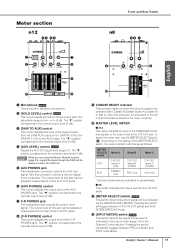
...bus signals, or the output level at the AUX PHONES jack. Meter section n12 34 56 Front and Rear Panels n8 56 7 English 1 7 2 8 3 8 ) 9 9 ) @ ! 1 Microphone Only This is ready to be operated with Cubase 4/Cubase Studio 4/Cubase AI 4; Use this jack can be indicated via the MASTER LEVEL...channels are using the Monitor Remote function (page 33), signals that pass through the DAW will be directly routed to the AUX buses. Owner's Manual 17 The output level at this connector to send a monitor signal to +6 dB. that of the signal routed from -∞ to the...
...bus signals, or the output level at the AUX PHONES jack. Meter section n12 34 56 Front and Rear Panels n8 56 7 English 1 7 2 8 3 8 ) 9 9 ) @ ! 1 Microphone Only This is ready to be operated with Cubase 4/Cubase Studio 4/Cubase AI 4; Use this jack can be indicated via the MASTER LEVEL...channels are using the Monitor Remote function (page 33), signals that pass through the DAW will be directly routed to the AUX buses. Owner's Manual 17 The output level at this connector to send a monitor signal to +6 dB. that of the signal routed from -∞ to the...
Owners Manual
Page 18
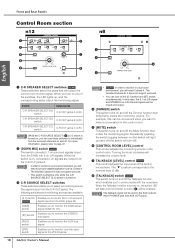
...to monitor only the input signal at the 2TR IN jacks. 18 Owner's Manual NOTE • Only In order to communicate with the musicians. NOTE • In order to page 47. 2 [DOWN MIX] switch Only This switch converts 5.1-ch surround signals (input from the C-R OUT... jacks). Front and Rear Panels Control Room section n12 n8 1 2 3 3 4 7 4 6 6 5 8 5 English 1 C-R SPEAKER SELECT switches ...
...to monitor only the input signal at the 2TR IN jacks. 18 Owner's Manual NOTE • Only In order to communicate with the musicians. NOTE • In order to page 47. 2 [DOWN MIX] switch Only This switch converts 5.1-ch surround signals (input from the C-R OUT... jacks). Front and Rear Panels Control Room section n12 n8 1 2 3 3 4 7 4 6 6 5 8 5 English 1 C-R SPEAKER SELECT switches ...

Owners Manual
Page 19
...in Cubase. 4 CLICK REMOTE [ON] switch This switch remotely turns on Owner's Manual 19 NOTE • To use the Monitor Remote function, turn on your needs....Cubase. 7 TRANSPORT switches These switches remotely control the transport section in Cubase. Moves the current position to Cubase 4/Cubase Studio 4/Cubase AI 4. Each switch has the following function: [CYCLE] switch [ ] switch [ADD] switch [ ] ...one below in the track list) in Cubase 4. Moves the current position to the n8/n12, then mix them . When the mixer is on and off . Plays the project. If you ...
...in Cubase. 4 CLICK REMOTE [ON] switch This switch remotely turns on Owner's Manual 19 NOTE • To use the Monitor Remote function, turn on your needs....Cubase. 7 TRANSPORT switches These switches remotely control the transport section in Cubase. Moves the current position to Cubase 4/Cubase Studio 4/Cubase AI 4. Each switch has the following function: [CYCLE] switch [ ] switch [ADD] switch [ ] ...one below in the track list) in Cubase 4. Moves the current position to the n8/n12, then mix them . When the mixer is on and off . Plays the project. If you ...
Owners Manual
Page 20
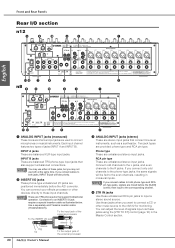
...phone-type jacks, the same signals will take priority. 2 INSERT I/O jacks These phone-type unbalanced I /O section n12 9 8 ) 4 3 1 English !@ 7 6 n8 98 ) 5 4 3 2 1 !@ 65 ... input channel features two types of the external processor 20 Owner's Manual 2 3 ANALOG INPUT jacks (stereo) These are stereo input jacks...will be fed to the R jacks. Use a separately-sold Yamaha insertion cable (YIC025/050/070). NOTE These are balanced TRS ... to both phone type and RCA pin type jacks, signals are mixed before the A/D converter. INPUT A jacks These are provided: phone...
...phone-type jacks, the same signals will take priority. 2 INSERT I/O jacks These phone-type unbalanced I /O section n12 9 8 ) 4 3 1 English !@ 7 6 n8 98 ) 5 4 3 2 1 !@ 65 ... input channel features two types of the external processor 20 Owner's Manual 2 3 ANALOG INPUT jacks (stereo) These are stereo input jacks...will be fed to the R jacks. Use a separately-sold Yamaha insertion cable (YIC025/050/070). NOTE These are balanced TRS ... to both phone type and RCA pin type jacks, signals are mixed before the A/D converter. INPUT A jacks These are provided: phone...
Owners Manual
Page 21
...optional foot switch (such as Yamaha FC4 or FC5) to this will operate as the Mackie Control...and unbalanced phone-type connections for the Control Room monitor. Owner's Manual 21 RCA pin type These are unbalanced stereo output jacks. 6 C-R...sure to unplug the adaptor from either type of Cubase 4/Cubase Studio 4/Cubase AI 4 using your main speakers. By default, ...signal level is output. If necessary, you are connecting the n8/n12 to a computer via MIDI cables. NOTE • Use an ... Rear Panels 5 ST OUT jacks These stereo jacks output the mixed signal, and are suitable for use these jacks, for example,...
...optional foot switch (such as Yamaha FC4 or FC5) to this will operate as the Mackie Control...and unbalanced phone-type connections for the Control Room monitor. Owner's Manual 21 RCA pin type These are unbalanced stereo output jacks. 6 C-R...sure to unplug the adaptor from either type of Cubase 4/Cubase Studio 4/Cubase AI 4 using your main speakers. By default, ...signal level is output. If necessary, you are connecting the n8/n12 to a computer via MIDI cables. NOTE • Use an ... Rear Panels 5 ST OUT jacks These stereo jacks output the mixed signal, and are suitable for use these jacks, for example,...
Owners Manual
Page 22
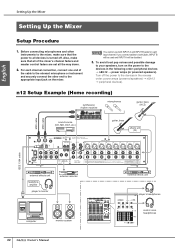
... connect the other end to the appropriate input jack on the power to both INPUT A and INPUT B jacks for each input channel. n12 Setup Example (Home recording) synthesizer, rhythm machine microphones guitar, bass (Hi-Z) MIDI cable MIDI cable sound source (CD, MD, DAT,... bass effects unit (DI) IEEE 1394 cable external effects unit headphone amplifier player's monitor external recorder computer monitor system 22 Owner's Manual external effects unit player's headphones control room headphones Turn off the power to all devices is turned off. Before connecting microphones and other...
... connect the other end to the appropriate input jack on the power to both INPUT A and INPUT B jacks for each input channel. n12 Setup Example (Home recording) synthesizer, rhythm machine microphones guitar, bass (Hi-Z) MIDI cable MIDI cable sound source (CD, MD, DAT,... bass effects unit (DI) IEEE 1394 cable external effects unit headphone amplifier player's monitor external recorder computer monitor system 22 Owner's Manual external effects unit player's headphones control room headphones Turn off the power to all devices is turned off. Before connecting microphones and other...

