

Owner's Manual
Page 1
OWNER'S MANUAL MUSIC PRODUCTION SYNTHESIZER EN
OWNER'S MANUAL MUSIC PRODUCTION SYNTHESIZER EN

Owner's Manual
Page 6
... data may appear somewhat different from this instrument. Accessories The following items have everything listed here. ❏ Power adaptor (PA-5D)* ❏ Owner's Manual (this owner's manual are the trademarks or registered trademarks of the Yamaha MO Music Production Synthesizer! Any unauthorized use with the device. It's packed with your purchase of their respective companies...
... data may appear somewhat different from this instrument. Accessories The following items have everything listed here. ❏ Power adaptor (PA-5D)* ❏ Owner's Manual (this owner's manual are the trademarks or registered trademarks of the Yamaha MO Music Production Synthesizer! Any unauthorized use with the device. It's packed with your purchase of their respective companies...

Owner's Manual
Page 7
...48 ● Once you play , giving you easily call up various rhythm patterns at the touch of sequenced phrases in real time. Owner's Manual 7 Arpeggios can be triggered not only according to the keys you play, but also by how strongly you play in real time to ... addition to being able to -understand interface with independent Zones), and for operating your favorite sequencing software from your song, use with Yamaha's powerful Voice Editor and Multi Part Editor software-featuring comprehensive, intuitive Page 112 editing of which you can easily and intuitively combine in...
...48 ● Once you play , giving you easily call up various rhythm patterns at the touch of sequenced phrases in real time. Owner's Manual 7 Arpeggios can be triggered not only according to the keys you play, but also by how strongly you play in real time to ... addition to being able to -understand interface with independent Zones), and for operating your favorite sequencing software from your song, use with Yamaha's powerful Voice Editor and Multi Part Editor software-featuring comprehensive, intuitive Page 112 editing of which you can easily and intuitively combine in...

Owner's Manual
Page 8
..., functions, features, modes and operations in the Remote Control mode. 8 Owner's Manual This section explains all of the buttons, controls and connectors of this instrument, and shows how they fit together. Throughout this manual, arrows are covered here in playing and using your Yamaha dealer or service center. Troubleshooting...Page 227 If this instrument...
..., functions, features, modes and operations in the Remote Control mode. 8 Owner's Manual This section explains all of the buttons, controls and connectors of this instrument, and shows how they fit together. Throughout this manual, arrows are covered here in playing and using your Yamaha dealer or service center. Troubleshooting...Page 227 If this instrument...
Owner's Manual
Page 9
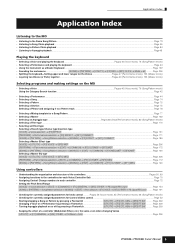
... and structure of a controller (Modulation Wheel, etc.) the same, even when changing Voices [UTILITY] → [F1] GENERAL → [SF4] OTHER → CtrlReset = hold ...Page 206 Owner's Manual 9 Page 209 • Turning Arpeggio playback on the MO • Selecting a Voice ...Pages 40 (Voice mode), 76 (Song/Pattern mode) Using the Category Search function...
... and structure of a controller (Modulation Wheel, etc.) the same, even when changing Voices [UTILITY] → [F1] GENERAL → [SF4] OTHER → CtrlReset = hold ...Page 206 Owner's Manual 9 Page 209 • Turning Arpeggio playback on the MO • Selecting a Voice ...Pages 40 (Voice mode), 76 (Song/Pattern mode) Using the Category Search function...

Owner's Manual
Page 10
...] → Pattern selection → [F6] CHAIN → [EDIT] → [F3] SONG Page 86 • Creating a Master...Page 122 • Creating an Arpeggio ...Page 97 10 Owner's Manual
...] → Pattern selection → [F6] CHAIN → [EDIT] → [F3] SONG Page 86 • Creating a Master...Page 122 • Creating an Arpeggio ...Page 97 10 Owner's Manual

Owner's Manual
Page 11
... the edited Master [MASTER] → Master selection → [F2] MEMORY → ZoneSwitch = on → [EDIT] → Zone selection → [F2] NOTE → Transpose Page 216 Owner's Manual 11 Page 192 • Initializing the edited Pattern Mixing settings PATTERN] → [MIXING] → [JOB] → [F1] INIT .......... Page 205 Adjusting the tuning to the...
... the edited Master [MASTER] → Master selection → [F2] MEMORY → ZoneSwitch = on → [EDIT] → Zone selection → [F2] NOTE → Transpose Page 216 Owner's Manual 11 Page 192 • Initializing the edited Pattern Mixing settings PATTERN] → [MIXING] → [JOB] → [F1] INIT .......... Page 205 Adjusting the tuning to the...

Owner's Manual
Page 12
... 102 • Setting the Mode set automatically when the power is turned on [UTILITY] → [F1] GENERAL → [SF4] OTHER → PowerOnMode ...Page 206 12 Owner's Manual
... 102 • Setting the Mode set automatically when the power is turned on [UTILITY] → [F1] GENERAL → [SF4] OTHER → PowerOnMode ...Page 206 12 Owner's Manual

Owner's Manual
Page 13
Table of Contents Table of Contents Introduction 6 Accessories 6 Main Features 7 How to use this manual 8 Application Index 9 The Controls & Connectors 14 Front Panel 14 Rear Panel 18 Setting up and Playing 20 Power supply 20 Playing the keyboard 22 Modes ... mode 205 File mode 211 Master mode 215 Appendix 219 Information Displays 219 Display Messages 221 About MIDI 223 Troubleshooting 227 Specifications 231 Index 232 Owner's Manual 13
Table of Contents Table of Contents Introduction 6 Accessories 6 Main Features 7 How to use this manual 8 Application Index 9 The Controls & Connectors 14 Front Panel 14 Rear Panel 18 Setting up and Playing 20 Power supply 20 Playing the keyboard 22 Modes ... mode 205 File mode 211 Master mode 215 Appendix 219 Information Displays 219 Display Messages 221 About MIDI 223 Troubleshooting 227 Specifications 231 Index 232 Owner's Manual 13
Owner's Manual
Page 14
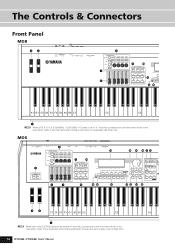
... → [F1] GENERAL → [SF2] KBD → Octave is set to "0," each key corresponds to the note name shown in the illustrations. MO6 PHONES OUTPUT L MONO R 2 OCTAVE DOWN UP DIGITAL OUT 6 FOOT CONTROLLER DAW REMOTE PAGE SELECT ASSIGN A PAN SEND PAN ASSIGN B REVERB ASSIGN 1 CHORUS ...buttons are turned off, each key corresponds to this illustration when setting parameters having note name values, such as Note Limit. 14 Owner's Manual Front Panel The Controls & Connectors Front Panel MO8 34 PHONES FOOT CONTROLLER OUTPUT L MONO R FOOT SWITCH DIGITAL OUT IN MIDI ...
... → [F1] GENERAL → [SF2] KBD → Octave is set to "0," each key corresponds to the note name shown in the illustrations. MO6 PHONES OUTPUT L MONO R 2 OCTAVE DOWN UP DIGITAL OUT 6 FOOT CONTROLLER DAW REMOTE PAGE SELECT ASSIGN A PAN SEND PAN ASSIGN B REVERB ASSIGN 1 CHORUS ...buttons are turned off, each key corresponds to this illustration when setting parameters having note name values, such as Note Limit. 14 Owner's Manual Front Panel The Controls & Connectors Front Panel MO8 34 PHONES FOOT CONTROLLER OUTPUT L MONO R FOOT SWITCH DIGITAL OUT IN MIDI ...

Owner's Manual
Page 15
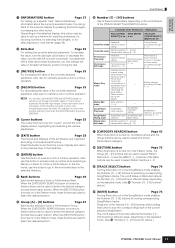
... 1 2 3 4 5 6 7 8 TRACK SELECT EDIT DEMO JOB STORE COMMON ELEMENT PERF. PART ZONE 9 10 11 12 13 14 15 16 MUTE E SOLO § STANDBY ON C5 C6 Owner's Manual 15 PIANO KEYBOARD ORGAN A B C GUITAR PLUCKED D BASS E STRINGS BRASS REED PIPE F G H SYN LEAD SYN PAD SYN COMP CHROMATIC DRUM SE MUSICAL FX COMBI CHOIR PERCUSSION...
... 1 2 3 4 5 6 7 8 TRACK SELECT EDIT DEMO JOB STORE COMMON ELEMENT PERF. PART ZONE 9 10 11 12 13 14 15 16 MUTE E SOLO § STANDBY ON C5 C6 Owner's Manual 15 PIANO KEYBOARD ORGAN A B C GUITAR PLUCKED D BASS E STRINGS BRASS REED PIPE F G H SYN LEAD SYN PAD SYN COMP CHROMATIC DRUM SE MUSICAL FX COMBI CHOIR PERCUSSION...

Owner's Manual
Page 16
... 33 These buttons located directly below the LCD display call up the corresponding functions indicated in the Song Play and Song Record modes. 16 Owner's Manual They can select the specific effect(s) to be also used to this button has no effect. ! To restore the normal octave setting...MO8 does not have OCTAVE buttons. 3 Pitch bend wheel Page 50 Controls the pitch bend effect. The Controls & Connectors Front Panel 1 Keyboard The MO6 features a 61-key keyboard, while the MO8 has 88 keys. With initial touch, the instrument senses how strongly or softly you play the keys, ...
... 33 These buttons located directly below the LCD display call up the corresponding functions indicated in the Song Play and Song Record modes. 16 Owner's Manual They can select the specific effect(s) to be also used to this button has no effect. ! To restore the normal octave setting...MO8 does not have OCTAVE buttons. 3 Pitch bend wheel Page 50 Controls the pitch bend effect. The Controls & Connectors Front Panel 1 Keyboard The MO6 features a 61-key keyboard, while the MO8 has 88 keys. With initial touch, the instrument senses how strongly or softly you play the keys, ...
Owner's Manual
Page 17
... selected mode. Functions of this button affects the Number [1] - [16] buttons in different ways, depending on the selected mode. (See § "Number [1] - [16] buttons" above .) Owner's Manual 17 Also use the [INC/YES] and [DEC/NO] buttons to quickly move the "cursor" around the LCD display screen, highlighting and selecting the various...
... selected mode. Functions of this button affects the Number [1] - [16] buttons in different ways, depending on the selected mode. (See § "Number [1] - [16] buttons" above .) Owner's Manual 17 Also use the [INC/YES] and [DEC/NO] buttons to quickly move the "cursor" around the LCD display screen, highlighting and selecting the various...
Owner's Manual
Page 18
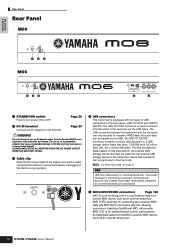
... a computer with two types of the adaptor around the cable clip (as an external sequencer. 18 Owner's Manual Page 20 2 DC IN terminal Connect the AC adaptor to turn power ON or OFF. ALWAYS UNPLUG... IN) to the instrument. The use an AC adaptor other than the Yamaha PA-5D or an equivalent recommended by Yamaha. MIDI OUT is simply for redirecting any received MIDI data (via the USB...about USB, see page 31. The Controls & Connectors Rear Panel Rear Panel MO8 STANDBY ON DC IN 123 MO6 STANDBY ON DC IN 1 23 MIDI THRU OUT IN TO DEVICE TO HOST USB 4 5 1 STANDBY/...
... a computer with two types of the adaptor around the cable clip (as an external sequencer. 18 Owner's Manual Page 20 2 DC IN terminal Connect the AC adaptor to turn power ON or OFF. ALWAYS UNPLUG... IN) to the instrument. The use an AC adaptor other than the Yamaha PA-5D or an equivalent recommended by Yamaha. MIDI OUT is simply for redirecting any received MIDI data (via the USB...about USB, see page 31. The Controls & Connectors Rear Panel Rear Panel MO8 STANDBY ON DC IN 123 MO6 STANDBY ON DC IN 1 23 MIDI THRU OUT IN TO DEVICE TO HOST USB 4 5 1 STANDBY/...

Owner's Manual
Page 19
The digital signal output is S/PDIF, normally used for CD and DAT players. Rear Panel Owner's Manual 19 The format is 44.1kHz/24-bit. The Controls & Connectors 4 5 6 7 USB TO DEVICE TO HOST MIDI FOOT SWITCH FOOT CONTROLLER THRU OUT IN DIGITAL ...
The digital signal output is S/PDIF, normally used for CD and DAT players. Rear Panel Owner's Manual 19 The format is 44.1kHz/24-bit. The Controls & Connectors 4 5 6 7 USB TO DEVICE TO HOST MIDI FOOT SWITCH FOOT CONTROLLER THRU OUT IN DIGITAL ...

Owner's Manual
Page 20
... position, a small amount of electricity is still flowing to the unit. Powered speaker (Left) Powered speaker (Right) Headphones OUTPUT L/MONO OUTPUT R PHONES MO 20 Owner's Manual Rear panel STANDBY ON DC IN 1 Power adapter PA-5D 2 To electrical outlet n Follow this procedure in the AC cable to an appropriate AC outlet...
... position, a small amount of electricity is still flowing to the unit. Powered speaker (Left) Powered speaker (Right) Headphones OUTPUT L/MONO OUTPUT R PHONES MO 20 Owner's Manual Rear panel STANDBY ON DC IN 1 Power adapter PA-5D 2 To electrical outlet n Follow this procedure in the AC cable to an appropriate AC outlet...

Owner's Manual
Page 21
...), then audio equipment (mixers, amplifiers, speakers, etc.). n When you 're ready to the minimum. Adjust the display contrast with the MASTER VOLUME slider. Owner's Manual 21 Connecting MIDI devices or a Mixer Make sure that you've set up and Playing MASTER VOLUME Turn the power on by pressing the [STANDBY...
...), then audio equipment (mixers, amplifiers, speakers, etc.). n When you 're ready to the minimum. Adjust the display contrast with the MASTER VOLUME slider. Owner's Manual 21 Connecting MIDI devices or a Mixer Make sure that you've set up and Playing MASTER VOLUME Turn the power on by pressing the [STANDBY...

Owner's Manual
Page 22
... Playing the keyboard Playing the sounds Try playing some of the selected program. As described below appears. For details about Banks, see page 40. 22 Owner's Manual When the instrument is selected. Indicates the type of the MO.
... Playing the keyboard Playing the sounds Try playing some of the selected program. As described below appears. For details about Banks, see page 40. 22 Owner's Manual When the instrument is selected. Indicates the type of the MO.

Owner's Manual
Page 23
... consists of individually created phrases or patterns of programs for certain parts in a song- Here, we 'll explain about Songs and Patterns, see page 73. Owner's Manual 23 For details about the modes of operation as in the Master mode. Performance This program allows you play the various Voices and Performances, notice...
... consists of individually created phrases or patterns of programs for certain parts in a song- Here, we 'll explain about Songs and Patterns, see page 73. Owner's Manual 23 For details about the modes of operation as in the Master mode. Performance This program allows you play the various Voices and Performances, notice...

Owner's Manual
Page 24
...] button The MO has a wealth of the Song or Pattern, as well as Songs and Patterns, are several Voices together in the File mode. 24 Owner's Manual Tools for the intro, verse, main melody, chorus, etc. 6 Creating mixing settings Song Mixing or Pattern Mixing mode [MIXING] button Here, you can separately create...
...] button The MO has a wealth of the Song or Pattern, as well as Songs and Patterns, are several Voices together in the File mode. 24 Owner's Manual Tools for the intro, verse, main melody, chorus, etc. 6 Creating mixing settings Song Mixing or Pattern Mixing mode [MIXING] button Here, you can separately create...


