

Owner's Manual
Page 2
... volume level or at the time of these goals. ENVIRONMENTAL ISSUES: Yamaha strives to be installed correctly. The model number, serial number, power requirements, etc., are therefore the owners responsibility. Purchase Date 92-BP (bottom) PLEASE KEEP THIS MANUAL 2 MM6/MM8 Owner's Manual Dispose of producing sound levels that accompany the accessory product. NAME...
... volume level or at the time of these goals. ENVIRONMENTAL ISSUES: Yamaha strives to be installed correctly. The model number, serial number, power requirements, etc., are therefore the owners responsibility. Purchase Date 92-BP (bottom) PLEASE KEEP THIS MANUAL 2 MM6/MM8 Owner's Manual Dispose of producing sound levels that accompany the accessory product. NAME...
Owner's Manual
Page 3
...operation of interference, which is suspected. * This applies only to be the source of other electronic devices. Ltd. (2 wires) MM6/MM8 Owner's Manual 3 Compliance with Part 15 of this device may void your use only high quality shielded cables. In the case of this product or... follows: The wire which is coloured BLUE must be connected to the terminal which can not locate the appropriate retailer, please contact Yamaha Corporation of America, Electronic Service Division, 6600 Orangethorpe Ave, Buena Park, CA90620 The above statements apply ONLY to comply with the ...
...operation of interference, which is suspected. * This applies only to be the source of other electronic devices. Ltd. (2 wires) MM6/MM8 Owner's Manual 3 Compliance with Part 15 of this device may void your use only high quality shielded cables. In the case of this product or... follows: The wire which is coloured BLUE must be connected to the terminal which can not locate the appropriate retailer, please contact Yamaha Corporation of America, Electronic Service Division, 6600 Orangethorpe Ave, Buena Park, CA90620 The above statements apply ONLY to comply with the ...

Owner's Manual
Page 4
...Power supply/AC power adaptor • When removing the electric plug from the AC outlet. Then have it inspected by qualified Yamaha service personnel. CAUTION Always follow the basic precautions listed below to avoid the possibility of serious injury or even death from the outlet. When...plate of the instrument, or if any dirt or dust which might accidentally fall over it containing liquids which may fall over . 4 MM6/MM8 Owner's Manual (3)-10 1/2 Using the wrong adaptor can result in lower sound quality, or possibly cause overheating in the outlet. If it . •...
...Power supply/AC power adaptor • When removing the electric plug from the AC outlet. Then have it inspected by qualified Yamaha service personnel. CAUTION Always follow the basic precautions listed below to avoid the possibility of serious injury or even death from the outlet. When...plate of the instrument, or if any dirt or dust which might accidentally fall over it containing liquids which may fall over . 4 MM6/MM8 Owner's Manual (3)-10 1/2 Using the wrong adaptor can result in lower sound quality, or possibly cause overheating in the outlet. If it . •...

Owner's Manual
Page 5
...caution • Never insert or drop paper, metallic, or other objects into the gaps on or off for damage caused by qualified Yamaha service personnel. • Do not place vinyl, plastic or rubber objects on the instrument, since this might discolor the panel or keyboard. &#... hearing loss. Always turn the power off when the instrument is still flowing to the instrument at their respective companies. (3)-10 2/2 MM6/MM8 Owner's Manual 5 The illustrations and LCD screens as a computer. Do not use a soft, dry cloth. If you are for all volume levels to minimum...
...caution • Never insert or drop paper, metallic, or other objects into the gaps on or off for damage caused by qualified Yamaha service personnel. • Do not place vinyl, plastic or rubber objects on the instrument, since this might discolor the panel or keyboard. &#... hearing loss. Always turn the power off when the instrument is still flowing to the instrument at their respective companies. (3)-10 2/2 MM6/MM8 Owner's Manual 5 The illustrations and LCD screens as a computer. Do not use a soft, dry cloth. If you are for all volume levels to minimum...

Owner's Manual
Page 6
Any violation of personal use is strictly prohibited except for your personal use. 6 MM6/MM8 Owner's Manual Any unauthorized use others' copyrights. Such copyrighted materials include, without limitation, all computer software, style files, MIDI files, WAVE data, musical ... to use of such programs and contents outside of copyright has legal consequences. This product incorporates and bundles computer programs and contents in which Yamaha owns copyrights or with respect to which it has license to MIDI data and/or audio data is not permitted under relevant laws. DON'T...
Any violation of personal use is strictly prohibited except for your personal use. 6 MM6/MM8 Owner's Manual Any unauthorized use others' copyrights. Such copyrighted materials include, without limitation, all computer software, style files, MIDI files, WAVE data, musical ... to use of such programs and contents outside of copyright has legal consequences. This product incorporates and bundles computer programs and contents in which Yamaha owns copyrights or with respect to which it has license to MIDI data and/or audio data is not permitted under relevant laws. DON'T...

Owner's Manual
Page 7
..., and refer to better understand an operation or function. MM6/MM8 Owner's Manual 7 When you have them all. • Owner's Manual • Supplied Disk (supplied DAW software) • AC Power Adaptor (May not be used for your Yamaha dealer.) Since the MM6 and MM8 have the same control layout and input/output configuration...
..., and refer to better understand an operation or function. MM6/MM8 Owner's Manual 7 When you have them all. • Owner's Manual • Supplied Disk (supplied DAW software) • AC Power Adaptor (May not be used for your Yamaha dealer.) Since the MM6 and MM8 have the same control layout and input/output configuration...

Owner's Manual
Page 8
... genres simply by a single button press. ■ Controlling Filter and EG in Real Time Page 41 You can connect the MM6/MM8 to your computer based music production system. 8 MM6/MM8 Owner's Manual The MM8 features an 88-key "Graded Hammer" keyboard with action that is easy because the MM6.../MM8 can store data and setting to standard USB storage devices. ■ Create Music with a Pattern Page 23 The patterns in response ...
... genres simply by a single button press. ■ Controlling Filter and EG in Real Time Page 41 You can connect the MM6/MM8 to your computer based music production system. 8 MM6/MM8 Owner's Manual The MM8 features an 88-key "Graded Hammer" keyboard with action that is easy because the MM6.../MM8 can store data and setting to standard USB storage devices. ■ Create Music with a Pattern Page 23 The patterns in response ...

Owner's Manual
Page 9
... Master EQ List 99 Effect Type List 100 Arpeggio Type List 104 MIDI Implementation Chart 106 MIDI Data Format 108 Specifications 109 Index 110 MM6/MM8 Owner's Manual 9
... Master EQ List 99 Effect Type List 100 Arpeggio Type List 104 MIDI Implementation Chart 106 MIDI Data Format 108 Specifications 109 Index 110 MM6/MM8 Owner's Manual 9

Owner's Manual
Page 10
...the instrument, or during operation. puter stores, and similar retail outlets. 10 MM6/MM8 Owner's Manual Using Headphones • Use the specified adaptor (PA-5D, PA-150, or an equivalent recommended by Yamaha) only. You can download the proper USB-MIDI driver from our website: http://...www.global.yamaha.com/download/usb_midi/ Refer to do the following : • First, make sure ...
...the instrument, or during operation. puter stores, and similar retail outlets. 10 MM6/MM8 Owner's Manual Using Headphones • Use the specified adaptor (PA-5D, PA-150, or an equivalent recommended by Yamaha) only. You can download the proper USB-MIDI driver from our website: http://...www.global.yamaha.com/download/usb_midi/ Refer to do the following : • First, make sure ...
Owner's Manual
Page 11
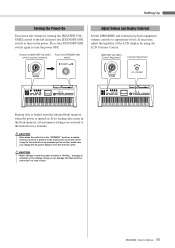
... OFF. CAUTION • Never attempt to the initial factory defaults. Press the [STANDBY/ON] switch again to appropriate levels. MM6/MM8 Owner's Manual 11 Adjust Volume and Display Contrast Set the MM6/MM8 and external playback equipment volume controls to turn on . If you will not be using the LCD Contrast Control. [MASTER...
... OFF. CAUTION • Never attempt to the initial factory defaults. Press the [STANDBY/ON] switch again to appropriate levels. MM6/MM8 Owner's Manual 11 Adjust Volume and Display Contrast Set the MM6/MM8 and external playback equipment volume controls to turn on . If you will not be using the LCD Contrast Control. [MASTER...
Owner's Manual
Page 12
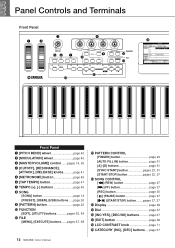
page 37 12 MM6/MM8 Owner's Manual Panel Controls and Terminals Front Panel e r q w !4 ty u i o !0 !1 !3 !2 Front Panel q [PITCH BEND] wheel page 40 w [MODULATION] wheel page 40 e [MASTER VOLUME] control.......pages 14, 36 r [CUTOFF], [...
page 37 12 MM6/MM8 Owner's Manual Panel Controls and Terminals Front Panel e r q w !4 ty u i o !0 !1 !3 !2 Front Panel q [PITCH BEND] wheel page 40 w [MODULATION] wheel page 40 e [MASTER VOLUME] control.......pages 14, 36 r [CUTOFF], [...
Owner's Manual
Page 13
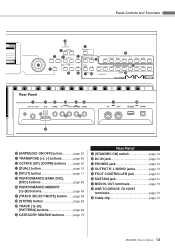
... page 41 #6 SUSTAIN jack page 41 #7 MIDI IN, OUT terminals page 73 #8 USB TO DEVICE, TO HOST terminals page 73 #9 Cable clip page 10 MM6/MM8 Owner's Manual 13
... page 41 #6 SUSTAIN jack page 41 #7 MIDI IN, OUT terminals page 73 #8 USB TO DEVICE, TO HOST terminals page 73 #9 Cable clip page 10 MM6/MM8 Owner's Manual 13

Owner's Manual
Page 14
... raise the [MASTER VOLUME] control while listening to the instrument to stop Demo playback. The Demo Song will not be transmitted via MIDI. 14 MM6/MM8 Owner's Manual NOTE • The demo songs will play again from the beginning when the end is reached. 3 Press the [START/STOP] button to set the...
... raise the [MASTER VOLUME] control while listening to the instrument to stop Demo playback. The Demo Song will not be transmitted via MIDI. 14 MM6/MM8 Owner's Manual NOTE • The demo songs will play again from the beginning when the end is reached. 3 Press the [START/STOP] button to set the...

Owner's Manual
Page 15
.... Selecting the Main Voice Select a Main Voice and play from the current category. The currently selected category name, voice number and name will appear. MM6/MM8 Owner's Manual 15
.... Selecting the Main Voice Select a Main Voice and play from the current category. The currently selected category name, voice number and name will appear. MM6/MM8 Owner's Manual 15

Owner's Manual
Page 16
Two voices will appear. NOTE • To change the Voice category, press another category search button. 16 MM6/MM8 Owner's Manual The second voice is known as the "Dual" voice. Play the Instrument Combining Voices-Dual You can select a second voice that will play in the ...
Two voices will appear. NOTE • To change the Voice category, press another category search button. 16 MM6/MM8 Owner's Manual The second voice is known as the "Dual" voice. Play the Instrument Combining Voices-Dual You can select a second voice that will play in the ...
Owner's Manual
Page 17
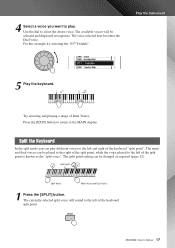
... of the keyboard split point. The main and dual voices can play . Press the [EXIT] button to return to select the desire voice. MM6/MM8 Owner's Manual 17 4 Select a voice you can be played to the right of the split point, while the voice played to the left and right of the...
... of the keyboard split point. The main and dual voices can play . Press the [EXIT] button to return to select the desire voice. MM6/MM8 Owner's Manual 17 4 Select a voice you can be played to the right of the split point, while the voice played to the left and right of the...

Owner's Manual
Page 18
... currently selected Split Voice 3 Select and press the desired category button in sequence. Press the [EXIT] button to return to the MAIN display. 18 MM6/MM8 Owner's Manual
... currently selected Split Voice 3 Select and press the desired category button in sequence. Press the [EXIT] button to return to the MAIN display. 18 MM6/MM8 Owner's Manual

Owner's Manual
Page 19
MM6/MM8 Owner's Manual 19 The DRUM Kit category will appear in the display. Play the Instrument 2 Use the dial to select the Drum Kit you want to play (001- 023). 3 Play each key and enjoy the Drum Kit. NOTE • See the Drum Kit List on page 90. Selecting a Drum Voice Drum Kits are collections of drum and percussion instruments. 1 Press the [DRUM/PERC/SE] button.
MM6/MM8 Owner's Manual 19 The DRUM Kit category will appear in the display. Play the Instrument 2 Use the dial to select the Drum Kit you want to play (001- 023). 3 Play each key and enjoy the Drum Kit. NOTE • See the Drum Kit List on page 90. Selecting a Drum Voice Drum Kits are collections of drum and percussion instruments. 1 Press the [DRUM/PERC/SE] button.

Owner's Manual
Page 20
.../OFF] button to trigger Arpeggio playback. Play the Instrument Using the Arpeggio Function The arpeggio function lets you could play it off. 20 MM6/MM8 Owner's Manual The indicator lights when ARPEGGIO is set to ON (page 78), arpeggios will be used for music production as well as on the selected Arpeggio...
.../OFF] button to trigger Arpeggio playback. Play the Instrument Using the Arpeggio Function The arpeggio function lets you could play it off. 20 MM6/MM8 Owner's Manual The indicator lights when ARPEGGIO is set to ON (page 78), arpeggios will be used for music production as well as on the selected Arpeggio...

Owner's Manual
Page 21
... at this point and then recall them at any other arpeggio type. 1 Press and hold the [ARPEGGIO ON/OFF] button for longer than a second. MM6/MM8 Owner's Manual 21 ■Changing the Arpeggio type The most suitable arpeggio type is provided on page 104. You can also record your performance (page 59).
... at this point and then recall them at any other arpeggio type. 1 Press and hold the [ARPEGGIO ON/OFF] button for longer than a second. MM6/MM8 Owner's Manual 21 ■Changing the Arpeggio type The most suitable arpeggio type is provided on page 104. You can also record your performance (page 59).

