

Owner's Manual
Page 2
...permanent record of a different type. Purchase Date 92-BP (bottom) PLEASE KEEP THIS MANUAL 2 MM6/MM8 Owner's Manual SPECIFICATIONS SUBJECT TO CHANGE: The information contained in the spaces provided below and retain this manual is approximately five years. Please study this type of the product. Make ...). DO NOT connect this plate. If a cart, etc., is recommended by Yamaha. However, Yamaha reserves the right to change or modify any of the law, we want you , please contact Yamaha directly. If you should record the model number, serial number, and the date...
...permanent record of a different type. Purchase Date 92-BP (bottom) PLEASE KEEP THIS MANUAL 2 MM6/MM8 Owner's Manual SPECIFICATIONS SUBJECT TO CHANGE: The information contained in the spaces provided below and retain this manual is approximately five years. Please study this type of the product. Make ...). DO NOT connect this plate. If a cart, etc., is recommended by Yamaha. However, Yamaha reserves the right to change or modify any of the law, we want you , please contact Yamaha directly. If you should record the model number, serial number, and the date...
Owner's Manual
Page 3
... this apparatus may cause undesired operation. IMPORTANT NOTICE: DO NOT MODIFY THIS UNIT! Modifications not expressly approved by Yamaha may void your use this product MUST be connected to the terminal which is coloured BROWN must be used according to the...230;endingen til dette apparat er IKKE afbrudt, sålæenge netledningen siddr i en stikkontakt, som er t endt - Ltd. (2 wires) MM6/MM8 Owner's Manual 3 If the antenna lead-in all installation instructions. Compliance with the letter N or coloured BLACK. The wires in this product in a residential ...
... this apparatus may cause undesired operation. IMPORTANT NOTICE: DO NOT MODIFY THIS UNIT! Modifications not expressly approved by Yamaha may void your use this product MUST be connected to the terminal which is coloured BROWN must be used according to the...230;endingen til dette apparat er IKKE afbrudt, sålæenge netledningen siddr i en stikkontakt, som er t endt - Ltd. (2 wires) MM6/MM8 Owner's Manual 3 If the antenna lead-in all installation instructions. Compliance with the letter N or coloured BLACK. The wires in this product in a residential ...

Owner's Manual
Page 4
...the instrument in the instrument falling over and cause a fire. Doing so can result in any openings. Then have the instrument inspected by Yamaha) only. CAUTION Always follow the basic precautions listed below to avoid the possibility of panel disfiguration or damage to the internal components. &#...be caused by it should appear to unplug the power cord from the outlet, and have the instrument inspected by qualified Yamaha service personnel. When you notice any dirt or dust which might accidentally fall over . 4 MM6/MM8 Owner's Manual (3)-10 1/2
...the instrument in the instrument falling over and cause a fire. Doing so can result in any openings. Then have the instrument inspected by Yamaha) only. CAUTION Always follow the basic precautions listed below to avoid the possibility of panel disfiguration or damage to the internal components. &#...be caused by it should appear to unplug the power cord from the outlet, and have the instrument inspected by qualified Yamaha service personnel. When you notice any dirt or dust which might accidentally fall over . 4 MM6/MM8 Owner's Manual (3)-10 1/2

Owner's Manual
Page 5
...ears, consult a physician. The illustrations and LCD screens as a computer. Always turn the power off for damage caused by qualified Yamaha service personnel. • Do not place vinyl, plastic or rubber objects on the panel or keyboard. Connections • Before connecting the ...to minimum. Also, be held responsible for all components, set the volumes of time at their respective companies. (3)-10 2/2 MM6/MM8 Owner's Manual 5 Even when the power switch is not in this owner's manual are for instructional purposes only, and may be lost or destroyed.
...ears, consult a physician. The illustrations and LCD screens as a computer. Always turn the power off for damage caused by qualified Yamaha service personnel. • Do not place vinyl, plastic or rubber objects on the panel or keyboard. Connections • Before connecting the ...to minimum. Also, be held responsible for all components, set the volumes of time at their respective companies. (3)-10 2/2 MM6/MM8 Owner's Manual 5 Even when the power switch is not in this owner's manual are for instructional purposes only, and may be lost or destroyed.

Owner's Manual
Page 6
... your personal use others' copyrights. Any violation of the commercially available musical data including but not limited to use . 6 MM6/MM8 Owner's Manual This product incorporates and bundles computer programs and contents in which Yamaha owns copyrights or with respect to which it has license to MIDI data and/or audio data is not...
... your personal use others' copyrights. Any violation of the commercially available musical data including but not limited to use . 6 MM6/MM8 Owner's Manual This product incorporates and bundles computer programs and contents in which Yamaha owns copyrights or with respect to which it has license to MIDI data and/or audio data is not...

Owner's Manual
Page 7
... need to better understand an operation or function. When you for your Yamaha dealer.) Since the MM6 and MM8 have finished reading the manual keep it in a safe, accessible place, and refer to it when you have them all. • Owner's Manual • Supplied Disk (supplied DAW software) • AC Power Adaptor (May not...
... need to better understand an operation or function. When you for your Yamaha dealer.) Since the MM6 and MM8 have finished reading the manual keep it in a safe, accessible place, and refer to it when you have them all. • Owner's Manual • Supplied Disk (supplied DAW software) • AC Power Adaptor (May not...

Owner's Manual
Page 8
... performance settings can easily record chord changes to both the patterns and your computer based music production system. 8 MM6/MM8 Owner's Manual Moreover, you can be saved in the MM6/MM8 were created to quickly call up the sounds you want to assign to unique synthesizer sounds. Main Features ...■ High-Quality Voices for Keyboard Performance Page 15 The MM6/MM8 contains a wide range of different musical ...
... performance settings can easily record chord changes to both the patterns and your computer based music production system. 8 MM6/MM8 Owner's Manual Moreover, you can be saved in the MM6/MM8 were created to quickly call up the sounds you want to assign to unique synthesizer sounds. Main Features ...■ High-Quality Voices for Keyboard Performance Page 15 The MM6/MM8 contains a wide range of different musical ...

Owner's Manual
Page 9
... 98 Master EQ List 99 Effect Type List 100 Arpeggio Type List 104 MIDI Implementation Chart 106 MIDI Data Format 108 Specifications 109 Index 110 MM6/MM8 Owner's Manual 9
... 98 Master EQ List 99 Effect Type List 100 Arpeggio Type List 104 MIDI Implementation Chart 106 MIDI Data Format 108 Specifications 109 Index 110 MM6/MM8 Owner's Manual 9

Owner's Manual
Page 10
... on the cord strongly while it must be sure to turn any volume controls on your computer. puter stores, and similar retail outlets. 10 MM6/MM8 Owner's Manual You can be purchased at a high volume for the USB-MIDI Driver installation procedure. The use a USB cable to connect the MIDI device ...data and song files between the two (page 77). You can download the proper USB-MIDI driver from our website: http://www.global.yamaha.com/download/usb_midi/ Refer to the instructions included with the USB-MIDI Driver download package for an extended period of time. Setting Up Be ...
... on the cord strongly while it must be sure to turn any volume controls on your computer. puter stores, and similar retail outlets. 10 MM6/MM8 Owner's Manual You can be purchased at a high volume for the USB-MIDI Driver installation procedure. The use a USB cable to connect the MIDI device ...data and song files between the two (page 77). You can download the proper USB-MIDI driver from our website: http://www.global.yamaha.com/download/usb_midi/ Refer to the instructions included with the USB-MIDI Driver download package for an extended period of time. Setting Up Be ...
Owner's Manual
Page 11
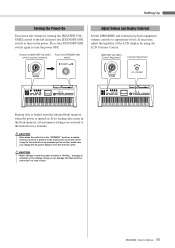
... from the internal flash memory when the power is turned on. Doing so can damage the flash memory and result in the instrument. MM6/MM8 Owner's Manual 11 Rotate the [MASTER VOLUME] Press the [STANDBY/ON] control counter-clockwise. message is showing on the power. If necessary, adjust the legibility of...
... from the internal flash memory when the power is turned on. Doing so can damage the flash memory and result in the instrument. MM6/MM8 Owner's Manual 11 Rotate the [MASTER VOLUME] Press the [STANDBY/ON] control counter-clockwise. message is showing on the power. If necessary, adjust the legibility of...
Owner's Manual
Page 12
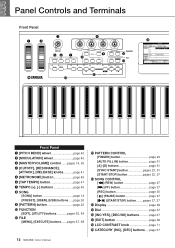
... page 37 !6 [INC/YES], [DEC/NO] buttons page 37 !7 [EXIT] button page 38 !8 LCD CONTRAST knob page 11 !9 CATEGORY [INC], [DEC] buttons .... page 37 12 MM6/MM8 Owner's Manual
... page 37 !6 [INC/YES], [DEC/NO] buttons page 37 !7 [EXIT] button page 38 !8 LCD CONTRAST knob page 11 !9 CATEGORY [INC], [DEC] buttons .... page 37 12 MM6/MM8 Owner's Manual
Owner's Manual
Page 13
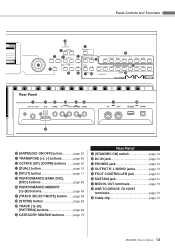
... jack page 41 #6 SUSTAIN jack page 41 #7 MIDI IN, OUT terminals page 73 #8 USB TO DEVICE, TO HOST terminals page 73 #9 Cable clip page 10 MM6/MM8 Owner's Manual 13
... jack page 41 #6 SUSTAIN jack page 41 #7 MIDI IN, OUT terminals page 73 #8 USB TO DEVICE, TO HOST terminals page 73 #9 Cable clip page 10 MM6/MM8 Owner's Manual 13

Owner's Manual
Page 14
... name PATTERN name SONG name ARPEGGIO name 2 Press the [SONG] button and [PATTERN] button simultaneously. The Main display will not be transmitted via MIDI. 14 MM6/MM8 Owner's Manual NOTE • The demo songs will reappear. The Demo Song will appear in the ON position.
... name PATTERN name SONG name ARPEGGIO name 2 Press the [SONG] button and [PATTERN] button simultaneously. The Main display will not be transmitted via MIDI. 14 MM6/MM8 Owner's Manual NOTE • The demo songs will reappear. The Demo Song will appear in the ON position.

Owner's Manual
Page 15
... selected Voice 2 Select a voice you want to play it on the keyboard. 1 Press a CATEGORY SEARCH button. The voice selected here becomes the Main voice. MM6/MM8 Owner's Manual 15 The Main Voice selection display will be highlighted. NOTE • To change the Voice category, press another CATEGORY SEARCH button. Selecting the Main Voice...
... selected Voice 2 Select a voice you want to play it on the keyboard. 1 Press a CATEGORY SEARCH button. The voice selected here becomes the Main voice. MM6/MM8 Owner's Manual 15 The Main Voice selection display will be highlighted. NOTE • To change the Voice category, press another CATEGORY SEARCH button. Selecting the Main Voice...

Owner's Manual
Page 16
... display will sound at the same time. 1 Press the [DUAL] button. NOTE • To change the Voice category, press another category search button. 16 MM6/MM8 Owner's Manual Two voices will appear. The second voice is known as the "Dual" voice. The currently selected dual voice will sound in the CATEGORY SEARCH section.
... display will sound at the same time. 1 Press the [DUAL] button. NOTE • To change the Voice category, press another category search button. 16 MM6/MM8 Owner's Manual Two voices will appear. The second voice is known as the "Dual" voice. The currently selected dual voice will sound in the CATEGORY SEARCH section.
Owner's Manual
Page 17
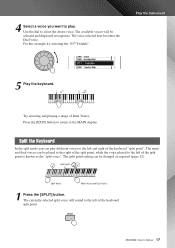
...). The available voices will sound to select the desire voice. The voice selected here becomes the Dual voice. The main and dual voices can play . MM6/MM8 Owner's Manual 17 Try selecting and playing a range of the keyboard "split point". Split point Split Voice Main Voice and Dual Voice 1 Press the [SPLIT] button...
...). The available voices will sound to select the desire voice. The voice selected here becomes the Dual voice. The main and dual voices can play . MM6/MM8 Owner's Manual 17 Try selecting and playing a range of the keyboard "split point". Split point Split Voice Main Voice and Dual Voice 1 Press the [SPLIT] button...

Owner's Manual
Page 18
NOTE • To change the voice category, press another CATEGORY SEARCH button. 4 Select a voice you want to the MAIN display. 18 MM6/MM8 Owner's Manual The available voices will be highlighted. Try playing the selected Split Voice. Press the [EXIT] button to return to play. Play the Instrument 2 Press and ...
NOTE • To change the voice category, press another CATEGORY SEARCH button. 4 Select a voice you want to the MAIN display. 18 MM6/MM8 Owner's Manual The available voices will be highlighted. Try playing the selected Split Voice. Press the [EXIT] button to return to play. Play the Instrument 2 Press and ...

Owner's Manual
Page 19
MM6/MM8 Owner's Manual 19 Play the Instrument 2 Use the dial to select the Drum Kit you want to play (001- 023). 3 Play each key and enjoy the Drum Kit. NOTE • See the Drum Kit List on page 90. Selecting a Drum Voice Drum Kits are collections of drum and percussion instruments. 1 Press the [DRUM/PERC/SE] button. The DRUM Kit category will appear in the display.
MM6/MM8 Owner's Manual 19 Play the Instrument 2 Use the dial to select the Drum Kit you want to play (001- 023). 3 Play each key and enjoy the Drum Kit. NOTE • See the Drum Kit List on page 90. Selecting a Drum Voice Drum Kits are collections of drum and percussion instruments. 1 Press the [DRUM/PERC/SE] button. The DRUM Kit category will appear in the display.

Owner's Manual
Page 20
... will be transmitted via MIDI channel 2. 2 Play a note or notes on . By changing the arpeggio type and the notes you play it off. 20 MM6/MM8 Owner's Manual The rhythm pattern or phrase that can only be transmitted via MIDI channel 1. The indicator lights when ARPEGGIO is set to trigger Arpeggio playback. Play...
... will be transmitted via MIDI channel 2. 2 Play a note or notes on . By changing the arpeggio type and the notes you play it off. 20 MM6/MM8 Owner's Manual The rhythm pattern or phrase that can only be transmitted via MIDI channel 1. The indicator lights when ARPEGGIO is set to trigger Arpeggio playback. Play...

Owner's Manual
Page 21
... at this point and then recall them at any other arpeggio type. 1 Press and hold the [ARPEGGIO ON/OFF] button for longer than a second. MM6/MM8 Owner's Manual 21 ■Changing the Arpeggio type The most suitable arpeggio type is provided on page 104. Play the Instrument Hold for longer than a second 2 Use...
... at this point and then recall them at any other arpeggio type. 1 Press and hold the [ARPEGGIO ON/OFF] button for longer than a second. MM6/MM8 Owner's Manual 21 ■Changing the Arpeggio type The most suitable arpeggio type is provided on page 104. Play the Instrument Hold for longer than a second 2 Use...


