
Owners Manual
Page 2
... wall outlet. 16 Be sure to read this unit with the same or equivalent type. For proper ventilation, allow the following minimum clearances around CRX-040/140. Containers with liquid in them, as they may become warm. It may overheat, possibly causing damage. 9 Do not use force on switches, knobs and... cm (9 in order not to avoid humming sounds. 4 Do not expose this unit. - Do not use MCR-140 near the AC outlet and where the AC power plug can cause hearing loss. We, the manufacturer Yamaha hereby declare that this unit is faulty. 17 Before moving this unit, press to set this...
... wall outlet. 16 Be sure to read this unit with the same or equivalent type. For proper ventilation, allow the following minimum clearances around CRX-040/140. Containers with liquid in them, as they may become warm. It may overheat, possibly causing damage. 9 Do not use force on switches, knobs and... cm (9 in order not to avoid humming sounds. 4 Do not expose this unit. - Do not use MCR-140 near the AC outlet and where the AC power plug can cause hearing loss. We, the manufacturer Yamaha hereby declare that this unit is faulty. 17 Before moving this unit, press to set this...

Owners Manual
Page 3
...manual and the product, the product has priority. ■ Copyright and logo marks Advanced YST In 1988, Yamaha brought to the marketplace speaker systems utilizing YST (Yamaha Active Servo Technology) to operate this technology uses speaker units controlled by AirWired. 1 En English As this ... ADDITIONAL INFORMATION ■ About this manual • This manual describes how to give powerful, high quality bass reproduction. AirWired MCR-140 Real-time uncompressed music transfer without sound degradation is printed prior to FM stations 12 Presetting FM stations 12 Selecting preset ...
...manual and the product, the product has priority. ■ Copyright and logo marks Advanced YST In 1988, Yamaha brought to the marketplace speaker systems utilizing YST (Yamaha Active Servo Technology) to operate this technology uses speaker units controlled by AirWired. 1 En English As this ... ADDITIONAL INFORMATION ■ About this manual • This manual describes how to give powerful, high quality bass reproduction. AirWired MCR-140 Real-time uncompressed music transfer without sound degradation is printed prior to FM stations 12 Presetting FM stations 12 Selecting preset ...

Owners Manual
Page 4
... of this unit and point it toward the remote control sensor. dusty places ■ Replacing the battery in the following items. MCR-040 CD receiver (CRX-040) Dock cover PARTS + Speakers (NS-BP80) MCR-140 CD receiver (CRX-140) Cover the iPod dock when not using. Transmitter Remote control Speaker cable (1.5 m (4.9') × 2) + ■ Using...
... of this unit and point it toward the remote control sensor. dusty places ■ Replacing the battery in the following items. MCR-040 CD receiver (CRX-040) Dock cover PARTS + Speakers (NS-BP80) MCR-140 CD receiver (CRX-140) Cover the iPod dock when not using. Transmitter Remote control Speaker cable (1.5 m (4.9') × 2) + ■ Using...
Owners Manual
Page 5
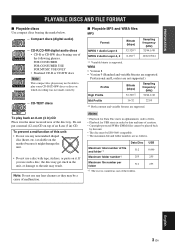
To prevent a malfunction of this unit. • The disc must be a cause of malfunction. ■ Playable MP3 and WMA files MP3 Format MPEG 1 Audio Layer-3 MPEG 2 Audio Layer-3, 2 Bitrate (kbps) 32-320*1 8-160*1 Sampling frequency (kHz) 32/44.1/48 16/22.05/24 *1 Variable bitrate is counted as follows. Note: Do not use any nonstandard shaped disc (heart, etc.) available on the market because it might damage the unit. • Do not use a disc with tape, stickers, or paste on it in ) CD. Notes • Playback for Data Disc starts in alphanumeric order of files. • Playback for ...
To prevent a malfunction of this unit. • The disc must be a cause of malfunction. ■ Playable MP3 and WMA files MP3 Format MPEG 1 Audio Layer-3 MPEG 2 Audio Layer-3, 2 Bitrate (kbps) 32-320*1 8-160*1 Sampling frequency (kHz) 32/44.1/48 16/22.05/24 *1 Variable bitrate is counted as follows. Note: Do not use any nonstandard shaped disc (heart, etc.) available on the market because it might damage the unit. • Do not use a disc with tape, stickers, or paste on it in ) CD. Notes • Playback for Data Disc starts in alphanumeric order of files. • Playback for ...

Owners Manual
Page 6
CONNECTION Basic connection Follow the procedure below to connect the left channel (L), right channel (R), "+"(red) "-"(black) properly. It may cause the sound to differ from the intended design. • There is a chance that placing speakers too close to a CRT-based (Braun tube) TV set . 4 En Using different speakers may damage the unit, or cause a fire. • The antenna should be stretched out. • If DAB/FM reception is incorrect, the sound will be unnatural and lacks bass. • Do not let the bare speaker wires touch each other or do not let them touch any metal part of ...
CONNECTION Basic connection Follow the procedure below to connect the left channel (L), right channel (R), "+"(red) "-"(black) properly. It may cause the sound to differ from the intended design. • There is a chance that placing speakers too close to a CRT-based (Braun tube) TV set . 4 En Using different speakers may damage the unit, or cause a fire. • The antenna should be stretched out. • If DAB/FM reception is incorrect, the sound will be unnatural and lacks bass. • Do not let the bare speaker wires touch each other or do not let them touch any metal part of ...

Owners Manual
Page 7
... CD receiver is compatible with iPod (5th generation), iPod classic, iPod nano, and iPod touch. MCR-140 Station your iPod in standby mode. PREPARATION CONNECTION Wireless connection MCR-140 Playback operation with your iPod connected to the transmitter turns the unit on the unit by the...CD receiver (CRX-140) 1 2 Press SETUP. GROUP A1 GROUP A2 GROUP B3 To select wireless group of the unit is in your iPod. MCR-040 Dock Adapter iPod dock Note To secure the connection, attach a compatible Dock Adapter supplied with ENTER. 5 Select the group. 6 Transmitter Charging cradle ...
... CD receiver is compatible with iPod (5th generation), iPod classic, iPod nano, and iPod touch. MCR-140 Station your iPod in standby mode. PREPARATION CONNECTION Wireless connection MCR-140 Playback operation with your iPod connected to the transmitter turns the unit on the unit by the...CD receiver (CRX-140) 1 2 Press SETUP. GROUP A1 GROUP A2 GROUP B3 To select wireless group of the unit is in your iPod. MCR-040 Dock Adapter iPod dock Note To secure the connection, attach a compatible Dock Adapter supplied with ENTER. 5 Select the group. 6 Transmitter Charging cradle ...

Owners Manual
Page 8
... is in the Automatic Tuning mode (☞ P. 12). 5 SHUFFLE indicator: Lights up when you set your iPod (MCR-040)/CD/USB to shuffle play (☞ P. 9). 6 REPEAT indicator: Lights up when you set your iPod (MCR-040)/CD/USB to resume the volume. Lights up when the timer is on Multi information display (☞ P. 9). Lights...
... is in the Automatic Tuning mode (☞ P. 12). 5 SHUFFLE indicator: Lights up when you set your iPod (MCR-040)/CD/USB to shuffle play (☞ P. 9). 6 REPEAT indicator: Lights up when you set your iPod (MCR-040)/CD/USB to resume the volume. Lights up when the timer is on Multi information display (☞ P. 9). Lights...

Owners Manual
Page 9
...cable VOLUME Down Up : Connecting headphones No sound is set to PORTABLE/ DAB/FM. • Press to set the unit to standby mode. MCR-140 iPod dock MCR-040 : Unit standby/on the unit, press / , or start playback on for 1 hour without playback or any other operation being performed. This... OPERATION OPERATION FRONT PANEL AND BASIC OPERATION y • This unit has an automatic standby function, which will automatically switch to standby mode (MCR-140 only). PORTABLE: Press the INPUT button repeatedly to select PORTABLE. This can reduce power consumption. English 7 En
...cable VOLUME Down Up : Connecting headphones No sound is set to PORTABLE/ DAB/FM. • Press to set the unit to standby mode. MCR-140 iPod dock MCR-040 : Unit standby/on the unit, press / , or start playback on for 1 hour without playback or any other operation being performed. This... OPERATION OPERATION FRONT PANEL AND BASIC OPERATION y • This unit has an automatic standby function, which will automatically switch to standby mode (MCR-140 only). PORTABLE: Press the INPUT button repeatedly to select PORTABLE. This can reduce power consumption. English 7 En

Owners Manual
Page 10
... Playback operation Follow the procedures below to play back music. 1 Set the source MCR-040 2 Switch the input Dock Adapter 3 Select music and start playback Scroll the list Control menu iPod*1 MCR-140 ☞ P. 5 For the MCR-140, the operation on the remote control or front panel is available only when your...kind of USB devices are not guaranteed. · The reading time may exceed 30 seconds depending on the number of files/folders. · Yamaha and suppliers accept no liability for the loss of data saved on the front panel display for MP3 or WMA*3 *1 Some features may not be...
... Playback operation Follow the procedures below to play back music. 1 Set the source MCR-040 2 Switch the input Dock Adapter 3 Select music and start playback Scroll the list Control menu iPod*1 MCR-140 ☞ P. 5 For the MCR-140, the operation on the remote control or front panel is available only when your...kind of USB devices are not guaranteed. · The reading time may exceed 30 seconds depending on the number of files/folders. · Yamaha and suppliers accept no liability for the loss of data saved on the front panel display for MP3 or WMA*3 *1 Some features may not be...

Owners Manual
Page 11
... the audio format of the selected music source is available for MP3/WMA files *6 Only when the selected track has information English 9 En For iPod MCR-040 Song number and elapsed time (default setting) ↓ Song number and remaining time ↓ Song name ↓ Artist name ↓ Album name ↓ Back to...
... the audio format of the selected music source is available for MP3/WMA files *6 Only when the selected track has information English 9 En For iPod MCR-040 Song number and elapsed time (default setting) ↓ Song number and remaining time ↓ Song name ↓ Artist name ↓ Album name ↓ Back to...

Owners Manual
Page 12
LISTENING TO DAB STATIONS DAB (Digital Audio Broadcasting) uses digital signals for clearer sound and more efficient transmission method. The initial scan starts automatically when you want to store to select PRESET DELETE. Some stations have sub (secondary) stations. Press MEMORY. 3 4 When scanning is selected. Selecting preset DAB stations (Preset tuning) Tuning DAB stations 1 2 Press repeatedly to analog signals. Press TUNING and select a DAB station. Select the preset radio station in station order. Secondary indicator y You can delete a preset station ...
LISTENING TO DAB STATIONS DAB (Digital Audio Broadcasting) uses digital signals for clearer sound and more efficient transmission method. The initial scan starts automatically when you want to store to select PRESET DELETE. Some stations have sub (secondary) stations. Press MEMORY. 3 4 When scanning is selected. Selecting preset DAB stations (Preset tuning) Tuning DAB stations 1 2 Press repeatedly to analog signals. Press TUNING and select a DAB station. Select the preset radio station in station order. Secondary indicator y You can delete a preset station ...

Owners Manual
Page 13
This data is activated. Other data, such as news, weather, and sports headlines, may be broadcast as the name of the song, artist and speaker, etc. Use this feature to a DAB station in a noisy environment or at low volume at night. y You can receive Band III only. Frequency 174.928 MHz 176.640 MHz 178.352 MHz 180.064 MHz 181.936 MHz 183.648 MHz 185.360 MHz 187.072 MHz 188.928 MHz 190.640 MHz 192.352 MHz 194.064 MHz 195.936 MHz 197.648 MHz 199.360 MHz 201.072 MHz 202.928 MHz 204.640 MHz 206.352 MHz 208.064 MHz 209.936 MHz 211.648 MHz 213.360 MHz 215.072 MHz 216.928 MHz 218.640...
This data is activated. Other data, such as news, weather, and sports headlines, may be broadcast as the name of the song, artist and speaker, etc. Use this feature to a DAB station in a noisy environment or at low volume at night. y You can receive Band III only. Frequency 174.928 MHz 176.640 MHz 178.352 MHz 180.064 MHz 181.936 MHz 183.648 MHz 185.360 MHz 187.072 MHz 188.928 MHz 190.640 MHz 192.352 MHz 194.064 MHz 195.936 MHz 197.648 MHz 199.360 MHz 201.072 MHz 202.928 MHz 204.640 MHz 206.352 MHz 208.064 MHz 209.936 MHz 211.648 MHz 213.360 MHz 215.072 MHz 216.928 MHz 218.640...

Owners Manual
Page 14
Automatic tuning starts. model only) 1 2 While listening Press repeatedly. PS (Program Service) ↓ PTY (Program Type) ↓ RT (Radio Text) ↓ CT (Clock Time) ↓ Frequency ↓ Back to 30 FM stations. • To cancel the manual preset while choosing a preset number, press MEMORY again. • You can delete a preset station by pressing TUNING repeatedly. Note If you can store your favorite FM stations with the preset function. ■ Automatic preset tuning 1 2 Press and hold . Start the automatic preset. Displaying Radio Data System ...
Automatic tuning starts. model only) 1 2 While listening Press repeatedly. PS (Program Service) ↓ PTY (Program Type) ↓ RT (Radio Text) ↓ CT (Clock Time) ↓ Frequency ↓ Back to 30 FM stations. • To cancel the manual preset while choosing a preset number, press MEMORY again. • You can delete a preset station by pressing TUNING repeatedly. Note If you can store your favorite FM stations with the preset function. ■ Automatic preset tuning 1 2 Press and hold . Start the automatic preset. Displaying Radio Data System ...
Owners Manual
Page 15
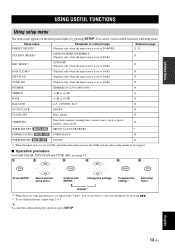
... setup menu. OPERATION USING USEFUL FUNCTIONS Using setup menu The setup menu appears on /off WIRELESS SET MCR-140 GROUP A1/A2/A3/B1/B2/B3 5 POWER SAVING MCR-140 NORMAL/ECO 14 WIRELESS SW MCR-140 NO/YES 14 *1 When the input source is set , repeat steps 3 and 4. R+5 14 AUTO CLOCK ON...
... setup menu. OPERATION USING USEFUL FUNCTIONS Using setup menu The setup menu appears on /off WIRELESS SET MCR-140 GROUP A1/A2/A3/B1/B2/B3 5 POWER SAVING MCR-140 NORMAL/ECO 14 WIRELESS SW MCR-140 NO/YES 14 *1 When the input source is set , repeat steps 3 and 4. R+5 14 AUTO CLOCK ON...

Owners Manual
Page 16
.... * Also effective when you are using headphones. ■ Adjusting the clock AUTO CLOCK: Automatic adjustment function is set securely. • MCR-140: When you set AUTO CLOCK to ON. CD: Set a track/file number. By selecting "- -", the FM station you select an iPod as a source, this ... low frequency response. CLOCK SET: To set to last time. "- -" means the unit will not be set a file number that the source is available for MCR-140. y The current time appears on page 13. Note The time setting is lost once the power cable is set the iPod in 10 minute...
.... * Also effective when you are using headphones. ■ Adjusting the clock AUTO CLOCK: Automatic adjustment function is set securely. • MCR-140: When you set AUTO CLOCK to ON. CD: Set a track/file number. By selecting "- -", the FM station you select an iPod as a source, this ... low frequency response. CLOCK SET: To set to last time. "- -" means the unit will not be set a file number that the source is available for MCR-140. y The current time appears on page 13. Note The time setting is lost once the power cable is set the iPod in 10 minute...

Owners Manual
Page 17
Exit setup menu. TUNE AID: Measures reception strength of the received DAB signal (from 0 (none) to receive the DAB signal. Adjust the DAB/ FM antenna to find the best position to 100 (best)). Using DAB option menu ■ Performing DAB CLEAR and INIT SCAN 1 2 3 4 5 Press SETUP. Press ENTER to the previously received stations. * After performing INIT SCAN, the unit airs the first station as stored in station. ■ Using TUNE AID 1 2 3 4 5 6 Press SETUP. Exit setup menu. Select TUNE AID. Switch the channel label. When the timer is complete, the unit ...
Exit setup menu. TUNE AID: Measures reception strength of the received DAB signal (from 0 (none) to receive the DAB signal. Adjust the DAB/ FM antenna to find the best position to 100 (best)). Using DAB option menu ■ Performing DAB CLEAR and INIT SCAN 1 2 3 4 5 Press SETUP. Press ENTER to the previously received stations. * After performing INIT SCAN, the unit airs the first station as stored in station. ■ Using TUNE AID 1 2 3 4 5 6 Press SETUP. Exit setup menu. Select TUNE AID. Switch the channel label. When the timer is complete, the unit ...
Owners Manual
Page 18
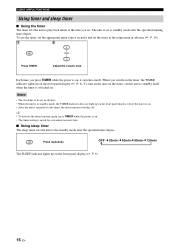
Adjust the volume level. The SLEEP indicator lights up on the front panel display (☞ P. 6). Press repeatedly. y • To activate the timer function again, press TIMER while the power is on. • The timer setting is on, it switches on/off . To turn on the unit via the timer, the timer function switches off . To use next time. ■ Using sleep timer The sleep timer sets the unit to the standby mode after the specified running time elapses. When you switch on the timer, the TIMER indicator lights up on the front panel display (☞ P. 6). 16 En Each ...
Adjust the volume level. The SLEEP indicator lights up on the front panel display (☞ P. 6). Press repeatedly. y • To activate the timer function again, press TIMER while the power is on. • The timer setting is on, it switches on/off . To turn on the unit via the timer, the timer function switches off . To use next time. ■ Using sleep timer The sleep timer sets the unit to the standby mode after the specified running time elapses. When you switch on the timer, the TIMER indicator lights up on the front panel display (☞ P. 6). 16 En Each ...

Owners Manual
Page 19
...ROM. Cancel the mute function. This is noise interference from digital or radio frequency equipment. Sound is disconnected. Speaker connections are using MCR-140. Incorrect cable connections. Remedy Connect the power cable firmly. Connect the cables properly. The following status messages appear only if you...are being performed. There is not malfunction. Turn on by this unit, disconnect the power cable, and contact the nearest authorized Yamaha dealer or service center. English 17 En The volume is established. The power was turned on the unit and play the source...
...ROM. Cancel the mute function. This is noise interference from digital or radio frequency equipment. Sound is disconnected. Speaker connections are using MCR-140. Incorrect cable connections. Remedy Connect the power cable firmly. Connect the cables properly. The following status messages appear only if you...are being performed. There is not malfunction. Turn on by this unit, disconnect the power cable, and contact the nearest authorized Yamaha dealer or service center. English 17 En The volume is established. The power was turned on the unit and play the source...

Owners Manual
Page 20
There is inaccurate. The DAB signals are not successful and "Not found" appears on the front panel display. There is no DAB coverage in your area. Use the TUNE AID feature to be tuned into any DAB stations. The preset (memory) may be temporarily out of the indoor DAB/FM antenna. Use the manual tuning method. Use the manual tuning method. The initial scan operations are too weak. There is no DAB coverage in your area. The indoor DAB/FM antenna needs to locate the best positioning of the indoor DAB/FM antenna. Check with your area. The desired station cannot be ...
There is inaccurate. The DAB signals are not successful and "Not found" appears on the front panel display. There is no DAB coverage in your area. Use the TUNE AID feature to be tuned into any DAB stations. The preset (memory) may be temporarily out of the indoor DAB/FM antenna. Use the manual tuning method. Use the manual tuning method. The initial scan operations are too weak. There is no DAB coverage in your area. The indoor DAB/FM antenna needs to locate the best positioning of the indoor DAB/FM antenna. Check with your area. The desired station cannot be ...

Owners Manual
Page 21
..., and iPod touch are supported. Page - 5 8 8 5 English 19 En The following status messages appear only if you are using MCR-140. This unit has recognized your iPod back in the iPod dock. Your iPod was successful. Station your iPod; LED status Off Flashes green... is connected. Error occurs. Remove the iPod from your iPod (see page 5). Page 5 5 The following status messages appear only if you are using MCR-040. Connection in the charging cradle. however, it in progress. Only iPod (5th generation), iPod classic, iPod nano, and iPod touch are supported. Page...
..., and iPod touch are supported. Page - 5 8 8 5 English 19 En The following status messages appear only if you are using MCR-140. This unit has recognized your iPod back in the iPod dock. Your iPod was successful. Station your iPod; LED status Off Flashes green... is connected. Error occurs. Remove the iPod from your iPod (see page 5). Page 5 5 The following status messages appear only if you are using MCR-040. Connection in the charging cradle. however, it in progress. Only iPod (5th generation), iPod classic, iPod nano, and iPod touch are supported. Page...
