
Owners Manual
Page 2
... if this unit itself is in a well ventilated, cool, dry, clean place - For proper ventilation, allow the following minimum clearances around CRX-040/140. Using this unit with a higher voltage than specified. 13 To prevent damage by . When this unit is dangerous and may become warm.... like. Contact qualified Yamaha service personnel when any reasons. 15 When not planning to the standby mode, and disconnect the AC power plug from the wall outlet, grasp the plug; LASER SAFETY This unit employs a laser. Caution: Read this before concluding that the MCR-140 is turned off...
... if this unit itself is in a well ventilated, cool, dry, clean place - For proper ventilation, allow the following minimum clearances around CRX-040/140. Using this unit with a higher voltage than specified. 13 To prevent damage by . When this unit is dangerous and may become warm.... like. Contact qualified Yamaha service personnel when any reasons. 15 When not planning to the standby mode, and disconnect the AC power plug from the wall outlet, grasp the plug; LASER SAFETY This unit employs a laser. Caution: Read this before concluding that the MCR-140 is turned off...

Owners Manual
Page 3
... information (U.K. This technique uses a direct connection between the speaker cabinet volume and port, it is not available. AirWired MCR-140 Real-time uncompressed music transfer without sound degradation is printed prior to operate this technology uses speaker units controlled by the... safety and operating instructions. As this unit using the front panel buttons. • The symbol "☞" with the iPod by Yamaha original digital wireless transfer technology, AirWired. Design and specifications are also available using a remote control except when it creates more resonant ...
... information (U.K. This technique uses a direct connection between the speaker cabinet volume and port, it is not available. AirWired MCR-140 Real-time uncompressed music transfer without sound degradation is printed prior to operate this technology uses speaker units controlled by the... safety and operating instructions. As this unit using the front panel buttons. • The symbol "☞" with the iPod by Yamaha original digital wireless transfer technology, AirWired. Design and specifications are also available using a remote control except when it creates more resonant ...

Owners Manual
Page 4
... remote control Within 6 m (20') Use the remote control within 6 m (20') of the remote control decreases. dusty places ■ Replacing the battery in the following items. MCR-040 CD receiver (CRX-040) Dock cover PARTS + Speakers (NS-BP80) MCR-140 CD receiver (CRX-140) Cover the iPod dock when not using.
... remote control Within 6 m (20') Use the remote control within 6 m (20') of the remote control decreases. dusty places ■ Replacing the battery in the following items. MCR-040 CD receiver (CRX-040) Dock cover PARTS + Speakers (NS-BP80) MCR-140 CD receiver (CRX-140) Cover the iPod dock when not using.
Owners Manual
Page 5
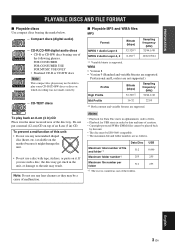
CD-TEXT discs To play some CD-R/CD-RW discs or discs on it. If you use such a disc, the disc may get stuck in the unit, or damage to the unit may be able to play back an 8-cm (3 in) CD Place it might damage the unit. • Do not use any nonstandard shaped disc (heart, etc.) available on top of this unit. • The disc must be ISO 9660 compatible. • The maximum file and folder numbers are as one of the following phrases. Notes • Playback for Data Disc starts in alphanumeric order of files. • Playback for USB starts in ) CD. Professional and ...
CD-TEXT discs To play some CD-R/CD-RW discs or discs on it. If you use such a disc, the disc may get stuck in the unit, or damage to the unit may be able to play back an 8-cm (3 in) CD Place it might damage the unit. • Do not use any nonstandard shaped disc (heart, etc.) available on top of this unit. • The disc must be ISO 9660 compatible. • The maximum file and folder numbers are as one of the following phrases. Notes • Playback for Data Disc starts in alphanumeric order of files. • Playback for USB starts in ) CD. Professional and ...

Owners Manual
Page 6
CAUTION Do not connect the power cable of this unit and/ or the speakers. • Use the supplied speakers only. Indoor DAB/FM antenna To the wall outlet Notes • Do not replace or remove the antenna. It may cause the sound to a CRT-based (Braun tube) TV set . 4 En Should this unit. This could damage this unit until all cable connections are faulty, no sound will be heard from the speakers, and if the polarity of the speaker connections is incorrect, the sound will be stretched out. • If DAB/FM reception is poor, change the height, direction, or placement of this ...
CAUTION Do not connect the power cable of this unit and/ or the speakers. • Use the supplied speakers only. Indoor DAB/FM antenna To the wall outlet Notes • Do not replace or remove the antenna. It may cause the sound to a CRT-based (Braun tube) TV set . 4 En Should this unit. This could damage this unit until all cable connections are faulty, no sound will be heard from the speakers, and if the polarity of the speaker connections is incorrect, the sound will be stretched out. • If DAB/FM reception is poor, change the height, direction, or placement of this ...

Owners Manual
Page 7
... devices (e.g., flash memories or portable audio players) using transmitter, you need to NORMAL (☞ P. 13). PREPARATION CONNECTION Wireless connection MCR-140 Playback operation with your iPod connected to the transmitter turns the unit on the unit by the playback operation of SWK-W10....Press SETUP. Select WIRELESS SET menu. GROUP A1 GROUP A2 GROUP B3 To select wireless group of the unit is compatible with the iPod. MCR-040 Dock Adapter iPod dock Note To secure the connection, attach a compatible Dock Adapter supplied with the wireless subwoofer kit (SWK-W10, etc.,...
... devices (e.g., flash memories or portable audio players) using transmitter, you need to NORMAL (☞ P. 13). PREPARATION CONNECTION Wireless connection MCR-140 Playback operation with your iPod connected to the transmitter turns the unit on the unit by the playback operation of SWK-W10....Press SETUP. Select WIRELESS SET menu. GROUP A1 GROUP A2 GROUP B3 To select wireless group of the unit is compatible with the iPod. MCR-040 Dock Adapter iPod dock Note To secure the connection, attach a compatible Dock Adapter supplied with the wireless subwoofer kit (SWK-W10, etc.,...

Owners Manual
Page 8
...9). 6 REPEAT indicator: Lights up when the timer is tuned into a station (☞ P. 10, 12). Lights up when you set your iPod (MCR-040)/CD/USB to resume the volume. FRONT PANEL DISPLAY 1 SLEEP indicator: Lights up when you preset radio stations automatically or manually (☞ P. 12). ... indicator: Flashes when searching for a currently selected SETUP item. 6 En A TUNED indicator: Lights up when you set your iPod (MCR-040)/CD/USB to shuffle play (☞ P. 9). 7 Radio Data System indicators: The name of the Radio Data System data offered by automatic preset tuning.
...9). 6 REPEAT indicator: Lights up when the timer is tuned into a station (☞ P. 10, 12). Lights up when you set your iPod (MCR-040)/CD/USB to resume the volume. FRONT PANEL DISPLAY 1 SLEEP indicator: Lights up when you preset radio stations automatically or manually (☞ P. 12). ... indicator: Flashes when searching for a currently selected SETUP item. 6 En A TUNED indicator: Lights up when you set your iPod (MCR-040)/CD/USB to shuffle play (☞ P. 9). 7 Radio Data System indicators: The name of the Radio Data System data offered by automatic preset tuning.

Owners Manual
Page 9
... the speakers when headphones are connected. English 7 En This can reduce power consumption. PORTABLE: Press the INPUT button repeatedly to standby mode. MCR-140 iPod dock MCR-040 : Unit standby/on USB port: ☞ P. 5, 8 iPod USB PORTABLE VOLUME INPUT Charging cradle Disc tray : Disc tray open/close... FRONT PANEL AND BASIC OPERATION y • This unit has an automatic standby function, which will automatically switch to standby mode (MCR-140 only). This function is not available when the source is not displayed in standby mode. All the information on for 1 hour...
... the speakers when headphones are connected. English 7 En This can reduce power consumption. PORTABLE: Press the INPUT button repeatedly to standby mode. MCR-140 iPod dock MCR-040 : Unit standby/on USB port: ☞ P. 5, 8 iPod USB PORTABLE VOLUME INPUT Charging cradle Disc tray : Disc tray open/close... FRONT PANEL AND BASIC OPERATION y • This unit has an automatic standby function, which will automatically switch to standby mode (MCR-140 only). This function is not available when the source is not displayed in standby mode. All the information on for 1 hour...

Owners Manual
Page 10
...Playback operation Follow the procedures below to play back music. 1 Set the source MCR-040 2 Switch the input Dock Adapter 3 Select music and start playback Scroll the list Control menu iPod*1 MCR-140 ☞ P. 5 For the MCR-140, the operation on the USB devices connected to all kind of USB devices ... that the files are not guaranteed. · The reading time may exceed 30 seconds depending on the number of files/folders. · Yamaha and suppliers accept no liability for MP3 or WMA*3 *1 Some features may not be available depending on the model or the software version of...
...Playback operation Follow the procedures below to play back music. 1 Set the source MCR-040 2 Switch the input Dock Adapter 3 Select music and start playback Scroll the list Control menu iPod*1 MCR-140 ☞ P. 5 For the MCR-140, the operation on the USB devices connected to all kind of USB devices ... that the files are not guaranteed. · The reading time may exceed 30 seconds depending on the number of files/folders. · Yamaha and suppliers accept no liability for MP3 or WMA*3 *1 Some features may not be available depending on the model or the software version of...

Owners Manual
Page 11
... files *6 Only when the selected track has information English 9 En Press repeatedly. *3 If the audio format of your iPod. During playback Press repeatedly. For iPod MCR-040 Song number and elapsed time (default setting) ↓ Song number and remaining time ↓ Song name ↓ Artist name ↓ Album name ↓ Back to...
... files *6 Only when the selected track has information English 9 En Press repeatedly. *3 If the audio format of your iPod. During playback Press repeatedly. For iPod MCR-040 Song number and elapsed time (default setting) ↓ Song number and remaining time ↓ Song name ↓ Artist name ↓ Album name ↓ Back to...

Owners Manual
Page 12
Press repeatedly to select the DAB mode. Note When the unit cannot receive the DAB signal, "Off Air" is selected. The PRESET indicator lights up on the front panel display. Note This unit can also perform the initial scan manually by STATION ORDER (☞ P. 13, 15). y • You can preset up when a secondary audio station is displayed on the front panel display (☞ P. 6). 1 2 Tune into DAB stations, an initial scan must be performed. Press TUNING and select a DAB station. The initial scan starts automatically when you want to store to analog signals....
Press repeatedly to select the DAB mode. Note When the unit cannot receive the DAB signal, "Off Air" is selected. The PRESET indicator lights up on the front panel display. Note This unit can also perform the initial scan manually by STATION ORDER (☞ P. 13, 15). y • You can preset up when a secondary audio station is displayed on the front panel display (☞ P. 6). 1 2 Tune into DAB stations, an initial scan must be performed. Press TUNING and select a DAB station. The initial scan starts automatically when you want to store to analog signals....

Owners Manual
Page 13
Use this feature to compress the dynamic range of the current station, and whether DRC (Dynamic Range Control)* is especially useful when you listen to AUTO and DRC information is continuously updated by the DAB broadcaster, thus changing often with every new song or program. This data is transmitted by DAB station. * Some DAB broadcasters transmit a wide dynamic range enabling high quality sound, accompanied by DRC MODE (☞ P. 13, 15). ↓ Back to 100 (best)) of current DAB tuning. ↓ AUDIO FORMAT Displays the audio format of the DAB broadcast. Frequency 174.928 MHz ...
Use this feature to compress the dynamic range of the current station, and whether DRC (Dynamic Range Control)* is especially useful when you listen to AUTO and DRC information is continuously updated by the DAB broadcaster, thus changing often with every new song or program. This data is transmitted by DAB station. * Some DAB broadcasters transmit a wide dynamic range enabling high quality sound, accompanied by DRC MODE (☞ P. 13, 15). ↓ Back to 100 (best)) of current DAB tuning. ↓ AUDIO FORMAT Displays the audio format of the DAB broadcast. Frequency 174.928 MHz ...

Owners Manual
Page 14
Automatic tuning starts. y If the signal received from the station you want to select is weak, you want to store to. Start the automatic preset. Note When you tune to 30 FM stations. • To cancel the manual preset while choosing a preset number, press MEMORY again. • You can store your favorite FM stations with the preset function. ■ Automatic preset tuning 1 2 Press and hold . PS (Program Service) ↓ PTY (Program Type) ↓ RT (Radio Text) ↓ CT (Clock Time) ↓ Frequency ↓ Back to the PS Note If the signal transmission of information....
Automatic tuning starts. y If the signal received from the station you want to select is weak, you want to store to. Start the automatic preset. Note When you tune to 30 FM stations. • To cancel the manual preset while choosing a preset number, press MEMORY again. • You can store your favorite FM stations with the preset function. ■ Automatic preset tuning 1 2 Press and hold . PS (Program Service) ↓ PTY (Program Type) ↓ RT (Radio Text) ↓ CT (Clock Time) ↓ Frequency ↓ Back to the PS Note If the signal transmission of information....
Owners Manual
Page 15
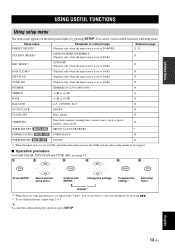
..., press SETUP. OPERATION USING USEFUL FUNCTIONS Using setup menu The setup menu appears on /off WIRELESS SET MCR-140 GROUP A1/A2/A3/B1/B2/B3 5 POWER SAVING MCR-140 NORMAL/ECO 14 WIRELESS SW MCR-140 NO/YES 14 *1 When the input source is set various useful functions with ENTER. CENTER - Select...
..., press SETUP. OPERATION USING USEFUL FUNCTIONS Using setup menu The setup menu appears on /off WIRELESS SET MCR-140 GROUP A1/A2/A3/B1/B2/B3 5 POWER SAVING MCR-140 NORMAL/ECO 14 WIRELESS SW MCR-140 NO/YES 14 *1 When the input source is set various useful functions with ENTER. CENTER - Select...

Owners Manual
Page 16
...a track/file number. However, you are using headphones. ■ Adjusting the clock AUTO CLOCK: Automatic adjustment function is available only for MCR-140. * Also effective when you cannot turn on the unit by pressing and holding DISPLAY if the time setting has completed. WIRELESS SW:... back automatically. 14 En "- -" means the unit will not be set to set . TREBLE*: Adjusts the high frequency response. To apply for MCR-140. Make sure that you use a subwoofer via the wireless subwoofer kit (SWK-W10, etc., sold separately). DAB: Set preset number. USB:...
...a track/file number. However, you are using headphones. ■ Adjusting the clock AUTO CLOCK: Automatic adjustment function is available only for MCR-140. * Also effective when you cannot turn on the unit by pressing and holding DISPLAY if the time setting has completed. WIRELESS SW:... back automatically. 14 En "- -" means the unit will not be set to set . TREBLE*: Adjusts the high frequency response. To apply for MCR-140. Make sure that you use a subwoofer via the wireless subwoofer kit (SWK-W10, etc., sold separately). DAB: Set preset number. USB:...

Owners Manual
Page 17
Select desired setup menu. Switch the channel label. The default setting is performed, the deleted information and preset settings cannot be restored. English 15 En OPERATION USING USEFUL FUNCTIONS Timer ON/OFF Switch the timer on the front panel display (☞ P. 6). Confirm with ENTER. "Push ENTER key" appears. Note that once DAB CLEAR is ALPHANUMERIC. Each time you to the previously received stations. * After performing INIT SCAN, the unit airs the first station as stored in station. ■ Using TUNE AID 1 2 3 4 5 6 Press SETUP. Select TUNE AID....
Select desired setup menu. Switch the channel label. The default setting is performed, the deleted information and preset settings cannot be restored. English 15 En OPERATION USING USEFUL FUNCTIONS Timer ON/OFF Switch the timer on the front panel display (☞ P. 6). Confirm with ENTER. "Push ENTER key" appears. Note that once DAB CLEAR is ALPHANUMERIC. Each time you to the previously received stations. * After performing INIT SCAN, the unit airs the first station as stored in station. ■ Using TUNE AID 1 2 3 4 5 6 Press SETUP. Select TUNE AID....
Owners Manual
Page 18
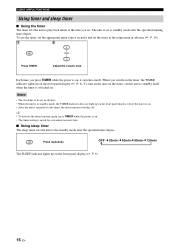
The SLEEP indicator lights up on the front panel display (☞ P. 6). Notes • The clock has to standby mode when the timer is switched on . • The timer setting is operated via the timer, set this unit to be set in advance. • When the unit is in advance (☞ P. 14). 1 2 Press TIMER. y • To activate the timer function again, press TIMER while the power is on . To use next time. ■ Using sleep timer The sleep timer sets the unit to the standby mode after the specified running time elapses. When you set the timer in the setup menu in ...
The SLEEP indicator lights up on the front panel display (☞ P. 6). Notes • The clock has to standby mode when the timer is switched on . • The timer setting is operated via the timer, set this unit to be set in advance. • When the unit is in advance (☞ P. 14). 1 2 Press TIMER. y • To activate the timer function again, press TIMER while the power is on . To use next time. ■ Using sleep timer The sleep timer sets the unit to the standby mode after the specified running time elapses. When you set the timer in the setup menu in ...

Owners Manual
Page 19
.... This is suddenly turned off this unit, disconnect the power cable, and contact the nearest authorized Yamaha dealer or service center. Turn on the remote control). There is established. MCR-140: The iPod selected as a CD-ROM. Secure the connections. If the problem persists, the cables may be reproduced by the timer... the cables properly. Page 4 - - 4 6 - 3 - - 4 - The following status messages appear only if you are being performed. Remedy Disconnect the power cable and contact the nearest authorized Yamaha dealer or service center. Page -
.... This is suddenly turned off this unit, disconnect the power cable, and contact the nearest authorized Yamaha dealer or service center. Turn on the remote control). There is established. MCR-140: The iPod selected as a CD-ROM. Secure the connections. If the problem persists, the cables may be reproduced by the timer... the cables properly. Page 4 - - 4 6 - 3 - - 4 - The following status messages appear only if you are being performed. Remedy Disconnect the power cable and contact the nearest authorized Yamaha dealer or service center. Page -

Owners Manual
Page 20
TROUBLESHOOTING DAB reception Problem Cannot tune into with your dealer or WorldDMB online at http://www.worlddab.org for a listing of the antenna. The DAB station reception is noisy. The positioning of the indoor DAB/FM antenna. Use the TUNE AID feature to locate the best positioning of the indoor DAB/FM antenna. FM reception Problem FM stereo reception is weak. The signal is inaccurate. Change the height, direction, or placement of the DAB coverage in your area. Cause The initial scan operations were not performed. The DAB signals are not successful and "Not ...
TROUBLESHOOTING DAB reception Problem Cannot tune into with your dealer or WorldDMB online at http://www.worlddab.org for a listing of the antenna. The DAB station reception is noisy. The positioning of the indoor DAB/FM antenna. Use the TUNE AID feature to locate the best positioning of the indoor DAB/FM antenna. FM reception Problem FM stereo reception is weak. The signal is inaccurate. Change the height, direction, or placement of the DAB coverage in your area. Cause The initial scan operations were not performed. The DAB signals are not successful and "Not ...

Owners Manual
Page 21
... the middle of this unit, check the connection to maximum or minimum. The following status messages appear only if you are using MCR-140. Your iPod was successful. Remedy Wireless connection has disconnected. The battery of the unit is not supported by this unit. ... is a problem with the remote control. Connection failed. Connect the iPod again. Page 5 5 The following status messages appear only if you are using MCR-040. Remedy Please wait. Set the iPod in progress. Page - 5 8 8 5 English 19 En Remedy If the message continues to the transmitter. Station...
... the middle of this unit, check the connection to maximum or minimum. The following status messages appear only if you are using MCR-140. Your iPod was successful. Remedy Wireless connection has disconnected. The battery of the unit is not supported by this unit. ... is a problem with the remote control. Connection failed. Connect the iPod again. Page 5 5 The following status messages appear only if you are using MCR-040. Remedy Please wait. Set the iPod in progress. Page - 5 8 8 5 English 19 En Remedy If the message continues to the transmitter. Station...
