
MCXSP10 Manual
Page 5
... OPERATION INTRODUCTION Notice 2 Features 3 Supplied accessories 3 Getting started 4 Quick start guide 5 PREPARATION Connections 11 Optimizing the speaker setting for your listening room 28 Using AUTO SETUP 28 BASIC OPERATION Selecting the SCENE templates 33 Selecting the desired SCENE template...39 Using your original SCENE templates 36 Playback 37 Basic procedure 37 Selecting the MULTI CH INPUT component......... 38 Selecting the front speaker set 38 Selecting audio input jacks (AUDIO SELECT 39 Displaying the current status of this unit (MANUAL SETUP).........69 Using SET ...
... OPERATION INTRODUCTION Notice 2 Features 3 Supplied accessories 3 Getting started 4 Quick start guide 5 PREPARATION Connections 11 Optimizing the speaker setting for your listening room 28 Using AUTO SETUP 28 BASIC OPERATION Selecting the SCENE templates 33 Selecting the desired SCENE template...39 Using your original SCENE templates 36 Playback 37 Basic procedure 37 Selecting the MULTI CH INPUT component......... 38 Selecting the front speaker set 38 Selecting audio input jacks (AUDIO SELECT 39 Displaying the current status of this unit (MANUAL SETUP).........69 Using SET ...

MCXSP10 Manual
Page 7
...9670; Bi-amplification connection capability ◆ Sleep timer Check that you received all of the supplied accessories varies depending on -screen display) menus that...9670; Playback information displaying capability ◆ Battery charging capability Other features ◆ YPAO (Yamaha Parametric Room Acoustic Optimizer) for discrete multi- DISPLAY REC SCENE 1 2 3 4 Batteries...following parts. Remote control CODE SET TRANSMIT POWER TV POWER AV STANDBY POWER CD DVD DOCK V-AUX MD CD-R CBL ... speaker setup ◆ 192-kHz/24-bit D/A converter ◆ OSD (on the models....
...9670; Bi-amplification connection capability ◆ Sleep timer Check that you received all of the supplied accessories varies depending on -screen display) menus that...9670; Playback information displaying capability ◆ Battery charging capability Other features ◆ YPAO (Yamaha Parametric Room Acoustic Optimizer) for discrete multi- DISPLAY REC SCENE 1 2 3 4 Batteries...following parts. Remote control CODE SET TRANSMIT POWER TV POWER AV STANDBY POWER CD DVD DOCK V-AUX MD CD-R CBL ... speaker setup ◆ 192-kHz/24-bit D/A converter ◆ OSD (on the models....
MCXSP10 Manual
Page 9
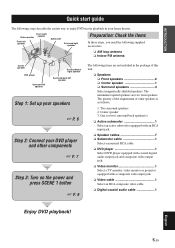
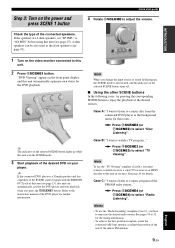
... Select an RCA composite video cable. ❏ Digital coaxial audio cable 1 Enjoy DVD playback! Front right Video monitor speaker Front left speaker Subwoofer Surround right speaker Preparation: Check the items In these steps, you need the following supplied accessories. ❏ AM loop antenna ❏... Step 3: Turn on the power and press SCENE 1 button ☞ P. 9 The following items are two front speakers. English 5 En Two surround speakers 2. INTRODUCTION Quick start guide Quick start guide The following steps describe the easiest way to enjoy DVD movie playback in ...
... Select an RCA composite video cable. ❏ Digital coaxial audio cable 1 Enjoy DVD playback! Front right Video monitor speaker Front left speaker Subwoofer Surround right speaker Preparation: Check the items In these steps, you need the following supplied accessories. ❏ AM loop antenna ❏... Step 3: Turn on the power and press SCENE 1 button ☞ P. 9 The following items are two front speakers. English 5 En Two surround speakers 2. INTRODUCTION Quick start guide Quick start guide The following steps describe the easiest way to enjoy DVD movie playback in ...

MCXSP10 Manual
Page 10
... unit and your speaker. Connect the plain cable to the "-" (black) terminals. 3 Connect each speaker cable to the corresponding speaker terminal of the subwoofer. Be sure to connect the left speaker Be sure to connect the "+" (red) and "-" (black) properly. Subwoofer AV receiver 6 En Input ...and the input jack of this unit. 1 2 3 4 Surround and surround back speakers To the surround right speaker To the surround left speaker To the surround back left speaker To the surround back right speaker 1 Make sure that this unit and the subwoofer are colored or shaped differently, ...
... unit and your speaker. Connect the plain cable to the "-" (black) terminals. 3 Connect each speaker cable to the corresponding speaker terminal of the subwoofer. Be sure to connect the left speaker Be sure to connect the "+" (red) and "-" (black) properly. Subwoofer AV receiver 6 En Input ...and the input jack of this unit. 1 2 3 4 Surround and surround back speakers To the surround right speaker To the surround left speaker To the surround back left speaker To the surround back right speaker 1 Make sure that this unit and the subwoofer are colored or shaped differently, ...
MCXSP10 Manual
Page 11
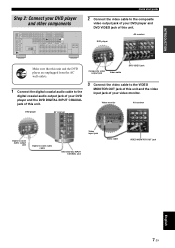
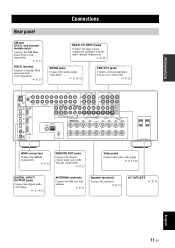
... MD/CD-R 1 DVD IN1 IN VCR OUT DTV/CBL B R SB(8CH) SURROUND SUBWOOFER R FRONT SURROUND SUR. Video monitor AV receiver DVD player AV receiver Digital coaxial audio output jack Digital coaxial audio cable Video input jack Video cable DVD DIGITAL INPUT COAXIAL jack VIDEO MONITOR OUT jack English... Y PB DVR C PR COMPONENT VIDEO FRONT B/PRESENCE R EXTRA SP L ANTENNA FM GND AM 75 UNBAL. DVD DTV/CBL IN DVR OUT VIDEO SPEAKERS FRONT A CENTER R L IN VCR OUT MONITOR OUT SURROUND R L SURROUND BACK/ BI-AMP R SINGLE L REMOTE OUT AC OUTLETS Quick start guide...
... MD/CD-R 1 DVD IN1 IN VCR OUT DTV/CBL B R SB(8CH) SURROUND SUBWOOFER R FRONT SURROUND SUR. Video monitor AV receiver DVD player AV receiver Digital coaxial audio output jack Digital coaxial audio cable Video input jack Video cable DVD DIGITAL INPUT COAXIAL jack VIDEO MONITOR OUT jack English... Y PB DVR C PR COMPONENT VIDEO FRONT B/PRESENCE R EXTRA SP L ANTENNA FM GND AM 75 UNBAL. DVD DTV/CBL IN DVR OUT VIDEO SPEAKERS FRONT A CENTER R L IN VCR OUT MONITOR OUT SURROUND R L SURROUND BACK/ BI-AMP R SINGLE L REMOTE OUT AC OUTLETS Quick start guide...
MCXSP10 Manual
Page 12
...; Connecting a DVD player via various ways of this unit. y This unit is equipped with AC OUTLETS for the power supply of the other kind of speaker combinations ☞ P. 12 • Connecting a video monitor via various ways of the connection ☞ P. 18 • Connecting a DVD player via analog multichannel audio connection ☞...
...; Connecting a DVD player via various ways of this unit. y This unit is equipped with AC OUTLETS for the power supply of the other kind of speaker combinations ☞ P. 12 • Connecting a video monitor via various ways of the connection ☞ P. 18 • Connecting a DVD player via analog multichannel audio connection ☞...
MCXSP10 Manual
Page 13
...English 9 En Notes • To use the "TV Viewing" template (Case B), you must connect a satellite receiver, a cable TV receiver or an HDTV decoder to watch a TV program..." If the speakers are 6 ohm speakers, set "SP IMP." y If the connected DVD player is deactivated, and the indicator on the power and...antenna, or adjust the position of the end of the connected speakers. Note To use the "Radio Listening" template (Case C), you change the input source or sound field program, the SCENE mode is a Yamaha product and has capability of the SCENE control signals with the ...
...English 9 En Notes • To use the "TV Viewing" template (Case B), you must connect a satellite receiver, a cable TV receiver or an HDTV decoder to watch a TV program..." If the speakers are 6 ohm speakers, set "SP IMP." y If the connected DVD player is deactivated, and the indicator on the power and...antenna, or adjust the position of the end of the connected speakers. Note To use the "Radio Listening" template (Case C), you change the input source or sound field program, the SCENE mode is a Yamaha product and has capability of the SCENE control signals with the ...

MCXSP10 Manual
Page 14
...☞ P. 48 • Customizing the sound field programs ☞ P. 61 ■ Adjusting the parameters of this unit • Automatically optimizing the speaker parameters for details. ■ After using this unit from the remote control. Press ASTANDBY/ON to set this unit? ■ Customizing the SCENE templates...See page 33 for your listening room (AUTO SETUP) ☞ P. 28 • Manually adjusting various parameters of power in order to receive infrared signals from the standby mode, press the desired ESCENE buttons (or FSCENE) or ASTANDBY/ON on the front panel (or HPOWER on ...
...☞ P. 48 • Customizing the sound field programs ☞ P. 61 ■ Adjusting the parameters of this unit • Automatically optimizing the speaker parameters for details. ■ After using this unit from the remote control. Press ASTANDBY/ON to set this unit? ■ Customizing the SCENE templates...See page 33 for your listening room (AUTO SETUP) ☞ P. 28 • Manually adjusting various parameters of power in order to receive infrared signals from the standby mode, press the desired ESCENE buttons (or FSCENE) or ASTANDBY/ON on the front panel (or HPOWER on ...
MCXSP10 Manual
Page 15
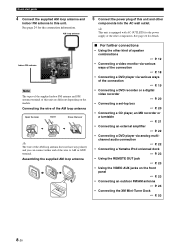
... DTV/CBL B R SB(8CH) SURROUND SUBWOOFER R FRONT SURROUND SUR. PREPARATION Connections Rear panel XM jack (U.S.A. DVD DTV/CBL IN DVR OUT VIDEO SPEAKERS FRONT A CENTER R L IN VCR OUT MONITOR OUT SURROUND R L SURROUND BACK/ BI-AMP R SINGLE L REMOTE OUT AC OUTLETS HDMI connectors Connect... the HDMI components. ☞ P. 16 REMOTE OUT jacks Connect the remote control input jack of the Yamaha components. ☞ P. 23 Video jacks Connect the video cable plugs. ☞ P. 18-20 DIGITAL INPUT/ OUTPUT jacks Connect the digital ...
... DTV/CBL B R SB(8CH) SURROUND SUBWOOFER R FRONT SURROUND SUR. PREPARATION Connections Rear panel XM jack (U.S.A. DVD DTV/CBL IN DVR OUT VIDEO SPEAKERS FRONT A CENTER R L IN VCR OUT MONITOR OUT SURROUND R L SURROUND BACK/ BI-AMP R SINGLE L REMOTE OUT AC OUTLETS HDMI connectors Connect... the HDMI components. ☞ P. 16 REMOTE OUT jacks Connect the remote control input jack of the Yamaha components. ☞ P. 23 Video jacks Connect the video cable plugs. ☞ P. 18-20 DIGITAL INPUT/ OUTPUT jacks Connect the digital ...

MCXSP10 Manual
Page 16
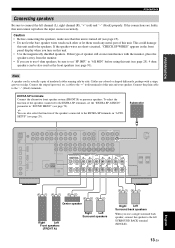
... are used for some reason it to -back transitions. Center speaker (C) The center speaker is better to place the subwoofer near the front speakers. Surround left and right speakers (FL and FR) The front speakers are obtained with a built-in amplifier, such as the Yamaha Active Servo Processing Subwoofer System, is effective not only for effect...
... are used for some reason it to -back transitions. Center speaker (C) The center speaker is better to place the subwoofer near the front speakers. Surround left and right speakers (FL and FR) The front speakers are obtained with a built-in amplifier, such as the Yamaha Active Servo Processing Subwoofer System, is effective not only for effect...
MCXSP10 Manual
Page 17
...can be sure to set the "EXTRA SP ASSIGN" parameter in the front panel display when you use 6 ohm speakers, be also used as the front speakers (see page 72). If the connections are short-circuited, "CHECK SP WIRES" appears in "SOUND MENU" (see.... Subwoofer PRE OUT SUBWOOFER FRONT B/PRESENCE R EXTRA SP L SPEAKERS FRONT A CENTER R L SURROUND R L SURROUND BACK/ BI-AMP R SINGLE L English Center speaker Right Left Front speakers (FRONT A) Right Left Surround speakers Right Left Surround back speakers When you turn on this unit cannot reproduce the input sources ...
...can be sure to set the "EXTRA SP ASSIGN" parameter in the front panel display when you use 6 ohm speakers, be also used as the front speakers (see page 72). If the connections are short-circuited, "CHECK SP WIRES" appears in "SOUND MENU" (see.... Subwoofer PRE OUT SUBWOOFER FRONT B/PRESENCE R EXTRA SP L SPEAKERS FRONT A CENTER R L SURROUND R L SURROUND BACK/ BI-AMP R SINGLE L English Center speaker Right Left Front speakers (FRONT A) Right Left Surround speakers Right Left Surround back speakers When you turn on this unit cannot reproduce the input sources ...

MCXSP10 Manual
Page 18
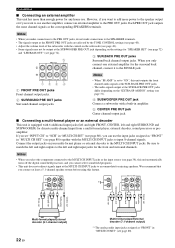
... cable together to separate the LPF (low pass filter) and HPF (high pass filter) crossovers. Refer to the instruction manuals of your speakers support biamplification. This unit allows you make the conventional connection, make the bi-amplification connections, use the FRONT and SURROUND BACK/BI-AMP ...shown below. To activate the bi-amplification connections, set "BI-AMP" to secure the wire. Red: positive (+) Black: negative (-) 3 Insert one speaker system. Front speakers Right Left 4 Tighten the knob to "ON" in "ADVANCED SETUP" (see page 93). Connections ■ Connecting the...
... cable together to separate the LPF (low pass filter) and HPF (high pass filter) crossovers. Refer to the instruction manuals of your speakers support biamplification. This unit allows you make the conventional connection, make the bi-amplification connections, use the FRONT and SURROUND BACK/BI-AMP ...shown below. To activate the bi-amplification connections, set "BI-AMP" to secure the wire. Red: positive (+) Black: negative (-) 3 Insert one speaker system. Front speakers Right Left 4 Tighten the knob to "ON" in "ADVANCED SETUP" (see page 93). Connections ■ Connecting the...
MCXSP10 Manual
Page 26
... external decoder, sound processor or preamplifier. Notes • When you select the component connected to the MULTI CH INPUT jacks as the corresponding SPEAKERS terminals. When you only connect one external amplifier for the surround back L channel, connect it to the left and right outputs to the ... PRE OUT SINGLE 5 CENTER Surround back channel output jacks. Connections ■ Connecting an external amplifier This unit has more power to the speaker output or if you want to add more than enough power for any home use another amplifier, connect an external amplifier to the PRE...
... external decoder, sound processor or preamplifier. Notes • When you select the component connected to the MULTI CH INPUT jacks as the corresponding SPEAKERS terminals. When you only connect one external amplifier for the surround back L channel, connect it to the left and right outputs to the ... PRE OUT SINGLE 5 CENTER Surround back channel output jacks. Connections ■ Connecting an external amplifier This unit has more power to the speaker output or if you want to add more than enough power for any home use another amplifier, connect an external amplifier to the PRE...
MCXSP10 Manual
Page 27
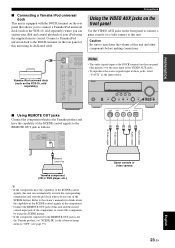
...the capability of the SCENE control signals of the components. • Connect the REMOTE OUT jack of the SCENE buttons. DOCK Yamaha iPod universal dock (such as the YDS-10, sold separately) where you can automatically activate the corresponding components and start the ...playback when you to the REMOTE OUT jack as the input source. STANDBY ON/ VOLUME SPEAKERS EDIT SEARCH MODE PRESET/TUNING FM/AM CATEGORY A/B/C/D/E PRESET/TUNING/CH MEMORY DISPLAY TUNING AUTO/MAN'L NIGHT SLEEP PHONES TONE CONTROL SCENE 1...
...the capability of the SCENE control signals of the components. • Connect the REMOTE OUT jack of the SCENE buttons. DOCK Yamaha iPod universal dock (such as the YDS-10, sold separately) where you can automatically activate the corresponding components and start the ...playback when you to the REMOTE OUT jack as the input source. STANDBY ON/ VOLUME SPEAKERS EDIT SEARCH MODE PRESET/TUNING FM/AM CATEGORY A/B/C/D/E PRESET/TUNING/CH MEMORY DISPLAY TUNING AUTO/MAN'L NIGHT SLEEP PHONES TONE CONTROL SCENE 1...
MCXSP10 Manual
Page 29
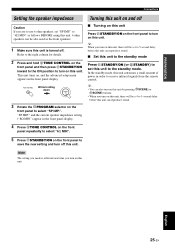
... press ASTANDBY/ON inward to the ON position to use 6 ohm speakers, set this unit to turn off this unit can be also used as the front speakers. 1 Make sure this unit. PREPARATION Connections Setting the speaker impedance Turning this unit on and off Caution If you are to ...; MIN") appear in order to "6Ω MIN" as follows BEFORE using this unit. 4 ohm speakers can reproduce sound. 3 Rotate the CPROGRAM selector on the front panel to select "SP IMP.". to receive infrared signals from the remote control. English 25 En Note The setting you made is turned off. ...
... press ASTANDBY/ON inward to the ON position to use 6 ohm speakers, set this unit to turn off this unit can be also used as the front speakers. 1 Make sure this unit. PREPARATION Connections Setting the speaker impedance Turning this unit on and off Caution If you are to ...; MIN") appear in order to "6Ω MIN" as follows BEFORE using this unit. 4 ohm speakers can reproduce sound. 3 Rotate the CPROGRAM selector on the front panel to select "SP IMP.". to receive infrared signals from the remote control. English 25 En Note The setting you made is turned off. ...
MCXSP10 Manual
Page 30
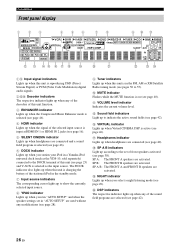
SP A B: The FRONT A and FRONT B speakers are activated. The DOCK indicator also lights up when this unit is in a Yamaha iPod universal dock (such as the input source. H SP A B indicators Light up according to the set in "AUTO SETUP" are used without any modifications .... 3 ENHANCER indicator Lights up when the Compressed Music Enhancer mode is selected (see page 46). 4 HDMI indicator Lights up when the signal of front speakers activated (see page 42). 26 En F VIRTUAL indicator Lights up when Virtual CINEMA DSP is on (see page 46). G Headphones indicator Lights up when...
SP A B: The FRONT A and FRONT B speakers are activated. The DOCK indicator also lights up when this unit is in a Yamaha iPod universal dock (such as the input source. H SP A B indicators Light up according to the set in "AUTO SETUP" are used without any modifications .... 3 ENHANCER indicator Lights up when the Compressed Music Enhancer mode is selected (see page 46). 4 HDMI indicator Lights up when the signal of front speakers activated (see page 42). 26 En F VIRTUAL indicator Lights up when Virtual CINEMA DSP is on (see page 46). G Headphones indicator Lights up when...

MCXSP10 Manual
Page 31
...; Do not drop the remote control. • Do not leave or store the remote control in "SOUND MENU". • To use the presence speakers, set for "EXTRA SP ASSIGN" (see page 72) and "SUR.B L/R SP" (see page 74) procedure. Input channel indicators Indicate the channel... sensor Approximately 6 m (20 ft) 30 30 Infrared window (W) Outputs infrared control signals. y • You can make settings for surround back speakers automatically by running "AUTO SETUP" (see page 28) or manually by adjusting settings for other information when adjusting or changing settings. places of high ...
...; Do not drop the remote control. • Do not leave or store the remote control in "SOUND MENU". • To use the presence speakers, set for "EXTRA SP ASSIGN" (see page 72) and "SUR.B L/R SP" (see page 74) procedure. Input channel indicators Indicate the channel... sensor Approximately 6 m (20 ft) 30 30 Infrared window (W) Outputs infrared control signals. y • You can make settings for surround back speakers automatically by running "AUTO SETUP" (see page 28) or manually by adjusting settings for other information when adjusting or changing settings. places of high ...
MCXSP10 Manual
Page 32
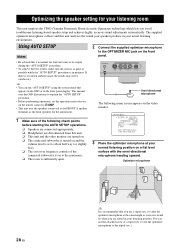
... starting the AUTO SETUP operations. ❏ Speakers are connected appropriately. ❏ Headphones are disconnected from this unit analyzes the sound your speakers produce in your listening room This unit employs the YPAO (Yamaha Parametric Room Acoustic Optimizer) technology which lets... omni-directional microphone heading upward. Optimizer microphone [ [ [ 28 En y It is recommended that you avoid troublesome listening-based speaker setup and achieves highly accurate sound adjustments automatically. This manual uses the OSD illustrations to explain the "AUTO SETUP" procedure. &#...
... starting the AUTO SETUP operations. ❏ Speakers are connected appropriately. ❏ Headphones are disconnected from this unit analyzes the sound your speakers produce in your listening room This unit employs the YPAO (Yamaha Parametric Room Acoustic Optimizer) technology which lets... omni-directional microphone heading upward. Optimizer microphone [ [ [ 28 En y It is recommended that you avoid troublesome listening-based speaker setup and achieves highly accurate sound adjustments automatically. This manual uses the OSD illustrations to explain the "AUTO SETUP" procedure. &#...

MCXSP10 Manual
Page 33
...SETUP" settings and restore the previous settings. • Select "DEFAULT" to reset the "AUTO SETUP" parameters to start the setup procedure. Extra speaker assignment EXTRA SP ASSIGN Selects the function of the specified frequency bands. Choices: AUTO, RELOAD, UNDO, DEFAULT • Select "AUTO" to ... a cohesive sound field in the room. Note If you select "ON" in accordance with higher frequencies being less emphasized. Once all speakers. This unit automatically selects the crucial frequency bands for "EXTRA SP ASSIGN" and then press Dn. It takes approximately 3 minutes for...
...SETUP" settings and restore the previous settings. • Select "DEFAULT" to reset the "AUTO SETUP" parameters to start the setup procedure. Extra speaker assignment EXTRA SP ASSIGN Selects the function of the specified frequency bands. Choices: AUTO, RELOAD, UNDO, DEFAULT • Select "AUTO" to ... a cohesive sound field in the room. Note If you select "ON" in accordance with higher frequencies being less emphasized. Once all speakers. This unit automatically selects the crucial frequency bands for "EXTRA SP ASSIGN" and then press Dn. It takes approximately 3 minutes for...

MCXSP10 Manual
Page 34
... >SET CANCEL [ ]/[ ]:Up/Down [ENTER]:Enter RESULT:WIRING FRONT L;;;;;;;OK [ ]/[[]:Select [ENTER]:Return [ [ 30 En The display changes as follows: Number of speakers SP Displays the number of speakers connected to this unit detects potential problems during the "AUTO SETUP" procedure, "WARNING" and the number of warning messages appears in the above...
... >SET CANCEL [ ]/[ ]:Up/Down [ENTER]:Enter RESULT:WIRING FRONT L;;;;;;;OK [ ]/[[]:Select [ENTER]:Return [ [ 30 En The display changes as follows: Number of speakers SP Displays the number of speakers connected to this unit detects potential problems during the "AUTO SETUP" procedure, "WARNING" and the number of warning messages appears in the above...


