
Owner's Manual
Page 2
...) ENVIRONMENTAL ISSUES: Yamaha strives to how a function or effect works (when the unit is soldered in the safety instruction section. The model number, serial number, power requirements, etc., are tested and approved by an independent safety testing laboratory in the spaces provided below and retain this type of your dealer before requesting service. CAUTION RISK OF ELECTRIC SHOCK DO NOT OPEN CAUTION: TO REDUCE...
...) ENVIRONMENTAL ISSUES: Yamaha strives to how a function or effect works (when the unit is soldered in the safety instruction section. The model number, serial number, power requirements, etc., are tested and approved by an independent safety testing laboratory in the spaces provided below and retain this type of your dealer before requesting service. CAUTION RISK OF ELECTRIC SHOCK DO NOT OPEN CAUTION: TO REDUCE...
Owner's Manual
Page 3
...;er and headphones or speaker/s, may be assumed that is used, please observe all Safety Instructions, Installation Instructions, Special Message Section items, and any Assembly Instructions found in the owners manual, on , trip over, or roll anything over and try again. If the problem persists, contact an electrician to heat sources such as; Some electronic products utilize external power supplies or adapters. Do NOT connect this...
...;er and headphones or speaker/s, may be assumed that is used, please observe all Safety Instructions, Installation Instructions, Special Message Section items, and any Assembly Instructions found in the owners manual, on , trip over, or roll anything over and try again. If the problem persists, contact an electrician to heat sources such as; Some electronic products utilize external power supplies or adapters. Do NOT connect this...
Owner's Manual
Page 4
.... Do not open • Do not open the instrument or attempt to disassemble the internal parts or modify them in the outlet. These precautions include, but are not limited to, the following : Power supply/Power cord • When removing the electric plug from the wall AC outlet. 2 4 H01 Owner's Manual (1)B-11 1/2 Doing so can damage it inspected by qualified Yamaha service personnel. Assembly • Read...
.... Do not open • Do not open the instrument or attempt to disassemble the internal parts or modify them in the outlet. These precautions include, but are not limited to, the following : Power supply/Power cord • When removing the electric plug from the wall AC outlet. 2 4 H01 Owner's Manual (1)B-11 1/2 Doing so can damage it inspected by qualified Yamaha service personnel. Assembly • Read...
Owner's Manual
Page 5
... the volume controls while playing the instrument to crack or peel. Using it has license to the instrument, or data that is lost or destroyed. Always turn off for a long period of copyright has legal consequences. Any violation of time at their respective companies. (1)B-11 2/2 H01 Owner's Manual 5 Handling caution • Take care that you experience any gaps on the key cover, panel or keyboard. Use...
... the volume controls while playing the instrument to crack or peel. Using it has license to the instrument, or data that is lost or destroyed. Always turn off for a long period of copyright has legal consequences. Any violation of time at their respective companies. (1)B-11 2/2 H01 Owner's Manual 5 Handling caution • Take care that you experience any gaps on the key cover, panel or keyboard. Use...
Owner's Manual
Page 6
... playing an actual acoustic grand piano. Main Features Stylish and sophisticated digital piano The H01 combines true piano sound in a safe and handy place for purchasing the Yamaha Digital Piano H01! The Grand Piano 1 feature totally new samples painstakingly recorded from a full concert grand piano. We also recommend that add the subtle sound produced when the keys are released. Authentic Acoustic Piano-like Touch Natural Wood Keyboard The special Natural Wood keyboard uses...
... playing an actual acoustic grand piano. Main Features Stylish and sophisticated digital piano The H01 combines true piano sound in a safe and handy place for purchasing the Yamaha Digital Piano H01! The Grand Piano 1 feature totally new samples painstakingly recorded from a full concert grand piano. We also recommend that add the subtle sound produced when the keys are released. Authentic Acoustic Piano-like Touch Natural Wood Keyboard The special Natural Wood keyboard uses...
Owner's Manual
Page 7
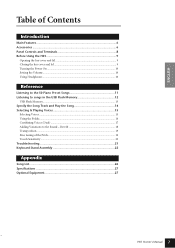
... Touch Sensitivity ...20 Troubleshooting 21 Keyboard Stand Assembly 22 Appendix Song List...26 Specifications 27 Optional Equipment 27 H01 Owner's Manual 7 Reverb 18 Transposition...19 Fine tuning of Contents Introduction Main Features 6 Accessories 6 Panel Controls and Terminals 8 Before Using the H01 9 Opening the key cover and lid 9 Closing the key cover and lid 9 Turning the Power On 10 Setting the Volume ...10 Using Headphones ...10 Reference Listening to the 50 Piano Preset Songs 11 Listening to songs in the USB Flash Memory 12 USB Flash Memory...
... Touch Sensitivity ...20 Troubleshooting 21 Keyboard Stand Assembly 22 Appendix Song List...26 Specifications 27 Optional Equipment 27 H01 Owner's Manual 7 Reverb 18 Transposition...19 Fine tuning of Contents Introduction Main Features 6 Accessories 6 Panel Controls and Terminals 8 Before Using the H01 9 Opening the key cover and lid 9 Closing the key cover and lid 9 Turning the Power On 10 Setting the Volume ...10 Using Headphones ...10 Reference Listening to the 50 Piano Preset Songs 11 Listening to songs in the USB Flash Memory 12 USB Flash Memory...
Owner's Manual
Page 8
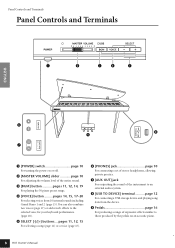
...) or a voice (page 15). 6 [PHONES] jack page 10 For connecting a set of stereo headphones, allowing private practice. 7 [AUX OUT] jack For outputting the sound of expressive effects similar to an external audio system. 8 [USB TO DEVICE] terminal .......... page 12 For connecting a USB storage device and playing song data from 10 internal sounds including Grand Piano 1 and 2 (page 15). Panel Controls and Terminals Panel Controls and Terminals q w e r t ENGLISH y i o u 1 [POWER] switch page 10 For turning the power on or off. 2 [MASTER VOLUME] slider...
...) or a voice (page 15). 6 [PHONES] jack page 10 For connecting a set of stereo headphones, allowing private practice. 7 [AUX OUT] jack For outputting the sound of expressive effects similar to an external audio system. 8 [USB TO DEVICE] terminal .......... page 12 For connecting a USB storage device and playing song data from 10 internal sounds including Grand Piano 1 and 2 (page 15). Panel Controls and Terminals Panel Controls and Terminals q w e r t ENGLISH y i o u 1 [POWER] switch page 10 For turning the power on or off. 2 [MASTER VOLUME] slider...
Owner's Manual
Page 10
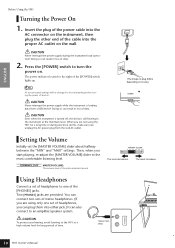
... instrument is turned off and on locale.) Setting the Volume Initially set of stereo headphones. (If you start playing, re-adjust the [MASTER VOLUME] slider to the instrument at a high volume level for a long time or during the instrument load operation! Doing so can connect two sets of headphones, you can plug them into the proper AC outlet on . Stereo mini plug 8 10 H01 Owner's Manual ENGLISH Before Using the H01 Turning the Power On 1. CAUTION Never interrupt the power supply...
... instrument is turned off and on locale.) Setting the Volume Initially set of stereo headphones. (If you start playing, re-adjust the [MASTER VOLUME] slider to the instrument at a high volume level for a long time or during the instrument load operation! Doing so can connect two sets of headphones, you can plug them into the proper AC outlet on . Stereo mini plug 8 10 H01 Owner's Manual ENGLISH Before Using the H01 Turning the Power On 1. CAUTION Never interrupt the power supply...
Owner's Manual
Page 11
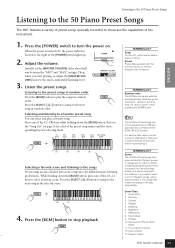
... power is connected to the [USB DEVICE] terminal. Listen the preset songs. Selecting and listening to a favorite preset song You can select and play sequentially. Melancholy 8. Baroque and Pre-romantic Music 11. Post-romantic 13. Preset: Preset Data supplied with the internal memory of the instrument. 9 ENGLISH 1. Morning 3. Relaxing 6. Press the [BGM] button to the next song in the selected scene. NOTE The 50 Piano Preset songs cannot be played when a USB storage device is turned ON, the power...
... power is connected to the [USB DEVICE] terminal. Listen the preset songs. Selecting and listening to a favorite preset song You can select and play sequentially. Melancholy 8. Baroque and Pre-romantic Music 11. Post-romantic 13. Preset: Preset Data supplied with the internal memory of the instrument. 9 ENGLISH 1. Morning 3. Relaxing 6. Press the [BGM] button to the next song in the selected scene. NOTE The 50 Piano Preset songs cannot be played when a USB storage device is turned ON, the power...
Owner's Manual
Page 12
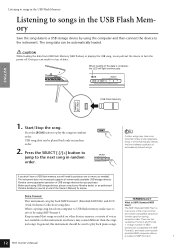
... played songs. NOTE Certain songs may sound different than others to save it by using SMF Format 0. Before purchasing USB storage devices, please consult your Yamaha dealer, or an authorized Yamaha distributor (see list at end of the Owner's Manual) for storing sequence data. A large number of voices not available on other devices may use a variety of MIDI devices are two variations: Format 0 and Format 1. Press the SELECT [-]/[+] button to jump to play the songs...
... played songs. NOTE Certain songs may sound different than others to save it by using SMF Format 0. Before purchasing USB storage devices, please consult your Yamaha dealer, or an authorized Yamaha distributor (see list at end of the Owner's Manual) for storing sequence data. A large number of voices not available on other devices may use a variety of MIDI devices are two variations: Format 0 and Format 1. Press the SELECT [-]/[+] button to jump to play the songs...

Owner's Manual
Page 14
... track to play back piano songs. 12 14 H01 Owner's Manual ENGLISH Specify the Song Track and Play the Song Specify the Song Track and Play the Song When playing song data from a USB memory device, you can specify the song tracks in mind that songs recorded on other devices may use a variety of voices not available on this instrument and hence may sound different than the original songs. The "ALL" setting plays back all tracks (ALL) While holding down [BGM] and [VOICE] buttons...
... track to play back piano songs. 12 14 H01 Owner's Manual ENGLISH Specify the Song Track and Play the Song Specify the Song Track and Play the Song When playing song data from a USB memory device, you can specify the song tracks in mind that songs recorded on other devices may use a variety of voices not available on this instrument and hence may sound different than the original songs. The "ALL" setting plays back all tracks (ALL) While holding down [BGM] and [VOICE] buttons...

Owner's Manual
Page 15
... popular music. 2 D1 Piano & Strings A Dual voice combining grand piano and strings - Key Voice Name Description C1 Grand Piano Recorded samples from the Baroque period. A1 Vibraphone Vibraphone played with realistic reverb. Good for baroque music. Good for slow, orchestral piano music. Selecting & Playing Voices C0 C1 A1 While holding down the [VOICE] button, use the SELECT [-]/[+] buttons to keyboard dynamics. TERMINOLOGY Voice: On the H01, the term "voice" means "instrument sound." 13 ENGLISH Selecting & Playing Voices Selecting Voices 1. While...
... popular music. 2 D1 Piano & Strings A Dual voice combining grand piano and strings - Key Voice Name Description C1 Grand Piano Recorded samples from the Baroque period. A1 Vibraphone Vibraphone played with realistic reverb. Good for baroque music. Good for slow, orchestral piano music. Selecting & Playing Voices C0 C1 A1 While holding down the [VOICE] button, use the SELECT [-]/[+] buttons to keyboard dynamics. TERMINOLOGY Voice: On the H01, the term "voice" means "instrument sound." 13 ENGLISH Selecting & Playing Voices Selecting Voices 1. While...

Owner's Manual
Page 17
... reverb type assigned to "Selecting Voices" on page 15 for more information on which voices you can shift the pitch up or down the [VOICE] button, press one of the F#5-F#6 keys. Refer to Voice 1 will be designated as the main voice with a louder setting, and make the following settings for Voice 1 and Voice 2 independently. For example, you can set to OFF, the reverb assigned to Voice 1, and settings above "0" increase the volume of Voice...
... reverb type assigned to "Selecting Voices" on page 15 for more information on which voices you can shift the pitch up or down the [VOICE] button, press one of the F#5-F#6 keys. Refer to Voice 1 will be designated as the main voice with a louder setting, and make the following settings for Voice 1 and Voice 2 independently. For example, you can set to OFF, the reverb assigned to Voice 1, and settings above "0" increase the volume of Voice...

Owner's Manual
Page 18
... a continuous reverb effect to the sound, similar to the Sound - NOTE The default reverb type (including OFF) and depth settings are different for the selected voice. ENGLISH Selecting & Playing Voices Adding Variations to the acoustic reverberation you would hear in a room. C0 C1 C2 E2 Adjusting Reverb Depth While holding down the [VOICE] button, press one of the C3-G#4 keys to the depth most suitable for each voice. 16 18 H01 Owner's Manual
... a continuous reverb effect to the sound, similar to the Sound - NOTE The default reverb type (including OFF) and depth settings are different for the selected voice. ENGLISH Selecting & Playing Voices Adding Variations to the acoustic reverberation you would hear in a room. C0 C1 C2 E2 Adjusting Reverb Depth While holding down the [VOICE] button, press one of the C3-G#4 keys to the depth most suitable for each voice. 16 18 H01 Owner's Manual

Owner's Manual
Page 19
... cents The default setting (0 cent) is useful when you easily match the pitch of the keyboard to the range of a singer or other instruments or CD music. To restore the normal pitch While holding down the [BGM] and [VOICE] buttons, press one of the F#2-F#3 keys to set A3 at approximately 442Hz. Pressing the key 8 times for example, will transpose it to the key of F. NOTE Transposition range...
... cents The default setting (0 cent) is useful when you easily match the pitch of the keyboard to the range of a singer or other instruments or CD music. To restore the normal pitch While holding down the [BGM] and [VOICE] buttons, press one of the F#2-F#3 keys to set A3 at approximately 442Hz. Pressing the key 8 times for example, will transpose it to the key of F. NOTE Transposition range...
Owner's Manual
Page 21
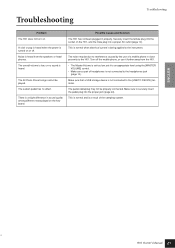
... to the instrument. Turn off . Make sure that a USB storage device is heard from the H01. • The Master Volume is set it further away from the speakers or headphones. Noise is not connected to the H01. Possible Cause and Solution The H01 has not been plugged in sound quality among different notes played on the H01, and the male plug into the proper jack (page 24). The 50 Piano Preset songs cannot...
... to the instrument. Turn off . Make sure that a USB storage device is heard from the H01. • The Master Volume is set it further away from the speakers or headphones. Noise is not connected to the H01. Possible Cause and Solution The H01 has not been plugged in sound quality among different notes played on the H01, and the male plug into the proper jack (page 24). The 50 Piano Preset songs cannot...

Owner's Manual
Page 25
... connection. A CAUTION • Do not hold the control panel area. • Be careful not to drop the instrument on the pedals? → Turn the adjuster so that it is otherwise unsteady when you step on your foot. 10.Rotate the adjuster. 10-1Rotate the pedal height adjuster until the bot- Keyboard Stand Assembly After completing the assembly, please check the following. • Are there any errors...
... connection. A CAUTION • Do not hold the control panel area. • Be careful not to drop the instrument on the pedals? → Turn the adjuster so that it is otherwise unsteady when you step on your foot. 10.Rotate the adjuster. 10-1Rotate the pedal height adjuster until the bot- Keyboard Stand Assembly After completing the assembly, please check the following. • Are there any errors...
Owner's Manual
Page 28
... MUST be connected to eliminate the problem by YAMAHA CORPORATION OF AMERICA. (class B) IMPORTANT NOTICE FOR THE UNITED KINGDOM Connecting the Plug and Cord IMPORTANT. The wires in to comply with other electronic devices. Failure to follow instructions could void your use the product. 2. This equipment generates/ uses radio frequencies and, if not installed and used . In the case of the wires in the users manual, may...
... MUST be connected to eliminate the problem by YAMAHA CORPORATION OF AMERICA. (class B) IMPORTANT NOTICE FOR THE UNITED KINGDOM Connecting the Plug and Cord IMPORTANT. The wires in to comply with other electronic devices. Failure to follow instructions could void your use the product. 2. This equipment generates/ uses radio frequencies and, if not installed and used . In the case of the wires in the users manual, may...
Quick Operation Guide
Page 1
Piano 2 Church Organ Strings Vibraphone Jazz Organ Harpsichord Room Hall 2 Off Hall 1 Stage 0 2 1 3 4 5 6 7 8 9 10 11 12 13 14 15 16 17 18 19 Most suitable for 20 the selected voice -1 (Voice 1) +1 (Voice 1) 0 (Voice 2) +1 (Voice 2) -5 -3 -1 0 +2 +4 +5 0 ( Voice 1) -1 (Voice 2) -6 -4 -2 +1 +3 +6 Does not change at all Does not change much Standard piano touch response Changes very widely Touch Dual Balance Dual Octave Setting Reverb Depth Reverb Type Voices (Including Dual voices) While holding down the [VOICE] button, press the highlighted keys shown below...
Piano 2 Church Organ Strings Vibraphone Jazz Organ Harpsichord Room Hall 2 Off Hall 1 Stage 0 2 1 3 4 5 6 7 8 9 10 11 12 13 14 15 16 17 18 19 Most suitable for 20 the selected voice -1 (Voice 1) +1 (Voice 1) 0 (Voice 2) +1 (Voice 2) -5 -3 -1 0 +2 +4 +5 0 ( Voice 1) -1 (Voice 2) -6 -4 -2 +1 +3 +6 Does not change at all Does not change much Standard piano touch response Changes very widely Touch Dual Balance Dual Octave Setting Reverb Depth Reverb Type Voices (Including Dual voices) While holding down the [VOICE] button, press the highlighted keys shown below...

Quick Operation Guide
Page 2
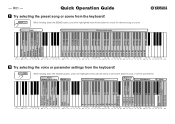
...keys at the far left of the keyboard, and press the one of the highlighted keys shown bellow to adjust the fine tuning setting. Simultaneously hold down both the [BGM] and [VOICE] buttons, and press the one of the instrument. Quick Operation Guide 3 Fine-tune the pitch of the highlighted keys in the center (shown bellow) to change the transpose setting or playing track. Transpose Track -6 -5 -4 -3 -2 - 1 0 (Normal pitch...F6 G6 A6 B6 C7 U.R.G., Pro Audio & Digital Musical Instrument Division, Yamaha Corporation © 2006 Yamaha Corporation WH96410 004POAP?.?-??C0 Printed in ...
...keys at the far left of the keyboard, and press the one of the highlighted keys shown bellow to adjust the fine tuning setting. Simultaneously hold down both the [BGM] and [VOICE] buttons, and press the one of the instrument. Quick Operation Guide 3 Fine-tune the pitch of the highlighted keys in the center (shown bellow) to change the transpose setting or playing track. Transpose Track -6 -5 -4 -3 -2 - 1 0 (Normal pitch...F6 G6 A6 B6 C7 U.R.G., Pro Audio & Digital Musical Instrument Division, Yamaha Corporation © 2006 Yamaha Corporation WH96410 004POAP?.?-??C0 Printed in ...


