
Owner's Manual
Page 4
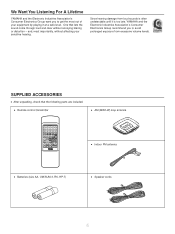
One that the following parts are included. Since hearing damage from excessive volume levels. q Remote control transmitter q AM (MW/LW) loop antenna CD/TUNER 1 2 3 4 5 1 2 3 4 5 6 7 8 6 7 8 9 0 A TIME B PROG C TAPE D EDIT E +I0 DISC SKIP STOP PLAY/PAUSE MODE REPEAT ... FM antenna q Batteries (size AA, UM/SUM-3, R6, HP-7) q Speaker cords 4 and, most out of your sensitive hearing. We Want You Listening For A Lifetime YAMAHA and the Electronic Industries Association's Consumer Electronics Group want you to avoid prolonged exposure from loud sounds is too late...
One that the following parts are included. Since hearing damage from excessive volume levels. q Remote control transmitter q AM (MW/LW) loop antenna CD/TUNER 1 2 3 4 5 1 2 3 4 5 6 7 8 6 7 8 9 0 A TIME B PROG C TAPE D EDIT E +I0 DISC SKIP STOP PLAY/PAUSE MODE REPEAT ... FM antenna q Batteries (size AA, UM/SUM-3, R6, HP-7) q Speaker cords 4 and, most out of your sensitive hearing. We Want You Listening For A Lifetime YAMAHA and the Electronic Industries Association's Consumer Electronics Group want you to avoid prolonged exposure from loud sounds is too late...
Owner's Manual
Page 9
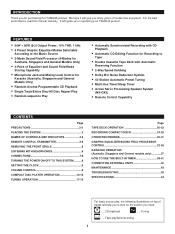
...-Use Timer/Sleep Timer • Active Servo Processing Speaker System (NX-GX5) • Remote Control Capability CONTENTS Page PRECAUTIONS 2-3 PLACING THE SYSTEM 3 NAMES OF CONTROLS AND INDICATORS 4-5 REMOTE CONTROL TRANSMITTER 5-6 REMOVING THE FRONT GRILLE 6 LISTENING WITH HEADPHONES 6 CONNECTIONS 7-8 TURNING THE ...44 For basic source play, the following illustrations on top of trouble-free enjoyment. For the best performance, read this YAMAHA product. INTRODUCTION Thank you for the section you need. ......CD playback ......Tuning ......Tape playback/recording 1 We hope it...
...-Use Timer/Sleep Timer • Active Servo Processing Speaker System (NX-GX5) • Remote Control Capability CONTENTS Page PRECAUTIONS 2-3 PLACING THE SYSTEM 3 NAMES OF CONTROLS AND INDICATORS 4-5 REMOTE CONTROL TRANSMITTER 5-6 REMOVING THE FRONT GRILLE 6 LISTENING WITH HEADPHONES 6 CONNECTIONS 7-8 TURNING THE ...44 For basic source play, the following illustrations on top of trouble-free enjoyment. For the best performance, read this YAMAHA product. INTRODUCTION Thank you for the section you need. ......CD playback ......Tuning ......Tape playback/recording 1 We hope it...
Owner's Manual
Page 10
...and other equipment. screwdrivers, tools, etc.) to other factors. Note If condensation forms on switches, controls or connection wires. YAMAHA will rise rapidly and eventually damage the circuits. WARNING TO REDUCE THE RISK OF FIRE OR ELECTRIC SHOCK, DO NOT EXPOSE... for future reference. Condensation can have a serious effect on the transmitter window with chemical solvents; s Do not use . • Remote control Wipe off condensation on reproduction quality. this unit are obstructed, the temperature inside the cabinet. s Although the cassette deck's record/playback...
...and other equipment. screwdrivers, tools, etc.) to other factors. Note If condensation forms on switches, controls or connection wires. YAMAHA will rise rapidly and eventually damage the circuits. WARNING TO REDUCE THE RISK OF FIRE OR ELECTRIC SHOCK, DO NOT EXPOSE... for future reference. Condensation can have a serious effect on the transmitter window with chemical solvents; s Do not use . • Remote control Wipe off condensation on reproduction quality. this unit are obstructed, the temperature inside the cabinet. s Although the cassette deck's record/playback...
Owner's Manual
Page 12
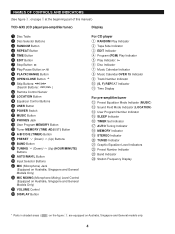
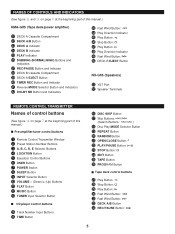
... 2 Disc Selector Buttons 3 RANDOM Button 4 REPEAT Button 5 TIME Button 6 EDIT Button 7 Stop Button: 8 Play/Pause Button: / 9 PLAYXCHANGE Button 0 OPEN/CLOSE Button: A Skip Buttons: / (Search Buttons: / ) B Remote Control Sensor C LOCATION Button D Equalizer Control Buttons E USER Button F POWER Switch G MUSIC Button H PHONES Jack I User Program MEMORY Button J Tuner MEMORY (TIME ADJUST) Button K A/B/C/D/E (TIMER...
... 2 Disc Selector Buttons 3 RANDOM Button 4 REPEAT Button 5 TIME Button 6 EDIT Button 7 Stop Button: 8 Play/Pause Button: / 9 PLAYXCHANGE Button 0 OPEN/CLOSE Button: A Skip Buttons: / (Search Buttons: / ) B Remote Control Sensor C LOCATION Button D Equalizer Control Buttons E USER Button F POWER Switch G MUSIC Button H PHONES Jack I User Program MEMORY Button J Tuner MEMORY (TIME ADJUST) Button K A/B/C/D/E (TIMER...
Owner's Manual
Page 13
... Play Button: h Play Direction Indicator i Fast Wind Button: j DECK B EJECT Button NX-GX5 (Speakers) k YST Port l Speaker Terminals REMOTE CONTROL TRANSMITTER Names of control buttons (See figure 4 on page 7 at the beginning part of this manual.) s Pre-amplifier/tuner control buttons... 1 Remote Control Transmitter Window 2 Preset Station Number Buttons 3 A, B, C, D, E Selector Buttons 4 LOCATION Button 5 Equalizer Control Buttons 6 USER Button 7 POWER Switch ...
... Play Button: h Play Direction Indicator i Fast Wind Button: j DECK B EJECT Button NX-GX5 (Speakers) k YST Port l Speaker Terminals REMOTE CONTROL TRANSMITTER Names of control buttons (See figure 4 on page 7 at the beginning part of this manual.) s Pre-amplifier/tuner control buttons... 1 Remote Control Transmitter Window 2 Preset Station Number Buttons 3 A, B, C, D, E Selector Buttons 4 LOCATION Button 5 Equalizer Control Buttons 6 USER Button 7 POWER Switch ...
Owner's Manual
Page 14
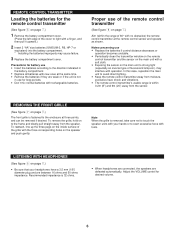
...battery compartment. * Installing the batteries improperly may interfere with operation. In this case, reposition the main unit to the enclosure at the remote control sensor and operate as shown. REMOVING THE FRONT GRILLE (See figure 7 on to exert excessive force with rechargeable batteries. To ...remove the grille, hold on page 8.) The front grille is fastened to avoid direct lighting. • Keep the remote control transmitter away from the sensor. Adjust the VOLUME control for long periods. • Don't mix normal batteries with tools. Proper ...
...battery compartment. * Installing the batteries improperly may interfere with operation. In this case, reposition the main unit to the enclosure at the remote control sensor and operate as shown. REMOVING THE FRONT GRILLE (See figure 7 on to exert excessive force with rechargeable batteries. To ...remove the grille, hold on page 8.) The front grille is fastened to avoid direct lighting. • Keep the remote control transmitter away from the sensor. Adjust the VOLUME control for long periods. • Don't mix normal batteries with tools. Proper ...

Owner's Manual
Page 16
... this mode, main voltage is connected to be sure to the red socket on the rear of TCD-GX5 or the POWER switch on the remote control transmitter. System connection (See figure 9 on page 8.) Connect the red connector on the rear of time. If you want to disconnect the connector. How... TCD-GX5 to connect the speaker wires properly. STANDBY mode While the power is on, pressing the POWER switch (or the POWER switch on the remote control transmitter) switches the system to the STANDBY mode. (In this mode, the display shows only the time.) In this could damage the power amplifier...
... this mode, main voltage is connected to be sure to the red socket on the rear of TCD-GX5 or the POWER switch on the remote control transmitter. System connection (See figure 9 on page 8.) Connect the red connector on the rear of time. If you want to disconnect the connector. How... TCD-GX5 to connect the speaker wires properly. STANDBY mode While the power is on, pressing the POWER switch (or the POWER switch on the remote control transmitter) switches the system to the STANDBY mode. (In this mode, the display shows only the time.) In this could damage the power amplifier...

Owner's Manual
Page 17
... a power failure or when the AC supply lead is left for about 5 minutes. Note If this system is advanced from "59" to display the time. Remote control operation Press the VOLUME + button to cancel the mode, and then set the time. button to advance the time by 1 minute. SETTING THE CLOCK...
... a power failure or when the AC supply lead is left for about 5 minutes. Note If this system is advanced from "59" to display the time. Remote control operation Press the VOLUME + button to cancel the mode, and then set the time. button to advance the time by 1 minute. SETTING THE CLOCK...

Owner's Manual
Page 18
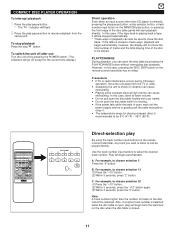
... disc play MODE selector button on the disc table are played back sequentially. All disc play mode by pressing the DISC SKIP button on the remote control transmitter once or more (so that track number will begin from track 1. * The " " indicator will appear and playback will go out. Music calendar 1 2345... 6 7 8 9 10 11 12 TRACK T Total number of tracks Total playing time 5 If necessary, change the disc play mode: All discs on the remote control transmitter while watching the display.
... disc play MODE selector button on the disc table are played back sequentially. All disc play mode by pressing the DISC SKIP button on the remote control transmitter once or more (so that track number will begin from track 1. * The " " indicator will appear and playback will go out. Music calendar 1 2345... 6 7 8 9 10 11 12 TRACK T Total number of tracks Total playing time 5 If necessary, change the disc play mode: All discs on the remote control transmitter while watching the display.
Owner's Manual
Page 19
...the disc table is playing back a tape, it will not show the total number of tracks and the total playing time of tracks on the remote control transmitter has no effect. In this case, if the tape deck is open , wait until the power supply returns or gently push the ...the same point. A. COMPACT DISC PLAYER OPERATION To interrupt playback 1 Press the play/pause button. * The " " indicator will begin from the last track on the remote control transmitter, any track you can be played directly. In this case, pressing the DISC SKIP button on the disc cannot be selected. For example...
...the disc table is playing back a tape, it will not show the total number of tracks and the total playing time of tracks on the remote control transmitter has no effect. In this case, if the tape deck is open , wait until the power supply returns or gently push the ...the same point. A. COMPACT DISC PLAYER OPERATION To interrupt playback 1 Press the play/pause button. * The " " indicator will begin from the last track on the remote control transmitter, any track you can be played directly. In this case, pressing the DISC SKIP button on the disc cannot be selected. For example...

Owner's Manual
Page 26
... station number buttons and the A,B,C,D,E selector buttons on other areas in the same way by selecting other stations to the preset station numbers on the remote control transmitter, a preset station number and an area can be programmed in step 3. With this case, select "1".) 5 Within about 5 seconds. 3 Select a desired area (A - A8. * You...
... station number buttons and the A,B,C,D,E selector buttons on other areas in the same way by selecting other stations to the preset station numbers on the remote control transmitter, a preset station number and an area can be programmed in step 3. With this case, select "1".) 5 Within about 5 seconds. 3 Select a desired area (A - A8. * You...

Owner's Manual
Page 33
... recorded in the same way. 1 Program desired tracks from one or more discs. (Refer to page 13 for the programming procedure.) 2 Follow steps 2-5 on the remote control transmitter). To stop recording Press the stop button of the tape deck. (At this time, CD playback does not stop.) Recording programmed tracks Programmed...
... recorded in the same way. 1 Program desired tracks from one or more discs. (Refer to page 13 for the programming procedure.) 2 Follow steps 2-5 on the remote control transmitter). To stop recording Press the stop button of the tape deck. (At this time, CD playback does not stop.) Recording programmed tracks Programmed...

Owner's Manual
Page 35
... tape to be used to program tracks on the display in turn, and next it returns to the "Dolby B and C Type Noise Reduction" on the remote control transmitter (Examples) C-62: Press "6" and then "2". RECORDING COMPACT DISCS 7 1 1 B C 54 3 6 2 6 1 CD/TUNER 1 2 3 4 5 1 2 3 4 5 6 7 8 6 7 8 9 0 A TIME B PROG C TAPE D EDIT E +I0 DISC SKIP STOP PLAY/PAUSE MODE REPEAT...
... tape to be used to program tracks on the display in turn, and next it returns to the "Dolby B and C Type Noise Reduction" on the remote control transmitter (Examples) C-62: Press "6" and then "2". RECORDING COMPACT DISCS 7 1 1 B C 54 3 6 2 6 1 CD/TUNER 1 2 3 4 5 1 2 3 4 5 6 7 8 6 7 8 9 0 A TIME B PROG C TAPE D EDIT E +I0 DISC SKIP STOP PLAY/PAUSE MODE REPEAT...

Owner's Manual
Page 42
... - + 3 FLAT Turning the equalizer to "flat" (the state with no equalization applied) There are two ways as follows: • Press the FLAT button on the remote control transmitter. * Pressing the FLAT button once more will restore the pattern which had been selected before it was turned to "flat". • Press the...
... - + 3 FLAT Turning the equalizer to "flat" (the state with no equalization applied) There are two ways as follows: • Press the FLAT button on the remote control transmitter. * Pressing the FLAT button once more will restore the pattern which had been selected before it was turned to "flat". • Press the...
Owner's Manual
Page 51
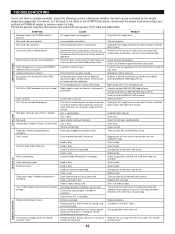
.... Tape travel stops in FM broadcasts. Head is loaded. Direct sunlight or lighting (of an inverter type of your authorized YAMAHA dealer or service center for help. Connect properly. Check antenna connections. Install a multi-element type FM antenna if possible. Install...Conversation etc. Demagnetize heads with a pencil before using a coaxial cable. Relocate this unit away from TV or microprocessor. TAPE DECK REMOTE CONTROL 43 Loose speaker connections. Antenna input is worn. Stereo balance is dirty. Take up . If it cannot, or if ...
.... Tape travel stops in FM broadcasts. Head is loaded. Direct sunlight or lighting (of an inverter type of your authorized YAMAHA dealer or service center for help. Connect properly. Check antenna connections. Install a multi-element type FM antenna if possible. Install...Conversation etc. Demagnetize heads with a pencil before using a coaxial cable. Relocate this unit away from TV or microprocessor. TAPE DECK REMOTE CONTROL 43 Loose speaker connections. Antenna input is worn. Stereo balance is dirty. Take up . If it cannot, or if ...


