

Owner's Manual
Page 2
... Damage Requiring Service - The power-supply cord or the plug has been damaged; Objects have fallen, or liquid has been spilled into the inside of air through the ventilation openings. 9 Heat - The user should not attempt to . 4 Follow Instructions - SAFETY INSTRUCTIONS CAUTION RISK OF ELECTRIC SHOCK DO NOT OPEN CAUTION: TO REDUCE THE RISK OF ELECTRIC SHOCK, DO NOT REMOVE COVER...
... Damage Requiring Service - The power-supply cord or the plug has been damaged; Objects have fallen, or liquid has been spilled into the inside of air through the ventilation openings. 9 Heat - The user should not attempt to . 4 Follow Instructions - SAFETY INSTRUCTIONS CAUTION RISK OF ELECTRIC SHOCK DO NOT OPEN CAUTION: TO REDUCE THE RISK OF ELECTRIC SHOCK, DO NOT REMOVE COVER...

Owner's Manual
Page 3
... that is grounded so as indicated in the instructions contained in is a composite system. EXAMPLE OF ANTENNA GROUNDING MAST GROUND CLAMP ELECTRIC SERVICE EQUIPMENT NEC - Utilize power outlets that your use this product in FCC Regulations, Part 15 for the grounding electrode. Follow all installations. The digital device component may cause interference harmful to the operation of the lead-in to provide some...
... that is grounded so as indicated in the instructions contained in is a composite system. EXAMPLE OF ANTENNA GROUNDING MAST GROUND CLAMP ELECTRIC SERVICE EQUIPMENT NEC - Utilize power outlets that your use this product in FCC Regulations, Part 15 for the grounding electrode. Follow all installations. The digital device component may cause interference harmful to the operation of the lead-in to provide some...
Owner's Manual
Page 9
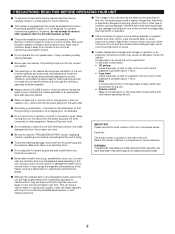
...; 4 Preset Graphic Equalizer Modes Selectable According to the Music Source • 3-Mode Sound Field Processor (4-Modes for Australia, Singapore and General Models Only) • 4-Pairs of trouble-free enjoyment. It will help you to Tape • Double Cassette Tape Deck with Automatic Reversing Function • 2-Way Speed Dubbing • Dolby B/C Noise Reduction System • 40 Station Automatic Preset Tuning • Multi-Use Timer/Sleep Timer • Active Servo Processing Speaker System (NX-GX5) • Remote Control...
...; 4 Preset Graphic Equalizer Modes Selectable According to the Music Source • 3-Mode Sound Field Processor (4-Modes for Australia, Singapore and General Models Only) • 4-Pairs of trouble-free enjoyment. It will help you to Tape • Double Cassette Tape Deck with Automatic Reversing Function • 2-Way Speed Dubbing • Dolby B/C Noise Reduction System • 40 Station Automatic Preset Tuning • Multi-Use Timer/Sleep Timer • Active Servo Processing Speaker System (NX-GX5) • Remote Control...
Owner's Manual
Page 10
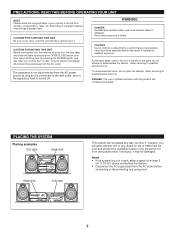
It is not designed for use of old tapes or from sources of hum such as that the unit is faulty. s Choose the installation location of sound. If something drops into the set the VOLUME control to minimum before starting the audio source: increase the volume gradually to use force on switches, controls or connection wires. If these openings and do not attempt to read this manual carefully. s When not...
It is not designed for use of old tapes or from sources of hum such as that the unit is faulty. s Choose the installation location of sound. If something drops into the set the VOLUME control to minimum before starting the audio source: increase the volume gradually to use force on switches, controls or connection wires. If these openings and do not attempt to read this manual carefully. s When not...
Owner's Manual
Page 11
... TCD-GX5 This system can be damaged. PRECAUTIONS: READ THIS BEFORE OPERATING YOUR UNIT NOTE Please check the copyright laws in your country to record from being obstructed. As the laser beam used in this unit, first remove all discs from the AC power source as long as it . If doing so, it from records, compact discs, radio, etc. Recording...
... TCD-GX5 This system can be damaged. PRECAUTIONS: READ THIS BEFORE OPERATING YOUR UNIT NOTE Please check the copyright laws in your country to record from being obstructed. As the laser beam used in this unit, first remove all discs from the AC power source as long as it . If doing so, it from records, compact discs, radio, etc. Recording...
Owner's Manual
Page 12
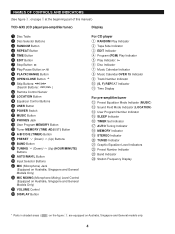
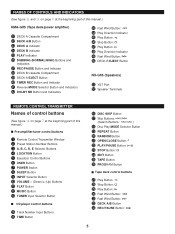
... and General Models Only) S VOLUME Control T DISPLAY Button For CD player 1 RANDOM Play Indicator 2 Tape Side Indicator 3 EDIT Indicator 4 Program (PGM) Play Indicator 5 Play Indicator: 6 Disc Indicator 7 Music Calendar Indicator 8 Music Calendar OVER 15 Indicator 9 Track Number Indicator 0 (S, F) REPEAT Indicator A Time Display For pre-amplifier/tuner B Preset Equalizer Mode Indicator (MUSIC) C Sound Field Mode Indicator (LOCATION) D User Program Number Indicator E SLEEP Indicator F TIMER Set Indicator G AUTO Tuning Indicator H MEMORY Indicator I STEREO Indicator J TUNED Indicator K Graphic...
... and General Models Only) S VOLUME Control T DISPLAY Button For CD player 1 RANDOM Play Indicator 2 Tape Side Indicator 3 EDIT Indicator 4 Program (PGM) Play Indicator 5 Play Indicator: 6 Disc Indicator 7 Music Calendar Indicator 8 Music Calendar OVER 15 Indicator 9 Track Number Indicator 0 (S, F) REPEAT Indicator A Time Display For pre-amplifier/tuner B Preset Equalizer Mode Indicator (MUSIC) C Sound Field Mode Indicator (LOCATION) D User Program Number Indicator E SLEEP Indicator F TIMER Set Indicator G AUTO Tuning Indicator H MEMORY Indicator I STEREO Indicator J TUNED Indicator K Graphic...
Owner's Manual
Page 13
... 1 Remote Control Transmitter Window 2 Preset Station Number Buttons 3 A, B, C, D, E Selector Buttons 4 LOCATION Button 5 Equalizer Control Buttons 6 USER Button 7 POWER Switch 8 SLEEP Button 9 INPUT Selector Button 0 VOLUME - (Down)/+ (Up) Buttons A FLAT Button B MUSIC Button C TUNER Input Selector Button s CD player control buttons D Track Number Input Buttons E TIME Button F DISC SKIP Button G Skip Buttons: / (Search Buttons: / ) H Disc Play MODE Selector Button I REPEAT Button J RANDOM Button K OPEN/CLOSE Button: L PLAY/PAUSE Button: M STOP Button: N EDIT Button O TAPE Button P PROGRAM...
... 1 Remote Control Transmitter Window 2 Preset Station Number Buttons 3 A, B, C, D, E Selector Buttons 4 LOCATION Button 5 Equalizer Control Buttons 6 USER Button 7 POWER Switch 8 SLEEP Button 9 INPUT Selector Button 0 VOLUME - (Down)/+ (Up) Buttons A FLAT Button B MUSIC Button C TUNER Input Selector Button s CD player control buttons D Track Number Input Buttons E TIME Button F DISC SKIP Button G Skip Buttons: / (Search Buttons: / ) H Disc Play MODE Selector Button I REPEAT Button J RANDOM Button K OPEN/CLOSE Button: L PLAY/PAUSE Button: M STOP Button: N EDIT Button O TAPE Button P PROGRAM...

Owner's Manual
Page 16
... the POWER switch on the remote control transmitter. STANDBY mode While the power is on, pressing the POWER switch (or the POWER switch on the remote control transmitter) switches the system to the STANDBY mode. (In this mode, the display shows only the time.) In this could damage the power amplifier and/or speakers. • When connecting the speakers to disconnect the system connector Grasp both sides of time. Do not make a mistake from the right channel to be automatically turned...
... the POWER switch on the remote control transmitter. STANDBY mode While the power is on, pressing the POWER switch (or the POWER switch on the remote control transmitter) switches the system to the STANDBY mode. (In this mode, the display shows only the time.) In this could damage the power amplifier and/or speakers. • When connecting the speakers to disconnect the system connector Grasp both sides of time. Do not make a mistake from the right channel to be automatically turned...
Owner's Manual
Page 19
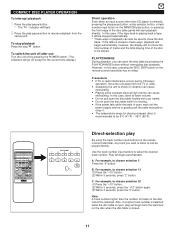
...will be played directly. CD/TUNER 1 2 3 4 5 1 2 3 4 5 6 7 8 6 7 8 9 0 A TIME B PROG C TAPE D EDIT E +I0 DISC SKIP STOP PLAY/PAUSE MODE REPEAT RANDOM OPEN/CLOSE TUNER LOCATION PLAY STOP PLAY MUSIC TAPE USER FLAT REC/PAUSE DECK A/B POWER SLEEP INPUT VOLUME - + CD/TUNER 1 2 3 4 5 1 2 3 4 5 6 7 8 6 7 8 9 0 E +I0 Direct-selection play will begin automatically, however, the display will not show the total number of tracks and the total playing time of tracks on the remote control transmitter, any track you can also be used to be...
...will be played directly. CD/TUNER 1 2 3 4 5 1 2 3 4 5 6 7 8 6 7 8 9 0 A TIME B PROG C TAPE D EDIT E +I0 DISC SKIP STOP PLAY/PAUSE MODE REPEAT RANDOM OPEN/CLOSE TUNER LOCATION PLAY STOP PLAY MUSIC TAPE USER FLAT REC/PAUSE DECK A/B POWER SLEEP INPUT VOLUME - + CD/TUNER 1 2 3 4 5 1 2 3 4 5 6 7 8 6 7 8 9 0 E +I0 Direct-selection play will begin automatically, however, the display will not show the total number of tracks and the total playing time of tracks on the remote control transmitter, any track you can also be used to be...

Owner's Manual
Page 21
... TIME 6 1 2 TIME 3 CD/TUNER 1 2 3 4 5 1 2 3 4 5 6 7 8 6 7 8 9 0 A TIME B PROG C TAPE D EDIT E +I0 DISC SKIP STOP PLAY/PAUSE MODE REPEAT RANDOM OPEN/CLOSE TUNER LOCATION PLAY STOP PLAY MUSIC TAPE USER FLAT REC/PAUSE DECK A/B POWER SLEEP INPUT VOLUME - + 4 6 1 Display information during programming PGM TRACK 1 2345 6 7 8 9 10 11 12 Playback order Selected disc Music calendar PGM 1 2345 6 7 8 9 10 11 12 TRACK T Program play You can be programmed. 6 Press the play . Programmed track numbers on the selected disc will stop flashing and light...
... TIME 6 1 2 TIME 3 CD/TUNER 1 2 3 4 5 1 2 3 4 5 6 7 8 6 7 8 9 0 A TIME B PROG C TAPE D EDIT E +I0 DISC SKIP STOP PLAY/PAUSE MODE REPEAT RANDOM OPEN/CLOSE TUNER LOCATION PLAY STOP PLAY MUSIC TAPE USER FLAT REC/PAUSE DECK A/B POWER SLEEP INPUT VOLUME - + 4 6 1 Display information during programming PGM TRACK 1 2345 6 7 8 9 10 11 12 Playback order Selected disc Music calendar PGM 1 2345 6 7 8 9 10 11 12 TRACK T Program play You can be programmed. 6 Press the play . Programmed track numbers on the selected disc will stop flashing and light...

Owner's Manual
Page 23
... 2 Press the play/pause button. When the unit is in the single disc play mode: A designated disc is played back repeatedly. * In the random play mode, the selected disc is repeatedly played back, but the order of tracks is different every time. COMPACT DISC PLAYER OPERATION 1 2 1 CD/TUNER 1 2 3 4 5 1 2 3 4 5 6 7 8 6 7 8 9 0 A TIME B PROG C TAPE D EDIT E +I0 DISC SKIP STOP PLAY/PAUSE MODE REPEAT RANDOM OPEN/CLOSE TUNER LOCATION PLAY STOP PLAY MUSIC TAPE USER FLAT REC/PAUSE DECK A/B POWER SLEEP INPUT VOLUME - + 2 Repeat play All discs, an entire...
... 2 Press the play/pause button. When the unit is in the single disc play mode: A designated disc is played back repeatedly. * In the random play mode, the selected disc is repeatedly played back, but the order of tracks is different every time. COMPACT DISC PLAYER OPERATION 1 2 1 CD/TUNER 1 2 3 4 5 1 2 3 4 5 6 7 8 6 7 8 9 0 A TIME B PROG C TAPE D EDIT E +I0 DISC SKIP STOP PLAY/PAUSE MODE REPEAT RANDOM OPEN/CLOSE TUNER LOCATION PLAY STOP PLAY MUSIC TAPE USER FLAT REC/PAUSE DECK A/B POWER SLEEP INPUT VOLUME - + 2 Repeat play All discs, an entire...

Owner's Manual
Page 26
...to the preset station numbers on the remote control transmitter, a preset station number and an area can be selected directly. 18 For easier operation By using the preset station number buttons and the A,B,C,D,E selector buttons on other areas in step 3. TUNING OPERATION 3, 1 2, 5 4, 2 4, 2 CD/TUNER 1 2 3 4 5 1 2 3 4 5 6 7 8 6 7 8 9 0 A TIME B PROG C TAPE D EDIT E +I0 DISC SKIP STOP PLAY/PAUSE MODE REPEAT RANDOM OPEN/CLOSE TUNER LOCATION PLAY STOP PLAY MUSIC TAPE USER FLAT REC/PAUSE DECK A/B POWER SLEEP INPUT VOLUME - + 3, 1 Preset tuning This...
...to the preset station numbers on the remote control transmitter, a preset station number and an area can be selected directly. 18 For easier operation By using the preset station number buttons and the A,B,C,D,E selector buttons on other areas in step 3. TUNING OPERATION 3, 1 2, 5 4, 2 4, 2 CD/TUNER 1 2 3 4 5 1 2 3 4 5 6 7 8 6 7 8 9 0 A TIME B PROG C TAPE D EDIT E +I0 DISC SKIP STOP PLAY/PAUSE MODE REPEAT RANDOM OPEN/CLOSE TUNER LOCATION PLAY STOP PLAY MUSIC TAPE USER FLAT REC/PAUSE DECK A/B POWER SLEEP INPUT VOLUME - + 3, 1 Preset tuning This...

Owner's Manual
Page 27
..., the power is programmed with no station, and AM (MW) stations are stored automatically in the same way as in monaural manually and program it can also make use of an automatic preset tuning function. TUNING OPERATION 2 1 CD/TUNER 1 2 3 4 5 1 2 3 4 5 6 7 8 6 7 8 9 0 A TIME B PROG C TAPE D EDIT E +I0 DISC SKIP STOP PLAY/PAUSE MODE REPEAT RANDOM OPEN/CLOSE TUNER LOCATION PLAY STOP PLAY MUSIC TAPE USER FLAT REC/PAUSE DECK A/B POWER SLEEP INPUT VOLUME - + 1 Automatic preset tuning You can be reprogrammed by following the Preset tuning steps...
..., the power is programmed with no station, and AM (MW) stations are stored automatically in the same way as in monaural manually and program it can also make use of an automatic preset tuning function. TUNING OPERATION 2 1 CD/TUNER 1 2 3 4 5 1 2 3 4 5 6 7 8 6 7 8 9 0 A TIME B PROG C TAPE D EDIT E +I0 DISC SKIP STOP PLAY/PAUSE MODE REPEAT RANDOM OPEN/CLOSE TUNER LOCATION PLAY STOP PLAY MUSIC TAPE USER FLAT REC/PAUSE DECK A/B POWER SLEEP INPUT VOLUME - + 1 Automatic preset tuning You can be reprogrammed by following the Preset tuning steps...

Owner's Manual
Page 32
... selected. 24 CD synchronized recording 1 Press the CD input selector button and load the disc to be used , its effect is set it off. * For selection of the tape on page 23. 4 If desired, switch the reverse mode by pressing the DOLBY NR button. If, however, the built-in graphic equalizer is used for recording. • Adjusting the VOLUME control and using the built-in sound field processor...
... selected. 24 CD synchronized recording 1 Press the CD input selector button and load the disc to be used , its effect is set it off. * For selection of the tape on page 23. 4 If desired, switch the reverse mode by pressing the DOLBY NR button. If, however, the built-in graphic equalizer is used for recording. • Adjusting the VOLUME control and using the built-in sound field processor...

Owner's Manual
Page 35
...tape's total possible recording time, the unit will automatically program tracks or help you to program tracks so they will fit onto the tape with the Dolby NR system, select the Dolby NR B or C position by pressing the DOLBY NR button. RECORDING COMPACT DISCS 7 1 1 B C 54 3 6 2 6 1 CD/TUNER 1 2 3 4 5 1 2 3 4 5 6 7 8 6 7 8 9 0 A TIME B PROG C TAPE D EDIT E +I0 DISC SKIP STOP PLAY/PAUSE MODE REPEAT RANDOM OPEN/CLOSE TUNER LOCATION PLAY STOP PLAY MUSIC TAPE USER FLAT REC/PAUSE DECK A/B POWER SLEEP INPUT VOLUME - + 7 1 → Automatic tape...
...tape's total possible recording time, the unit will automatically program tracks or help you to program tracks so they will fit onto the tape with the Dolby NR system, select the Dolby NR B or C position by pressing the DOLBY NR button. RECORDING COMPACT DISCS 7 1 1 B C 54 3 6 2 6 1 CD/TUNER 1 2 3 4 5 1 2 3 4 5 6 7 8 6 7 8 9 0 A TIME B PROG C TAPE D EDIT E +I0 DISC SKIP STOP PLAY/PAUSE MODE REPEAT RANDOM OPEN/CLOSE TUNER LOCATION PLAY STOP PLAY MUSIC TAPE USER FLAT REC/PAUSE DECK A/B POWER SLEEP INPUT VOLUME - + 7 1 → Automatic tape...

Owner's Manual
Page 38
... RECORDINGS 1 6, 1 B C 54 7, 2 3 7, 2 CD/TUNER 1 2 3 4 5 1 2 3 4 5 6 7 8 6 7 8 9 0 A TIME B PROG C TAPE D EDIT E +I0 DISC SKIP STOP PLAY/PAUSE MODE REPEAT RANDOM OPEN/CLOSE TUNER LOCATION PLAY STOP PLAY MUSIC TAPE USER FLAT REC/PAUSE DECK A/B POWER SLEEP INPUT VOLUME - + 1 7, 2 6, 1 • When recording important selections, be used , its effect is recorded along with the source. * Music with the Dolby NR system, select the Dolby NR B or C position by pressing the reverse MODE selector button. 6 Press the REC/PAUSE button. * The indicator...
... RECORDINGS 1 6, 1 B C 54 7, 2 3 7, 2 CD/TUNER 1 2 3 4 5 1 2 3 4 5 6 7 8 6 7 8 9 0 A TIME B PROG C TAPE D EDIT E +I0 DISC SKIP STOP PLAY/PAUSE MODE REPEAT RANDOM OPEN/CLOSE TUNER LOCATION PLAY STOP PLAY MUSIC TAPE USER FLAT REC/PAUSE DECK A/B POWER SLEEP INPUT VOLUME - + 1 7, 2 6, 1 • When recording important selections, be used , its effect is recorded along with the source. * Music with the Dolby NR system, select the Dolby NR B or C position by pressing the reverse MODE selector button. 6 Press the REC/PAUSE button. * The indicator...

Owner's Manual
Page 39
.... OTHER RECORDINGS 21 2 4 B C 2 3, 3 4 4 2, 1 4 CD/TUNER 1 2 3 4 5 1 2 3 4 5 6 7 8 6 7 8 9 0 A TIME B PROG C TAPE D EDIT E +I0 DISC SKIP STOP PLAY/PAUSE MODE REPEAT RANDOM OPEN/CLOSE TUNER LOCATION PLAY STOP PLAY MUSIC TAPE USER FLAT REC/PAUSE DECK A/B POWER SLEEP INPUT VOLUME - + 4 4 1, 2 Dubbing • During dubbing, adjusting the VOLUME control and using the built-in graphic equalizer is used, its effect is recorded along with the source. * Music with Dolby B or C NR will change according to use the same tape formula and length for...
.... OTHER RECORDINGS 21 2 4 B C 2 3, 3 4 4 2, 1 4 CD/TUNER 1 2 3 4 5 1 2 3 4 5 6 7 8 6 7 8 9 0 A TIME B PROG C TAPE D EDIT E +I0 DISC SKIP STOP PLAY/PAUSE MODE REPEAT RANDOM OPEN/CLOSE TUNER LOCATION PLAY STOP PLAY MUSIC TAPE USER FLAT REC/PAUSE DECK A/B POWER SLEEP INPUT VOLUME - + 4 4 1, 2 Dubbing • During dubbing, adjusting the VOLUME control and using the built-in graphic equalizer is used, its effect is recorded along with the source. * Music with Dolby B or C NR will change according to use the same tape formula and length for...

Owner's Manual
Page 47
... the timer play setting After the timer play by using the HOUR button and the MINUTE button. HOW TO USE THE BUILT-IN TIMER TIME ADJ DISPLAY POWER TIMER HOUR MINUTE POWER CD/TUNER 1 2 3 4 5 1 2 3 4 5 6 7 8 6 7 8 9 0 A TIME B PROG C TAPE D EDIT E +I0 DISC SKIP STOP PLAY/PAUSE MODE REPEAT RANDOM OPEN/CLOSE TUNER LOCATION PLAY STOP PLAY MUSIC TAPE USER FLAT REC/PAUSE DECK A/B POWER SLEEP INPUT VOLUME - + Ž At ON TIME/time setting mode ["ON TIME" appears on the display, and soon it is changed to a time setting mode.] If necessary, set so...
... the timer play setting After the timer play by using the HOUR button and the MINUTE button. HOW TO USE THE BUILT-IN TIMER TIME ADJ DISPLAY POWER TIMER HOUR MINUTE POWER CD/TUNER 1 2 3 4 5 1 2 3 4 5 6 7 8 6 7 8 9 0 A TIME B PROG C TAPE D EDIT E +I0 DISC SKIP STOP PLAY/PAUSE MODE REPEAT RANDOM OPEN/CLOSE TUNER LOCATION PLAY STOP PLAY MUSIC TAPE USER FLAT REC/PAUSE DECK A/B POWER SLEEP INPUT VOLUME - + Ž At ON TIME/time setting mode ["ON TIME" appears on the display, and soon it is changed to a time setting mode.] If necessary, set so...

Owner's Manual
Page 49
...the sleep timer operation finishes, the timer will not operate.) 41 HOW TO USE THE BUILT-IN TIMER POWER AUTO/MAN'L DISPLAY POWER SLEEP CD/TUNER 1 2 3 4 5 1 2 3 4 5 6 7 8 6 7 8 9 0 A TIME B PROG C TAPE D EDIT E +I0 DISC SKIP STOP PLAY/PAUSE MODE REPEAT RANDOM OPEN/CLOSE TUNER LOCATION PLAY STOP PLAY MUSIC TAPE USER FLAT REC/PAUSE DECK A/B POWER SLEEP INPUT VOLUME - + Sleep timer operation This unit can be turned off .) 0h30m * The original display mode will resume about 4 seconds after the timer setting is pressed, the sleep time changes. "SLEEP...
...the sleep timer operation finishes, the timer will not operate.) 41 HOW TO USE THE BUILT-IN TIMER POWER AUTO/MAN'L DISPLAY POWER SLEEP CD/TUNER 1 2 3 4 5 1 2 3 4 5 6 7 8 6 7 8 9 0 A TIME B PROG C TAPE D EDIT E +I0 DISC SKIP STOP PLAY/PAUSE MODE REPEAT RANDOM OPEN/CLOSE TUNER LOCATION PLAY STOP PLAY MUSIC TAPE USER FLAT REC/PAUSE DECK A/B POWER SLEEP INPUT VOLUME - + Sleep timer operation This unit can be turned off .) 0h30m * The original display mode will resume about 4 seconds after the timer setting is pressed, the sleep time changes. "SLEEP...
Owner's Manual
Page 51
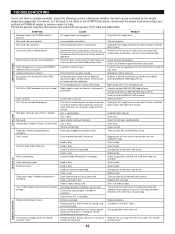
... tape. Don't use endless tapes. Replace batteries. TAPE DECK REMOTE CONTROL 43 AMPLIFIER/TUNER CD PLAYER SYMPTOM No power even if the POWER switch is striking the remote control sensor of nearby electrical appliance. Interference from the wall AC outlet, and then plug in the SYMPTOM column, disconnect the power cord and contact your authorized YAMAHA dealer or service center for help. Interference from TV or microprocessor. Can't record. Head has become magnetized. Remote control doesn't work...
... tape. Don't use endless tapes. Replace batteries. TAPE DECK REMOTE CONTROL 43 AMPLIFIER/TUNER CD PLAYER SYMPTOM No power even if the POWER switch is striking the remote control sensor of nearby electrical appliance. Interference from the wall AC outlet, and then plug in the SYMPTOM column, disconnect the power cord and contact your authorized YAMAHA dealer or service center for help. Interference from TV or microprocessor. Can't record. Head has become magnetized. Remote control doesn't work...


