
Owner's Manual
Page 1
Contents Precautions 3 Main Body/Accessories 4 Nomenclature 5 Setup 7 ■ Installing the Bridge 7 ■ Tuning 8 ■ The Shoulder Rest 8 ■ Changing Strings 9 Power Supply 11 Using the Controls 12 ■ About the Controlled Mode 12 ■ Using Headphones ... later reference. Please keep this Owner's Manual thoroughly before using the instrument. In order to read this Owner's Manual in a safe place for purchasing the Yamaha Electric Violin. English ELECTRIC VIOLIN EV-204/EV-205 Owner's Manual Congratulations!
Contents Precautions 3 Main Body/Accessories 4 Nomenclature 5 Setup 7 ■ Installing the Bridge 7 ■ Tuning 8 ■ The Shoulder Rest 8 ■ Changing Strings 9 Power Supply 11 Using the Controls 12 ■ About the Controlled Mode 12 ■ Using Headphones ... later reference. Please keep this Owner's Manual thoroughly before using the instrument. In order to read this Owner's Manual in a safe place for purchasing the Yamaha Electric Violin. English ELECTRIC VIOLIN EV-204/EV-205 Owner's Manual Congratulations!
Owner's Manual
Page 5
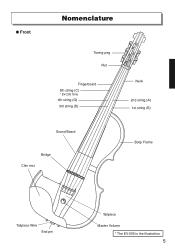
● Front Nomenclature Tuning peg Nut Fingerboard 5th string (C) * EV-205 Only 4th string (G) 3rd string (D) Neck 2nd string (A) 1st string (E) Sound Board Bridge Chin rest Body Frame Tailpiece Wire End pin Tailpiece Master Volume * The EV-205 is the illustration. 5
● Front Nomenclature Tuning peg Nut Fingerboard 5th string (C) * EV-205 Only 4th string (G) 3rd string (D) Neck 2nd string (A) 1st string (E) Sound Board Bridge Chin rest Body Frame Tailpiece Wire End pin Tailpiece Master Volume * The EV-205 is the illustration. 5
Owner's Manual
Page 7
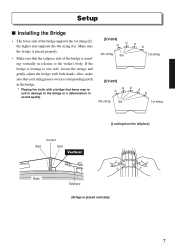
... string passes over its corresponding notch in the bridge. * Playing the violin with both hands. If the bridge is placed vertically] 7 Setup ■ Installing the Bridge • The lower side of the bridge is standing vertically in sound quality. [EV-204] G DA E 4th string Slit 1st string [EV-205] G C D A E 5th string Slit 1st string Correct Bad Bad...
... string passes over its corresponding notch in the bridge. * Playing the violin with both hands. If the bridge is placed vertically] 7 Setup ■ Installing the Bridge • The lower side of the bridge is standing vertically in sound quality. [EV-204] G DA E 4th string Slit 1st string [EV-205] G C D A E 5th string Slit 1st string Correct Bad Bad...
Owner's Manual
Page 8
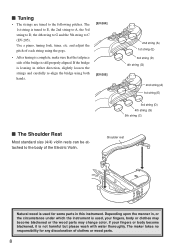
... some parts in either direction, slightly loosen the strings and carefully re-align the bridge using the pegs. • After tuning is still properly aligned. and adjust the pitch of each string using both hands. [EV-204] [EV-205] 2nd string (A) 1st string (E) 3rd string (D) 4th string (G) 2nd string ...Electric Violin. If your fingers, body or clothes may change color. If the bridge is not harmful but please wash with water thoroughly. ■ Tuning • The strings are tuned to C (EV-205). Depending upon the manner in, or the circumstance under which the instrument is used...
... some parts in either direction, slightly loosen the strings and carefully re-align the bridge using the pegs. • After tuning is still properly aligned. and adjust the pitch of each string using both hands. [EV-204] [EV-205] 2nd string (A) 1st string (E) 3rd string (D) 4th string (G) 2nd string ...Electric Violin. If your fingers, body or clothes may change color. If the bridge is not harmful but please wash with water thoroughly. ■ Tuning • The strings are tuned to C (EV-205). Depending upon the manner in, or the circumstance under which the instrument is used...

Owner's Manual
Page 10
... period of time, loosen the strings until the pitch drops a whole tone. 10 Also, make sure that the tailpiece side of the bridge is not going to be used for tuning the violin.Too many or too few wraps may result in the top of each string using... 1st string (E) protective tube. 3rd (D), 4th (G) and 5th (C) strings [EV-204] 3rd string (D) 4th string (G) Rotate the tuning peg as shown [EV-205] 3rd string (D) 4th string (G) 5th string (C) 3 Use a piano, tuning fork, tuner, etc., and adjust the pitch of the bridge. (Make sure that the strings pass over toward the fingerboard.
... period of time, loosen the strings until the pitch drops a whole tone. 10 Also, make sure that the tailpiece side of the bridge is not going to be used for tuning the violin.Too many or too few wraps may result in the top of each string using... 1st string (E) protective tube. 3rd (D), 4th (G) and 5th (C) strings [EV-204] 3rd string (D) 4th string (G) Rotate the tuning peg as shown [EV-205] 3rd string (D) 4th string (G) 5th string (C) 3 Use a piano, tuning fork, tuner, etc., and adjust the pitch of the bridge. (Make sure that the strings pass over toward the fingerboard.
Owner's Manual
Page 15
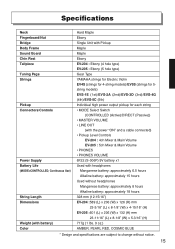
...Bridge Body Frame Sound Board Chin Rest Tailpiece Tuning Pegs Strings Pickup Connectors/Controls Power Supply Battery Life (MODE=CONTROLLED, Continuous Use) String Length Dimensions Weight (with battery) Color Hard Maple Ebony Single Unit with Pickup Maple Maple Ebony EV-204 : Ebony (4 hole type) EV-205 : Ebony (5 hole type) Gear Type YAMAHA... strings for Electric Violin EV4S (strings for 4-string models)/EV5S (strings for 5string models) EVS-1E (1st)/EVS-2A (2nd)/EVS-3D (3rd)/EVS-4G (4th)/EVS-5C (5th) ...
...Bridge Body Frame Sound Board Chin Rest Tailpiece Tuning Pegs Strings Pickup Connectors/Controls Power Supply Battery Life (MODE=CONTROLLED, Continuous Use) String Length Dimensions Weight (with battery) Color Hard Maple Ebony Single Unit with Pickup Maple Maple Ebony EV-204 : Ebony (4 hole type) EV-205 : Ebony (5 hole type) Gear Type YAMAHA... strings for Electric Violin EV4S (strings for 4-string models)/EV5S (strings for 5string models) EVS-1E (1st)/EVS-2A (2nd)/EVS-3D (3rd)/EVS-4G (4th)/EVS-5C (5th) ...


