

Owner's Manual
Page 2
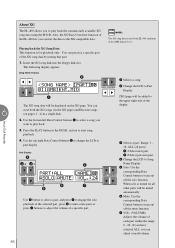
... it is properly installed and used in its useful life is considered to return the defective parts. Keep all cautions indicated on this product become damaged beyond repair, or for some areas, the servicer is soldered in the safety instruction section. DISPOSAL NOTICE: Should this page. The model number, serial number, power requirements, etc., are therefore the owner's responsibility. Claims filed under the expressed...
... it is properly installed and used in its useful life is considered to return the defective parts. Keep all cautions indicated on this product become damaged beyond repair, or for some areas, the servicer is soldered in the safety instruction section. DISPOSAL NOTICE: Should this page. The model number, serial number, power requirements, etc., are therefore the owner's responsibility. Claims filed under the expressed...

Owner's Manual
Page 4
... this Owner's manual are the proud owner of a fine electronic organ, Electone EL-400. In order to make the most advanced AWM tone generation technology with maximum musical enjoyment. When the Electone is turned on your instrument. • Copying of -the-art digital electronics and features to read the manual thoroughly while trying out the various features described. The Yamaha EL-400 Electone combines the most of high-quality voices...
... this Owner's manual are the proud owner of a fine electronic organ, Electone EL-400. In order to make the most advanced AWM tone generation technology with maximum musical enjoyment. When the Electone is turned on your instrument. • Copying of -the-art digital electronics and features to read the manual thoroughly while trying out the various features described. The Yamaha EL-400 Electone combines the most of high-quality voices...
Owner's Manual
Page 46
... been designed to perfectly match the bass and chord parts of the Fill In pattern and create additional rhythmic interest. simply press the FILL IN button before ) the beat that you should be very careful to spice up a repeating rhythm. Since the Fill In feature is playing, the display momentarily changes to show the current tempo. 2) To use the Fill In patterns: Fill...
... been designed to perfectly match the bass and chord parts of the Fill In pattern and create additional rhythmic interest. simply press the FILL IN button before ) the beat that you should be very careful to spice up a repeating rhythm. Since the Fill In feature is playing, the display momentarily changes to show the current tempo. 2) To use the Fill In patterns: Fill...
Owner's Manual
Page 65
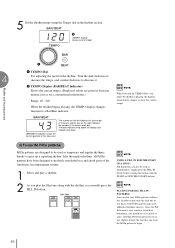
..., the rhythm name currently played back is recorded as a part of metronome sounds, will be programmed by pressing the SEQ buttons. The rhythm sequence data is displayed on the LCD. Select the song number containing the registration data and press PLAY button on page 78). 2. RHYTHM SEQ. MARCH WALTZ SWING BOUNCE SLOW 1 1 2 ROCK MAX SEQ. Rhythm and Accompaniment 4 65 If you load the sequence data using MDR, the default settings on each SEQ button, four types of registration data...
..., the rhythm name currently played back is recorded as a part of metronome sounds, will be programmed by pressing the SEQ buttons. The rhythm sequence data is displayed on the LCD. Select the song number containing the registration data and press PLAY button on page 78). 2. RHYTHM SEQ. MARCH WALTZ SWING BOUNCE SLOW 1 1 2 ROCK MAX SEQ. Rhythm and Accompaniment 4 65 If you load the sequence data using MDR, the default settings on each SEQ button, four types of registration data...

Owner's Manual
Page 66
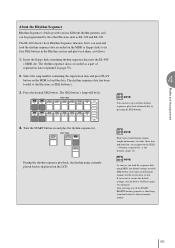
... touch of EL-400 are limited to the Registration Memory panel buttons. M. 1 2 3 4 5 6 7 8 D. /TO DISK Functions and settings that cannot be memorized are conveniently located between the Upper and Lower keyboards for easy access while playing. All registrations in a Pattern Disk (except for q User Keyboard Percussion settings (except for User User voice numbers currently assigned to the numbers currently assigned to the Lower/Pedal Dotted buttons) buttons) q Rhythm Sequence q Registration Shift settings q MIDI settings 5 q Pitch/Transpose settings Registration...
... touch of EL-400 are limited to the Registration Memory panel buttons. M. 1 2 3 4 5 6 7 8 D. /TO DISK Functions and settings that cannot be memorized are conveniently located between the Upper and Lower keyboards for easy access while playing. All registrations in a Pattern Disk (except for q User Keyboard Percussion settings (except for User User voice numbers currently assigned to the numbers currently assigned to the Lower/Pedal Dotted buttons) buttons) q Rhythm Sequence q Registration Shift settings q MIDI settings 5 q Pitch/Transpose settings Registration...
Owner's Manual
Page 74
... of important data, slide the disk's write-protect tab to be free from the reading sound during playback and to record the song playback using the several song numbers with care: Do not place heavy objects on the LED display in the reading process. of data recorded in any way. Music Disk Recorder Do not open ).If you record data. NOTE: The time reading sound is produced is set to "off...
... of important data, slide the disk's write-protect tab to be free from the reading sound during playback and to record the song playback using the several song numbers with care: Do not place heavy objects on the LED display in the reading process. of data recorded in any way. Music Disk Recorder Do not open ).If you record data. NOTE: The time reading sound is produced is set to "off...

Owner's Manual
Page 76
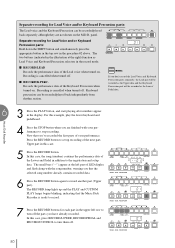
... a floppy disk. RECORD PLAY UPPER LOWER PEDAL CONTROL UPPER LOWER PEDAL CONTROL SHIFT SONG REPEAT FROM TO SONG COPY SONG DEL. PAUSE STOP PLAY SONG SELECT RECORD CUSTOM PLAY MUSIC DISK RECORDER TEMPO FORMAT 5 Press the PLAY button. The PLAY lamp lights up to cancel recording. NOTE: If the selected song number already contains recorded data, small bars ("--") appear at the beginning of the song. 2 Put a formatted disk into the disk slot. 3 Use the SONG SELECT (G, H) buttons to right. Make all registrations you will use at the left part of the song data you...
... a floppy disk. RECORD PLAY UPPER LOWER PEDAL CONTROL UPPER LOWER PEDAL CONTROL SHIFT SONG REPEAT FROM TO SONG COPY SONG DEL. PAUSE STOP PLAY SONG SELECT RECORD CUSTOM PLAY MUSIC DISK RECORDER TEMPO FORMAT 5 Press the PLAY button. The PLAY lamp lights up to cancel recording. NOTE: If the selected song number already contains recorded data, small bars ("--") appear at the beginning of the song. 2 Put a formatted disk into the disk slot. 3 Use the SONG SELECT (G, H) buttons to right. Make all registrations you will use at the left part of the song data you...

Owner's Manual
Page 78
Bulk data includes: Registration Shift settings, Rhythm Pattern (User rhythms) and Rhythm Sequence data, and User voices. Performance data The M.D.R. Upper, Lower, Pedal and Lead - These include registration changes, the use of performance data - is as easy to operate as digital data, it is also saved to the panel, are recorded at which you play as a cassette tape recorder, it allows you much more flexibility and control than even the most sophisticated tape recorder. Bulk data is far move...
Bulk data includes: Registration Shift settings, Rhythm Pattern (User rhythms) and Rhythm Sequence data, and User voices. Performance data The M.D.R. Upper, Lower, Pedal and Lead - These include registration changes, the use of performance data - is as easy to operate as digital data, it is also saved to the panel, are recorded at which you play as a cassette tape recorder, it allows you much more flexibility and control than even the most sophisticated tape recorder. Bulk data is far move...

Owner's Manual
Page 79
...RECORD PLAY UPPER LOWER PEDAL CONTROL UPPER LOWER PEDAL CONTROL SHIFT SONG REPEAT FROM TO SONG COPY SONG DEL. Operation on . PAUSE STOP PLAY SONG SELECT RECORD CUSTOM PLAY MUSIC DISK RECORDER TEMPO FORMAT Music Disk Recorder 6 s RECORD/UPPER Records the performance data of the Upper keyboard when turned on the all the registrations needed for recording. 2) To record each part is ready to the Registration Memory numbered buttons, and set the registration that recording the melody (using the Upper Keyboard). for example, first recording the chords and bass...
...RECORD PLAY UPPER LOWER PEDAL CONTROL UPPER LOWER PEDAL CONTROL SHIFT SONG REPEAT FROM TO SONG COPY SONG DEL. Operation on . PAUSE STOP PLAY SONG SELECT RECORD CUSTOM PLAY MUSIC DISK RECORDER TEMPO FORMAT Music Disk Recorder 6 s RECORD/UPPER Records the performance data of the Upper keyboard when turned on the all the registrations needed for recording. 2) To record each part is ready to the Registration Memory numbered buttons, and set the registration that recording the melody (using the Upper Keyboard). for example, first recording the chords and bass...
Owner's Manual
Page 80
... . Records the performance data of the Lead voice when turned on. Music Disk Recorder 6 3 Press the PLAY button, and start playing after numbers appear in the procedure #2 above. In this case, the song (number) contains the performance data of the Lower and Pedal in the illustration at the left row to the registration and setup data. RECORD PLAY UPPER LOWER PEDAL CONTROL UPPER LOWER PEDAL CONTROL SHIFT SONG REPEAT FROM TO SONG COPY SONG DEL. Keyboard percussion can be recorded/played back independently from rhythm section...
... . Records the performance data of the Lead voice when turned on. Music Disk Recorder 6 3 Press the PLAY button, and start playing after numbers appear in the procedure #2 above. In this case, the song (number) contains the performance data of the Lower and Pedal in the illustration at the left row to the registration and setup data. RECORD PLAY UPPER LOWER PEDAL CONTROL UPPER LOWER PEDAL CONTROL SHIFT SONG REPEAT FROM TO SONG COPY SONG DEL. Keyboard percussion can be recorded/played back independently from rhythm section...

Owner's Manual
Page 81
... LOWER PEDAL CONTROL SHIFT SONG REPEAT FROM TO SONG COPY SONG DEL. If you want to do punch-in recording should be turned on the Upper keyboard. Press the PAUSE button at the point you want to change . 2. Since registration data has already been recorded with the first parts of the previously recorded parts. 8 Press the CUSTOM PLAY button to start punch-in recording. The current song is used here to change . 6. PAUSE STOP PLAY SONG SELECT RECORD CUSTOM PLAY MUSIC DISK RECORDER TEMPO FORMAT NOTE...
... LOWER PEDAL CONTROL SHIFT SONG REPEAT FROM TO SONG COPY SONG DEL. If you want to do punch-in recording should be turned on the Upper keyboard. Press the PAUSE button at the point you want to change . 2. Since registration data has already been recorded with the first parts of the previously recorded parts. 8 Press the CUSTOM PLAY button to start punch-in recording. The current song is used here to change . 6. PAUSE STOP PLAY SONG SELECT RECORD CUSTOM PLAY MUSIC DISK RECORDER TEMPO FORMAT NOTE...
Owner's Manual
Page 86
... Data Control button to adjust the volume of the XG song data by muting that part. 1. DATA CONTROL 2 Change the LCD to part display. Use the top right Data Control buttons 2 to change the LCD to Part Display. 1 The XG song data will be displayed on / off the mute function. 7 VOL. (VOLUME): Adjusts the volume of the EL-400 lets you convert the data to the SMF format 0 or 1. If you have selected ALL, you can practice a specific part of a specific part. NOTE: The XG song data created with EL-400...
... Data Control button to adjust the volume of the XG song data by muting that part. 1. DATA CONTROL 2 Change the LCD to part display. Use the top right Data Control buttons 2 to change the LCD to Part Display. 1 The XG song data will be displayed on / off the mute function. 7 VOL. (VOLUME): Adjusts the volume of the EL-400 lets you convert the data to the SMF format 0 or 1. If you have selected ALL, you can practice a specific part of a specific part. NOTE: The XG song data created with EL-400...

Owner's Manual
Page 97
... save the changes. Cancel the operation. 3) When executing Disk Copy, set the Write-protect tab on the M.D.R. Insert the appropriate disk. XX: song number You have inserted a wrong type disk as the source disk. 97 An error occurred because the disk was received at one time. Messages on the source disk to ON. The installed disk is inserted in the Disk Copy operation. Use another formatted disk or delete unnecessary data. 2) All of the song numbers...
... save the changes. Cancel the operation. 3) When executing Disk Copy, set the Write-protect tab on the M.D.R. Insert the appropriate disk. XX: song number You have inserted a wrong type disk as the source disk. 97 An error occurred because the disk was received at one time. Messages on the source disk to ON. The installed disk is inserted in the Disk Copy operation. Use another formatted disk or delete unnecessary data. 2) All of the song numbers...
Owner's Manual
Page 104
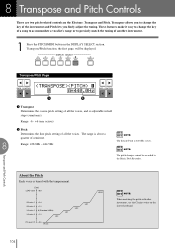
... tuning. Range: -6 - +6 (one octave) 2 Pitch Determines the fine pitch setting of another instrument. 1 Press the PITCH/MIDI button in half steps (semitones). Transpose and Pitch Controls About the Pitch Each voice is 440.0Hz (=A3). These features make it easy to change the key of a song to accommodate a vocalist's range or to change the key of all the voices. DISPLAY SELECT VOICE EFFECT A.B.C. 8 Transpose and Pitch Controls There are two pitch-related controls on the Lower keyboard. 104 FOOT SW. REGIST. NOTE: The pitch changes...
... tuning. Range: -6 - +6 (one octave) 2 Pitch Determines the fine pitch setting of another instrument. 1 Press the PITCH/MIDI button in half steps (semitones). Transpose and Pitch Controls About the Pitch Each voice is 440.0Hz (=A3). These features make it easy to change the key of a song to accommodate a vocalist's range or to change the key of all the voices. DISPLAY SELECT VOICE EFFECT A.B.C. 8 Transpose and Pitch Controls There are two pitch-related controls on the Lower keyboard. 104 FOOT SW. REGIST. NOTE: The pitch changes...
Owner's Manual
Page 106
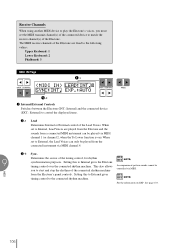
... NOTE: Accompaniment pattern sounds cannot be played from the Electone's panel controls. See page 103. 106 NOTE: For the information on ). Receive Channels When using another MIDI device to play the Electone's voices, you to start and stop the rhythms of the connected rhythm machine MIDI from the connected instrument via MIDI. EXP.:AUTO 1 -2 1 Internal/External Controls Switches between the Electone (INT.: Internal) and the connected device (EXT.: External) to the connected rhythm machine. Setting this to External gives timing control...
... NOTE: Accompaniment pattern sounds cannot be played from the Electone's panel controls. See page 103. 106 NOTE: For the information on ). Receive Channels When using another MIDI device to play the Electone's voices, you to start and stop the rhythms of the connected rhythm machine MIDI from the connected instrument via MIDI. EXP.:AUTO 1 -2 1 Internal/External Controls Switches between the Electone (INT.: Internal) and the connected device (EXT.: External) to the connected rhythm machine. Setting this to External gives timing control...

Owner's Manual
Page 113
... format such as an "Electone." NOTE: When you start to XG data. Appendix 11 113 The internal tone generator mode automatically changes to XG when you create an XG song data using an external sequencer (or sequencing software) and the internal XG tone generator. The internal tone generator section of the data. Sending an appropriate system exclusive message from the sequencing software (PC) to the EL-400. *N: Device Number...
... format such as an "Electone." NOTE: When you start to XG data. Appendix 11 113 The internal tone generator mode automatically changes to XG when you create an XG song data using an external sequencer (or sequencing software) and the internal XG tone generator. The internal tone generator section of the data. Sending an appropriate system exclusive message from the sequencing software (PC) to the EL-400. *N: Device Number...
Owner's Manual
Page 126
... and/or Lead voice. Turn off , or an electric power tool (such as cabinets or glass windows. Radio/ or TV generates some noise. Relocate it especially when playing piano voice. Because the Electone is capable of producing powerful bass sounds, resonance may be set to reset the Electone. (page 72) Pressing a certain panel button doesn't open its maximum. To avoid this occurs, plug the Electone into...
... and/or Lead voice. Turn off , or an electric power tool (such as cabinets or glass windows. Radio/ or TV generates some noise. Relocate it especially when playing piano voice. Because the Electone is capable of producing powerful bass sounds, resonance may be set to reset the Electone. (page 72) Pressing a certain panel button doesn't open its maximum. To avoid this occurs, plug the Electone into...

Owner's Manual
Page 127
... Pedal Voice 1 and Pedal Voice 2 are turned on. Then change , even when pressing different keys of the keyboard. modes, Single Finger or Fingered Chord, is designed not to 0. Be sure to the either side, Upper or Lower. While an intro./Ending pattern is automatically playing, the Lower keyboard does not produce any sound during the playback of an Intro./Ending pattern. Adjust the Touch Tone setting using the Voice Condition display. The Accompaniment volume...
... Pedal Voice 1 and Pedal Voice 2 are turned on. Then change , even when pressing different keys of the keyboard. modes, Single Finger or Fingered Chord, is designed not to 0. Be sure to the either side, Upper or Lower. While an intro./Ending pattern is automatically playing, the Lower keyboard does not produce any sound during the playback of an Intro./Ending pattern. Adjust the Touch Tone setting using the Voice Condition display. The Accompaniment volume...

Owner's Manual
Page 130
.../Off Start; Synchro Start; Bar/Beat LED; Custom A.B.C.; Shift; Format, Read & Auto Increment, Song Repeat; Song Delete; LED Display; Pitch Control; Data Controls; FUN TO PLAY ELECTONE Disk; R/L); R/L); To Host; reserves the right to change or modify products or specifications at any time without prior notice. Tango 1, 2, 3; Lead In; Fingered Chord; Mode: Off; M.O.C.; MIDI (Output: Upper, Lower, Pedal; Monitor x 2 107.7cm x 46.1cm x 94.7cm *With Keyboard Cover Closed 54.5kg Specifications and description in this Owner's Manual are...
.../Off Start; Synchro Start; Bar/Beat LED; Custom A.B.C.; Shift; Format, Read & Auto Increment, Song Repeat; Song Delete; LED Display; Pitch Control; Data Controls; FUN TO PLAY ELECTONE Disk; R/L); R/L); To Host; reserves the right to change or modify products or specifications at any time without prior notice. Tango 1, 2, 3; Lead In; Fingered Chord; Mode: Off; M.O.C.; MIDI (Output: Upper, Lower, Pedal; Monitor x 2 107.7cm x 46.1cm x 94.7cm *With Keyboard Cover Closed 54.5kg Specifications and description in this Owner's Manual are...

Owner's Manual
Page 133
... secured BEFORE using any connections, including connection to have been spilled into the outlet, turn the plug over power or connecting cords of an extension cord is required. 7. If you should be left unused for enclosed installations are not spilled into the enclosure through openings; If the problem persists, contact an electrician to the main supply. 2. Do NOT connect this manual. 3. If instructions for extended...
... secured BEFORE using any connections, including connection to have been spilled into the outlet, turn the plug over power or connecting cords of an extension cord is required. 7. If you should be left unused for enclosed installations are not spilled into the enclosure through openings; If the problem persists, contact an electrician to the main supply. 2. Do NOT connect this manual. 3. If instructions for extended...

