
Owner's Manual
Page 5
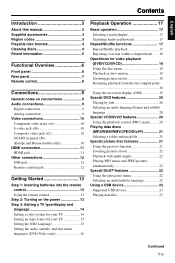
English Contents Introduction 3 About this manual 3 Supplied accessories 3 Region codes 3 Playable disc formats 4 Cleaning discs 4 Patent information 5 Functional Overview 6 Front panel 6 Rear panel 7 Remote control 8 Connections 9 General notes on connections 9 Audio connections 9 Digital connection 9 Analog connection 9 Video connections 10 Component video jacks
English Contents Introduction 3 About this manual 3 Supplied accessories 3 Region codes 3 Playable disc formats 4 Cleaning discs 4 Patent information 5 Functional Overview 6 Front panel 6 Rear panel 7 Remote control 8 Connections 9 General notes on connections 9 Audio connections 9 Digital connection 9 Analog connection 9 Video connections 10 Component video jacks
Owner's Manual
Page 7
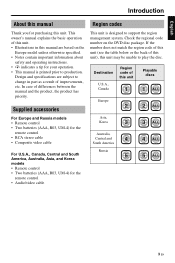
...• Composite video cable For U.S.A., Canada, Central and South America, Australia, Asia, and Korea models • Remote control • Two batteries (AAA, R03, UM-4) for the remote control • Audio/video cable This unit is printed prior to support the region management system. Destination U.S.A., Canada Region code...region code of this unit (see the table below or the back of this unit. Design and specifications are based on the DVD disc package. Check the regional code number on the Europe model unless otherwise specified. • Notes contain important information about ...
...• Composite video cable For U.S.A., Canada, Central and South America, Australia, Asia, and Korea models • Remote control • Two batteries (AAA, R03, UM-4) for the remote control • Audio/video cable This unit is printed prior to support the region management system. Destination U.S.A., Canada Region code...region code of this unit (see the table below or the back of this unit. Design and specifications are based on the DVD disc package. Check the regional code number on the Europe model unless otherwise specified. • Notes contain important information about ...

Owner's Manual
Page 10
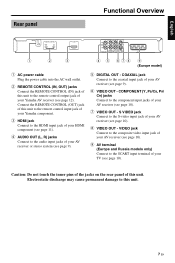
...17). 0 STOP ( s ) Stops playback. Frame-by-frame playback (see page 12). 6 En In the standby mode, this unit. 7 Remote control sensor Receives infrared signals from the remote control (see page 13). 8 PLAY ( p ) Starts playback. 9 PAUSE ( ) Pauses playback. FFuuncntiocnatliOovenrvaiewl Overview Front panel 1 2 3 45 6... 7890 q 1 STANDBY/ON Turns on this unit or sets it to receive infrared signals from the remote control. 2 Disc tray Loads a disc in the disc tray (see page 17). 3 OPEN/CLOSE ( ) Opens or closes the disc tray (see...
...17). 0 STOP ( s ) Stops playback. Frame-by-frame playback (see page 12). 6 En In the standby mode, this unit. 7 Remote control sensor Receives infrared signals from the remote control (see page 13). 8 PLAY ( p ) Starts playback. 9 PAUSE ( ) Pauses playback. FFuuncntiocnatliOovenrvaiewl Overview Front panel 1 2 3 45 6... 7890 q 1 STANDBY/ON Turns on this unit or sets it to receive infrared signals from the remote control. 2 Disc tray Loads a disc in the disc tray (see page 17). 3 OPEN/CLOSE ( ) Opens or closes the disc tray (see...
Owner's Manual
Page 11
...) jack of this unit to the remote control input jack of your Yamaha component. 3 HDMI jack Connect to the HDMI input jack of your HDMI component (see page 11). 4 AUDIO OUT (L, R) jacks Connect to the audio input jacks ... OUT 1 2 3 45 678 9 (Europe model) 1 AC power cable Plug the power cable into the AC wall outlet. 2 REMOTE CONTROL (IN, OUT) jacks Connect the REMOTE CONTROL (IN) jack of this unit to the remote control output jack of your Yamaha AV receiver (see page 9). 6 VIDEO OUT - COAXIAL jack Connect to the coaxial input jack of this unit...
...) jack of this unit to the remote control input jack of your Yamaha component. 3 HDMI jack Connect to the HDMI input jack of your HDMI component (see page 11). 4 AUDIO OUT (L, R) jacks Connect to the audio input jacks ... OUT 1 2 3 45 678 9 (Europe model) 1 AC power cable Plug the power cable into the AC wall outlet. 2 REMOTE CONTROL (IN, OUT) jacks Connect the REMOTE CONTROL (IN) jack of this unit to the remote control output jack of your Yamaha AV receiver (see page 9). 6 VIDEO OUT - COAXIAL jack Connect to the coaxial input jack of this unit...
Owner's Manual
Page 12
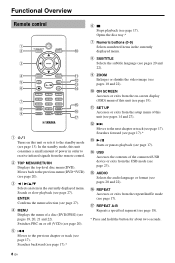
Functional Overview Remote control 1 2 0 3 4 q 5 w e 6 r 7 t 8 9 y u 1 Turns on this unit or sets it to the standby mode (see page 17). Switches PBC on -screen display (OSD) menu of this unit consumes a small amount of a disc (DVD/JPEG) (see ...receive infrared signals from the on or off (VCD) (see page 20). 5 l22 Moves to the previous menu (DVD*/VCD) (see page 17). Opens the disc tray.* 7 Numeric buttons (0-9) Selects numbered items in order to the... 22). 0 ON SCREEN Accesses or exits from the remote control. 2 TOP MENU/RETURN Displays the top-level disc menu...
Functional Overview Remote control 1 2 0 3 4 q 5 w e 6 r 7 t 8 9 y u 1 Turns on this unit or sets it to the standby mode (see page 17). Switches PBC on -screen display (OSD) menu of this unit consumes a small amount of a disc (DVD/JPEG) (see ...receive infrared signals from the on or off (VCD) (see page 20). 5 l22 Moves to the previous menu (DVD*/VCD) (see page 17). Opens the disc tray.* 7 Numeric buttons (0-9) Selects numbered items in order to the... 22). 0 ON SCREEN Accesses or exits from the remote control. 2 TOP MENU/RETURN Displays the top-level disc menu...
Owner's Manual
Page 13
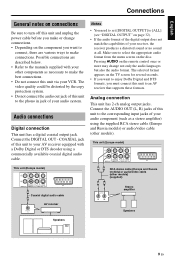
... digital audio cable C AV receiver Notes • You need to set [DIGITAL OUTPUT] to select the appropriate audio format from the menu screen on the remote control once or more may change connections. • Depending on the component you must connect this unit to your AV receiver equipped with your other models...
... digital audio cable C AV receiver Notes • You need to set [DIGITAL OUTPUT] to select the appropriate audio format from the menu screen on the remote control once or more may change connections. • Depending on the component you must connect this unit to your AV receiver equipped with your other models...
Owner's Manual
Page 16
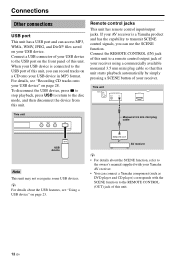
...so that this unit. y For details about the SCENE function, refer to the owner's manual supplied with your USB device to the REMOTE CONTROL (OUT) jack of your Yamaha AV receiver. • You can use the SCENE function. Connections Other connections USB port This unit has a USB port and can access... on your USB device in MP3 format. REMOTE OUT AV receiver y • For details about the USB features, see "Recording CD tracks onto your AV receiver is connected to the USB port of this unit, you can connect a Yamaha component (such as DVD player and CD player) corresponds with the...
...so that this unit. y For details about the SCENE function, refer to the owner's manual supplied with your USB device to the REMOTE CONTROL (OUT) jack of your Yamaha AV receiver. • You can use the SCENE function. Connections Other connections USB port This unit has a USB port and can access... on your USB device in MP3 format. REMOTE OUT AV receiver y • For details about the USB features, see "Recording CD tracks onto your AV receiver is connected to the USB port of this unit, you can connect a Yamaha component (such as DVD player and CD player) corresponds with the...
Owner's Manual
Page 17
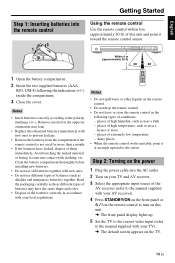
...supplied batteries (AAA, R03, UM-4) following types of conditions: - English Getting Started Step 1: Inserting batteries into the remote control 3 1 2 Getting Started Using the remote control Use the remote control within 6 m (approximately 20 ft) of this unit. ➜ The front panel display lights up. 5 Set ... manual supplied with your TV). ➜ The default screen appears on the remote control. • Do not drop the remote control. • Do not leave or store the remote control in accordance with your local regulations. places of the batteries correctly in the ...
...supplied batteries (AAA, R03, UM-4) following types of conditions: - English Getting Started Step 1: Inserting batteries into the remote control 3 1 2 Getting Started Using the remote control Use the remote control within 6 m (approximately 20 ft) of this unit. ➜ The front panel display lights up. 5 Set ... manual supplied with your TV). ➜ The default screen appears on the remote control. • Do not drop the remote control. • Do not leave or store the remote control in accordance with your local regulations. places of the batteries correctly in the ...

Owner's Manual
Page 18
... standard setting, ensure that matches your TV supports the selected TV type. • When making HDMI connections, you can customize this unit using the supplied remote control. Setting a color system for Europe and Russia models. 1 Press SET UP. 2 Press 3 repeatedly to select "VIDEO SETUP PAGE". 3 Press 5/a to highlight [TV TYPE], and then...
... standard setting, ensure that matches your TV supports the selected TV type. • When making HDMI connections, you can customize this unit using the supplied remote control. Setting a color system for Europe and Russia models. 1 Press SET UP. 2 Press 3 repeatedly to select "VIDEO SETUP PAGE". 3 Press 5/a to highlight [TV TYPE], and then...

Owner's Manual
Page 43
... also use the MENU button on the remote control to display a disc menu. ON Select this not to turn on or off . Selecting the PBC (playback control) function You can set auto standby function to on or off the playback control (PBC) function (see "Using the playback control (PBC) menu" on page 20).... 30 minutes. ON Select this to set this to the standby mode automatically when disc playback is available only on Video CD 2.0 with the playback control (PBC) feature. • Select [PBC] in "PREFERENCE PAGE". Playback starts from the beginning of the filename for the same movie file is ...
... also use the MENU button on the remote control to display a disc menu. ON Select this not to turn on or off . Selecting the PBC (playback control) function You can set auto standby function to on or off the playback control (PBC) function (see "Using the playback control (PBC) menu" on page 20).... 30 minutes. ON Select this to set this to the standby mode automatically when disc playback is available only on Video CD 2.0 with the playback control (PBC) feature. • Select [PBC] in "PREFERENCE PAGE". Playback starts from the beginning of the filename for the same movie file is ...
Owner's Manual
Page 46
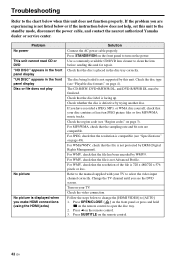
The disc being loaded is defective by this unit to the standby mode, disconnect the power cable, and contact the nearest authorized Yamaha dealer or service center. Check whether the disc is not supported by trying another disc. Refer to the manual supplied with your disc ...below does not help, set this unit. For WMV, check that the file is compatible (see "Region codes" on the remote control. 42 En The CD-R/RW, DVD+R/RW/R DL, and DVD-R/RW/R DL must be finalized. Change the TV channel until you make HDMI connections (using the HDMI jacks) Solution Connect the...
The disc being loaded is defective by this unit to the standby mode, disconnect the power cable, and contact the nearest authorized Yamaha dealer or service center. Check whether the disc is not supported by trying another disc. Refer to the manual supplied with your disc ...below does not help, set this unit. For WMV, check that the file is compatible (see "Region codes" on the remote control. 42 En The CD-R/RW, DVD+R/RW/R DL, and DVD-R/RW/R DL must be finalized. Change the TV channel until you make HDMI connections (using the HDMI jacks) Solution Connect the...
Owner's Manual
Page 47
...30 seconds. Reduce the distance of your receiver can decode DTS, and that the TV setting of this unit matches the screen size of the remote control from center to [ON] (see "Setting a color system for fingerprints/scratches and clean it with their polarities (+/- signs) as indicated. ...scan. 1. Check the video connection. Check the audio connection. Press OPEN/CLOSE ( ) on the front panel or press and hold 7 on the remote control to open the disc tray. 2. Check that [DIGITAL OUTPUT] is compatible with this unit (see "Playable disc formats" on the front panel. ...
...30 seconds. Reduce the distance of your receiver can decode DTS, and that the TV setting of this unit matches the screen size of the remote control from center to [ON] (see "Setting a color system for fingerprints/scratches and clean it with their polarities (+/- signs) as indicated. ...scan. 1. Check the video connection. Check the audio connection. Press OPEN/CLOSE ( ) on the front panel or press and hold 7 on the remote control to open the disc tray. 2. Check that [DIGITAL OUTPUT] is compatible with this unit (see "Playable disc formats" on the front panel. ...

Owner's Manual
Page 48
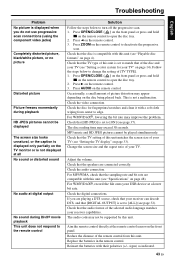
... En Refer to the standby mode, and then turn it again and turn on page 23). Set this unit (see "Supported USB devices" on the remote control before selecting the setup menu. Troubleshooting Problem Buttons do not work This unit does not respond to some menu items cannot be used even if...
... En Refer to the standby mode, and then turn it again and turn on page 23). Set this unit (see "Supported USB devices" on the remote control before selecting the setup menu. Troubleshooting Problem Buttons do not work This unit does not respond to some menu items cannot be used even if...