

Data List
Page 2
... Deep Brush 026 Tap Brush 027 T9 028 T8 029 Gate 030 RX 031 Sm 032 FM 033 EFX 2 DTX700 Data List Name 064 Break 3 065 Break 4 066 Break Deep 067 BD & Cym 068 Tek Power 069 ...6 118 Sm Bd 119 FX Hammer 120 Reverse Snare1 No. Name 001 DTX700 002 BirchCstmAbs 003 Loud 004 Vintage 70s 005 Funk Kit 006 Metal 007 Hip Hop 008 Digi Beat 009 Percs Master 010 Oak Custom... Stab&Scratch 031 LegendTechno 032 Drum Corps 033 Hexagon 034 Flange Perc 035 Compact 036 MG Kit 037 Zone 038 Gate FX 039 Beat Box 9 040 Acid Jazz 041 Deep Brush 042...
... Deep Brush 026 Tap Brush 027 T9 028 T8 029 Gate 030 RX 031 Sm 032 FM 033 EFX 2 DTX700 Data List Name 064 Break 3 065 Break 4 066 Break Deep 067 BD & Cym 068 Tek Power 069 ...6 118 Sm Bd 119 FX Hammer 120 Reverse Snare1 No. Name 001 DTX700 002 BirchCstmAbs 003 Loud 004 Vintage 70s 005 Funk Kit 006 Metal 007 Hip Hop 008 Digi Beat 009 Percs Master 010 Oak Custom... Stab&Scratch 031 LegendTechno 032 Drum Corps 033 Hexagon 034 Flange Perc 035 Compact 036 MG Kit 037 Zone 038 Gate FX 039 Beat Box 9 040 Acid Jazz 041 Deep Brush 042...

Data List
Page 16
... Portamento Time messages are received but not to the internal tone generator. 2.2.26 Pad Function (1 to 95) If the PadFunc parameter from the Menu area's Kit/MIDI/Assign page is identical to specify RPN data. 2.2.6 Main Volume (7) Main Volume messages are transmitted and received. 2.2.7 Pan (10) Pan messages are... Key On and Key Off messages are not received when the Rcv10ch parameter on MIDI channel 10 are transmitted and received. accordingly, the DTX700 can be sent upon striking of that for a specific pad, a Control Change message with the control change number specified by the...
... Portamento Time messages are received but not to the internal tone generator. 2.2.26 Pad Function (1 to 95) If the PadFunc parameter from the Menu area's Kit/MIDI/Assign page is identical to specify RPN data. 2.2.6 Main Volume (7) Main Volume messages are transmitted and received. 2.2.7 Pan (10) Pan messages are... Key On and Key Off messages are not received when the Rcv10ch parameter on MIDI channel 10 are transmitted and received. accordingly, the DTX700 can be sent upon striking of that for a specific pad, a Control Change message with the control change number specified by the...

Data List
Page 17
... that set by the PC parameter from the Menu area's Kit/MIDI/Other page will, upon striking of that pad, be sent via the MIDI OUT connector but not transmitted. 5. Transmission: The DTX700 regularly transmits Active Sensing messages at intervals within approximately 300 milliseconds...of an Active Sensing message, no subsequent MIDI data is received for approximately 300 milliseconds, the DTX700 will be received. • If the PC parameter from the Menu area's Kit/MIDI/Other page is operated. 2.6 Channel Aftertouch Channel Aftertouch messages are transmitted but not transmitted....
... that set by the PC parameter from the Menu area's Kit/MIDI/Other page will, upon striking of that pad, be sent via the MIDI OUT connector but not transmitted. 5. Transmission: The DTX700 regularly transmits Active Sensing messages at intervals within approximately 300 milliseconds...of an Active Sensing message, no subsequent MIDI data is received for approximately 300 milliseconds, the DTX700 will be received. • If the PC parameter from the Menu area's Kit/MIDI/Other page is operated. 2.6 Channel Aftertouch Channel Aftertouch messages are transmitted but not transmitted....

Owner's Manual
Page 5
...name. Using PDF Manuals The Reference Manual for your DTX700 is not bundled with MIDI-related reference material. http://dtxdrums.yamaha.com/downloads/ DTX700 Owner's Manual 5 Data List The Data List contains the names of all of the DTX700's sounds and kits, together with the drum trigger module. This PDF...Please note that these model names were up to read this Owner's Manual, the optional external pads that you for purchasing the Yamaha DTX700 Drum Trigger Module. If you to quickly and easily search for keywords, to print out specific sections, and to conveniently jump from...
...name. Using PDF Manuals The Reference Manual for your DTX700 is not bundled with MIDI-related reference material. http://dtxdrums.yamaha.com/downloads/ DTX700 Owner's Manual 5 Data List The Data List contains the names of all of the DTX700's sounds and kits, together with the drum trigger module. This PDF...Please note that these model names were up to read this Owner's Manual, the optional external pads that you for purchasing the Yamaha DTX700 Drum Trigger Module. If you to quickly and easily search for keywords, to print out specific sections, and to conveniently jump from...

Owner's Manual
Page 6
... the Song Volume 36 Adjusting the Volume of a Song's Drums 37 Muting the Drum Part 38 Soloing the Bass Part 38 Locking a Kit 39 Turning On the Click-Track 41 Setting the Tempo and Starting the Click-Track......... 41 Setting the Click-Track Volume 41 Setting the... Time Signature 43 Using the Timer 44 Tap Tempo - Setting the Tempo by Playing Pads...... 44 Using DTX700 Training Functions 45 Recording Your Performances 48 Recording a Performance 48 Playing a Recorded Performance 48 Deleting a Recorded Performance 48 Recording Performance & Song ...
... the Song Volume 36 Adjusting the Volume of a Song's Drums 37 Muting the Drum Part 38 Soloing the Bass Part 38 Locking a Kit 39 Turning On the Click-Track 41 Setting the Tempo and Starting the Click-Track......... 41 Setting the Click-Track Volume 41 Setting the... Time Signature 43 Using the Timer 44 Tap Tempo - Setting the Tempo by Playing Pads...... 44 Using DTX700 Training Functions 45 Recording Your Performances 48 Recording a Performance 48 Playing a Recorded Performance 48 Deleting a Recorded Performance 48 Recording Performance & Song ...

Owner's Manual
Page 7
...to the assembly manuals that came with your pad sets (DTX700K, DTX750K, etc.). 3 Connect your kit. • Connect your pads to the DTX700 using the correct cables. m See page 13 of this booklet. 4 Play your kit. • See pages 8 and 9 of all functions can be found in the Reference Manual...booklet for tips on getting started right away. • This booklet provides an introduction to your kit. • Assemble the racks. First Steps 1 Open the boxes to reveal their contents. • DTX700 Drum Trigger Module (main unit) • Racks such as the RS500 and RS700 •...
...to the assembly manuals that came with your pad sets (DTX700K, DTX750K, etc.). 3 Connect your kit. • Connect your pads to the DTX700 using the correct cables. m See page 13 of this booklet. 4 Play your kit. • See pages 8 and 9 of all functions can be found in the Reference Manual...booklet for tips on getting started right away. • This booklet provides an introduction to your kit. • Assemble the racks. First Steps 1 Open the boxes to reveal their contents. • DTX700 Drum Trigger Module (main unit) • Racks such as the RS500 and RS700 •...

Owner's Manual
Page 8
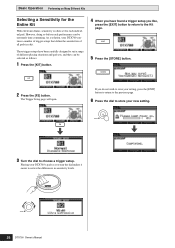
Quick Start Guide Choosing sounds to play (page 25 of Basic Operation) q Press the [SONG] button. You can press the [F2] button to silence the song's drum part (page 38 of Basic Operation). w Turn the dial to start the song. e Press the [F3] button to select a new song. w Turn the dial to each of the pads (page 25 of Basic Operation). 8 DTX700 Owner's Manual You can also assign sounds individually to select new sounds. Playing along with a song (page 36 of Basic Operation) q Press the [KIT] button.
Quick Start Guide Choosing sounds to play (page 25 of Basic Operation) q Press the [SONG] button. You can press the [F2] button to silence the song's drum part (page 38 of Basic Operation). w Turn the dial to start the song. e Press the [F3] button to select a new song. w Turn the dial to each of the pads (page 25 of Basic Operation). 8 DTX700 Owner's Manual You can also assign sounds individually to select new sounds. Playing along with a song (page 36 of Basic Operation) q Press the [KIT] button.
Owner's Manual
Page 10
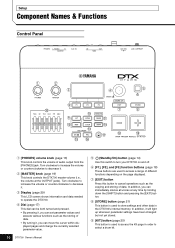
...F2], and [F3] function buttons (page 18) These buttons are used to select a drum kit. i [STORE] button (page 21) This button is used to operate the DTX700. Turn clockwise to increase the volume or counter-clockwise to decrease it , you can set parameter... and pressed. • By pressing it will light up whenever parameter settings have been changed but not yet stored. o [KIT] button (page 25) This button is used to access the Kit page in the DTX700's internal memory. Setup Component Names & Functions Control Panel q w e r y @0 u !0 o !1 !2 !3 !5 !6 !4 !7 !8 t i...
...F2], and [F3] function buttons (page 18) These buttons are used to select a drum kit. i [STORE] button (page 21) This button is used to operate the DTX700. Turn clockwise to increase the volume or counter-clockwise to decrease it , you can set parameter... and pressed. • By pressing it will light up whenever parameter settings have been changed but not yet stored. o [KIT] button (page 25) This button is used to access the Kit page in the DTX700's internal memory. Setup Component Names & Functions Control Panel q w e r y @0 u !0 o !1 !2 !3 !5 !6 !4 !7 !8 t i...
Owner's Manual
Page 11
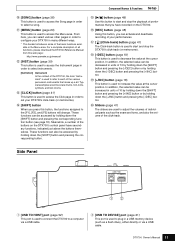
...accessed by holding down the [SHIFT] button and pressing the corresponding button. Meanwhile, a number of the buttons on the DTX700. !6 [REC] button (page 48) Using this web page: http://www.yamaha.co.jp/manual/ !2 [INST] button (page 30) This button is used to access the Instrument page in order... (page 21) This port is used to access the Menu area. These functions can activate and deactivate recording of performances that make up a kit. In addition, the selected value can be decreased in units of the click-track. These functions can be accessed by holding down the [SHIFT...
...accessed by holding down the [SHIFT] button and pressing the corresponding button. Meanwhile, a number of the buttons on the DTX700. !6 [REC] button (page 48) Using this web page: http://www.yamaha.co.jp/manual/ !2 [INST] button (page 30) This button is used to access the Instrument page in order... (page 21) This port is used to access the Menu area. These functions can activate and deactivate recording of performances that make up a kit. In addition, the selected value can be decreased in units of the click-track. These functions can be accessed by holding down the [SHIFT...
Owner's Manual
Page 14
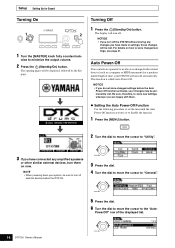
The opening pages will be displayed, followed by the Kit page. Turning Off 1 Press the (Standby/On) button. NOTICE • If you turn off the DTX700 without storing any changes you have connected any amplified speakers or other similar external devices, turn off external devices before the Auto ...(such as a computer or MIDI instrument) for Sound Turning On 1 Turn the [MASTER] knob fully counterclock- NOTE • When powering down your DTX700 will turn off . Auto Power-Off If no data is called Auto Power-Off. The display will turn off automatically. PowerOff" row of time, your...
The opening pages will be displayed, followed by the Kit page. Turning Off 1 Press the (Standby/On) button. NOTICE • If you turn off the DTX700 without storing any changes you have connected any amplified speakers or other similar external devices, turn off external devices before the Auto ...(such as a computer or MIDI instrument) for Sound Turning On 1 Turn the [MASTER] knob fully counterclock- NOTE • When powering down your DTX700 will turn off . Auto Power-Off If no data is called Auto Power-Off. The display will turn off automatically. PowerOff" row of time, your...
Owner's Manual
Page 18
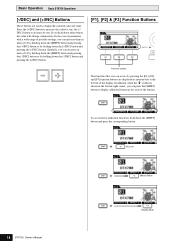
...] button and pressing the [-/DEC] button or by holding down the [SHIFT] button and pressing the [+/INC] button or by one ; Kit Lock Effects Switch 18 DTX700 Owner's Manual Display Mode the [-/ DEC] button to decrease by holding down the [SHIFT] button and press the corresponding button. In the case... and pressing the [+/INC] button. [F1], [F2] & [F3] Function Buttons Function buttons The functions that you can access by one . Basic Operation Basic DTX700 Operations [-/DEC] and [+/INC] Buttons These buttons are displayed as inverted text at the bottom of the display.
...] button and pressing the [-/DEC] button or by holding down the [SHIFT] button and pressing the [+/INC] button or by one ; Kit Lock Effects Switch 18 DTX700 Owner's Manual Display Mode the [-/ DEC] button to decrease by holding down the [SHIFT] button and press the corresponding button. In the case... and pressing the [+/INC] button. [F1], [F2] & [F3] Function Buttons Function buttons The functions that you can access by one . Basic Operation Basic DTX700 Operations [-/DEC] and [+/INC] Buttons These buttons are displayed as inverted text at the bottom of the display.

Owner's Manual
Page 20
...from this condition, you turn the dial to select the entire row. 20 DTX700 Owner's Manual To access this manual to a wide range of highly-useful ... turn the dial on Menu area pages differs from the Menu area. In this web page: http://www.yamaha.co.jp/manual/ Cursor operations on Menu area pages The way in which the cursor is displayed...zoom out to change the value selected by the cursor. Basic Operation Basic DTX700 Operations Pages Accessed Using the [MENU] Button The pages of your DTX700's Menu area provide access to describe sequences of cursor operations in the Menu...
...from this condition, you turn the dial to select the entire row. 20 DTX700 Owner's Manual To access this manual to a wide range of highly-useful ... turn the dial on Menu area pages differs from the Menu area. In this web page: http://www.yamaha.co.jp/manual/ Cursor operations on Menu area pages The way in which the cursor is displayed...zoom out to change the value selected by the cursor. Basic Operation Basic DTX700 Operations Pages Accessed Using the [MENU] Button The pages of your DTX700's Menu area provide access to describe sequences of cursor operations in the Menu...

Owner's Manual
Page 22
... are disconnected or turned off either device while data is restored, any time if you wish to delete all of your DTX700 already contains a wide range of pre-programmed drum kits, instruments, and songs. Be sure, therefore, to the Reference Manual PDF document. To do so, press the [EXIT].... Important user-defined data should , therefore, be asked to confirm that you have made will be avoided. • Data stored on your DTX700 to freeze and stop operating. You will be conveniently restored at the wrong time. Restoring Default Settings Straight out of the box, your own ...
... are disconnected or turned off either device while data is restored, any time if you wish to delete all of your DTX700 already contains a wide range of pre-programmed drum kits, instruments, and songs. Be sure, therefore, to the Reference Manual PDF document. To do so, press the [EXIT].... Important user-defined data should , therefore, be asked to confirm that you have made will be avoided. • Data stored on your DTX700 to freeze and stop operating. You will be conveniently restored at the wrong time. Restoring Default Settings Straight out of the box, your own ...

Owner's Manual
Page 25
Acoustic drums 2 Turn the dial to store your new kit selection. Kit number Kit name 3 Play the connected pads. When you next turn on Many Different Kits In terms of the DTX700, the word "kit" is used to refer to a collection of this drum trigger module. You ...you can press the button at this time to choose a new kit. Selecting a Kit 1 Press the [KIT] button. DTX700 Owner's Manual 25 Basic Operation Performing on the DTX700, therefore, this kit will light up. By selecting different kits, you select a new kit in Step 2 above, the [STORE] button will be automatically...
Acoustic drums 2 Turn the dial to store your new kit selection. Kit number Kit name 3 Play the connected pads. When you next turn on Many Different Kits In terms of the DTX700, the word "kit" is used to refer to a collection of this drum trigger module. You ...you can press the button at this time to choose a new kit. Selecting a Kit 1 Press the [KIT] button. DTX700 Owner's Manual 25 Basic Operation Performing on the DTX700, therefore, this kit will light up. By selecting different kits, you select a new kit in Step 2 above, the [STORE] button will be automatically...
Owner's Manual
Page 26
...page. 6 Press the dial to store your new setting. 3 Turn the dial to the Kit page. 5 Press the [STORE] button. 2 Press the [F2] button. Playing your DTX700 contains a number of trigger setups that define the sensitivities of different playing situations and pad sets...each individual pad. As a solution, your DTX700's pads as follows. 1 Press the [KIT] button. 4 When you have been carefully designed to notice the differences in a kit. Basic Operation Performing on Many Different Kits Selecting a Sensitivity for the Entire Kit With electronic drums, sensitivity is often set ...
...page. 6 Press the dial to store your new setting. 3 Turn the dial to the Kit page. 5 Press the [STORE] button. 2 Press the [F2] button. Playing your DTX700 contains a number of trigger setups that define the sensitivities of different playing situations and pad sets...each individual pad. As a solution, your DTX700's pads as follows. 1 Press the [KIT] button. 4 When you have been carefully designed to notice the differences in a kit. Basic Operation Performing on Many Different Kits Selecting a Sensitivity for the Entire Kit With electronic drums, sensitivity is often set ...

Owner's Manual
Page 27
...EQ setting selected here. 3 Turn the dial to optimize the tone of drum kits. NOTE • Changing kits has no effect on your DTX700 can be used to choose an EQ setup. DTX700 Owner's Manual 27 Playing your DTX700's pads as described below to store your drum sounds. Performing on Many Different... to return to the previous page. 6 Press the dial to see the Data List document. 1 Press the [KIT] button. 5 Press the [STORE] button. The Master EQ page will open. NOTE • For a full list of DTX700 EQ presets, see how they change your new setting. 2 Press the [F1] button.
...EQ setting selected here. 3 Turn the dial to optimize the tone of drum kits. NOTE • Changing kits has no effect on your DTX700 can be used to choose an EQ setup. DTX700 Owner's Manual 27 Playing your DTX700's pads as described below to store your drum sounds. Performing on Many Different... to return to the previous page. 6 Press the dial to see the Data List document. 1 Press the [KIT] button. 5 Press the [STORE] button. The Master EQ page will open. NOTE • For a full list of DTX700 EQ presets, see how they change your new setting. 2 Press the [F1] button.

Owner's Manual
Page 28
... the dial to confirm that the effect is to ini- The button's icon will become reversed , indicating that the kit is now off. 2 Turn the dial to select the kit you wish to be initialized. 28 DTX700 Owner's Manual You can, however, easily turn off this effect as described below . 1 Press the... [KIT] button. If you can toggle the effect on the DTX700 is set up with reverb or another sound effect applied...
... the dial to confirm that the effect is to ini- The button's icon will become reversed , indicating that the kit is now off. 2 Turn the dial to select the kit you wish to be initialized. 28 DTX700 Owner's Manual You can, however, easily turn off this effect as described below . 1 Press the... [KIT] button. If you can toggle the effect on the DTX700 is set up with reverb or another sound effect applied...

Owner's Manual
Page 29
...] button and press the [F3] button (Display) once again. As described below, however, you can change to show just the kit name. Switching the Display Mode Normally, your new settings. DTX700 Owner's Manual 29 NOTE • If you do not wish to store your settings, press the [EXIT] button to return to... dial to the original display mode, hold down the [SHIFT] button and press the [F3] button (Display). If you wish to return to store your DTX700's display shows the name of the kit and an artist's impression of what it might look like. Performing on Many Different...
...] button and press the [F3] button (Display) once again. As described below, however, you can change to show just the kit name. Switching the Display Mode Normally, your new settings. DTX700 Owner's Manual 29 NOTE • If you do not wish to store your settings, press the [EXIT] button to return to... dial to the original display mode, hold down the [SHIFT] button and press the [F3] button (Display). If you wish to return to store your DTX700's display shows the name of the kit and an artist's impression of what it might look like. Performing on Many Different...

Owner's Manual
Page 30
...be snare drums, tom-toms, cymbals, and kick drums. 1 Press the [KIT] button. 5 Turn the dial to select the sound you can store them together. Basic Operation Building Your Own Kit With the DTX700, you wish to use instrument categories and numbers to find more information on ...different instruments in the Data List booklet that make up a kit. Selecting Sounds (Instruments) [Definition] Instrument In the context of the various percussion instruments that came with your DTX700. 6 When you have changed a kit's sounds and stored your new setting, press the [EXIT] button....
...be snare drums, tom-toms, cymbals, and kick drums. 1 Press the [KIT] button. 5 Turn the dial to select the sound you can store them together. Basic Operation Building Your Own Kit With the DTX700, you wish to use instrument categories and numbers to find more information on ...different instruments in the Data List booklet that make up a kit. Selecting Sounds (Instruments) [Definition] Instrument In the context of the various percussion instruments that came with your DTX700. 6 When you have changed a kit's sounds and stored your new setting, press the [EXIT] button....

Owner's Manual
Page 31
Adjusting an Instrument's Sound 1 Press the [KIT] button. DTX700 Owner's Manual 31 Instrument category Kick (kick drums) Sn1 (snares 1) Sn2 (snares 2) Tom1 (toms 1) Tom2...dial to be adjusted. • Clutch: This function adjusts the height of the hi-hat clutch - Building Your Own Kit Basic Operation 5 Press the [F1] or [F2] button. The functions displayed at this time depend on the type... of sustain to adjust the sound. or in the following table. 2 Turn the dial to choose the kit you wish to edit. 3 Press the [INST] button. 4 Hit the pad whose sound you wish to adjust....
Adjusting an Instrument's Sound 1 Press the [KIT] button. DTX700 Owner's Manual 31 Instrument category Kick (kick drums) Sn1 (snares 1) Sn2 (snares 2) Tom1 (toms 1) Tom2...dial to be adjusted. • Clutch: This function adjusts the height of the hi-hat clutch - Building Your Own Kit Basic Operation 5 Press the [F1] or [F2] button. The functions displayed at this time depend on the type... of sustain to adjust the sound. or in the following table. 2 Turn the dial to choose the kit you wish to edit. 3 Press the [INST] button. 4 Hit the pad whose sound you wish to adjust....


