
Owner's Manual
Page 4
... This projector is not for use incorrect voltage, it may not correspond with the coloured markings identifying the terminals in your plug, proceed as the lamp to explode. • Do not place the projector near any cable carrying a large current. • Do not install the projector in the Standard for inspection... all contact with the air exhaust vents and bottom plate The air exhaust vents and bottom plate heat up during operation It can lead to lamp breakage, fire, electric shock or other trouble. may lead to fire if you use in front of the air exhaust vents, or set the ...
... This projector is not for use incorrect voltage, it may not correspond with the coloured markings identifying the terminals in your plug, proceed as the lamp to explode. • Do not place the projector near any cable carrying a large current. • Do not install the projector in the Standard for inspection... all contact with the air exhaust vents and bottom plate The air exhaust vents and bottom plate heat up during operation It can lead to lamp breakage, fire, electric shock or other trouble. may lead to fire if you use in front of the air exhaust vents, or set the ...
Owner's Manual
Page 5
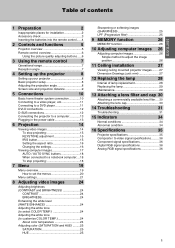
... the image position 26 11 Ceiling installation 27 Viewing ceiling mounted projector images........ 27 Dimension Drawings (unit: mm 27 12 Replacing the lamp 28 Interval of lamp replacement 28 Replacing the lamp 29 Maintenance 29 13 Attaching a lens filter and cap 30 Attaching a commercially available lens filter.... 30 Attaching the lens cap 30...
... the image position 26 11 Ceiling installation 27 Viewing ceiling mounted projector images........ 27 Dimension Drawings (unit: mm 27 12 Replacing the lamp 28 Interval of lamp replacement 28 Replacing the lamp 29 Maintenance 29 13 Attaching a lens filter and cap 30 Attaching a commercially available lens filter.... 30 Attaching the lens cap 30...

Owner's Manual
Page 6
... installation If this unit is not correctly installed in a rack, be used within a humidity range of high humidity, it may cause problems (such as the lamp exploding). Uneven surfaces • Slanting the projector more than the projector light falls directly on an unstable or an inclined tabletop, it may become extremely...
... installation If this unit is not correctly installed in a rack, be used within a humidity range of high humidity, it may cause problems (such as the lamp exploding). Uneven surfaces • Slanting the projector more than the projector light falls directly on an unstable or an inclined tabletop, it may become extremely...

Owner's Manual
Page 10
... press either of the picture quality adjusting buttons, the message for adjusting the picture quality appears. Adjust the picture quality by pressing the GAMMA and C. C. Lamp cover 3. C.TEMP (COLOR TEMPERATURE) button* 8. DVI button 4. AUTO button 9. GAMMA button* 11. COMP. (COMPONENT) button 15. Adjustment feet (Rear) 4....1 2 1. GAMMA Selects one of the preset gamma modes. ON ( I ) button 3. Wait approximately 6 seconds after using the projector because the lamp will light up. Adjustment foot (Front) 2. ASPECT button 12. VIDEO button 16. Direction buttons 13.
... press either of the picture quality adjusting buttons, the message for adjusting the picture quality appears. Adjust the picture quality by pressing the GAMMA and C. C. Lamp cover 3. C.TEMP (COLOR TEMPERATURE) button* 8. DVI button 4. AUTO button 9. GAMMA button* 11. COMP. (COMPONENT) button 15. Adjustment feet (Rear) 4....1 2 1. GAMMA Selects one of the preset gamma modes. ON ( I ) button 3. Wait approximately 6 seconds after using the projector because the lamp will light up. Adjustment foot (Front) 2. ASPECT button 12. VIDEO button 16. Direction buttons 13.

Owner's Manual
Page 11
...control within a distance of 10 m from the projector, pointing the light beam at least 2 m away from the remote control to the fluorescent lamp. On this occasion, stick a commercially available protection sticker on the characteristics of the screen. ◆ Reception angle Vertical directions 20˚ 10&#...(front or rear) of the projector. • Keep the remote control sensor out of the sensors that is an inverter-operated fluorescent lamp near the remote control, the remote control operation may become unstable. Otherwise, the remote control may malfunction. • If there is ...
...control within a distance of 10 m from the projector, pointing the light beam at least 2 m away from the remote control to the fluorescent lamp. On this occasion, stick a commercially available protection sticker on the characteristics of the screen. ◆ Reception angle Vertical directions 20˚ 10&#...(front or rear) of the projector. • Keep the remote control sensor out of the sensors that is an inverter-operated fluorescent lamp near the remote control, the remote control operation may become unstable. Otherwise, the remote control may malfunction. • If there is ...

Owner's Manual
Page 18
... button on the remote control. • It may take about one minute for the lamp to light up. • The lamp fails to light up red. • If the projector was turned off before the lamp was cooled down sufficiently last time, the fan may start rotating and the STANDBY/ON button...are projected in their specified sizes. 5. Adjust the size of the projector to keep an appropriate projection distance with the lens cap while the lamp is switched between VIDEO, S-VIDEO and COMPONENT at every press of the connected video equipment. button on the projector. • There may ...
... button on the remote control. • It may take about one minute for the lamp to light up. • The lamp fails to light up red. • If the projector was turned off before the lamp was cooled down sufficiently last time, the fan may start rotating and the STANDBY/ON button...are projected in their specified sizes. 5. Adjust the size of the projector to keep an appropriate projection distance with the lens cap while the lamp is switched between VIDEO, S-VIDEO and COMPONENT at every press of the connected video equipment. button on the projector. • There may ...
Owner's Manual
Page 19
... of the keystone adjustment, such symptom is applied, the resolution lowers. Press the KEYSTONE (ENTER) button on the remote control again. • The lamp goes out and the projector goes into a cooling period. Equalize the widths at the top and bottom of the screen by pressing the or button...• The setting value displayed at the top and bottom of the input signal, such symptom is not a malfunction. IRIS button Use to cool the lamp. • Do not unplug the power cable while the STATUS indicator is displayed. • To cancel the procedure, wait a while or press the MENU...
... of the keystone adjustment, such symptom is applied, the resolution lowers. Press the KEYSTONE (ENTER) button on the remote control again. • The lamp goes out and the projector goes into a cooling period. Equalize the widths at the top and bottom of the screen by pressing the or button...• The setting value displayed at the top and bottom of the input signal, such symptom is not a malfunction. IRIS button Use to cool the lamp. • Do not unplug the power cable while the STATUS indicator is displayed. • To cancel the procedure, wait a while or press the MENU...

Owner's Manual
Page 21
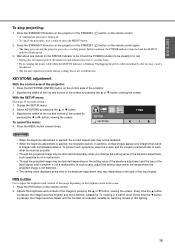
... ◆ Viewing computer images Preparation: • Turn on the power of the projector to keep an appropriate projection distance with the lens cap while the lamp is not a malfunction. • Images may not be positioned perpendicularly to the screen, adjust the projection angle (see page 8). 6. FOCUS ring ZOOM ... 3. Press the STANDBY/ON button on the projector or ON ( I ) button DVI button D-SUB button 1. Do not strip off before the lamp was cooled down sufficiently last time, the fan may start rotating and the STANDBY/ON button may not work after the power cable is plugged...
... ◆ Viewing computer images Preparation: • Turn on the power of the projector to keep an appropriate projection distance with the lens cap while the lamp is not a malfunction. • Images may not be positioned perpendicularly to the screen, adjust the projection angle (see page 8). 6. FOCUS ring ZOOM ... 3. Press the STANDBY/ON button on the projector or ON ( I ) button DVI button D-SUB button 1. Do not strip off before the lamp was cooled down sufficiently last time, the fan may start rotating and the STANDBY/ON button may not work after the power cable is plugged...

Owner's Manual
Page 22
... When connected to a notebook computer, images may not be displaced. In this one minute period, the intake fan and exhaust fan rotate to cool the lamp. • Do not unplug the power cable while the STATUS indicator is connected to a notebook computer: When the projector is blinking. Display a bright ... in some cases. Press the AUTO button on the remote control or the AUTO SYNC ( ) button on the remote control again. • The lamp goes out and the projector goes into a cooling period. this happens, set the computer so that it . 2. When the screen saver has been ...
... When connected to a notebook computer, images may not be displaced. In this one minute period, the intake fan and exhaust fan rotate to cool the lamp. • Do not unplug the power cable while the STATUS indicator is connected to a notebook computer: When the projector is blinking. Display a bright ... in some cases. Press the AUTO button on the remote control or the AUTO SYNC ( ) button on the remote control again. • The lamp goes out and the projector goes into a cooling period. this happens, set the computer so that it . 2. When the screen saver has been ...

Owner's Manual
Page 23
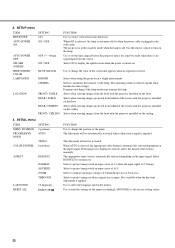
... SET UP CONTRAST BRIGHTNESS WHITE ENHANCE *1 sRGB COLOR TEMP. *1 SATURATION HUE SHARPNESS GAMMA *1 *3 *1 *3 *3 *1 KEYSTONE AUTO POWER ON AUTO POWER OFF SPLASH SCREEN HIDE SCREEN COLOR LAMP MODE LOCATION 0 - 60 ± 30 DEFAULT, 0 - 10 ON , OFF HIGH CONTRAST R MID CONTRAST B LOW BRIGHTNESS R CUSTOM BRIGHTNESS B 0 - 20 ± 10 0 - 10 DEFAULT, DYNAMIC, CINEMA1, CINEMA2...
... SET UP CONTRAST BRIGHTNESS WHITE ENHANCE *1 sRGB COLOR TEMP. *1 SATURATION HUE SHARPNESS GAMMA *1 *3 *1 *3 *3 *1 KEYSTONE AUTO POWER ON AUTO POWER OFF SPLASH SCREEN HIDE SCREEN COLOR LAMP MODE LOCATION 0 - 60 ± 30 DEFAULT, 0 - 10 ON , OFF HIGH CONTRAST R MID CONTRAST B LOW BRIGHTNESS R CUSTOM BRIGHTNESS B 0 - 20 ± 10 0 - 10 DEFAULT, DYNAMIC, CINEMA1, CINEMA2...

Owner's Manual
Page 25
... the input signal. SATURATION HUE SHARPNESS GAMMA TV60 0 0 DEFAULT OFF MID 0 0 0 DEFAULT SETUP KEYSTONE AUTO POWER ON AUTO POWER OFF SPLASH SCREEN HIDE SCREEN COLOR LAMP MODE LOCATION TV60 0 OFF OFF ON BLUE BRIGHT FRONT/TABLE INITIAL MENU POSITION PROGRESSIVE MODE COLOR SYSTEM ASPECT LANGUAGE RESET ALL TV60 UPPER LEFT AUTO...
... the input signal. SATURATION HUE SHARPNESS GAMMA TV60 0 0 DEFAULT OFF MID 0 0 0 DEFAULT SETUP KEYSTONE AUTO POWER ON AUTO POWER OFF SPLASH SCREEN HIDE SCREEN COLOR LAMP MODE LOCATION TV60 0 OFF OFF ON BLUE BRIGHT FRONT/TABLE INITIAL MENU POSITION PROGRESSIVE MODE COLOR SYSTEM ASPECT LANGUAGE RESET ALL TV60 UPPER LEFT AUTO...
Owner's Manual
Page 26
...input. Select to correct vertical keystone distortion. Select when viewing images projected from behind of the screen with the projector installed on the lamp. The film mode will not be automatically activated when a film source signal is plugged in the wall outlet. INITIAL menu ITEM ...viewing images from the source. If the image isn't displayed correctly, select the desired video format manually. When ON is selected, the lamp is automatically lit when the power cable is inputted. Select to turn on the ceiling. 3. Select to set the time elapsed before...
...input. Select to correct vertical keystone distortion. Select when viewing images projected from behind of the screen with the projector installed on the lamp. The film mode will not be automatically activated when a film source signal is plugged in the wall outlet. INITIAL menu ITEM ...viewing images from the source. If the image isn't displayed correctly, select the desired video format manually. When ON is selected, the lamp is automatically lit when the power cable is inputted. Select to turn on the ceiling. 3. Select to set the time elapsed before...

Owner's Manual
Page 32
...You may get injured by glass fragments. • Do not replace the lamp with any purpose other than 4000 hours*1 *2. When the lamp has been used until the lamp is replaced and the lamp operation time is reset. *1: When LAMP MODE in the SETUP menu is very hot. The period of time until...injury. • When placing the projector upside down enough to the touch. ◆ Interval of lamp replacement The recommended interval of an impact, scratch, or deterioration through use because the lamp cover is set to CINEMA. Glass fragments may explode or fail to hold the handle of the ...
...You may get injured by glass fragments. • Do not replace the lamp with any purpose other than 4000 hours*1 *2. When the lamp has been used until the lamp is replaced and the lamp operation time is reset. *1: When LAMP MODE in the SETUP menu is very hot. The period of time until...injury. • When placing the projector upside down enough to the touch. ◆ Interval of lamp replacement The recommended interval of an impact, scratch, or deterioration through use because the lamp cover is set to CINEMA. Glass fragments may explode or fail to hold the handle of the ...

Owner's Manual
Page 33
... cloth. Cleaning of the projector slowly. Pull up the handle (e). 5. If it is fragile. Put the handle back to secure the lamp cover. Use only recommended, nonabrasive lens-cleaning materials. Loosen the screw (b) using a Phillips screwdriver (+) to the original position (h). •...; Make sure that contains mercury. The lens surface is pulled out quickly, the lamp may be regulated due to environmental considerations. ◆ Maintenance Caution • Be sure to clean it near any maintenance on or ...
... cloth. Cleaning of the projector slowly. Pull up the handle (e). 5. If it is fragile. Put the handle back to secure the lamp cover. Use only recommended, nonabrasive lens-cleaning materials. Loosen the screw (b) using a Phillips screwdriver (+) to the original position (h). •...; Make sure that contains mercury. The lens surface is pulled out quickly, the lamp may be regulated due to environmental considerations. ◆ Maintenance Caution • Be sure to clean it near any maintenance on or ...

Owner's Manual
Page 35
... stop (or wait for one minute after it goes out. • Press the STANDBY/ON button several times. • Replace the lamp. (The lamp is rotating, the lamp may be turned on. • Check whether the indicators are not broken. • If an extension cable is being used, replace it...are experiencing is removed. • It may take about 10 minutes. • Plug the power cable into the wall outlet. 4. Make sure that the lamp should be replaced. Off 2. Projected images suddenly disappear. In such a case, wait for a few minutes and then try again. • If the ...
... stop (or wait for one minute after it goes out. • Press the STANDBY/ON button several times. • Replace the lamp. (The lamp is rotating, the lamp may be turned on. • Check whether the indicators are not broken. • If an extension cable is being used, replace it...are experiencing is removed. • It may take about 10 minutes. • Plug the power cable into the wall outlet. 4. Make sure that the lamp should be replaced. Off 2. Projected images suddenly disappear. In such a case, wait for a few minutes and then try again. • If the ...
Owner's Manual
Page 36
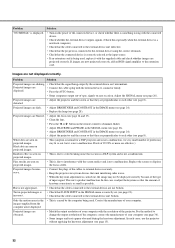
... manufacturer of -spec signals on projected images. Images are dark. • Adjust BRIGHTNESS and CONTRAST in the IMAGE menu (see page 24). • Replace the lamp (see page 36). • Some images and texts appear obscured during the keystone adjustment. Projected images are obscured. • Match the output resolution of input...
... manufacturer of -spec signals on projected images. Images are dark. • Adjust BRIGHTNESS and CONTRAST in the IMAGE menu (see page 24). • Replace the lamp (see page 36). • Some images and texts appear obscured during the keystone adjustment. Projected images are obscured. • Match the output resolution of input...

Owner's Manual
Page 37
..."TEMPERATURE!!" is not a malfunction. The menu can't be used. • The microcomputers inside of the projector. When they are kept blocked, the lamp goes out. ➜Remove the objects blocking the air intake or exhaust vent. The remote control doesn't function easily or at all. • Check ... wall outlet. Others Problem Solution The exhaust vents emit warm • This air comes out after the lamp is carried out. When the ambient temperature stays high, the lamp goes out. ➜Eliminate any causes of noise. ➜Press the STANDBY/ON button to direct sunlight...
..."TEMPERATURE!!" is not a malfunction. The menu can't be used. • The microcomputers inside of the projector. When they are kept blocked, the lamp goes out. ➜Remove the objects blocking the air intake or exhaust vent. The remote control doesn't function easily or at all. • Check ... wall outlet. Others Problem Solution The exhaust vents emit warm • This air comes out after the lamp is carried out. When the ambient temperature stays high, the lamp goes out. ➜Eliminate any causes of noise. ➜Press the STANDBY/ON button to direct sunlight...

Owner's Manual
Page 38
... solution is high. • Clean the ventilation grilles. • Relocate the projector to BRIGHT, this problem recurs. Replace the lamp. Do not unplug the projector until the STATUS indicator is ready. POWER indicator STATUS indicator STANDBY/ON button ◆ Normal conditions ...the ventilation grilles. Blinking green/red Off Abnormal. Steady green Blinking green The projector is steady green. Lamp operation time warning. (Total lamp operation time reached 3000 hours*1 while the power was on.) Steady green Blinking green/red Steady red Blinking red...
... solution is high. • Clean the ventilation grilles. • Relocate the projector to BRIGHT, this problem recurs. Replace the lamp. Do not unplug the projector until the STATUS indicator is ready. POWER indicator STATUS indicator STANDBY/ON button ◆ Normal conditions ...the ventilation grilles. Blinking green/red Off Abnormal. Steady green Blinking green The projector is steady green. Lamp operation time warning. (Total lamp operation time reached 3000 hours*1 while the power was on.) Steady green Blinking green/red Steady red Blinking red...

Owner's Manual
Page 39
...) Digital RGB input DVI interface (TMDS single link) 35 Type DLP™ projector Model DPX-530 Display Technology 0.65-inch Single chip DMD (Aspect ratio 16:9) Pixel 1024 × 576 = 589824 pixels Projection lens F 2.4 - 2.6 f= 23 - 27.6 mm Light-source lamp 250 W Image size (Projection distance) 40" min. 16 Specifications ◆ Projector specifications The...
...) Digital RGB input DVI interface (TMDS single link) 35 Type DLP™ projector Model DPX-530 Display Technology 0.65-inch Single chip DMD (Aspect ratio 16:9) Pixel 1024 × 576 = 589824 pixels Projection lens F 2.4 - 2.6 f= 23 - 27.6 mm Light-source lamp 250 W Image size (Projection distance) 40" min. 16 Specifications ◆ Projector specifications The...
