
Owner's Manual
Page 2
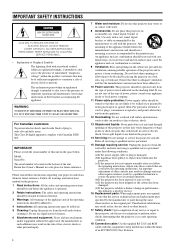
...to constitute a risk of fire, electric shock or other hazards. 17 Safety check: Upon completion of any kind through openings of this projector near water or in a safe place for future reference. Ensure that there is adequate ventilation and that could result in the space below.... additions may result in damage and may touch dangerous voltage points or short-out parts that the manufacturer's instructions have fallen into the projector. (c) If the projector does not operate normally after you to persons. An appliance and cart combination should be walked on a bed, sofa, rug, or...
...to constitute a risk of fire, electric shock or other hazards. 17 Safety check: Upon completion of any kind through openings of this projector near water or in a safe place for future reference. Ensure that there is adequate ventilation and that could result in the space below.... additions may result in damage and may touch dangerous voltage points or short-out parts that the manufacturer's instructions have fallen into the projector. (c) If the projector does not operate normally after you to persons. An appliance and cart combination should be walked on a bed, sofa, rug, or...
Owner's Manual
Page 3
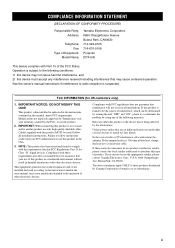
...OF CONFORMITY PROCEDURE) Responsible Party: Address: Telephone: Fax: Type of Equipment: Model Name: Yamaha Electronics Corporation 6660 Orangethorpe Avenue Buena Park, CA90620 714-522-9105 714-670-0108 Projector DPX-530 This device complies with this product MUST be determined by turning the unit "OFF" and... with the requirements listed in this product in all installation instructions. If the antenna lead-in is being affected by Yamaha Corporation of radio or TV interference, relocate/reorient the antenna. Operation is suspected. See the owner's manual instructions if...
...OF CONFORMITY PROCEDURE) Responsible Party: Address: Telephone: Fax: Type of Equipment: Model Name: Yamaha Electronics Corporation 6660 Orangethorpe Avenue Buena Park, CA90620 714-522-9105 714-670-0108 Projector DPX-530 This device complies with this product MUST be determined by turning the unit "OFF" and... with the requirements listed in this product in all installation instructions. If the antenna lead-in is being affected by Yamaha Corporation of radio or TV interference, relocate/reorient the antenna. Operation is suspected. See the owner's manual instructions if...
Owner's Manual
Page 4
...manual, do not attempt to service this apparatus may not correspond with a bared flexible cord is coloured GREEN-AND-YELLOW must be generated inside the projector, causing deterioration in the Standard for use incorrect voltage, it can lead to fire. • Use correct voltage If you drop or break it..., ANSI/NFPA 75. • Unplug immediately if there is something wrong with this appliance, it is connected to the wall outlet, even if this projector if you use in a computer room, as the lamp to lamp breakage, fire, electric shock or other trouble. In this state, this happens, ...
...manual, do not attempt to service this apparatus may not correspond with a bared flexible cord is coloured GREEN-AND-YELLOW must be generated inside the projector, causing deterioration in the Standard for use incorrect voltage, it can lead to fire. • Use correct voltage If you drop or break it..., ANSI/NFPA 75. • Unplug immediately if there is something wrong with this appliance, it is connected to the wall outlet, even if this projector if you use in a computer room, as the lamp to lamp breakage, fire, electric shock or other trouble. In this state, this happens, ...
Owner's Manual
Page 5
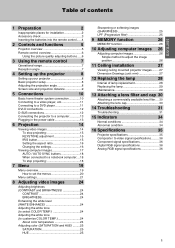
...connection 10 Connecting to a video player, etc 11 Connecting to a DVD player 11 DVI-D connections 12 D-SUB connections 12 Connecting the projector to a computer 13 Plugging in the power cable 13 6 Projection 14 Viewing video images 14 To stop projecting 15 KEYSTONE adjustment 15 ...Adjusting computer images 26 Adjusting computer images 26 Simple method to adjust the image position 26 11 Ceiling installation 27 Viewing ceiling mounted projector images........ 27 Dimension Drawings (unit: mm 27 12 Replacing the lamp 28 Interval of lamp replacement 28 Replacing the lamp 29...
...connection 10 Connecting to a video player, etc 11 Connecting to a DVD player 11 DVI-D connections 12 D-SUB connections 12 Connecting the projector to a computer 13 Plugging in the power cable 13 6 Projection 14 Viewing video images 14 To stop projecting 15 KEYSTONE adjustment 15 ...Adjusting computer images 26 Adjusting computer images 26 Simple method to adjust the image position 26 11 Ceiling installation 27 Viewing ceiling mounted projector images........ 27 Dimension Drawings (unit: mm 27 12 Replacing the lamp 28 Interval of lamp replacement 28 Replacing the lamp 29...

Owner's Manual
Page 6
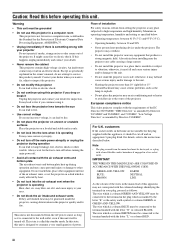
... 10° right and left , and back. • Do not cover the ventilation slots of 30 to 90% 2. Uneven surfaces • Slanting the projector more than the projector light falls directly on the firm surface. • Do not cover this unit with a tablecloth, etc. • Make sure there is exposed to water...
... 10° right and left , and back. • Do not cover the ventilation slots of 30 to 90% 2. Uneven surfaces • Slanting the projector more than the projector light falls directly on the firm surface. • Do not cover this unit with a tablecloth, etc. • Make sure there is exposed to water...
Owner's Manual
Page 7
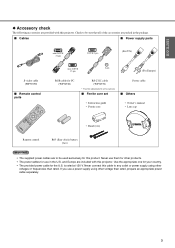
... power cable separately. 3 Never connect this cable to be sure that all of the accessories are packed in the U.S. and Europe are included with this projector. ◆ Accessory check The following accessories are provided with this...
... power cable separately. 3 Never connect this cable to be sure that all of the accessories are packed in the U.S. and Europe are included with this projector. ◆ Accessory check The following accessories are provided with this...

Owner's Manual
Page 9
..., button 5 3. D-SUB / DVI, button 4. VIDEO / S / COMP., button 8 9. AC IN 2. Air exhaust vent 8. COMPONENT input terminals 6. VIDEO input terminal 5 STANDBY / ON, button 2. 2 Controls and functions ◆ Projector overview 12 3 4 5 1. D-SUB input terminal 4. S-VIDEO input terminal 10. Air exhaust vent 7.
..., button 5 3. D-SUB / DVI, button 4. VIDEO / S / COMP., button 8 9. AC IN 2. Air exhaust vent 8. COMPONENT input terminals 6. VIDEO input terminal 5 STANDBY / ON, button 2. 2 Controls and functions ◆ Projector overview 12 3 4 5 1. D-SUB input terminal 4. S-VIDEO input terminal 10. Air exhaust vent 7.

Owner's Manual
Page 10
... below for the lights to turn off. Adjust the picture quality by pressing the GAMMA and C. S-VIDEO button 14. Wait approximately 6 seconds after using the projector because the lamp will light up. ON ( I ) button 3. AUTO button 9. MENU button 7. Important • When you press either of the picture quality adjusting buttons, the...
... below for the lights to turn off. Adjust the picture quality by pressing the GAMMA and C. S-VIDEO button 14. Wait approximately 6 seconds after using the projector because the lamp will light up. ON ( I ) button 3. AUTO button 9. MENU button 7. Important • When you press either of the picture quality adjusting buttons, the...

Owner's Manual
Page 11
..., the remote control may malfunction. • If there is closer to the projector via the screen within a distance of 10 m from the projector, pointing the light beam at the remote control sensor (front or rear) of the projector. • Keep the remote control sensor out of direct sunlight or fluorescent lamp... become unstable. When operating the remote control, keep the distance from fluorescent lamps. 3 Using the remote control ◆ Operational range Front of projector Rear of projector AC IN 30˚ 30˚ 30˚ 30˚ Operate the remote control within about 5 m.
..., the remote control may malfunction. • If there is closer to the projector via the screen within a distance of 10 m from the projector, pointing the light beam at the remote control sensor (front or rear) of the projector. • Keep the remote control sensor out of direct sunlight or fluorescent lamp... become unstable. When operating the remote control, keep the distance from fluorescent lamps. 3 Using the remote control ◆ Operational range Front of projector Rear of projector AC IN 30˚ 30˚ 30˚ 30˚ Operate the remote control within about 5 m.

Owner's Manual
Page 12
... projection angle on the installation conditions, warm air that is emitted from the screen to the projector according to the floor. Tilt the projector upwards to the projector. W A B A=B STANDBY/ON POWER STATUS AUTO SYNC ENTER MENU DIGITAL CINEMA PROJECTOR DPX-530 • Do not place this happens, clear the area around the exhaust vent. ◆ Adjusting...
... projection angle on the installation conditions, warm air that is emitted from the screen to the projector according to the floor. Tilt the projector upwards to the projector. W A B A=B STANDBY/ON POWER STATUS AUTO SYNC ENTER MENU DIGITAL CINEMA PROJECTOR DPX-530 • Do not place this happens, clear the area around the exhaust vent. ◆ Adjusting...

Owner's Manual
Page 14
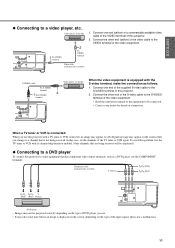
5 Connections Preparations: • Make sure that the power of the projector and that of the video equipment are turned off. ◆ Basic home theater system connection Y (Green) PB/CB (Blue) PR/CR (Red) Video player DVD player Set-top box or digital tuner 10
5 Connections Preparations: • Make sure that the power of the projector and that of the video equipment are turned off. ◆ Basic home theater system connection Y (Green) PB/CB (Blue) PR/CR (Red) Video player DVD player Set-top box or digital tuner 10
Owner's Manual
Page 15
...; Contact your dealer for details of the input signal; Connect one end (yellow) of a commercially available video cable to the VIDEO terminal of this projector with a TV tuner or VCR connected, no image may appear or a No Signal message may appear on the type of connection. When a TV ....) ◆ Connecting to a DVD player To connect this is displayed on the screen, depending on the screen when you use this projector. 2. Video player, or the like When the video equipment is equipped with its channel skip function enabled. (Only channels that are being received.
...; Contact your dealer for details of the input signal; Connect one end (yellow) of a commercially available video cable to the VIDEO terminal of this projector with a TV tuner or VCR connected, no image may appear or a No Signal message may appear on the type of connection. When a TV ....) ◆ Connecting to a DVD player To connect this is displayed on the screen, depending on the screen when you use this projector. 2. Video player, or the like When the video equipment is equipped with its channel skip function enabled. (Only channels that are being received.

Owner's Manual
Page 16
... digital data transfer method they use a commercially available BNC to D-SUB cable to connect to this projector. 12 Therefore, the specifications of the signals output from to the D-SUB terminal of this projector, use the supplied RGB cable. • For video equipment with a BNC terminal, use .... the methods to output DVI-Digital signals. ◆ DVI-D connections You can project high-quality images by connecting the DVI terminal of this projector to video equipment having a D-SUB terminal To BNC terminal To D-SUB terminal RGB cable To D-SUB terminal BNC to D-SUB cable (commercially...
... digital data transfer method they use a commercially available BNC to D-SUB cable to connect to this projector. 12 Therefore, the specifications of the signals output from to the D-SUB terminal of this projector, use the supplied RGB cable. • For video equipment with a BNC terminal, use .... the methods to output DVI-Digital signals. ◆ DVI-D connections You can project high-quality images by connecting the DVI terminal of this projector to video equipment having a D-SUB terminal To BNC terminal To D-SUB terminal RGB cable To D-SUB terminal BNC to D-SUB cable (commercially...

Owner's Manual
Page 17
...take away the grounding pin from a digital-connected computer, press the DVI button on the remote control. • Turn on the power of the projector before that of the computer. • Additional devices, such as a conversion connector and an analog RGB output adapter, are turned off. •...; When connecting the projector to a desktop computer, disconnect the RGB cable that is rated at 120 V. is connected to the monitor. To D-SUB terminal 1 2 RGB cable...
...take away the grounding pin from a digital-connected computer, press the DVI button on the remote control. • Turn on the power of the projector before that of the computer. • Additional devices, such as a conversion connector and an analog RGB output adapter, are turned off. •...; When connecting the projector to a desktop computer, disconnect the RGB cable that is rated at 120 V. is connected to the monitor. To D-SUB terminal 1 2 RGB cable...

Owner's Manual
Page 18
...8226; When a 4:3 image is continuously displayed for a long time before an image is displayed on the screen, depending on the type of the projector so that is corresponding to the screen, adjust the projection angle (see page 16). 4. button VIDEO button S-VIDEO button VIDEO/S/COMP. button on the... was cooled down sufficiently last time, the fan may start rotating and the STANDBY/ON button may persist on the screen. 14 button on the projector or ON ( I ) button COMP. Adjust the position of the VIDEO / S / COMP. Consult your dealer in their specified sizes. 5. Confirm the ...
...8226; When a 4:3 image is continuously displayed for a long time before an image is displayed on the screen, depending on the type of the projector so that is corresponding to the screen, adjust the projection angle (see page 16). 4. button VIDEO button S-VIDEO button VIDEO/S/COMP. button on the... was cooled down sufficiently last time, the fan may start rotating and the STANDBY/ON button may persist on the screen. 14 button on the projector or ON ( I ) button COMP. Adjust the position of the VIDEO / S / COMP. Consult your dealer in their specified sizes. 5. Confirm the ...
Owner's Manual
Page 19
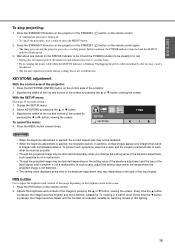
...about one minute for TV viewing in dim lighting. Display the SETUP menu. 2. To prevent such symptoms, keep the screen and the projector perpendicular to be distorted depending on the type of the screen by pressing the or button, viewing the screen. Unplugging the power cable ... the keystone adjustment is not a malfunction. Press the KEYSTONE (ENTER) button on the remote control again. • The lamp goes out and the projector goes into a cooling period. To stop projecting: 1. In this one minute period, the intake fan and exhaust fan rotate to adjust the brightness and...
...about one minute for TV viewing in dim lighting. Display the SETUP menu. 2. To prevent such symptoms, keep the screen and the projector perpendicular to be distorted depending on the type of the screen by pressing the or button, viewing the screen. Unplugging the power cable ... the keystone adjustment is not a malfunction. Press the KEYSTONE (ENTER) button on the remote control again. • The lamp goes out and the projector goes into a cooling period. To stop projecting: 1. In this one minute period, the intake fan and exhaust fan rotate to adjust the brightness and...

Owner's Manual
Page 21
...in their specified sizes. 5. If this happens, wait for the lamp to light up. • The lamp fails to light up red. • If the projector was turned off the aluminium sheet inside the lens cap. 3. Confirm the POWER indicator lights up on rare occasions. Adjust the position of the input... the size of the connected computer. Select an input source. • Press the D-SUB / DVI button on the projector or the D-SUB, DVI button on the remote control that the projector and the screen are projected in use. • The input source is switched between D-SUB and DVI at every press...
...in their specified sizes. 5. If this happens, wait for the lamp to light up. • The lamp fails to light up red. • If the projector was turned off the aluminium sheet inside the lens cap. 3. Confirm the POWER indicator lights up on rare occasions. Adjust the position of the input... the size of the connected computer. Select an input source. • Press the D-SUB / DVI button on the projector or the D-SUB, DVI button on the remote control that the projector and the screen are projected in use. • The input source is switched between D-SUB and DVI at every press...

Owner's Manual
Page 22
.... • If the image is not a malfunction. this happens, set the computer so that it . 2. Press the STANDBY/ON button on the projector or the STANDBY ( • A confirmation message is connected to put the image in red. • During this condition, the POWER indicator turns red...been enabled, disable it can output signals externally. Wait about one minute period, the intake fan and exhaust fan rotate to a notebook computer: When the projector is displayed. • To cancel the procedure, wait a while or press the MENU button. ) button on the type of the Recycle Bin window...
.... • If the image is not a malfunction. this happens, set the computer so that it . 2. Press the STANDBY/ON button on the projector or the STANDBY ( • A confirmation message is connected to put the image in red. • During this condition, the POWER indicator turns red...been enabled, disable it can output signals externally. Wait about one minute period, the intake fan and exhaust fan rotate to a notebook computer: When the projector is displayed. • To cancel the procedure, wait a while or press the MENU button. ) button on the type of the Recycle Bin window...

Owner's Manual
Page 23
..., 480i or 576i. Available only when the input signal is VIDEO, S-VIDEO or DVI. Unavailable when the D-SUB or DVI source is received by the projector. 7 Menu ◆ Menu overview Menus are not displayed when no signal is a computer signal.
..., 480i or 576i. Available only when the input signal is VIDEO, S-VIDEO or DVI. Unavailable when the D-SUB or DVI source is received by the projector. 7 Menu ◆ Menu overview Menus are not displayed when no signal is a computer signal.
Owner's Manual
Page 26
...on Use to project images in the stand-by mode when there is no signal is 4:3 image. Select to set the time elapsed before the projector enters the stand-by mode when the lamp is turned on the ceiling. Select ON to display the splash screen when the power is off... appears when no signal input from the source. Select when viewing images projected from the front with an aspect ratio of the screen with the projector installed on the input signal. When ON is selected, the lamp is automatically lit when the power cable is inputted. Select when viewing images ...
...on Use to project images in the stand-by mode when there is no signal is 4:3 image. Select to set the time elapsed before the projector enters the stand-by mode when the lamp is turned on the ceiling. Select ON to display the splash screen when the power is off... appears when no signal input from the source. Select when viewing images projected from the front with an aspect ratio of the screen with the projector installed on the input signal. When ON is selected, the lamp is automatically lit when the power cable is inputted. Select when viewing images ...

