Operation Manual
Page 8
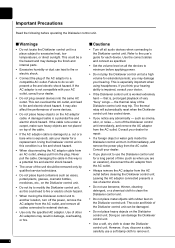
... - Consult your hearing. This could lead to fire or electric shock hazard. • When moving the Disklavier control unit to another location, turn off all audio devices when connecting to a compatible AC outlet. cut or a bare wire is , prolonged playback of the Disklavier control unit may result in damage, overheating, or...
... - Consult your hearing. This could lead to fire or electric shock hazard. • When moving the Disklavier control unit to another location, turn off all audio devices when connecting to a compatible AC outlet. cut or a bare wire is , prolonged playback of the Disklavier control unit may result in damage, overheating, or...
Operation Manual
Page 10
... Desired Piano Part .......... 46 Adjusting the Volume Balance among the Keyboard Playing, Ensemble Sound, and Software Playback 48 Adjusting the Pitch of Audio 50 Adjusting the L/R Balance of Audio 50 Using the Timer Play 51 Skipping the Blank Part at the Beginning of a Song 55 SmartKey™ Playback 56 Inactivating the Key...
... Desired Piano Part .......... 46 Adjusting the Volume Balance among the Keyboard Playing, Ensemble Sound, and Software Playback 48 Adjusting the Pitch of Audio 50 Adjusting the L/R Balance of Audio 50 Using the Timer Play 51 Skipping the Blank Part at the Beginning of a Song 55 SmartKey™ Playback 56 Inactivating the Key...
Operation Manual
Page 11
... of Songs 107 Restoring the Backups 108 Chapter 12 Enhancing the Disklavier by Hooking Up Other Devices Hooking Up Audio Equipment 110 Connecting Monitor Speakers 111 Setting the Disklavier Control Unit for Audio Data Reception/Transmission 113 Hooking Up MIDI Devices 115 Setting the Disklavier Control Unit for MIDI Data Reception 116...
... of Songs 107 Restoring the Backups 108 Chapter 12 Enhancing the Disklavier by Hooking Up Other Devices Hooking Up Audio Equipment 110 Connecting Monitor Speakers 111 Setting the Disklavier Control Unit for Audio Data Reception/Transmission 113 Hooking Up MIDI Devices 115 Setting the Disklavier Control Unit for MIDI Data Reception 116...

Operation Manual
Page 12
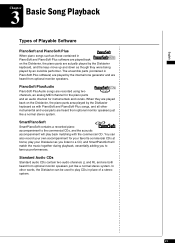
...to preserve your valuable data. • Connecting external USB devices to the Disklavier control unit allows you to over 11 music channel by Yamaha) • 1 Power cable • 1 Operation manual • 1 PianoSoft CD song list 1 Simple and Easy-to explore. ... for remote control • 1 Remote control sensor shielding sticker • 1 Sample PianoSoft CD software • 2 MIDI cables • 1 Audio cable (pin plugs - English 1Chapter Introduction Features The Disklavier control unit offers the valuable features that the following items are brief explanations of such features...
...to preserve your valuable data. • Connecting external USB devices to the Disklavier control unit allows you to over 11 music channel by Yamaha) • 1 Power cable • 1 Operation manual • 1 PianoSoft CD song list 1 Simple and Easy-to explore. ... for remote control • 1 Remote control sensor shielding sticker • 1 Sample PianoSoft CD software • 2 MIDI cables • 1 Audio cable (pin plugs - English 1Chapter Introduction Features The Disklavier control unit offers the valuable features that the following items are brief explanations of such features...
Operation Manual
Page 13
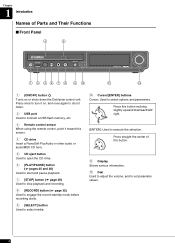
... 11 12 1 [ON/OFF] button Turns on , and once again to shut it toward this sensor. 4 CD drive Insert a PianoSoft·PlusAudio or other audio or audio/MIDI CD here. 5 CD eject button Used to open the CD drive. 6 [PLAY/PAUSE] button ( pages 25 and 26) Used to start and pause...
... 11 12 1 [ON/OFF] button Turns on , and once again to shut it toward this sensor. 4 CD drive Insert a PianoSoft·PlusAudio or other audio or audio/MIDI CD here. 5 CD eject button Used to open the CD drive. 6 [PLAY/PAUSE] button ( pages 25 and 26) Used to start and pause...

Operation Manual
Page 14
... to connect to the Internet. 3 OUTPUT jacks Used to connect the speaker cord from optional monitor speakers. 4 ANALOG MIDI IN jacks Used to connect the audio equipment such as an external CD changer. 5 OMNI (SYNC) OUT jacks Used to connect the microphone/line input of a camcorder. 6 OMNI (SYNC) IN ...jacks Used to connect the audio output of a camcorder. 7 TO PIANO connectors Used to connect the piano. 8 DC-IN 12V connector Used to connect to the supplied AC adaptor. 9 USB TO...
... to connect to the Internet. 3 OUTPUT jacks Used to connect the speaker cord from optional monitor speakers. 4 ANALOG MIDI IN jacks Used to connect the audio equipment such as an external CD changer. 5 OMNI (SYNC) OUT jacks Used to connect the microphone/line input of a camcorder. 6 OMNI (SYNC) IN ...jacks Used to connect the audio output of a camcorder. 7 TO PIANO connectors Used to connect the piano. 8 DC-IN 12V connector Used to connect to the supplied AC adaptor. 9 USB TO...
Operation Manual
Page 16
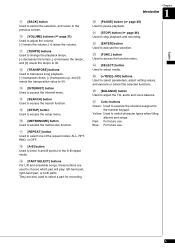
... [+/YES]/[-/NO] buttons Used to select parameters, adjust setting values, and execute or cancel the selected functions. 26 [BALANCE] button Used to adjust the TG, audio and voice balance. 27 Color buttons Green: Used to execute the shortcut assigned to select a part for the A-B repeat mode. 19 [PART SELECT] buttons For...
... [+/YES]/[-/NO] buttons Used to select parameters, adjust setting values, and execute or cancel the selected functions. 26 [BALANCE] button Used to adjust the TG, audio and voice balance. 27 Color buttons Green: Used to execute the shortcut assigned to select a part for the A-B repeat mode. 19 [PART SELECT] buttons For...
Operation Manual
Page 17
...and right-hand parts as a generic term for playing back along with standard audio CDs. The Disklavier control unit has an internal XG tone generator that can record the two parts simultaneously or separately. XG Yamaha XG is an extension of music with lyrics. However, in this manual. ... internal XG tone generator. PianoSoft is sometimes used to refer to any piece of music. PianoSoft·PlusAudio CD software made by Yamaha containing audio and MIDI signals for use with the Disklavier series. Ensemble Song An ensemble song contains the same left -hand piano part is ...
...and right-hand parts as a generic term for playing back along with standard audio CDs. The Disklavier control unit has an internal XG tone generator that can record the two parts simultaneously or separately. XG Yamaha XG is an extension of music with lyrics. However, in this manual. ... internal XG tone generator. PianoSoft is sometimes used to refer to any piece of music. PianoSoft·PlusAudio CD software made by Yamaha containing audio and MIDI signals for use with the Disklavier series. Ensemble Song An ensemble song contains the same left -hand piano part is ...
Operation Manual
Page 23
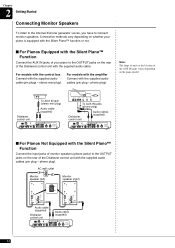
... jacks) to the OUTPUT jacks on the rear of the Disklavier control unit with the supplied audio cables (pin plug - For models with the amplifier Connect with the supplied audio cables (pin plug - Connection methods vary depending on whether your piano is equipped with the ...PARALLEL LINE 2 (--4dB) POWER ON OFF Monitor speaker (right) POWER ON OFF INPUT LINE 1 (--10dB) PARALLEL LINE 2 (--4dB) Audio cable (supplied) Disklavier control unit Audio cable (supplied) 12 stereo mini plug). phone plug). Note: The shape of units or the location of the Disklavier control unit with ...
... jacks) to the OUTPUT jacks on the rear of the Disklavier control unit with the supplied audio cables (pin plug - For models with the amplifier Connect with the supplied audio cables (pin plug - Connection methods vary depending on whether your piano is equipped with the ...PARALLEL LINE 2 (--4dB) POWER ON OFF Monitor speaker (right) POWER ON OFF INPUT LINE 1 (--10dB) PARALLEL LINE 2 (--4dB) Audio cable (supplied) Disklavier control unit Audio cable (supplied) 12 stereo mini plug). phone plug). Note: The shape of units or the location of the Disklavier control unit with ...

Operation Manual
Page 30
... available USB hard disk drives to your piano with the MIDI cables, turn the Disklavier control unit back on commercial audio CDs and data CDs (such as PianoSoft·PlusAudio). • The audio CDs should be formatted in CD-DA. • The data CDs should be formatted in FAT16 or FAT32 file...
... available USB hard disk drives to your piano with the MIDI cables, turn the Disklavier control unit back on commercial audio CDs and data CDs (such as PianoSoft·PlusAudio). • The audio CDs should be formatted in CD-DA. • The data CDs should be formatted in FAT16 or FAT32 file...
Operation Manual
Page 32
... played by the Disklavier keyboard, and the keys move up and down as though they were being played by an invisible performer. Standard Audio CDs Standard audio CDs contain two audio channels (L and R), and are heard from optional monitor speakers just like a normal stereo system. play your favorite commercial CDs at home; English... a stereo system. 21 PianoSoft·PlusAudio PianoSoft·PlusAudio songs are recorded using two channels, an analog MIDI channel for the piano parts and an audio channel for your Disklavier as you listen to famous performances.
... played by the Disklavier keyboard, and the keys move up and down as though they were being played by an invisible performer. Standard Audio CDs Standard audio CDs contain two audio channels (L and R), and are heard from optional monitor speakers just like a normal stereo system. play your favorite commercial CDs at home; English... a stereo system. 21 PianoSoft·PlusAudio PianoSoft·PlusAudio songs are recorded using two channels, an analog MIDI channel for the piano parts and an audio channel for your Disklavier as you listen to famous performances.

Operation Manual
Page 33
... page 30. See Chapter 11 "Media Management - The following media are available: Medium Memory CD USB1, USB2 Playlist D-Radio FromToPC Description Internal flash memory Audio CD or data CD USB flash memory or USB HDD (USB1 indicates the first inserted one, and USB2 indicates the second.) Playlist in the internal...
... page 30. See Chapter 11 "Media Management - The following media are available: Medium Memory CD USB1, USB2 Playlist D-Radio FromToPC Description Internal flash memory Audio CD or data CD USB flash memory or USB HDD (USB1 indicates the first inserted one, and USB2 indicates the second.) Playlist in the internal...
Operation Manual
Page 35
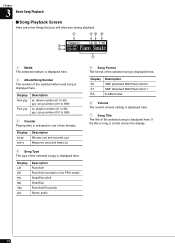
... song is displayed here. Display LR XP PS SK YM AU Description PianoSoft PianoSoft recorded on the PRO model SmartPianoSoft SmartKey PianoSoft·PlusAudio Stereo audio 5 Song Format The format of the selected song is long, it scrolls across the display. 24 If the title is displayed here. Display Axx-yyy...
... song is displayed here. Display LR XP PS SK YM AU Description PianoSoft PianoSoft recorded on the PRO model SmartPianoSoft SmartKey PianoSoft·PlusAudio Stereo audio 5 Song Format The format of the selected song is long, it scrolls across the display. 24 If the title is displayed here. Display Axx-yyy...

Operation Manual
Page 42
... remote control. Furthermore, at the maximum volume level of 0, volume can adjust volume with the dial on the upper right of the MIDI piano and audio parts. ■ Muting the Sound 1 Press [PAUSE] or [STOP]. Note: When the volume is a good idea to first balance the volume of the piano and...
... remote control. Furthermore, at the maximum volume level of 0, volume can adjust volume with the dial on the upper right of the MIDI piano and audio parts. ■ Muting the Sound 1 Press [PAUSE] or [STOP]. Note: When the volume is a good idea to first balance the volume of the piano and...
Operation Manual
Page 54
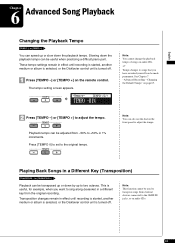
... songs from the original recording. Slowing down the playback tempo. Press [TEMPO 0] to set to two octaves. Changing the Default Tempo" on audio CDs. 43 Transposition changes remain in effect until recording is started , another medium or album is selected, or the Disklavier control unit is turned... off . 1 Press [TEMPO -] or [TEMPO +] on audio CDs. Tempo changes to songs that you want to adjust the tempo. This is useful, for example, when you have recorded yourself can speed...
... songs from the original recording. Slowing down the playback tempo. Press [TEMPO 0] to set to two octaves. Changing the Default Tempo" on audio CDs. 43 Transposition changes remain in effect until recording is started , another medium or album is selected, or the Disklavier control unit is turned... off . 1 Press [TEMPO -] or [TEMPO +] on audio CDs. Tempo changes to songs that you want to adjust the tempo. This is useful, for example, when you have recorded yourself can speed...

Operation Manual
Page 59
...: You cannot adjust the volume balance during the DisklavierRadio playback. See Chapter 8 "Advanced Piano Playing - Voice: Adjusts the volume of the accompaniment or standard audio sound pre-recorded in a range of 10 to adjust the volume. Playing the Disklavier with the cursor is on "P=." =Piano Part= L/R L=ON R=OFF P=ON 4 Press...
...: You cannot adjust the volume balance during the DisklavierRadio playback. See Chapter 8 "Advanced Piano Playing - Voice: Adjusts the volume of the accompaniment or standard audio sound pre-recorded in a range of 10 to adjust the volume. Playing the Disklavier with the cursor is on "P=." =Piano Part= L/R L=ON R=OFF P=ON 4 Press...

Operation Manual
Page 60
... setting screen appears. =BALANCE= -/+ ×2 AUDIO BALANCE 100 2 Press [+/YES] and [-/NO] to adjust the volume of 0 to 127. ■ Adjusting the Voice Balance 1 Press [BALANCE] three times on the remote ...] and [-/NO] to adjust the volume of 10 to 127. 49 Chapter 6 Advanced Song Playback Note: You can be adjusted in a range of the audio. English Audio volume can also use the dial on the front panel to adjust the volume. Note: You can be adjusted in a range of the voice. ■...
... setting screen appears. =BALANCE= -/+ ×2 AUDIO BALANCE 100 2 Press [+/YES] and [-/NO] to adjust the volume of 0 to 127. ■ Adjusting the Voice Balance 1 Press [BALANCE] three times on the remote ...] and [-/NO] to adjust the volume of 10 to 127. 49 Chapter 6 Advanced Song Playback Note: You can be adjusted in a range of the audio. English Audio volume can also use the dial on the front panel to adjust the volume. Note: You can be adjusted in a range of the voice. ■...

Operation Manual
Page 61
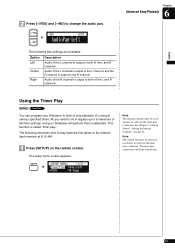
... are effective until another song is selected, recording is started , or the Disklavier control unit is turned off . The audio pan setting screen appears. =CD= -+ENT AudioPan=Center 50 Balance adjustments are effective until another medium or album is selected...playback, press [FUNC.] on the remote control. Adjusting the L/R Balance of Audio During playback [FUNC.] You can temporarily adjust the L/R balance of the song contains audio (PianoSoft·PlusAudio, SmartPianoSoft) or an audio CD for your listening pleasure. Chapter 6 Advanced Song Playback Adjusting the Pitch of...
... are effective until another song is selected, recording is started , or the Disklavier control unit is turned off . The audio pan setting screen appears. =CD= -+ENT AudioPan=Center 50 Balance adjustments are effective until another medium or album is selected...playback, press [FUNC.] on the remote control. Adjusting the L/R Balance of Audio During playback [FUNC.] You can temporarily adjust the L/R balance of the song contains audio (PianoSoft·PlusAudio, SmartPianoSoft) or an audio CD for your listening pleasure. Chapter 6 Advanced Song Playback Adjusting the Pitch of...
Operation Manual
Page 62
... start or stop playback of a song at 8:15 AM. 1 Press [SETUP] on page 16. The following pan settings are available: Option Left Center Right Description Audio of the L channel is called "timer play to function. Note: The control unit must be turned on /off the control unit. 51 This function is... in advance in order for the timer play back the first album in order for the timer play ." 2 Press [+/YES] and [-/NO] to change the audio pan. =CD= -+ENT AudioPan=Left The following describes how to play to function. The timer play cannot turn on in advance in the internal flash...
... start or stop playback of a song at 8:15 AM. 1 Press [SETUP] on page 16. The following pan settings are available: Option Left Center Right Description Audio of the L channel is called "timer play to function. Note: The control unit must be turned on /off the control unit. 51 This function is... in advance in order for the timer play back the first album in order for the timer play ." 2 Press [+/YES] and [-/NO] to change the audio pan. =CD= -+ENT AudioPan=Left The following describes how to play to function. The timer play cannot turn on in advance in the internal flash...

Operation Manual
Page 82
... of piano and video later on page 75. 2 Select "AudioI/O" with the cursor buttons then press [ENTER]. =SETUP MENU= (1/3) *TimerPlay *AudioI/O *MIDI *M-Tune The audio I/O setting screen appears. =AudioI/O= ] -+ >OMNI IN=AutoDetect >OMNI IN Vol=100 3 Select "OMNI IN" with sight. First set up the camcorder, the DVD recorder, and...
... of piano and video later on page 75. 2 Select "AudioI/O" with the cursor buttons then press [ENTER]. =SETUP MENU= (1/3) *TimerPlay *AudioI/O *MIDI *M-Tune The audio I/O setting screen appears. =AudioI/O= ] -+ >OMNI IN=AutoDetect >OMNI IN Vol=100 3 Select "OMNI IN" with sight. First set up the camcorder, the DVD recorder, and...


