Operation Manual
Page 2
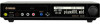
...product MAY contain a small nonrechargeable battery which (if applicable) is properly installed and used batteries promptly and as regulated by Yamaha. DO NOT modify this manual is required by an independent safety testing laboratory in order that you to return the defective parts.... Model Serial No Purchase Date PLEASE KEEP THIS MANUAL DO NOT connect this type of your dealer before requesting service. ENVIRONMENTAL ISSUES: Yamaha strives to recharge, disassemble, or incinerate this product to any of the specifications without notice...
...product MAY contain a small nonrechargeable battery which (if applicable) is properly installed and used batteries promptly and as regulated by Yamaha. DO NOT modify this manual is required by an independent safety testing laboratory in order that you to return the defective parts.... Model Serial No Purchase Date PLEASE KEEP THIS MANUAL DO NOT connect this type of your dealer before requesting service. ENVIRONMENTAL ISSUES: Yamaha strives to recharge, disassemble, or incinerate this product to any of the specifications without notice...
Operation Manual
Page 3
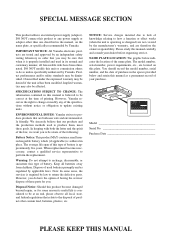
... Lasergerät der Klasse 1 eingestuft. Eins der nachstehend abgebildeten Etiketts bzw. IMPORTANT NOTICE FOR THE UNITED KINGDOM Applies to Power Adaptor Connecting the Plug and Cord IMPORTANT THE WIRES IN THE MAINS LEAD ARE COLOURED IN ACCORDANCE WITH THE FOLLOWING CODE: BLUE BROWN : NEUTRAL ...* Wavelength: 790 nm * Laser Output Power at the lens of the CD drive unit. The wire which is coloured BROWN must be connected to the terminal which is marked with the letter N or coloured BLACK. VORSICHT-Die Verwendung von Bedienungselementen oder Einstellungen, oder die Anwendung von...
... Lasergerät der Klasse 1 eingestuft. Eins der nachstehend abgebildeten Etiketts bzw. IMPORTANT NOTICE FOR THE UNITED KINGDOM Applies to Power Adaptor Connecting the Plug and Cord IMPORTANT THE WIRES IN THE MAINS LEAD ARE COLOURED IN ACCORDANCE WITH THE FOLLOWING CODE: BLUE BROWN : NEUTRAL ...* Wavelength: 790 nm * Laser Output Power at the lens of the CD drive unit. The wire which is coloured BROWN must be connected to the terminal which is marked with the letter N or coloured BLACK. VORSICHT-Die Verwendung von Bedienungselementen oder Einstellungen, oder die Anwendung von...
Operation Manual
Page 5
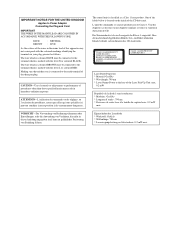
... OF CONFORMITY PROCEDURE) Responsible Party Address Telephone Fax Type of Equipment Model Name : Yamaha Corporation of the following two conditions: 1) this device must accept any interference received ...listed in FCC Regulations, Part 15 for Class "B" digital devices. IMPORTANT: When connecting this manual, meets FCC requirements. Utilize power outlets that may cause interference harmful to... USA : 1-714-522-9011 : 1-714-522-9301 : Player Piano Control Unit : DKC-850 This device complies with other electronic devices. If the antenna lead-in is suspected. Verbraucherinformation ...
... OF CONFORMITY PROCEDURE) Responsible Party Address Telephone Fax Type of Equipment Model Name : Yamaha Corporation of the following two conditions: 1) this device must accept any interference received ...listed in FCC Regulations, Part 15 for Class "B" digital devices. IMPORTANT: When connecting this manual, meets FCC requirements. Utilize power outlets that may cause interference harmful to... USA : 1-714-522-9011 : 1-714-522-9301 : Player Piano Control Unit : DKC-850 This device complies with other electronic devices. If the antenna lead-in is suspected. Verbraucherinformation ...
Operation Manual
Page 8
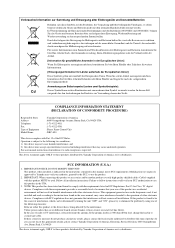
... devices into the same AC outlet. ii the thermal relay of some devices. • Do not place heavy objects on all audio devices when connecting to do so will automatically reset when the Disklavier control unit has cooled down. • If you discover a stain, carefully use a soft...volume level on the AC adaptor cable. The color and finish of the Disklavier control unit can lead to fire or electric shock. • Connect the plug of other AC adaptors may trip. Important Precautions Read the following before operating the Disklavier control unit. ■ Warnings • ...
... devices into the same AC outlet. ii the thermal relay of some devices. • Do not place heavy objects on all audio devices when connecting to do so will automatically reset when the Disklavier control unit has cooled down. • If you discover a stain, carefully use a soft...volume level on the AC adaptor cable. The color and finish of the Disklavier control unit can lead to fire or electric shock. • Connect the plug of other AC adaptors may trip. Important Precautions Read the following before operating the Disklavier control unit. ■ Warnings • ...
Operation Manual
Page 10
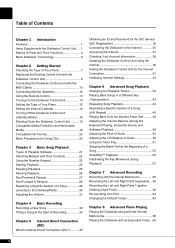
... Checking the Type of Your Piano 7 Replacing the Existing Control Unit with the Disklavier Control Unit 8 Connecting the Disklavier Control Unit with the MIDI Cables 10 Connecting Monitor Speakers 12 Using the Remote Control 13 Turning On the Disklavier Control Unit 14 Setting the Type ... Checking Your Account Information 38 Updating the Disklavier Control Unit Using the Internet 39 Setting the Disklavier Control Unit for the Internet Connection 41 Initializing Internet Settings 42 Chapter 6 Advanced Song Playback Changing the Playback Tempo 43 Playing Back Songs in a Different Key ...
... Checking the Type of Your Piano 7 Replacing the Existing Control Unit with the Disklavier Control Unit 8 Connecting the Disklavier Control Unit with the MIDI Cables 10 Connecting Monitor Speakers 12 Using the Remote Control 13 Turning On the Disklavier Control Unit 14 Setting the Type ... Checking Your Account Information 38 Updating the Disklavier Control Unit Using the Internet 39 Setting the Disklavier Control Unit for the Internet Connection 41 Initializing Internet Settings 42 Chapter 6 Advanced Song Playback Changing the Playback Tempo 43 Playing Back Songs in a Different Key ...
Operation Manual
Page 11
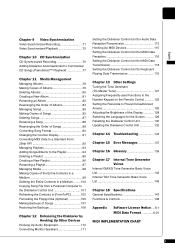
... 106 Making Backups of Songs 107 Restoring the Backups 108 Chapter 12 Enhancing the Disklavier by Hooking Up Other Devices Hooking Up Audio Equipment 110 Connecting Monitor Speakers 111 Setting the Disklavier Control Unit for Audio Data Reception/Transmission 113 Hooking Up MIDI Devices 115 Setting the Disklavier Control Unit for...
... 106 Making Backups of Songs 107 Restoring the Backups 108 Chapter 12 Enhancing the Disklavier by Hooking Up Other Devices Hooking Up Audio Equipment 110 Connecting Monitor Speakers 111 Setting the Disklavier Control Unit for Audio Data Reception/Transmission 113 Hooking Up MIDI Devices 115 Setting the Disklavier Control Unit for...

Operation Manual
Page 12
... Your Musical Memories • Total 128 megabytes of internal memory comes with the Disklavier control unit to preserve your valuable data. • Connecting external USB devices to the Disklavier control unit allows you start listening on the day this unit arrives at your home. • DisklavierRadio;... than ever. you can be played back with the Disklavier Control Unit Check that open up your musical possibility to over 11 music channel by Yamaha) • 1 Power cable • 1 Operation manual • 1 PianoSoft CD song list 1 You can see as well as hear performances with...
... Your Musical Memories • Total 128 megabytes of internal memory comes with the Disklavier control unit to preserve your valuable data. • Connecting external USB devices to the Disklavier control unit allows you start listening on the day this unit arrives at your home. • DisklavierRadio;... than ever. you can be played back with the Disklavier Control Unit Check that open up your musical possibility to over 11 music channel by Yamaha) • 1 Power cable • 1 Operation manual • 1 PianoSoft CD song list 1 You can see as well as hear performances with...
Operation Manual
Page 13
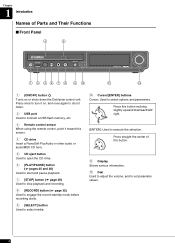
... Their Functions ■ Front Panel 4 5 1 2 36 7 8 9 10 11 12 1 [ON/OFF] button Turns on , and once again to shut it down. 2 USB port Used to connect a USB flash memory, etc. 3 Remote control sensor When using the remote control, point it on or shuts down the Disklavier control unit. Press once to...
... Their Functions ■ Front Panel 4 5 1 2 36 7 8 9 10 11 12 1 [ON/OFF] button Turns on , and once again to shut it down. 2 USB port Used to connect a USB flash memory, etc. 3 Remote control sensor When using the remote control, point it on or shuts down the Disklavier control unit. Press once to...

Operation Manual
Page 14
...control unit. 11 MIDI IN terminal For models to be replaced with Disklavier control unit: Used to connect the existing control unit. 3 For models to be connected with Disklavier control unit: Used to connect external MIDI equipment. ■ Rear Panel 1 2 3456 Chapter 1 Introduction English 7 8 9... 10 11 1 USB TO DEVICE port Used to connect a USB flash memory, an optional USB floppy disk drive, etc. 2 LAN port Used to connect to the Internet. 3 OUTPUT jacks Used to connect the speaker cord from optional monitor speakers. 4 ANALOG MIDI IN jacks Used to...
...control unit. 11 MIDI IN terminal For models to be replaced with Disklavier control unit: Used to connect the existing control unit. 3 For models to be connected with Disklavier control unit: Used to connect external MIDI equipment. ■ Rear Panel 1 2 3456 Chapter 1 Introduction English 7 8 9... 10 11 1 USB TO DEVICE port Used to connect a USB flash memory, an optional USB floppy disk drive, etc. 2 LAN port Used to connect to the Internet. 3 OUTPUT jacks Used to connect the speaker cord from optional monitor speakers. 4 ANALOG MIDI IN jacks Used to...
Operation Manual
Page 18
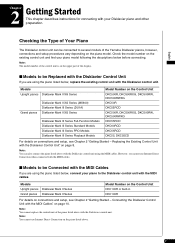
... Cables" on the upper part of the piano listed above with the MIDI cables. Note: You cannot use Internet Direct Connection when connected with the MIDI cables. ■ Models to be Replaced with the Disklavier Control Unit If you are using the piano listed... listed below, replace the existing control unit with the Disklavier control unit. Checking the Type of the Yamaha Disklavier pianos, however, connections and setup procedures vary depending on page 8. Connecting the Disklavier Control Unit with the Disklavier Control Unit" on the piano model. English Chapter 2 Getting ...
... Cables" on the upper part of the piano listed above with the MIDI cables. Note: You cannot use Internet Direct Connection when connected with the MIDI cables. ■ Models to be Replaced with the Disklavier Control Unit If you are using the piano listed... listed below, replace the existing control unit with the Disklavier control unit. Checking the Type of the Yamaha Disklavier pianos, however, connections and setup procedures vary depending on page 8. Connecting the Disklavier Control Unit with the Disklavier Control Unit" on the piano model. English Chapter 2 Getting ...
Operation Manual
Page 19
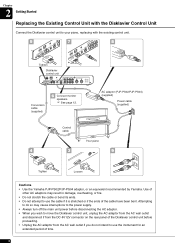
...supplied) Power cable (supplied) Control cable Your piano 4 3 9 Tighten Loosen Cautions • Use the Yamaha PJP-PS02/PJP-PS04 adaptor, or an equivalent recommended by Yamaha. Chapter 2 Getting Started Replacing the Existing Control Unit with the existing control unit. 5 7 8 Tighten Disklavier... control unit Conversion cable (supplied) 6 Connect monitor speakers. Use of other AC adaptors may ...
...supplied) Power cable (supplied) Control cable Your piano 4 3 9 Tighten Loosen Cautions • Use the Yamaha PJP-PS02/PJP-PS04 adaptor, or an equivalent recommended by Yamaha. Chapter 2 Getting Started Replacing the Existing Control Unit with the existing control unit. 5 7 8 Tighten Disklavier... control unit Conversion cable (supplied) 6 Connect monitor speakers. Use of other AC adaptors may ...
Operation Manual
Page 20
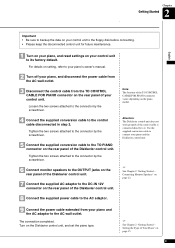
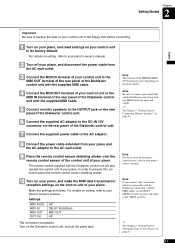
... on the rear panel of the Disklavier control unit. Attention: The Disklavier control unit does not work properly if the control cable is connected directly to connect your piano and the Disklavier control unit. See Chapter 2 "Getting Started - Use the supplied conversion cable to it. Turn...TO CONTROL CABLE FOR PIANO connector varies depending on the piano model. Loosen the two screws attached to the connector by the screwdriver. 4 Connect the supplied conversion cable to the AC wall outlet. Chapter 2 Getting Started English Important • Be sure to backup the data on ...
... on the rear panel of the Disklavier control unit. Attention: The Disklavier control unit does not work properly if the control cable is connected directly to connect your piano and the Disklavier control unit. See Chapter 2 "Getting Started - Use the supplied conversion cable to it. Turn...TO CONTROL CABLE FOR PIANO connector varies depending on the piano model. Loosen the two screws attached to the connector by the screwdriver. 4 Connect the supplied conversion cable to the AC wall outlet. Chapter 2 Getting Started English Important • Be sure to backup the data on ...
Operation Manual
Page 21
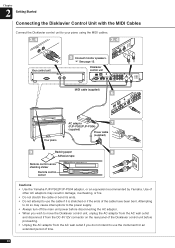
... 8 Adhesive tape Remote control sensor shielding sticker Remote control sensor Cautions • Use the Yamaha PJP-PS02/PJP-PS04 adaptor, or an equivalent recommended by Yamaha. Chapter 2 Getting Started Connecting the Disklavier Control Unit with the MIDI Cables Connect the Disklavier control unit to use the instrument for an extended period of the cable... fire. • Do not stretch the cable or bend its ends. • Do not attempt to your piano using the MIDI cables. 3, 4 3, 4 Your control unit 5 Connect monitor speakers.
... 8 Adhesive tape Remote control sensor shielding sticker Remote control sensor Cautions • Use the Yamaha PJP-PS02/PJP-PS04 adaptor, or an equivalent recommended by Yamaha. Chapter 2 Getting Started Connecting the Disklavier Control Unit with the MIDI Cables Connect the Disklavier control unit to use the instrument for an extended period of the cable... fire. • Do not stretch the cable or bend its ends. • Do not attempt to your piano using the MIDI cables. 3, 4 3, 4 Your control unit 5 Connect monitor speakers.
Operation Manual
Page 22
...of the MIDI IN/MIDI OUT terminals varies depending on page 12. Note: Be sure to your piano's owner's manual. Note: If you connect your control unit, which is replaceable with the Disklavier control unit, with the Disklavier control unit will also operate the control unit of your piano.... Chapter 2 Getting Started English Important Be sure to backup the data on your control unit to the floppy disk before connecting. 1 Turn on your piano, and reset settings on your control unit to the "MIDI" position. See Chapter 2 "Getting Started - Settings MIDI ...
...of the MIDI IN/MIDI OUT terminals varies depending on page 12. Note: Be sure to your piano's owner's manual. Note: If you connect your control unit, which is replaceable with the Disklavier control unit, with the Disklavier control unit will also operate the control unit of your piano.... Chapter 2 Getting Started English Important Be sure to backup the data on your control unit to the floppy disk before connecting. 1 Turn on your piano, and reset settings on your control unit to the "MIDI" position. See Chapter 2 "Getting Started - Settings MIDI ...
Operation Manual
Page 23
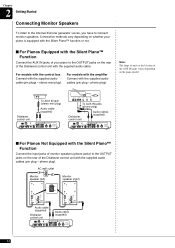
...Audio cables (supplied) ■ For Pianos Not Equipped with the Silent Piano™ Function Connect the input jacks of monitor speakers (phone jacks) to the OUTPUT jacks on the piano model. phone plug). Connection methods vary depending on whether your piano is equipped with the Silent Piano™ function or... not. ■ For Pianos Equipped with the Silent Piano™ Function Connect the AUX IN jacks of your piano to the OUTPUT jacks on the rear of the AUX IN jacks varies depending on the rear of...
...Audio cables (supplied) ■ For Pianos Not Equipped with the Silent Piano™ Function Connect the input jacks of monitor speakers (phone jacks) to the OUTPUT jacks on the piano model. phone plug). Connection methods vary depending on whether your piano is equipped with the Silent Piano™ function or... not. ■ For Pianos Equipped with the Silent Piano™ Function Connect the AUX IN jacks of your piano to the OUTPUT jacks on the rear of the AUX IN jacks varies depending on the rear of...
Operation Manual
Page 25
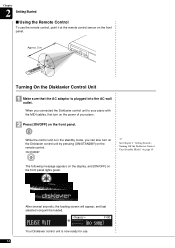
... =Memory= V+00 (no song) Your Disklavier control unit is plugged into the AC wall outlet. While the control unit is in the standby mode, you connected the Disklavier control unit to your piano. 2 Press [ON/OFF] on the remote control. See Chapter 2 "Getting Started - The following message appears on the...
... =Memory= V+00 (no song) Your Disklavier control unit is plugged into the AC wall outlet. While the control unit is in the standby mode, you connected the Disklavier control unit to your piano. 2 Press [ON/OFF] on the remote control. See Chapter 2 "Getting Started - The following message appears on the...
Operation Manual
Page 26
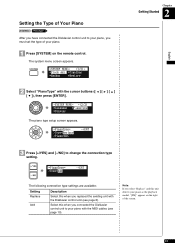
...when you replaced the existing unit with the Disklavier control unit (see page 10). Note: If you select "Replace" and this when you connected the Disklavier control unit to your piano, you must set the type of your piano. 1 Press [SYSTEM] on the right of the...= >Type=Replace >Piano=REC -+ENT Chapter 2 Getting Started English 3 Press [+/YES] and [-/NO] to change the connection type setting. =PianoType= >Type=Add -+ENT The following connection type settings are available: Setting Replace Add Description Select this unit detects your piano as the playback model, "[PB]" appears ...
...when you replaced the existing unit with the Disklavier control unit (see page 10). Note: If you select "Replace" and this when you connected the Disklavier control unit to your piano, you must set the type of your piano. 1 Press [SYSTEM] on the right of the...= >Type=Replace >Piano=REC -+ENT Chapter 2 Getting Started English 3 Press [+/YES] and [-/NO] to change the connection type setting. =PianoType= >Type=Add -+ENT The following connection type settings are available: Setting Replace Add Description Select this unit detects your piano as the playback model, "[PB]" appears ...

Operation Manual
Page 30
...medium contains a number of song data. The ending screen appears, and [ON/OFF] on the front panel lights red. See you again When you connected the Disklavier control unit to store song data. English See you again When you can play songs on commercial audio CDs and data CDs (such...the Disklavier Control Unit (Standby Mode) Press [ON/STANDBY] on the front panel. Floppy Disk (Optional) With the optional USB floppy disk drive, you connected the Disklavier control unit to turn off . Note: Do not insert or remove the USB media while reading or writing data. Note: Press [ON/...
...medium contains a number of song data. The ending screen appears, and [ON/OFF] on the front panel lights red. See you again When you connected the Disklavier control unit to store song data. English See you again When you can play songs on commercial audio CDs and data CDs (such...the Disklavier Control Unit (Standby Mode) Press [ON/STANDBY] on the front panel. Floppy Disk (Optional) With the optional USB floppy disk drive, you connected the Disklavier control unit to turn off . Note: Do not insert or remove the USB media while reading or writing data. Note: Press [ON/...
Operation Manual
Page 41
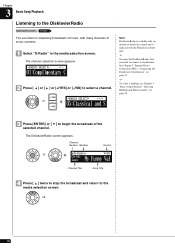
... Disklavier to select a channel. See Chapter 5 "Internet Direct Connection (IDC) - Selecting Medium and Their Contents" on page 22. 3 Press [ENTER] or [ ] to begin the broadcast of music contents. 1 Select "D-Radio" in the media selection ... selection screen "D-Radio" You can listen to streaming broadcasts of music, with the Disklavier control unit. To enjoy the DisklavierRadio, first you need to connect to the Internet. The channel selection screen appears. =RADIO SELECT= ][{ 01:Complimentary C 2 Press [ ] or [ ] or [+/YES] or [-/NO] to the Internet" on models of which...
... Disklavier to select a channel. See Chapter 5 "Internet Direct Connection (IDC) - Selecting Medium and Their Contents" on page 22. 3 Press [ENTER] or [ ] to begin the broadcast of music contents. 1 Select "D-Radio" in the media selection ... selection screen "D-Radio" You can listen to streaming broadcasts of music, with the Disklavier control unit. To enjoy the DisklavierRadio, first you need to connect to the Internet. The channel selection screen appears. =RADIO SELECT= ][{ 01:Complimentary C 2 Press [ ] or [ ] or [+/YES] or [-/NO] to the Internet" on models of which...
Operation Manual
Page 46
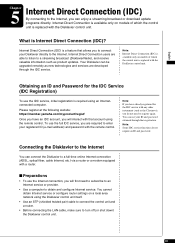
... replaced with the Disklavier control unit. What is required using an Internetconnected computer. Please register at the following website: https://member.yamaha.com/myproduct/regist/ Once you have already registered for the IDC Service (IDC Registration) To use your Disklavier directly to the ...using the Disklavier control unit itself. • Use an STP (shielded twisted pair) cable to connect the control unit and a router. • Before connecting the LAN cable, make sure to connect your ID and password obtained through the IDC service. Note: If you have an IDC account...
... replaced with the Disklavier control unit. What is required using an Internetconnected computer. Please register at the following website: https://member.yamaha.com/myproduct/regist/ Once you have already registered for the IDC Service (IDC Registration) To use your Disklavier directly to the ...using the Disklavier control unit itself. • Use an STP (shielded twisted pair) cable to connect the control unit and a router. • Before connecting the LAN cable, make sure to connect your ID and password obtained through the IDC service. Note: If you have an IDC account...


