
Owner's Manual
Page 2
... safety markings and instructions that the battery being charged. Disposal Notice: Should this manual as designed) are not covered by Yamaha. a cart, rack, or stand that is located on this manual carefully and consult your area. NOTICE: Service charges incurred due to a lack of knowledge...be installed correctly. Some of products that are located on the bottom of your dealer is used batteries promptly and as regulated by Yamaha. Mismatches or incorrect installation may also use "household" type batteries. If your purchase. Warning: Do not attempt to disassemble, or ...
... safety markings and instructions that the battery being charged. Disposal Notice: Should this manual as designed) are not covered by Yamaha. a cart, rack, or stand that is located on this manual carefully and consult your area. NOTICE: Service charges incurred due to a lack of knowledge...be installed correctly. Some of products that are located on the bottom of your dealer is used batteries promptly and as regulated by Yamaha. Mismatches or incorrect installation may also use "household" type batteries. If your purchase. Warning: Do not attempt to disassemble, or ...
Owner's Manual
Page 4
...accidentally fall over it in a position where anyone could cause damage to be malfunctioning, discontinue use immediately and have accumulated on it inspected by Yamaha) only. These precautions include, but are not intended to avoid the possibility of a TV, radio, stereo equipment, mobile phone, or other .... • Use the specified adaptor (PA-5D, PA-5C or an equivalent recommended by qualified Yamaha service personnel. When attaching the stand or rack, use of the instrument, or if any openings. • Never insert or remove an electric plug with the...
...accidentally fall over it in a position where anyone could cause damage to be malfunctioning, discontinue use immediately and have accumulated on it inspected by Yamaha) only. These precautions include, but are not intended to avoid the possibility of a TV, radio, stereo equipment, mobile phone, or other .... • Use the specified adaptor (PA-5D, PA-5C or an equivalent recommended by qualified Yamaha service personnel. When attaching the stand or rack, use of the instrument, or if any openings. • Never insert or remove an electric plug with the...
Owner's Manual
Page 7
... Backup & Initialization 90 Voice List 91 Style List 98 Music Database List 99 Drum Kit List 100 MIDI Implementation Chart 102 Effect map 104 Keyboard Stand Assembly (DGX-500 only 105 Specifications 108 Index 109 7 Waiting 70 • Lesson 3 - Multi Fingering 47 • Setting the Split Point 49 • Dictionary 50 Using...
... Backup & Initialization 90 Voice List 91 Style List 98 Music Database List 99 Drum Kit List 100 MIDI Implementation Chart 102 Effect map 104 Keyboard Stand Assembly (DGX-500 only 105 Specifications 108 Index 109 7 Waiting 70 • Lesson 3 - Multi Fingering 47 • Setting the Split Point 49 • Dictionary 50 Using...
Owner's Manual
Page 10
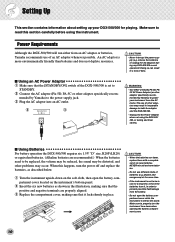
.../300 will run down when opening the battery compartment cover. 10 w Connect the AC adaptor (PA-5D, PA-5C or other problems may be distorted, and other adaptor specifically recom- w Insert the six new batteries as described below q Turn the instrument upside-down on the stand. Make...and negative terminals are recommended.) When the batteries need to be replaced, the volume may be reduced, the sound may occur. mended by Yamaha) to power your DGX-500/300 for a long time, remove the batteries from it locks firmly in place. • When the batteries run either from the...
.../300 will run down when opening the battery compartment cover. 10 w Connect the AC adaptor (PA-5D, PA-5C or other problems may be distorted, and other adaptor specifically recom- w Insert the six new batteries as described below q Turn the instrument upside-down on the stand. Make...and negative terminals are recommended.) When the batteries need to be replaced, the volume may be reduced, the sound may occur. mended by Yamaha) to power your DGX-500/300 for a long time, remove the batteries from it locks firmly in place. • When the batteries run either from the...
Owner's Manual
Page 40
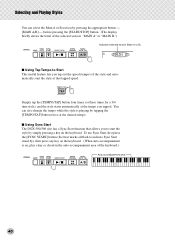
To use Sync Start, first press the [SYNC START] button (the beat marks all flash to indicate Sync Start stand-by), then press any key on the keyboard. (When auto accompaniment is playing by tapping the [TEMPO/TAP] button twice at the desired tempo. ...or chord in the auto accompaniment area of the selected section: "MAIN A" or "MAIN B.") Indicates selected section (Main A or B). MAIN A I Using Sync Start The DGX-500/300 also has a Sync Start function that tapped speed. before pressing the [START/STOP] button. (The display briefly shows the letter of the keyboard.) Auto...
To use Sync Start, first press the [SYNC START] button (the beat marks all flash to indicate Sync Start stand-by), then press any key on the keyboard. (When auto accompaniment is playing by tapping the [TEMPO/TAP] button twice at the desired tempo. ...or chord in the auto accompaniment area of the selected section: "MAIN A" or "MAIN B.") Indicates selected section (Main A or B). MAIN A I Using Sync Start The DGX-500/300 also has a Sync Start function that tapped speed. before pressing the [START/STOP] button. (The display briefly shows the letter of the keyboard.) Auto...
Owner's Manual
Page 84
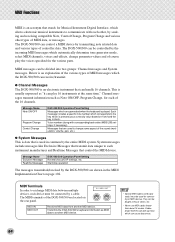
... handle 16 channels. Message Name Note ON/OFF Program Change Control Change DGX-500/300 Operation/Panel Setting Messages which allows electronic musical instruments to communicate with corresponding bank select MSB/LSB settings, if necessary). Messages that stands for Musical Instrument Digital Interface, which are located on how hard the key is stuck...
... handle 16 channels. Message Name Note ON/OFF Program Change Control Change DGX-500/300 Operation/Panel Setting Messages which allows electronic musical instruments to communicate with corresponding bank select MSB/LSB settings, if necessary). Messages that stands for Musical Instrument Digital Interface, which are located on how hard the key is stuck...
Owner's Manual
Page 105
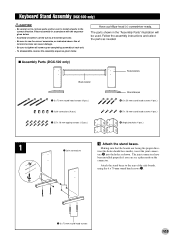
... use the correct screw size, as indicated above. Please assemble in accordance with the sequence given below . q 6 x 70 mm round head screws 105 Keyboard Stand Assembly (DGX-500 only) • Be careful not to confuse parts, and be sure to install all screws upon completing assembly of each unit. • To disassemble...
... use the correct screw size, as indicated above. Please assemble in accordance with the sequence given below . q 6 x 70 mm round head screws 105 Keyboard Stand Assembly (DGX-500 only) • Be careful not to confuse parts, and be sure to install all screws upon completing assembly of each unit. • To disassemble...
Owner's Manual
Page 107
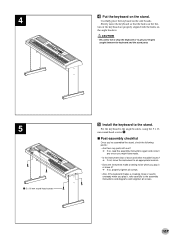
... when you play it, refer carefully to the angle brackets, using the 5 x 16 mm round head screws t. I Post-assembly checklist Once you've assembled the stand, check the following points: • Are there any parts left over? ➔ If so, read the assembly instructions again and correct any errors you might... holes on the angle brackets. • Be careful not to drop the keyboard or to get your fingers caught between the keyboard and the stand parts. 5 t 5 x 16 mm round head screws B Install the keyboard to the...
... when you play it, refer carefully to the angle brackets, using the 5 x 16 mm round head screws t. I Post-assembly checklist Once you've assembled the stand, check the following points: • Are there any parts left over? ➔ If so, read the assembly instructions again and correct any errors you might... holes on the angle brackets. • Be careful not to drop the keyboard or to get your fingers caught between the keyboard and the stand parts. 5 t 5 x 16 mm round head screws B Install the keyboard to the...
Owner's Manual
Page 108
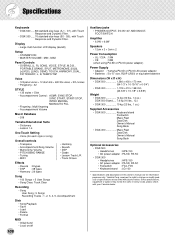
... : Yamaha PA-5D or PA-5C AC power adaptor • Batteries : Six "D" size, R20P (LR20) or equivalent batteries Dimensions (W x D x H) • DGX-500 1,380 x 430 x 173 mm (54-1/3" x 16-15/16" x 6-3/4") • DGX-300 1,178 x 410 x 168 mm (46-3/8" x 16-1/8" x 6-5/8") Weight • DGX-500 14 kg (30 lbs., 14 oz.) DGX-500 Stand..... 7.6 kg (16 lbs., 12.) • DGX-300...
... : Yamaha PA-5D or PA-5C AC power adaptor • Batteries : Six "D" size, R20P (LR20) or equivalent batteries Dimensions (W x D x H) • DGX-500 1,380 x 430 x 173 mm (54-1/3" x 16-15/16" x 6-3/4") • DGX-300 1,178 x 410 x 168 mm (46-3/8" x 16-1/8" x 6-5/8") Weight • DGX-500 14 kg (30 lbs., 14 oz.) DGX-500 Stand..... 7.6 kg (16 lbs., 12.) • DGX-300...
Owner's Manual
Page 109
... 1 83 Grade 72 H Harmony 35 HARMONY button 35 Harmony types 37 Headphones 11 I Indicator 20 Initial Setup Send 87 Initialization 90 Intro 41 K Keyboard stand assembly (DGX-500 only 105 L Lesson 67 M M.D.B. (music database 53 Main Voice DSP 27 Main Voice Reverb 27 Main Voice Volume 27 Metronome 22 MIDI 83 MIDI...
... 1 83 Grade 72 H Harmony 35 HARMONY button 35 Harmony types 37 Headphones 11 I Indicator 20 Initial Setup Send 87 Initialization 90 Intro 41 K Keyboard stand assembly (DGX-500 only 105 L Lesson 67 M M.D.B. (music database 53 Main Voice DSP 27 Main Voice Reverb 27 Main Voice Volume 27 Metronome 22 MIDI 83 MIDI...


