
Owner's Manual
Page 2
...the production methods used to produce them, meet these graphics on this type of battery. REFER SERVICING TO QUALIFIED SERVICE PERSONNEL. However, Yamaha reserves the right to change or modify any of the specifications without notice or obligation to perform the replacement. Keep all foreseeable... products may have either labels similar to the graphics shown below or molded/stamped facsimiles of these goals. NO USER-SERVICEABLE PARTS INSIDE. ENVIRONMENTAL ISSUES: Yamaha strives to be sure that when it is believed to produce products that may be at the time of printing. We ...
...the production methods used to produce them, meet these graphics on this type of battery. REFER SERVICING TO QUALIFIED SERVICE PERSONNEL. However, Yamaha reserves the right to change or modify any of the specifications without notice or obligation to perform the replacement. Keep all foreseeable... products may have either labels similar to the graphics shown below or molded/stamped facsimiles of these goals. NO USER-SERVICEABLE PARTS INSIDE. ENVIRONMENTAL ISSUES: Yamaha strives to be sure that when it is believed to produce products that may be at the time of printing. We ...
Owner's Manual
Page 3
... it, immediately turn off the power switch, disconnect the electric plug from the outlet, and have the instrument inspected by qualified Yamaha service personnel. Fire warning • Do not put burning items, such as correct for extended periods of serious injury or even death from...serviceable parts. If you or others, or damage to the instrument or even injury. Otherwise, the instrument, TV, or radio may generate noise. • Do not place the instrument in a position where anyone could walk on it might accidentally fall over it inspected by qualified Yamaha ...
... it, immediately turn off the power switch, disconnect the electric plug from the outlet, and have the instrument inspected by qualified Yamaha service personnel. Fire warning • Do not put burning items, such as correct for extended periods of serious injury or even death from...serviceable parts. If you or others, or damage to the instrument or even injury. Otherwise, the instrument, TV, or radio may generate noise. • Do not place the instrument in a position where anyone could walk on it might accidentally fall over it inspected by qualified Yamaha ...
Owner's Manual
Page 9
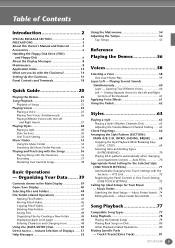
... Compatible Song Types 77 Song Playback 78 Playing the Internal Songs 78 Playing Back Songs on Disk 80 Other Playback-related Operations 80 Muting Specific Parts - OTS Link 72 Registering the Panel Controls in One Touch Setting (ONE TOUCH SETTING 72 Calling Up Ideal Setups for the Left and Right Sections...
... Compatible Song Types 77 Song Playback 78 Playing the Internal Songs 78 Playing Back Songs on Disk 80 Other Playback-related Operations 80 Muting Specific Parts - OTS Link 72 Registering the Panel Controls in One Touch Setting (ONE TOUCH SETTING 72 Calling Up Ideal Setups for the Left and Right Sections...

Owner's Manual
Page 12
... the sound with the right and left hands Left - Layering Two Different Voices" on page 60 Playing separate voices with the right and left -hand part ...page 83 Practicing with an accurate and steady tempo Using the Metronome" on page 144 Combining two voices Layer - Listening Listening to the internal songs...
... the sound with the right and left hands Left - Layering Two Different Voices" on page 60 Playing separate voices with the right and left -hand part ...page 83 Practicing with an accurate and steady tempo Using the Metronome" on page 144 Combining two voices Layer - Listening Listening to the internal songs...

Owner's Manual
Page 14
... harmonies to your backing band! SYNC.STOP SYNC.START START STOP MENU DEMO A HELP B FUNCTION C DIGITAL STUDIO D SOUND CREATOR E DIGITAL RECORDING MIXING CONSOLE BALANCE PART CHANNEL ON OFF PART DIRECT ACCESS 1 2 3 4 5 STYLE Back up your performance with Auto Accompaniment (page 28, 63) Playing a chord with your own complete, fully orchestrated compositions - SIGNAL...
... harmonies to your backing band! SYNC.STOP SYNC.START START STOP MENU DEMO A HELP B FUNCTION C DIGITAL STUDIO D SOUND CREATOR E DIGITAL RECORDING MIXING CONSOLE BALANCE PART CHANNEL ON OFF PART DIRECT ACCESS 1 2 3 4 5 STYLE Back up your performance with Auto Accompaniment (page 28, 63) Playing a chord with your own complete, fully orchestrated compositions - SIGNAL...

Owner's Manual
Page 15
... AUX OUT Organ Flutes Craft your own organ voices (page 96) This special function not only gives you create your computer recorded parts with different instrument sounds - BACK NEXT F VOICE PART ON OFF G LAYER H LEFT I J VOICE EFFECT REVERB DSP VARIATION HARMONY ECHO MONO VOICE PIANO & HARPSI. Connections and setup are exceptionally easy...
... AUX OUT Organ Flutes Craft your own organ voices (page 96) This special function not only gives you create your computer recorded parts with different instrument sounds - BACK NEXT F VOICE PART ON OFF G LAYER H LEFT I J VOICE EFFECT REVERB DSP VARIATION HARMONY ECHO MONO VOICE PIANO & HARPSI. Connections and setup are exceptionally easy...

Owner's Manual
Page 17
... stereo headphones can be provided to one into the AC INLET on the Clavinova. LINE PHONES MIN MAX POWER ON OFF A B C D E BALANCE CHANNEL ON OFF PART The drive lamp lights. The drive lamp below the right end of the keyboard will turn off. Otherwise, the Clavinova or the hanger may be...
... stereo headphones can be provided to one into the AC INLET on the Clavinova. LINE PHONES MIN MAX POWER ON OFF A B C D E BALANCE CHANNEL ON OFF PART The drive lamp lights. The drive lamp below the right end of the keyboard will turn off. Otherwise, the Clavinova or the hanger may be...

Owner's Manual
Page 18
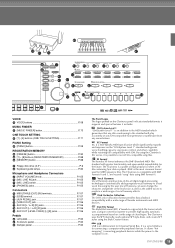
... 34 35 MENU 36 DEMO 37 HELP 38 FUNCTION 42 A B C DIGITAL STUDIO 39 SOUND CREATOR 40 DIGITAL RECORDING 41 MIXING CONSOLE D E BALANCE 43 PART CHANNEL ON ⁄ OFF 44 PART 45 50 DIRECT ACCESS 1 2 3 4 5 POWER 1 [ON / OFF] button (POWER P. 17 METRONOME 2 [START / STOP] button (METRONOME P. 54 MASTER...button P. 65, 80 45 [DIRECT ACCESS] button P. 51 46 [BACK] button P. 44, 50 47 [NEXT] button P. 44, 50 48 VOICE PART ON / OFF [LAYER] button P. 60 49 VOICE PART ON / OFF [LEFT] button P. 60 50 [1▲▼] - [8▲▼] buttons P. 39 - 49 51 [ENTER] button P. 50 52...
... 34 35 MENU 36 DEMO 37 HELP 38 FUNCTION 42 A B C DIGITAL STUDIO 39 SOUND CREATOR 40 DIGITAL RECORDING 41 MIXING CONSOLE D E BALANCE 43 PART CHANNEL ON ⁄ OFF 44 PART 45 50 DIRECT ACCESS 1 2 3 4 5 POWER 1 [ON / OFF] button (POWER P. 17 METRONOME 2 [START / STOP] button (METRONOME P. 54 MASTER...button P. 65, 80 45 [DIRECT ACCESS] button P. 51 46 [BACK] button P. 44, 50 47 [NEXT] button P. 44, 50 48 VOICE PART ON / OFF [LAYER] button P. 60 49 VOICE PART ON / OFF [LEFT] button P. 60 50 [1▲▼] - [8▲▼] buttons P. 39 - 49 51 [ENTER] button P. 50 52...
Owner's Manual
Page 19
...using the Clavinova's XG voices, it includes. LINE IN] jack P. 155 71 [MIC. By using the Style Creator feature. XF Format The Yamaha XF format enhances the SMF (Standard MIDI File) standard with peripheral devices. USB USB is a serial interface for connecting a computer with greater ...functionality and open-ended expandability for Universal Serial Bus. 68 80 81 82 67 46 BACK 47 NEXT 42 F VOICE PART ON ⁄ OFF G 48 LAYER H 49 LEFT I J VOICE EFFECT REVERB DSP 54 55 VARIATION 56 HARMONY ⁄ ECHO MONO 57 58...
...using the Clavinova's XG voices, it includes. LINE IN] jack P. 155 71 [MIC. By using the Style Creator feature. XF Format The Yamaha XF format enhances the SMF (Standard MIDI File) standard with peripheral devices. USB USB is a serial interface for connecting a computer with greater ...functionality and open-ended expandability for Universal Serial Bus. 68 80 81 82 67 46 BACK 47 NEXT 42 F VOICE PART ON ⁄ OFF G 48 LAYER H 49 LEFT I J VOICE EFFECT REVERB DSP 54 55 VARIATION 56 HARMONY ⁄ ECHO MONO 57 58...
Owner's Manual
Page 20
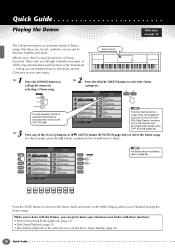
... (page 56). 3 Press any of the instrument - MENU DEMO HELP FUNCTION 2 Press the [BACK]/[NEXT] button to page 56. For details about the Demos, A F VOICE PART refer to select the Demo categories. Quick Guide Playing the Demos Reference on page 56 The Clavinova features an extensive variety of Demo functions. What...
... (page 56). 3 Press any of the instrument - MENU DEMO HELP FUNCTION 2 Press the [BACK]/[NEXT] button to page 56. For details about the Demos, A F VOICE PART refer to select the Demo categories. Quick Guide Playing the Demos Reference on page 56 The Clavinova features an extensive variety of Demo functions. What...

Owner's Manual
Page 23
... pages 84 and 87 for details. 6 While the song is playing, try using the Mute function to turn certain instrument channels off . 1 2 3 4 5 6 7 8 CHANNEL ON / OFF PART 1 2 3 4 5 6 7 8 If the STYLE tab is selected, press this button again. Song Playback 4 Press one of the [A] to [J] buttons to select a song file. 5 Press the...
... pages 84 and 87 for details. 6 While the song is playing, try using the Mute function to turn certain instrument channels off . 1 2 3 4 5 6 7 8 CHANNEL ON / OFF PART 1 2 3 4 5 6 7 8 If the STYLE tab is selected, press this button again. Song Playback 4 Press one of the [A] to [J] buttons to select a song file. 5 Press the...

Owner's Manual
Page 24
the song, the style, your singing, and your hand at mixing. BALANCE 1 2 3 4 5 6 7 8 You can be used to the part of which the volume you adjust the levels of mixing controls by pressing the [MIXING CONSOLE] button (page 123). 8 Press the SONG [START/STOP] button... adjust. REC TOP START / STOP NEW SONG SYNC.START • The [FADE IN/OUT] button (page 69) can call up a full set of the individual parts - These Balance controls let you wish to stop playback. Song Playback 7 Finally, take the producer's seat and try your playing. 1) Press the [BALANCE] button. 2) ...
the song, the style, your singing, and your hand at mixing. BALANCE 1 2 3 4 5 6 7 8 You can be used to the part of which the volume you adjust the levels of mixing controls by pressing the [MIXING CONSOLE] button (page 123). 8 Press the SONG [START/STOP] button... adjust. REC TOP START / STOP NEW SONG SYNC.START • The [FADE IN/OUT] button (page 69) can call up a full set of the individual parts - These Balance controls let you wish to stop playback. Song Playback 7 Finally, take the producer's seat and try your playing. 1) Press the [BALANCE] button. 2) ...

Owner's Manual
Page 25
...voices, combine two voices in a layer, and split two voices between your music. E. Quick Guide 25 so make sure that the LAYER and LEFT parts are turned off. 2 Select a voice group. BASS XG ORGAN FLUTES USER For this example, PRESET is selected. Playing Voices Playing Voices Reference The Clavinova... page 58 some of these voices now and hear what they can do for selecting the MAIN voice. For this example, STRINGS is selected. F VOICE PART ON OFF G LAYER H LEFT I J The voice you 'll learn how to call up the menu for your left and right hands. PIANO ORGAN ...
...voices, combine two voices in a layer, and split two voices between your music. E. Quick Guide 25 so make sure that the LAYER and LEFT parts are turned off. 2 Select a voice group. BASS XG ORGAN FLUTES USER For this example, PRESET is selected. Playing Voices Playing Voices Reference The Clavinova... page 58 some of these voices now and hear what they can do for selecting the MAIN voice. For this example, STRINGS is selected. F VOICE PART ON OFF G LAYER H LEFT I J The voice you 'll learn how to call up the menu for your left and right hands. PIANO ORGAN ...

Owner's Manual
Page 26
... the [G] button to select the other voice-related features: • Instant setup of the Clavinova for you need them (page 88). 26 Quick Guide VOICE PART ON OFF G LAYER H LEFT 3 Select a voice group. Call up whenever you . E. And that's just the beginning. and call them up the "CHOIR &... jump back to start the Demo for more to fill out the sound. C D E Press the corresponding buttons to select the LAYER part. Simply press the [8▲] button from the keyboard, but you can also have the Clavinova demonstrate the voice for piano play two different voices ...
... the [G] button to select the other voice-related features: • Instant setup of the Clavinova for you need them (page 88). 26 Quick Guide VOICE PART ON OFF G LAYER H LEFT 3 Select a voice group. Call up whenever you . E. And that's just the beginning. and call them up the "CHOIR &... jump back to start the Demo for more to fill out the sound. C D E Press the corresponding buttons to select the LAYER part. Simply press the [8▲] button from the keyboard, but you can also have the Clavinova demonstrate the voice for piano play two different voices ...

Owner's Manual
Page 27
... Voices Playing Different Voices with the Left and Right Hands 1 Press the VOICE PART ON/OFF [LEFT] button to turn the LEFT part on. 2 Press the [H] button to the MAIN display. VOICE PART ON OFF G LAYER H LEFT 3 Select a voice group. From here, you can set the particular key on the keyboard. (For more...
... Voices Playing Different Voices with the Left and Right Hands 1 Press the VOICE PART ON/OFF [LEFT] button to turn the LEFT part on. 2 Press the [H] button to the MAIN display. VOICE PART ON OFF G LAYER H LEFT 3 Select a voice group. From here, you can set the particular key on the keyboard. (For more...

Owner's Manual
Page 30
... pressed. When the intro finishes playing, accompaniment shifts to [D] buttons or [BREAK] button as in the auto accompaniment is used for playing the main part of the MAIN [A] to the main section. D 30 Quick Guide Intros, Endings, Main patterns, and Breaks - This is made up the beats - When the ending...
... pressed. When the intro finishes playing, accompaniment shifts to [D] buttons or [BREAK] button as in the auto accompaniment is used for playing the main part of the MAIN [A] to the main section. D 30 Quick Guide Intros, Endings, Main patterns, and Breaks - This is made up the beats - When the ending...
Owner's Manual
Page 36
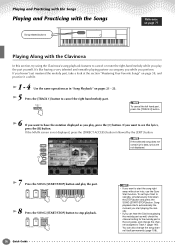
... starts automatically the moment you start the song right away without an intro, use the Sync Start function. TRACK 1 (R) To cancel the left hand part, press the [TRACK 2] button. 6 If you want to have the notation displayed as in the song data, and change the song channel itself ... a very talented and versatile playing partner accompany you while you want to see the lyrics, press the [B] button. If you haven't yet mastered the melody part, take a look at the section "Mastering Your Favorite Songs" on page 38, and practice it a while. 1 - 4 Use the same operations as you play...
... starts automatically the moment you start the song right away without an intro, use the Sync Start function. TRACK 1 (R) To cancel the left hand part, press the [TRACK 2] button. 6 If you want to have the notation displayed as in the song data, and change the song channel itself ... a very talented and versatile playing partner accompany you while you want to see the lyrics, press the [B] button. If you haven't yet mastered the melody part, take a look at the section "Mastering Your Favorite Songs" on page 38, and practice it a while. 1 - 4 Use the same operations as you play...

Owner's Manual
Page 38
... key guide lamps. Here, you'll try out the Follow Lights function, and use the powerful Repeat function to practice and master difficult parts. GUIDE Before Practicing Before starting a practice session, play the right notes. 1 - 6 Use the same operations as in "Playing Along with the Clavinova... the Songs Mastering Your Favorite Songs The Clavinova has several very useful practice features that help you play back the entire song (without canceling any parts) and listen to it down. 1) While the song is playing back, press the [GUIDE] button once to turn the [TRACK 2] and [EXTRA...
... key guide lamps. Here, you'll try out the Follow Lights function, and use the powerful Repeat function to practice and master difficult parts. GUIDE Before Practicing Before starting a practice session, play the right notes. 1 - 6 Use the same operations as in "Playing Along with the Clavinova... the Songs Mastering Your Favorite Songs The Clavinova has several very useful practice features that help you play back the entire song (without canceling any parts) and listen to it down. 1) While the song is playing back, press the [GUIDE] button once to turn the [TRACK 2] and [EXTRA...

Owner's Manual
Page 39
... is set to other song information is displayed. 3 Playback Position of Song (page 78) or Accompaniment Style (page 63) The current position of the parts (page 65) You can save your custom panel settings as Song Start/Stop and Glide. CVP-210/208 39 The volume balance of the keyboard... and song to be shifted down or up displays corresponding to each part is displayed here. The name of the currently selected style are specific positions on , the chord specified in semitones. Basic Operations - ...
... is set to other song information is displayed. 3 Playback Position of Song (page 78) or Accompaniment Style (page 63) The current position of the parts (page 65) You can save your custom panel settings as Song Start/Stop and Glide. CVP-210/208 39 The volume balance of the keyboard... and song to be shifted down or up displays corresponding to each part is displayed here. The name of the currently selected style are specific positions on , the chord specified in semitones. Basic Operations - ...

Owner's Manual
Page 44
... [ENTER] button to the USER or FLOPPY DISK section. Organizing Your Data Selecting Files and Folders Select a file shown in the PRESET section. A F VOICE PART ON OFF B G LAYER Selecting a different lan- There are display. Basic Operations - In this example, we'll select a voice file. The CVP-210/208 already...
... [ENTER] button to the USER or FLOPPY DISK section. Organizing Your Data Selecting Files and Folders Select a file shown in the PRESET section. A F VOICE PART ON OFF B G LAYER Selecting a different lan- There are display. Basic Operations - In this example, we'll select a voice file. The CVP-210/208 already...


