
Owner's Manual
Page 2
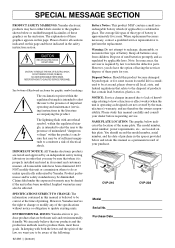
... is properly installed and used to produce them, meet these graphics appears on this manual as designed) are not covered by Yamaha. Disposal Notice: Should this manual carefully and consult your purchase. Keep all foreseeable risks have been eliminated. In keeping with..., within the product's enclosure that when it is operating as a permanent record of Keyboard enclosure for graphic symbol markings. IntroduScPtiEoCn IAL MESSAGE SECTION PRODUCT SAFETY MARKINGS: Yamaha electronic products may have either labels similar to the graphics shown below or molded/stamped ...
... is properly installed and used to produce them, meet these graphics appears on this manual as designed) are not covered by Yamaha. Disposal Notice: Should this manual carefully and consult your purchase. Keep all foreseeable risks have been eliminated. In keeping with..., within the product's enclosure that when it is operating as a permanent record of Keyboard enclosure for graphic symbol markings. IntroduScPtiEoCn IAL MESSAGE SECTION PRODUCT SAFETY MARKINGS: Yamaha electronic products may have either labels similar to the graphics shown below or molded/stamped ...
Owner's Manual
Page 4
...display page and then exit from the relevant display. However, this edited data is lost or destroyed. Caution for damage caused by qualified Yamaha service personnel. • Do not place vinyl, plastic or rubber objects on ) - including all voices, styles, and Registration Memory presets you...USER drive data - Using it might result in accident or injury. • Only one person should sit on the key cover, panel or keyboard. Backing up your data • Some of the instrument with a soft cloth. until the alert message disappears.) Turning the power off the power...
...display page and then exit from the relevant display. However, this edited data is lost or destroyed. Caution for damage caused by qualified Yamaha service personnel. • Do not place vinyl, plastic or rubber objects on ) - including all voices, styles, and Registration Memory presets you...USER drive data - Using it might result in accident or injury. • Only one person should sit on the key cover, panel or keyboard. Backing up your data • Some of the instrument with a soft cloth. until the alert message disappears.) Turning the power off the power...
Owner's Manual
Page 8
... vinyl, plastic, or rubber products on the screen to set up against a wall or stand it out of the box. Transport the keyboard horizontally. When such messages appear, simply follow the instructions as a PDF file (in tune. ■ Transporting If you move the... 8 CVP-210/208 It always stays perfectly in English) at the following Internet address: Clavinova Home Page http://www.yamahaclavinova.com/ Yamaha Manual Library (Electronic Musical Instruments) ......... When transporting the assembled Clavinova, make sure all screws are properly tightened and have not been ...
... vinyl, plastic, or rubber products on the screen to set up against a wall or stand it out of the box. Transport the keyboard horizontally. When such messages appear, simply follow the instructions as a PDF file (in tune. ■ Transporting If you move the... 8 CVP-210/208 It always stays perfectly in English) at the following Internet address: Clavinova Home Page http://www.yamahaclavinova.com/ Yamaha Manual Library (Electronic Musical Instruments) ......... When transporting the assembled Clavinova, make sure all screws are properly tightened and have not been ...
Owner's Manual
Page 9
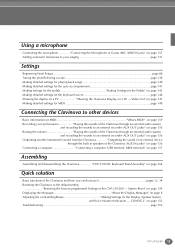
... ....... 39 Contents shown in patterns automatically when changing accompaniment sections - Auto Fill In 70 Appropriate Panel Setting for the Left and Right Sections of the Keyboard 61 Applying Voice Effects 61 Using the Pedals 62 Styles 63 Playing a style 63 Playing a Style's Rhythm Channels Only 65 Adjusting the Volume Balance/Channel...
... ....... 39 Contents shown in patterns automatically when changing accompaniment sections - Auto Fill In 70 Appropriate Panel Setting for the Left and Right Sections of the Keyboard 61 Applying Voice Effects 61 Using the Pedals 62 Styles 63 Playing a style 63 Playing a Style's Rhythm Channels Only 65 Adjusting the Volume Balance/Channel...

Owner's Manual
Page 10
...Guide Functions 83 Displaying Music Notation - Scale Tune 138 Setting Song-related Parameters - Controller 142 Making Settings for the Vocal Harmony and Microphone - Keyboard/Panel 144 10 CVP-210/208 Repeat Playback of the Voice - Song Creator 97 About Song Recording 97 Quick Recording 98 Multi Recording 99 ... Practice Functions - Chord Fingering 142 Making Settings for the Auto Accompaniment - Step Record (Note 103 Recording Chord Changes for the Pedals and Keyboard - Groove and Dynamics 118 Editing the Channel Data 120 Making Style File Format Settings -
...Guide Functions 83 Displaying Music Notation - Scale Tune 138 Setting Song-related Parameters - Controller 142 Making Settings for the Vocal Harmony and Microphone - Keyboard/Panel 144 10 CVP-210/208 Repeat Playback of the Voice - Song Creator 97 About Song Recording 97 Quick Recording 98 Multi Recording 99 ... Practice Functions - Chord Fingering 142 Making Settings for the Auto Accompaniment - Step Record (Note 103 Recording Chord Changes for the Pedals and Keyboard - Groove and Dynamics 118 Editing the Channel Data 120 Making Style File Format Settings -

Owner's Manual
Page 11
... 159 What You Can Do With MIDI 161 MIDI Data Compatibility 162 Disk format 162 Sequence Format 162 Voice Allocation Format 163 CVP-210/208: Keyboard Stand Assembly 164 Troubleshooting 166 Specifications 168 Index 170 Introduction Quick Guide Basic Operations - Disk 153 Entering Your Name and Language Preference - System 148 Transmitting...
... 159 What You Can Do With MIDI 161 MIDI Data Compatibility 162 Disk format 162 Sequence Format 162 Voice Allocation Format 163 CVP-210/208: Keyboard Stand Assembly 164 Troubleshooting 166 Specifications 168 Index 170 Introduction Quick Guide Basic Operations - Disk 153 Entering Your Name and Language Preference - System 148 Transmitting...

Owner's Manual
Page 12
... part ...page 83 Practicing with the right and left hands Left - Setting Separate Voices for the Left and Right Sections of the Keyboard" on page 61 Creating voices ...page 91 Playing the auto accompaniment Playing the accompaniment automatically page 63 Calling up the piano setting ...... an accompaniment that may be helpful for your particular application and situation. Setting Separate Voices for the Left and Right Sections of the Keyboard" on page 144 Combining two voices Layer - Listening Listening to the internal songs ...page 78 Listening to disk songs Playing Back Songs...
... part ...page 83 Practicing with the right and left hands Left - Setting Separate Voices for the Left and Right Sections of the Keyboard" on page 61 Creating voices ...page 91 Playing the auto accompaniment Playing the accompaniment automatically page 63 Calling up the piano setting ...... an accompaniment that may be helpful for your particular application and situation. Setting Separate Voices for the Left and Right Sections of the Keyboard" on page 144 Combining two voices Layer - Listening Listening to the internal songs ...page 78 Listening to disk songs Playing Back Songs...
Owner's Manual
Page 13
... 156 Connecting a computer Connecting a computer (USB terminal, MIDI terminal)" on page 157 Assembling Assembling and disassembling the Clavinova CVP-210/208: Keyboard Stand Assembly" on page 8 Adjusting the contrast/brightness Making Settings for the Display, Speaker System, and Voice Number Indication - on page 159...for the auto accompaniment page 141 Making settings for the pedals Making Settings for the Pedals" on page 142 Making detailed settings for the keyboard voices page 144 Showing the display on a TV Showing the Clavinova Display on a TV - CONFIG 2" on MIDI What's MIDI?" ...
... 156 Connecting a computer Connecting a computer (USB terminal, MIDI terminal)" on page 157 Assembling Assembling and disassembling the Clavinova CVP-210/208: Keyboard Stand Assembly" on page 8 Adjusting the contrast/brightness Making Settings for the Display, Speaker System, and Voice Number Indication - on page 159...for the auto accompaniment page 141 Making settings for the pedals Making Settings for the Pedals" on page 142 Making detailed settings for the keyboard voices page 144 Showing the display on a TV Showing the Clavinova Display on a TV - CONFIG 2" on MIDI What's MIDI?" ...

Owner's Manual
Page 14
... proper notes. Select an accompaniment style - and let the Clavinova be your left hand automatically plays the auto accompaniment backing. What can record your own keyboard performances, and create your own complete, fully orchestrated compositions - and give you can then save to the USER drive or a floppy disk for future...
... proper notes. Select an accompaniment style - and let the Clavinova be your left hand automatically plays the auto accompaniment backing. What can record your own keyboard performances, and create your own complete, fully orchestrated compositions - and give you can then save to the USER drive or a floppy disk for future...

Owner's Manual
Page 17
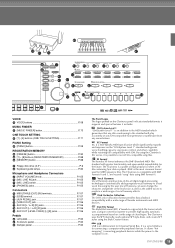
... to turn off the power, press the [POWER] switch again. → Both the display and the drive lamp below the lower right end of the keyboard also lights. BACK When you can plug them into a standard AC outlet. The drive lamp below the right end of the... keyboard will turn off . LINE IN MIC. Using the Headphone Hanger A headphone hanger is included in the LCD display. Otherwise, the Clavinova or the hanger may ...
... to turn off the power, press the [POWER] switch again. → Both the display and the drive lamp below the lower right end of the keyboard also lights. BACK When you can plug them into a standard AC outlet. The drive lamp below the right end of the... keyboard will turn off . LINE IN MIC. Using the Headphone Hanger A headphone hanger is included in the LCD display. Otherwise, the Clavinova or the hanger may ...
Owner's Manual
Page 19
...MEMORY 64 [FREEZE] button P. 90 65 [1] - [8] buttons (REGISTRATION MEMORY P. 88 66 [MEMORY] button P. 88 67 Floppy disk drive (3.5 P. 6 68 Keyboard guide lamps P. 82 Microphone and Headphone Connectors 69 [INPUT VOLUME] knob P. 155 70 [MIC. LINE] switch P. 155 72 [PHONES] jacks P. 155 Connectors 73... greater functionality and open-ended expandability for Universal Serial Bus. It is an abbreviation for the future. XF Format The Yamaha XF format enhances the SMF (Standard MIDI File) standard with peripheral devices. Disk Orchestra Collection The DOC voice allocation format...
...MEMORY 64 [FREEZE] button P. 90 65 [1] - [8] buttons (REGISTRATION MEMORY P. 88 66 [MEMORY] button P. 88 67 Floppy disk drive (3.5 P. 6 68 Keyboard guide lamps P. 82 Microphone and Headphone Connectors 69 [INPUT VOLUME] knob P. 155 70 [MIC. LINE] switch P. 155 72 [PHONES] jacks P. 155 Connectors 73... greater functionality and open-ended expandability for Universal Serial Bus. It is an abbreviation for the future. XF Format The Yamaha XF format enhances the SMF (Standard MIDI File) standard with peripheral devices. Disk Orchestra Collection The DOC voice allocation format...

Owner's Manual
Page 26
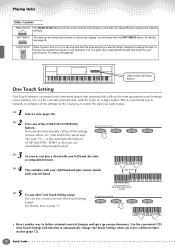
and discover even more - And that's just the beginning. Check out these other pages - quickly and easily - Simply press the [8▲] button from the keyboard, but you can play - Here, we'll select a lush pad to the Demo features than just voices, though-for you. the MAIN voice you can ...
and discover even more - And that's just the beginning. Check out these other pages - quickly and easily - Simply press the [8▲] button from the keyboard, but you can play - Here, we'll select a lush pad to the Demo features than just voices, though-for you. the MAIN voice you can ...

Owner's Manual
Page 27
... and LAYER voices are meant to be played with the left hand. 7 Press the [EXIT] button to return to turn the LEFT part on the keyboard. (For more information, see page 141.) F F G G H H I I ] button to the MAIN display. Here, we'll select the "STRINGS" group - The LEFT voice is played with the... SPLIT POINT display. The notes you play with your left hand sound one voice, while the notes you can set the particular key on the keyboard that separates the two voices - EXIT Quick Guide 27
... and LAYER voices are meant to be played with the left hand. 7 Press the [EXIT] button to return to turn the LEFT part on the keyboard. (For more information, see page 141.) F F G G H H I I ] button to the MAIN display. Here, we'll select the "STRINGS" group - The LEFT voice is played with the... SPLIT POINT display. The notes you play with your left hand sound one voice, while the notes you can set the particular key on the keyboard that separates the two voices - EXIT Quick Guide 27

Owner's Manual
Page 29
...STOP] button to page 141 for fully automatic accompaniment with your left hand. The specified left-hand section of the keyboard is called the "split point." Split Point ACMP Auto Accompaniment section • The point on . For this section are automatically... buttons if necessary. Quick Guide 29 And there's much more - Playing Styles 3 Turn ACMP on the keyboard that separates the auto accompaniment section and the right-hand section of the keyboard becomes the "Auto Accompaniment" section, and chords played in this example, play a chord with the selected ...
...STOP] button to page 141 for fully automatic accompaniment with your left hand. The specified left-hand section of the keyboard is called the "split point." Split Point ACMP Auto Accompaniment section • The point on . For this section are automatically... buttons if necessary. Quick Guide 29 And there's much more - Playing Styles 3 Turn ACMP on the keyboard that separates the auto accompaniment section and the right-hand section of the keyboard becomes the "Auto Accompaniment" section, and chords played in this example, play a chord with the selected ...

Owner's Manual
Page 30
.../Echo type may change according to the selected MAIN voice. • Harmony/Echo is made up the beats - This lets you play some of the keyboard. This is finished, the auto accompaniment stops automatically. 1 - 4 Use the same operations as you add dynamic variations and breaks in the auto accompaniment is...
.../Echo type may change according to the selected MAIN voice. • Harmony/Echo is made up the beats - This lets you play some of the keyboard. This is finished, the auto accompaniment stops automatically. 1 - 4 Use the same operations as you add dynamic variations and breaks in the auto accompaniment is...
Owner's Manual
Page 32
...) Link function to your left hand, the auto accompaniment starts. 4 Play melodies with your right hand and play various chords with the touch of the keyboard).
...) Link function to your left hand, the auto accompaniment starts. 4 Play melodies with your right hand and play various chords with the touch of the keyboard).

Owner's Manual
Page 37
... newly recorded performance, return the song to the beginning by using the [TOP] button and press the SONG [START/STOP] button. REC 8 To hear your keyboard performance. 1 - 3 Select a voice for recording. To keep your important recordings, you 've finished recording, press the [REC] button. REC TOP START / ... as soon as required (pages 40, 48). REC TOP START / STOP NEW SONG SYNC.START 9 Save the recorded data as you start playing the keyboard. 7 When you 'll need to save them to select "New Song" for recording. CAUTION The recorded data will be lost if you record, too...
... newly recorded performance, return the song to the beginning by using the [TOP] button and press the SONG [START/STOP] button. REC 8 To hear your keyboard performance. 1 - 3 Select a voice for recording. To keep your important recordings, you 've finished recording, press the [REC] button. REC TOP START / ... as soon as required (pages 40, 48). REC TOP START / STOP NEW SONG SYNC.START 9 Save the recorded data as you start playing the keyboard. 7 When you 'll need to save them to select "New Song" for recording. CAUTION The recorded data will be lost if you record, too...

Owner's Manual
Page 39
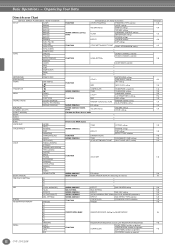
... song and other various functions, such as a Registration Memory preset and recall it at any specified order, and step through that divide the keyboard into separate sections. The name of the song or the accompaniment style being played is displayed. 4 Tempo (page 54) When a song or a accompaniment style is... (page 60) The voice selected for the Left part is displayed. 7 Intro and Ending (page 70) The names of the intro and ending of the keyboard, and "L", which divides the left hand section is displayed. 6 Accompaniment Style (page 63) The name, beat, and tempo of the...
... song and other various functions, such as a Registration Memory preset and recall it at any specified order, and step through that divide the keyboard into separate sections. The name of the song or the accompaniment style being played is displayed. 4 Tempo (page 54) When a song or a accompaniment style is... (page 60) The voice selected for the Left part is displayed. 7 Intro and Ending (page 70) The names of the intro and ending of the keyboard, and "L", which divides the left hand section is displayed. 6 Accompaniment Style (page 63) The name, beat, and tempo of the...
Owner's Manual
Page 52
... FILTER HARMONIC CONTENT settings BRIGHTNESS settings REVERB settings EFFECT CHORUS settings DSP settings STYLE SETTING/SPLIT POINT SYNC. STOP WINDOW setting - - EFFECT TYPE selection CONTROLLER KEYBOARD TOUCH selection FREEZE REGISTRATION BANK REGISTRATION EDIT (Editing the REGISTRATION) FUNCTION REGISTRATION SEQUENCE (Creating the REGISTRATION SEQUENCE) RIGHT PEDAL function assignment CONTROLLER CENTER PEDAL function...
... FILTER HARMONIC CONTENT settings BRIGHTNESS settings REVERB settings EFFECT CHORUS settings DSP settings STYLE SETTING/SPLIT POINT SYNC. STOP WINDOW setting - - EFFECT TYPE selection CONTROLLER KEYBOARD TOUCH selection FREEZE REGISTRATION BANK REGISTRATION EDIT (Editing the REGISTRATION) FUNCTION REGISTRATION SEQUENCE (Creating the REGISTRATION SEQUENCE) RIGHT PEDAL function assignment CONTROLLER CENTER PEDAL function...

Owner's Manual
Page 58
... & PAD GUITAR SYNTH. PIANO ORGAN & ACCORDION PERCUSSION BRASS WOODWIND STRINGS CHOIR & PAD GUITAR SYNTH. Press this button again. 3 Play the keyboard to start the demo of data well into the future. 58 CVP-210/208 You can disable this so that particular voice. VOICE PIANO &... the voice (PRESET/USER/FLOPPY DISK). A B C D E 2-1 Select the memory location of the GM System level 1 format, and was developed by Yamaha specially to ND the MAIN display. n You can set whether the voice bank and program change numbers ("MSBLSB-Program Change number" at any time, press...
... & PAD GUITAR SYNTH. PIANO ORGAN & ACCORDION PERCUSSION BRASS WOODWIND STRINGS CHOIR & PAD GUITAR SYNTH. Press this button again. 3 Play the keyboard to start the demo of data well into the future. 58 CVP-210/208 You can disable this so that particular voice. VOICE PIANO &... the voice (PRESET/USER/FLOPPY DISK). A B C D E 2-1 Select the memory location of the GM System level 1 format, and was developed by Yamaha specially to ND the MAIN display. n You can set whether the voice bank and program change numbers ("MSBLSB-Program Change number" at any time, press...

