
Owner's Manual
Page 2
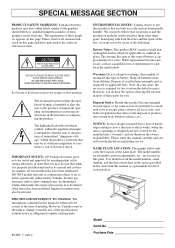
...and retain this unit or commission others to return the defective parts. NO USER-SERVICEABLE PARTS INSIDE. REFER SERVICING TO QUALIFIED SERVICE PERSONNEL. DO NOT modify this manual as designed) are tested and approved by Yamaha. Note: In some reason its normal and customary manner, all.... Disposal Notice: Should this type of your dealer before requesting service. Product performance and/or safety standards may be affected. However, Yamaha reserves the right to change or modify any of the specifications without notice or obligation to update existing units. 92-469- Œ...
...and retain this unit or commission others to return the defective parts. NO USER-SERVICEABLE PARTS INSIDE. REFER SERVICING TO QUALIFIED SERVICE PERSONNEL. DO NOT modify this manual as designed) are tested and approved by Yamaha. Note: In some reason its normal and customary manner, all.... Disposal Notice: Should this type of your dealer before requesting service. Product performance and/or safety standards may be affected. However, Yamaha reserves the right to change or modify any of the specifications without notice or obligation to update existing units. 92-469- Œ...
Owner's Manual
Page 3
... on it . • Do not connect the instrument to be malfunctioning, discontinue use immediately and have the instrument inspected by qualified Yamaha service personnel. • Only use paint thinners, solvents, cleaning fluids, or chemical-impregnated wiping cloths. sUSING THE BENCH (if included...precautions include, but are not limited to, the following : • Do not open the instrument or attempt to disassemble the internal parts or modify them periodically using a multiple-connector. sSAVING USER DATA • Always save data to a floppy disk frequently, in ...
... on it . • Do not connect the instrument to be malfunctioning, discontinue use immediately and have the instrument inspected by qualified Yamaha service personnel. • Only use paint thinners, solvents, cleaning fluids, or chemical-impregnated wiping cloths. sUSING THE BENCH (if included...precautions include, but are not limited to, the following : • Do not open the instrument or attempt to disassemble the internal parts or modify them periodically using a multiple-connector. sSAVING USER DATA • Always save data to a floppy disk frequently, in ...
Owner's Manual
Page 5
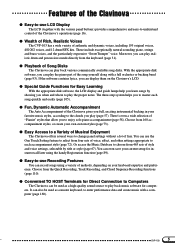
... of Musical Enjoyment The Clavinova offers several ways to change panel settings without a lot of the Clavinova's operations (page 16). You can play the piano part of the Clavinova gives you when and where to play (page 57). These include exceptionally natural-sounding piano, strings and brass voices, and the particularly...
... of Musical Enjoyment The Clavinova offers several ways to change panel settings without a lot of the Clavinova's operations (page 16). You can play the piano part of the Clavinova gives you when and where to play (page 57). These include exceptionally natural-sounding piano, strings and brass voices, and the particularly...
Owner's Manual
Page 6
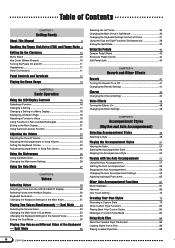
... 57 Using the Auto Accompaniment 57 Starting the Auto Accompaniment 58 Stopping the Auto Accompaniment 58 Changing the Auto Accompaniment Settings 59 Adjusting Individual Part Levels 65 Other Auto Accompaniment Functions 67 Music Database 67 Harmony 69 One Touch Setting 72 Creating Your Own Styles 73 Recording a Custom ...Other Custom Style Functions 80 Playing Back Your Custom Styles 84 Messages in Custom Style Mode 84 Using Style Files 86 About the Yamaha Style File Format 86 Loading Styles from a Disk 86 Playing Loaded Style Files 88 6 CVP-103 4
... 57 Using the Auto Accompaniment 57 Starting the Auto Accompaniment 58 Stopping the Auto Accompaniment 58 Changing the Auto Accompaniment Settings 59 Adjusting Individual Part Levels 65 Other Auto Accompaniment Functions 67 Music Database 67 Harmony 69 One Touch Setting 72 Creating Your Own Styles 73 Recording a Custom ...Other Custom Style Functions 80 Playing Back Your Custom Styles 84 Messages in Custom Style Mode 84 Using Style Files 86 About the Yamaha Style File Format 86 Loading Styles from a Disk 86 Playing Loaded Style Files 88 6 CVP-103 4
Owner's Manual
Page 7
... Setups) 89 Storing a Panel Setup 89 Recalling the Registered Panel Settings 90 Protecting Panel Settings 91 CHAPTER 7: Song Control Song Playback 93 Song Playback 93 Part Cancel 97 Assignment of Music Data 104 Guide Control 105 Guide Methods and Piano Roll 105 Using the Guide Function 106 Other Guide-related Functions...
... Setups) 89 Storing a Panel Setup 89 Recalling the Registered Panel Settings 90 Protecting Panel Settings 91 CHAPTER 7: Song Control Song Playback 93 Song Playback 93 Part Cancel 97 Assignment of Music Data 104 Guide Control 105 Guide Methods and Piano Roll 105 Using the Guide Function 106 Other Guide-related Functions...
Owner's Manual
Page 23
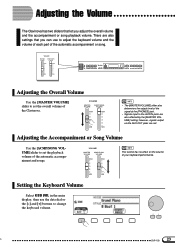
... jacks are not. Adjusting the Accompaniment or Song Volume Use the [ACMP/SONG VOLUME] slider to adjust the keyboard volume and the volume of each part of the automatic accompaniment and songs. VOLUME MASTER VOLUME ACMP/SONG VOLUME MAX MAX This control has no effect on the volume of the Clavinova...
... jacks are not. Adjusting the Accompaniment or Song Volume Use the [ACMP/SONG VOLUME] slider to adjust the keyboard volume and the volume of each part of the automatic accompaniment and songs. VOLUME MASTER VOLUME ACMP/SONG VOLUME MAX MAX This control has no effect on the volume of the Clavinova...

Owner's Manual
Page 24
..." (page 65) for details. 22 24 CVP-103 See "Adjusting Indi- vidual Track Levels" (page 100) for details. Adjusting the Volume Adjusting Accompaniment or Song Part Levels Call up the MIXER display by pressing [MIXER]. q Automatic Accompaniment Mixer This MIXER display appears when you're not using the Song mode. q Song... Mixer This MIXER display appears in the Song mode. In the Mixer display, the volume of Automatic Accompaniment and individual parts of mixer display, as shown below.
..." (page 65) for details. 22 24 CVP-103 See "Adjusting Indi- vidual Track Levels" (page 100) for details. Adjusting the Volume Adjusting Accompaniment or Song Part Levels Call up the MIXER display by pressing [MIXER]. q Automatic Accompaniment Mixer This MIXER display appears when you're not using the Song mode. q Song... Mixer This MIXER display appears in the Song mode. In the Mixer display, the volume of Automatic Accompaniment and individual parts of mixer display, as shown below.

Owner's Manual
Page 41
... [REVERB] button depends on the voice, the reverb may turn the reverb off automatically when you choose from a room in a jazz club to the keyboard part(s), press the [REVERB] button. ONE TOUCH 1 2 3 4 BANK BANK RATION SETTING REVERB Turning the Reverb On or Off To apply reverb to a concert hall. To turn...
... [REVERB] button depends on the voice, the reverb may turn the reverb off automatically when you choose from a room in a jazz club to the keyboard part(s), press the [REVERB] button. ONE TOUCH 1 2 3 4 BANK BANK RATION SETTING REVERB Turning the Reverb On or Off To apply reverb to a concert hall. To turn...

Owner's Manual
Page 42
.... Reverb The LCD displays either the REVERB page or the REVERB DEPTH page (whichever was selected most recently). Different settings cannot be made for each part. • Depending on the selected voice, the depth of this chapter for details. • If both effects will be applied to the sounds input through...
.... Reverb The LCD displays either the REVERB page or the REVERB DEPTH page (whichever was selected most recently). Different settings cannot be made for each part. • Depending on the selected voice, the depth of this chapter for details. • If both effects will be applied to the sounds input through...

Owner's Manual
Page 43
... the settings is 127. 41 CVP-103 43 Press the LCD button corresponding to RHYTHM to set the reverb depth for the drum part, or ACMP to a part depends on voice. Different settings cannot be applied to its basic setting, simultaneously press the [-] and [+] buttons. The amount of ... Range: 0 (no effect) - 127 (max.) • Basic setting: 64 LEFT, RIGHT1, and RIGHT2 • Range: 0 (no reverb will be made for each keyboard part. (See the next operation.) • You can also advance a value by using the TOTAL DEPTH w and v buttons, the data dial, or the [-] and [+] buttons. ...
... the settings is 127. 41 CVP-103 43 Press the LCD button corresponding to RHYTHM to set the reverb depth for the drum part, or ACMP to a part depends on voice. Different settings cannot be applied to its basic setting, simultaneously press the [-] and [+] buttons. The amount of ... Range: 0 (no effect) - 127 (max.) • Basic setting: 64 LEFT, RIGHT1, and RIGHT2 • Range: 0 (no reverb will be made for each keyboard part. (See the next operation.) • You can also advance a value by using the TOTAL DEPTH w and v buttons, the data dial, or the [-] and [+] buttons. ...

Owner's Manual
Page 45
... on , you should set a chorus depth of the effect may change automatically when you select a different style. You can also select several parts at once and adjust their settings simultaneously. Since the chorus feature is also possible to apply chorus effects to the keyboard voices using the data... chorus type may sound stronger or weaker, even though the same chorus type is selected. • It is always on page 46 for any parts that you don't want affected by using the [EFFECT] button. Chorus The selected chorus type is highlighted. • The chorus type selection affects...
... on , you should set a chorus depth of the effect may change automatically when you select a different style. You can also select several parts at once and adjust their settings simultaneously. Since the chorus feature is also possible to apply chorus effects to the keyboard voices using the data... chorus type may sound stronger or weaker, even though the same chorus type is selected. • It is always on page 46 for any parts that you don't want affected by using the [EFFECT] button. Chorus The selected chorus type is highlighted. • The chorus type selection affects...
Owner's Manual
Page 46
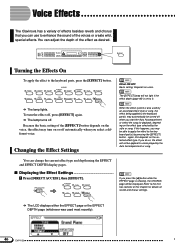
... the effect off . ONE TOUCH 1 2 3 4 BANK BANK RATION SETTING EFFECT Turning the Effects On To apply the effect to the keyboard part(s) by the style or song. VOLUME MASTER VOLUME ACMP/SONG VOLUME MAX MAX MIN MIN DEMO HELP ACMP ON 8BEAT 16BEAT BALLAD ST YLE DANCE...CUSSION ENSEMBLE XG SPLIT EFFECT REGISTRATION/ONE TOUCH SETTING REGIST- The [EFFECT] lamp will not be able to apply the effect to the keyboard parts, press the [EFFECT] button. You can change the current effect type and depth using the EFFECT and EFFECT DEPTH display pages. PIANO GUITAR...
... the effect off . ONE TOUCH 1 2 3 4 BANK BANK RATION SETTING EFFECT Turning the Effects On To apply the effect to the keyboard part(s) by the style or song. VOLUME MASTER VOLUME ACMP/SONG VOLUME MAX MAX MIN MIN DEMO HELP ACMP ON 8BEAT 16BEAT BALLAD ST YLE DANCE...CUSSION ENSEMBLE XG SPLIT EFFECT REGISTRATION/ONE TOUCH SETTING REGIST- The [EFFECT] lamp will not be able to apply the effect to the keyboard parts, press the [EFFECT] button. You can change the current effect type and depth using the EFFECT and EFFECT DEPTH display pages. PIANO GUITAR...

Owner's Manual
Page 47
...voice. VARIATION function • Settings: OFF, ON • Basic setting: Depends on voice. • The effect type selection affects all keyboard parts. Because the basic setting of this function may sound stronger or weaker, even though the same effect type is highlighted. The value displayed by ...settings cannot be applied. The way in Dual and/or Split mode, the Clavinova will be made for each part. • When the basic setting of the [EFFECT] button is ON for each part to its basic setting, simultaneously press the EFFECT TYPE v and w buttons or the [-] and [+] buttons...
...voice. VARIATION function • Settings: OFF, ON • Basic setting: Depends on voice. • The effect type selection affects all keyboard parts. Because the basic setting of this function may sound stronger or weaker, even though the same effect type is highlighted. The value displayed by ...settings cannot be applied. The way in Dual and/or Split mode, the Clavinova will be made for each part. • When the basic setting of the [EFFECT] button is ON for each part to its basic setting, simultaneously press the EFFECT TYPE v and w buttons or the [-] and [+] buttons...

Owner's Manual
Page 48
... when you play from the keyboard. Voice Effects s Setting the Effect Depth for Each Part The settings in the EFFECT DEPTH page let you set the effect depth for the corresponding keyboard part. Press LEFT, RIGHT1, or RIGHT2 to its basic setting, simultaneously press the [-] and... [+] buttons. X Set the effect depth. The selected function is highlighted. You can also advance a value by using the data dial or [-] and [+] buttons. Z Select a part. To reset a...
... when you play from the keyboard. Voice Effects s Setting the Effect Depth for Each Part The settings in the EFFECT DEPTH page let you set the effect depth for the corresponding keyboard part. Press LEFT, RIGHT1, or RIGHT2 to its basic setting, simultaneously press the [-] and... [+] buttons. X Set the effect depth. The selected function is highlighted. You can also advance a value by using the data dial or [-] and [+] buttons. Z Select a part. To reset a...

Owner's Manual
Page 49
... eleven groups, corresponding to the eleven STYLE buttons on optional Style File Disks (page 86) or your original styles (page 73) . including bass and rhythm parts - There is also a selection of "Pianist" styles that you can be retained in memory, even after turning off the power, when the Backup function (page...
... eleven groups, corresponding to the eleven STYLE buttons on optional Style File Disks (page 86) or your original styles (page 73) . including bass and rhythm parts - There is also a selection of "Pianist" styles that you can be retained in memory, even after turning off the power, when the Backup function (page...

Owner's Manual
Page 58
Since these styles do not contain drum parts, you'll have to indicate a chord as follows: Z Select a style...Select the desired style. (See page 49.) 8BEAT 16BEAT BALLAD ST YLE DANCE ROCK/ R&B PIANIST ... ON] lamp lights. The methods used to select an accompaniment mode (page 59) before you start the style to adjust the volume of the accompaniment parts (page 23). C Turn on the keyboard. • You can start the Auto Accompaniment as you start the style using the Auto Accompaniment, the recorded accompaniment...
Since these styles do not contain drum parts, you'll have to indicate a chord as follows: Z Select a style...Select the desired style. (See page 49.) 8BEAT 16BEAT BALLAD ST YLE DANCE ROCK/ R&B PIANIST ... ON] lamp lights. The methods used to select an accompaniment mode (page 59) before you start the style to adjust the volume of the accompaniment parts (page 23). C Turn on the keyboard. • You can start the Auto Accompaniment as you start the style using the Auto Accompaniment, the recorded accompaniment...

Owner's Manual
Page 65
...each style, including acoustic bass and synth bass. RHYTHM BASS CHORD PAD PHRASE This part forms the basis of the drum kits. The selected function is used for the five accompaniment parts can be adjusted individually in the MIXER display page. • The overall accompaniment ... instruments here. You'll find guitar, piano, and other extras that is relative to set. Part volume relationships • The volume level of reverb that make the accompaniment more interesting. paniment part is relative to the [ACMP/ SONG VOLUME] setting. • The [ACMP/SONG VOLUME] ...
...each style, including acoustic bass and synth bass. RHYTHM BASS CHORD PAD PHRASE This part forms the basis of the drum kits. The selected function is used for the five accompaniment parts can be adjusted individually in the MIXER display page. • The overall accompaniment ... instruments here. You'll find guitar, piano, and other extras that is relative to set. Part volume relationships • The volume level of reverb that make the accompaniment more interesting. paniment part is relative to the [ACMP/ SONG VOLUME] setting. • The [ACMP/SONG VOLUME] ...

Owner's Manual
Page 66
... time to set the volume of 110, simultaneously press the [-] and [+] buttons. You can also increase the level by pressing and quickly releasing its button. Part volume levels • Range: 0 (min.) - 127 (max.) • Basic setting: 110 V Repeat steps Xand C Repeat the preceding steps to restore ... MIXER EXIT The lamp turns off, and the main display appears. 64 66 CVP-103 To reset the highlighted part's volume to the basic setting of the highlighted part to 0 by holding down the button you used to adjust the volume level. Playing with the Auto Accompaniment C...
... time to set the volume of 110, simultaneously press the [-] and [+] buttons. You can also increase the level by pressing and quickly releasing its button. Part volume levels • Range: 0 (min.) - 127 (max.) • Basic setting: 110 V Repeat steps Xand C Repeat the preceding steps to restore ... MIXER EXIT The lamp turns off, and the main display appears. 64 66 CVP-103 To reset the highlighted part's volume to the basic setting of the highlighted part to 0 by holding down the button you used to adjust the volume level. Playing with the Auto Accompaniment C...

Owner's Manual
Page 70
... of the TYPE function depends on main voice. To restore the basic setting for details. 68 70 CVP-103 Harmony Types Type Duet Trio Block 4 Part Country Octave 1+5 Echo Tremolo Trill Strumming Add Jazz Gtr Add Brass Add Strings In The Forest Speed r r r - - - - - • Some harmony types (indicated by a "r" in the...
... of the TYPE function depends on main voice. To restore the basic setting for details. 68 70 CVP-103 Harmony Types Type Duet Trio Block 4 Part Country Octave 1+5 Echo Tremolo Trill Strumming Add Jazz Gtr Add Brass Add Strings In The Forest Speed r r r - - - - - • Some harmony types (indicated by a "r" in the...

Owner's Manual
Page 75
..., press the PAGE [ Once the style has been cleared, you can use the MEAS. q Changing the section length: Press the MEAS. button to clear all parts of the currently selected section and start recording from scratch if you change the number of measures. • The "Clear section?" MEAS. Clear style? message...
..., press the PAGE [ Once the style has been cleared, you can use the MEAS. q Changing the section length: Press the MEAS. button to clear all parts of the currently selected section and start recording from scratch if you change the number of measures. • The "Clear section?" MEAS. Clear style? message...


