

Owner's Manual
Page 2
...name plate. However, Yamaha reserves the right to change or modify any of the specifications without notice or obligation to be sure that you . Note: In some reason its normal and customary manner, all batteries away from children. CVP-94 CVP-92 Model Serial No ...Purchase Date SPECIAL MESSAGE SECTION PRODUCT SAFETY MARKINGS: Yamaha electronic products may have either labels similar to return the defective parts. You should record the model number, serial number, and ...
...name plate. However, Yamaha reserves the right to change or modify any of the specifications without notice or obligation to be sure that you . Note: In some reason its normal and customary manner, all batteries away from children. CVP-94 CVP-92 Model Serial No ...Purchase Date SPECIAL MESSAGE SECTION PRODUCT SAFETY MARKINGS: Yamaha electronic products may have either labels similar to return the defective parts. You should record the model number, serial number, and ...
Owner's Manual
Page 3
...extreme cold or heat (such as televisions, radios, or speakers, since this might cause interference which may have it inspected by qualified Yamaha service personnel. • Do not place the instrument against a wall (allow at a high or uncomfortable volume level, since this ... due to an electrical outlet using the included tool. Pulling by qualified Yamaha service personnel. • Only use of time, or during electrical storms. • Before connecting the instrument to disassemble the internal parts or modify them periodically using a multipleconnector. Do not use . (1)B_EL...
...extreme cold or heat (such as televisions, radios, or speakers, since this might cause interference which may have it inspected by qualified Yamaha service personnel. • Do not place the instrument against a wall (allow at a high or uncomfortable volume level, since this ... due to an electrical outlet using the included tool. Pulling by qualified Yamaha service personnel. • Only use of time, or during electrical storms. • Before connecting the instrument to disassemble the internal parts or modify them periodically using a multipleconnector. Do not use . (1)B_EL...

Owner's Manual
Page 4
... of the CVP-94/92. Split Mode... Depth for Each Part - G Floppy Disk...the CVP-94/92 8 Music Stand 8 Key Cover (CVP-94 8 Turning on the CVP-94/92, ...and MIDI driver software for computers (page 141). G Owner's Manual and Reference Manual (Assembly Instructions and Lists) G Bench (included or optional depending on locale) G Dust Cover (For instruments without a key cover only) Table of Contents CHAPTER 1: Getting Ready Features of the CVP...-94/92 4 About This Manual 5 Conventions...
... of the CVP-94/92. Split Mode... Depth for Each Part - G Floppy Disk...the CVP-94/92 8 Music Stand 8 Key Cover (CVP-94 8 Turning on the CVP-94/92, ...and MIDI driver software for computers (page 141). G Owner's Manual and Reference Manual (Assembly Instructions and Lists) G Bench (included or optional depending on locale) G Dust Cover (For instruments without a key cover only) Table of Contents CHAPTER 1: Getting Ready Features of the CVP...-94/92 4 About This Manual 5 Conventions...

Owner's Manual
Page 5
...CHAPTER 8: Others The Connectors 138 Connecting to 1/RIGHT and 2/LEFT, and Voice Assignment 80 Overall Song Playback Volume Control 81 Individual Part Volume Control 82 Changing Settings in the INITIAL EDIT Display 112 Recording Without a Disk 114 CHAPTER 7: The Utility Functions Keyboard 116 Keyboard... Types of Auto Accompaniment 47 Stopping the Auto Accompaniment ...... 50 Adjusting the Overall Auto Accompaniment Volume 51 Individual Part Volume Control 51 Changing the Split Point 52 Other Auto Accompaniment Functions 53 Harmony 53 One Touch Setting 54 Virtual...
...CHAPTER 8: Others The Connectors 138 Connecting to 1/RIGHT and 2/LEFT, and Voice Assignment 80 Overall Song Playback Volume Control 81 Individual Part Volume Control 82 Changing Settings in the INITIAL EDIT Display 112 Recording Without a Disk 114 CHAPTER 7: The Utility Functions Keyboard 116 Keyboard... Types of Auto Accompaniment 47 Stopping the Auto Accompaniment ...... 50 Adjusting the Overall Auto Accompaniment Volume 51 Individual Part Volume Control 51 Changing the Split Point 52 Other Auto Accompaniment Functions 53 Harmony 53 One Touch Setting 54 Virtual...

Owner's Manual
Page 6
... a wide variety of the CVP-94/92's operations (page 12). There are 100 accompaniment styles (page 38), plus an additional 40 "Pianist" styles that allow you play the piano part of the song yourself along with the dedicated buttons) provides comprehensive and easy-to-understand control of... authentic and dynamic voices (133 Clavinova voices + 480 XG voices + 12 Drum Kits). CHAPTER 1: Getting Ready Features of the CVP-94/92 G Large, Easy-to-...
... a wide variety of the CVP-94/92's operations (page 12). There are 100 accompaniment styles (page 38), plus an additional 40 "Pianist" styles that allow you play the piano part of the song yourself along with the dedicated buttons) provides comprehensive and easy-to-understand control of... authentic and dynamic voices (133 Clavinova voices + 480 XG voices + 12 Drum Kits). CHAPTER 1: Getting Ready Features of the CVP-94/92 G Large, Easy-to-...
Owner's Manual
Page 18
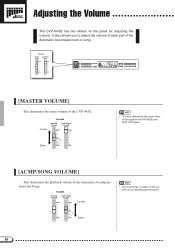
... Volume The CVP-94/92 has two sliders on the volume of the Automatic Accompaniment or song. VOLUME MASTER VOLUME ACMP/SONG VOLUME MAX MAX Louder • This control has no effect on the panel for adjusting the volume. It also allows you to adjust the volume of each part of your keyboard... also determines the output level of the signal at the [PHONES] and [AUX OUT] jacks. [ACMP/SONG VOLUME] This determines the playback volume of the CVP-94/92.
... Volume The CVP-94/92 has two sliders on the volume of the Automatic Accompaniment or song. VOLUME MASTER VOLUME ACMP/SONG VOLUME MAX MAX Louder • This control has no effect on the panel for adjusting the volume. It also allows you to adjust the volume of each part of your keyboard... also determines the output level of the signal at the [PHONES] and [AUX OUT] jacks. [ACMP/SONG VOLUME] This determines the playback volume of the CVP-94/92.

Owner's Manual
Page 19
Adjusting the Volume [MIXER] Call up the Mixer display by pressing [MIXER]. There are three types of a song can be adjusted. G Page 1, when using disk See Song volume (page 83) for details. 17 G Automatic Accompaniment Volume See Automatic Accompaniment volume (page 51) for details. G Page 2, when using disk See Song volume (page 82) for details. In the Mixer display, the volume of Automatic Accompaniment and individual parts of mixer display, as shown below. Press [MIXER] again (or [EXIT]) to return to the previous display.
Adjusting the Volume [MIXER] Call up the Mixer display by pressing [MIXER]. There are three types of a song can be adjusted. G Page 1, when using disk See Song volume (page 83) for details. 17 G Automatic Accompaniment Volume See Automatic Accompaniment volume (page 51) for details. G Page 2, when using disk See Song volume (page 82) for details. In the Mixer display, the volume of Automatic Accompaniment and individual parts of mixer display, as shown below. Press [MIXER] again (or [EXIT]) to return to the previous display.

Owner's Manual
Page 36
...; Backup of the effect may sound stronger or weaker, even though the same Reverb Type is selected. • The effect cannot be made for each part. (Refer to the sounds input through the AUX IN [R] [L/L+R] jacks. • If the Reverb Type in 5-unit steps. STAGE3 PLATE Simulated steel plate reverb. Keep...
...; Backup of the effect may sound stronger or weaker, even though the same Reverb Type is selected. • The effect cannot be made for each part. (Refer to the sounds input through the AUX IN [R] [L/L+R] jacks. • If the Reverb Type in 5-unit steps. STAGE3 PLATE Simulated steel plate reverb. Keep...

Owner's Manual
Page 37
... produced even if the other words, if one of last settings: OFF • The actual Reverb Depth is "100." mum) for each part • Basic setting: 50 for each part • Backup of the settings is "0" (no effect), no effect) - 100 (maxi- Reverb Setting the Depth for the rhythm, bass, ...; Set the Reverb Depth of the REVERB pop-up display by using the PAGE [] buttons. Select the desired part by using the BASS, CHORD, RHYTHM and KBD (keyboard) in 5-unit steps. Reverb Part Depth The Reverb Part Depth parameter lets you play from the keyboard. To use this, call up the REVERB...
... produced even if the other words, if one of last settings: OFF • The actual Reverb Depth is "100." mum) for each part • Basic setting: 50 for each part • Backup of the settings is "0" (no effect), no effect) - 100 (maxi- Reverb Setting the Depth for the rhythm, bass, ...; Set the Reverb Depth of the REVERB pop-up display by using the PAGE [] buttons. Select the desired part by using the BASS, CHORD, RHYTHM and KBD (keyboard) in 5-unit steps. Reverb Part Depth The Reverb Part Depth parameter lets you play from the keyboard. To use this, call up the REVERB...
Owner's Manual
Page 40
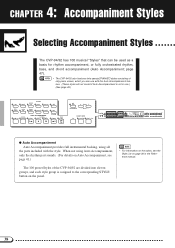
... REGISTRATION 1 2 3 4 BANK BANK MEMORY FREEZE G Auto Accompaniment Auto Accompaniment provides full instrumental backing, using Auto Accompaniment, only the rhythm part sounds. (For details on Auto Accompaniment, see page 41.) • For information on the styles, see the Style List on the panel... REC PAUSE REW FF GUIDE CONTROL SOUND EASY PLAY NEXT NOTE REPEAT PIANO E. CHAPTER 4: Accompaniment Styles Selecting Accompaniment Styles The CVP-94/92 has 100 musical "Styles" that can use with the style. ROOM LATIN POP TRADI- TIONAL COUNTRY WALTZ DISK ACMP ON ...
... REGISTRATION 1 2 3 4 BANK BANK MEMORY FREEZE G Auto Accompaniment Auto Accompaniment provides full instrumental backing, using Auto Accompaniment, only the rhythm part sounds. (For details on Auto Accompaniment, see page 41.) • For information on the styles, see the Style List on the panel... REC PAUSE REW FF GUIDE CONTROL SOUND EASY PLAY NEXT NOTE REPEAT PIANO E. CHAPTER 4: Accompaniment Styles Selecting Accompaniment Styles The CVP-94/92 has 100 musical "Styles" that can use with the style. ROOM LATIN POP TRADI- TIONAL COUNTRY WALTZ DISK ACMP ON ...

Owner's Manual
Page 53
... VOLUME MASTER VOLUME ACMP/SONG VOLUME MAX MAX MIN MIN Individual Part Volume Control The CVP-94/92 has five accompaniment parts: Bass, Chord, Pad, Phrase, and Rhythm. Each volume setting of the five accompaniment parts can be done by using the mixer function. Playing with the...), conveniently allowing you to control the entire volume of the CVP-94/92. The Chord part provides appropriate rhythmic chordal accompaniment for embellishments such as strings, organ, and choir. The Phrase part is the main rhythm part. You'll find guitar, piano, and other extras that ...
... VOLUME MASTER VOLUME ACMP/SONG VOLUME MAX MAX MIN MIN Individual Part Volume Control The CVP-94/92 has five accompaniment parts: Bass, Chord, Pad, Phrase, and Rhythm. Each volume setting of the five accompaniment parts can be done by using the mixer function. Playing with the...), conveniently allowing you to control the entire volume of the CVP-94/92. The Chord part provides appropriate rhythmic chordal accompaniment for embellishments such as strings, organ, and choir. The Phrase part is the main rhythm part. You'll find guitar, piano, and other extras that ...

Owner's Manual
Page 54
... KEYBOARD is the same parameter as set here for Auto Accompaniment can also press the [EXIT] button to return to the [MASTER VOLUME]. • Each part volume of F#2, simultaneously press the [-/ +] buttons. • The split point set in units of two. Split Point • Range: All keys •...Backup of your own keyboard performance and the Harmony sound (see page 35. To reset the value to the [MATER VOLUME]. • The Harmony part volume is included in the left range for the Auto Accompaniment is selected. 52 paniment is relative to the [ACMP/ SONG VOLUME]. • ...
... KEYBOARD is the same parameter as set here for Auto Accompaniment can also press the [EXIT] button to return to the [MASTER VOLUME]. • Each part volume of F#2, simultaneously press the [-/ +] buttons. • The split point set in units of two. Split Point • Range: All keys •...Backup of your own keyboard performance and the Harmony sound (see page 35. To reset the value to the [MATER VOLUME]. • The Harmony part volume is included in the left range for the Auto Accompaniment is selected. 52 paniment is relative to the [ACMP/ SONG VOLUME]. • ...

Owner's Manual
Page 58
... SMALL ACMP button so that it is highlighted. Small Accompaniment (SMALL ACMP) The Small Accompaniment function lets you mute some of the selected Auto Accompaniment parts, creating a simpler and smaller orchestration and accompaniment.
... SMALL ACMP button so that it is highlighted. Small Accompaniment (SMALL ACMP) The Small Accompaniment function lets you mute some of the selected Auto Accompaniment parts, creating a simpler and smaller orchestration and accompaniment.

Owner's Manual
Page 62
.... (As for each INTRO, FILL IN and ENDING section. • Whether the "A" or "B" variations of the style and start recording from B to as "part". • Only one pattern can select a new time signature as required: 2, 3, 4, or 5. 60 Custom Style CSelect the section you want to record In...Once the style has been cleared you will have to completely clear all sections and parts of the INTRO, FILL IN and ENDING sections are referred to B" is initially selected. Current recording section and part Use the BEAT LCD button to change the time signature. Total measure number of ...
.... (As for each INTRO, FILL IN and ENDING section. • Whether the "A" or "B" variations of the style and start recording from B to as "part". • Only one pattern can select a new time signature as required: 2, 3, 4, or 5. 60 Custom Style CSelect the section you want to record In...Once the style has been cleared you will have to completely clear all sections and parts of the INTRO, FILL IN and ENDING sections are referred to B" is initially selected. Current recording section and part Use the BEAT LCD button to change the time signature. Total measure number of ...

Owner's Manual
Page 63
... can be cleared using this operation. As soon as you change the number of measures as required, press the PAGE [ parameters have to clear all parts of the currently selected section and start recording from scratch if you choose to change the number of measures. Custom Style Use the MEAS. LCD...
... can be cleared using this operation. As soon as you change the number of measures as required, press the PAGE [ parameters have to clear all parts of the currently selected section and start recording from scratch if you choose to change the number of measures. Custom Style Use the MEAS. LCD...

Owner's Manual
Page 64
...3 8th note triplets quarter notes 62 Another useful recording aid is the SOLO LCD button: when this button is pressed and highlighted, only the selected part will be cleared while holding the keyboard "C1" key. the beats to which the notes in the Custom Style mode - i.e. If you want ...to record with (the preset voice for that part will initially be recorded while playback is stopped. • The timing guide will sound to provide a timing guide (the metronome sound is not recorded). ...
...3 8th note triplets quarter notes 62 Another useful recording aid is the SOLO LCD button: when this button is pressed and highlighted, only the selected part will be cleared while holding the keyboard "C1" key. the beats to which the notes in the Custom Style mode - i.e. If you want ...to record with (the preset voice for that part will initially be recorded while playback is stopped. • The timing guide will sound to provide a timing guide (the metronome sound is not recorded). ...

Owner's Manual
Page 65
... CH.SET LCD button to enter the character at the character you expected. The BACK LCD button can also be applied to the already recorded part. Custom Style • Quantization can be used to back up to 12 characters in the center of the display. Playback will stop for the current... complete, use the PAGE buttons to select CUSTOM STYLE display page 3, and press the STYLE NAME LCD button to go to actually quantize the current part. When the name is complete. Repeat this procedure until your custom style is being quantized, then the START LCD button will not be up one...
... CH.SET LCD button to enter the character at the character you expected. The BACK LCD button can also be applied to the already recorded part. Custom Style • Quantization can be used to back up to 12 characters in the center of the display. Playback will stop for the current... complete, use the PAGE buttons to select CUSTOM STYLE display page 3, and press the STYLE NAME LCD button to go to actually quantize the current part. When the name is complete. Repeat this procedure until your custom style is being quantized, then the START LCD button will not be up one...

Owner's Manual
Page 66
... play mode. The time signature has been changed), the "Can't recall!" see "Save to recall the last-stored version of the currently selected section (all parts of the section are recalled). If the recall operation can't be sure to save your custom style before turning the power off - parameter will appear...
... play mode. The time signature has been changed), the "Can't recall!" see "Save to recall the last-stored version of the currently selected section (all parts of the section are recalled). If the recall operation can't be sure to save your custom style before turning the power off - parameter will appear...

Owner's Manual
Page 67
...Volume & Effects CUSTOM STYLE display page 4 includes a range of parameters that of what is in CUSTOM STYLE display page 3 to "ALL", the R1 part preset values are displayed. When VOLUME is set to entirely clear the current custom style. The PAN VALUE settings are listed below. C (center) ... ... 2 • OFF • Normally the preset VALUE and EFFECT TYPE are from -50 to +50, relative to the preset volume of each part of the source style. The REVERB and EFFECT DEPTH ranges are initially selected. If SECTION is selected the SECT. The "OTHERS" selection cannot be re...
...Volume & Effects CUSTOM STYLE display page 4 includes a range of parameters that of what is in CUSTOM STYLE display page 3 to "ALL", the R1 part preset values are displayed. When VOLUME is set to entirely clear the current custom style. The PAN VALUE settings are listed below. C (center) ... ... 2 • OFF • Normally the preset VALUE and EFFECT TYPE are from -50 to +50, relative to the preset volume of each part of the source style. The REVERB and EFFECT DEPTH ranges are initially selected. If SECTION is selected the SECT. The "OTHERS" selection cannot be re...

Owner's Manual
Page 69
... you are produced during playback. Custom Style Playing Back Your Custom Styles Once created, your original custom styles can be selected for playback by clearing a part, etc.), or DELETE to go to the "Delete style ?" to select the custom style you want to play. or the data dial or [-/+] buttons...
... you are produced during playback. Custom Style Playing Back Your Custom Styles Once created, your original custom styles can be selected for playback by clearing a part, etc.), or DELETE to go to the "Delete style ?" to select the custom style you want to play. or the data dial or [-/+] buttons...

