
Owner's Manual
Page 2
...or obligation to constitute a risk of electrical shock. When replacement becomes necessary, contact a qualified service representative to return the defective parts. Note: In some reason its normal and customary manner, all local, state, and federal regulations that are located on the ...or for graphic symbol markings The exclamation point with both user safe and environmentally friendly. CVP-79A CVP-69/69A CVP-59S Model Serial No Purchase Date IMPORTANT NOTICE: All Yamaha electronic products are therefore the owners responsibility. DO NOT modify this type of battery. ...
...or obligation to constitute a risk of electrical shock. When replacement becomes necessary, contact a qualified service representative to return the defective parts. Note: In some reason its normal and customary manner, all local, state, and federal regulations that are located on the ...or for graphic symbol markings The exclamation point with both user safe and environmentally friendly. CVP-79A CVP-69/69A CVP-59S Model Serial No Purchase Date IMPORTANT NOTICE: All Yamaha electronic products are therefore the owners responsibility. DO NOT modify this type of battery. ...
Owner's Manual
Page 4
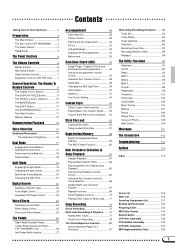
...Auto Bass Chord (ABC) 34 Single-Finger, Fingered Chord, and Full Keyboard Accompaniment 34 Overall Accompaniment Volume Control 37 Individual Part Volume Control 38 Small ABC 39 Changing the ABC Split Point 39 Chord Assist 40 Harmony 41 One Touch Setting 44 ... Up Parameters 122 Fingering Chart 123 MIDI Data Format 124 Specifications 135 CVP-79A: Assembly 136 CVP-69/69A: Assembly 142 CVP-59S: Assembly 150 MIDI Implementation Chart 156 1 and Left-hand Practice 67 Repeat Functions 69 Other Playback Controls 70 Playing Other Types of Your Clavinova 2 Preparation ...
...Auto Bass Chord (ABC) 34 Single-Finger, Fingered Chord, and Full Keyboard Accompaniment 34 Overall Accompaniment Volume Control 37 Individual Part Volume Control 38 Small ABC 39 Changing the ABC Split Point 39 Chord Assist 40 Harmony 41 One Touch Setting 44 ... Up Parameters 122 Fingering Chart 123 MIDI Data Format 124 Specifications 135 CVP-79A: Assembly 136 CVP-69/69A: Assembly 142 CVP-59S: Assembly 150 MIDI Implementation Chart 156 1 and Left-hand Practice 67 Repeat Functions 69 Other Playback Controls 70 Playing Other Types of Your Clavinova 2 Preparation ...
Owner's Manual
Page 5
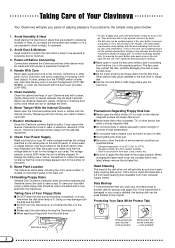
... in your area. Never use , and close the key cover to protect the keyboard (CVP-79A/ 69/69A), or cover the instrument with both the disk and the FDD. In some areas ...button slowly as far as books on the bottom panel of the main unit. 10.Handling Floppy Disks Yamaha Disk Orchestra Collection disks are subject to excessive humidity or heat. A neutral cleanser may cause interference if...as it eventually causing data errors. s Be sure to apply the disk label at any other parts of your local AC mains voltage matches the voltage specified on the name plate on the Internal ...
... in your area. Never use , and close the key cover to protect the keyboard (CVP-79A/ 69/69A), or cover the instrument with both the disk and the FDD. In some areas ...button slowly as far as books on the bottom panel of the main unit. 10.Handling Floppy Disks Yamaha Disk Orchestra Collection disks are subject to excessive humidity or heat. A neutral cleanser may cause interference if...as it eventually causing data errors. s Be sure to apply the disk label at any other parts of your local AC mains voltage matches the voltage specified on the name plate on the Internal ...
Owner's Manual
Page 10
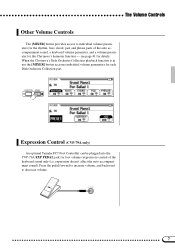
... page 41 for each Disk Orchestra Collection part. expression doesn't affect the auto-accompaniment sound). When the Clavinova's Disk Orchestra Collection playback function is in use the [MIXER] button accesses individual volume parameters for details. FUNCTION MIXER Expression Control (CVP-79A only) An optional Yamaha FC7 Foot Controller can be plugged into the...
... page 41 for each Disk Orchestra Collection part. expression doesn't affect the auto-accompaniment sound). When the Clavinova's Disk Orchestra Collection playback function is in use the [MIXER] button accesses individual volume parameters for details. FUNCTION MIXER Expression Control (CVP-79A only) An optional Yamaha FC7 Foot Controller can be plugged into the...
Owner's Manual
Page 13
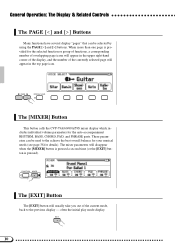
...back to the achieve the best overall balance for your musical needs (see page 38 for the auto-accompaniment RHYTHM, BASS, CHORD, PAD, and PHRASE parts. EXIT 10 General Operation: The Display & Related Controls The PAGE [] Buttons Many functions have several display "pages" that can be selected by using ..., a corresponding number of overlapping page icons will appear in the top page icon. PAGE DISPLAY HOLD The [MIXER] Button This button calls the CVP-79A/69/69A/59S mixer display which includes individual volume parameters for details). When more than one page is pressed).
...back to the achieve the best overall balance for your musical needs (see page 38 for the auto-accompaniment RHYTHM, BASS, CHORD, PAD, and PHRASE parts. EXIT 10 General Operation: The Display & Related Controls The PAGE [] Buttons Many functions have several display "pages" that can be selected by using ..., a corresponding number of overlapping page icons will appear in the top page icon. PAGE DISPLAY HOLD The [MIXER] Button This button calls the CVP-79A/69/69A/59S mixer display which includes individual volume parameters for details). When more than one page is pressed).
Owner's Manual
Page 26
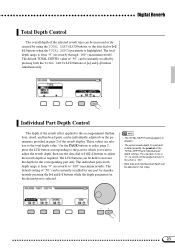
... if the other is from "0" (no reverb) through "100" (maximum reverb). The total depth range is "100". • Both total and individual part depth can be individually adjusted via the parameters provided in five steps. -+ 23 These values are relative to adjust the reverb depth as required. The... LCD buttons can be increased or decreased by the product of the TOTAL DEPTH and individual part depth settings. The individual part reverb depth range is highlighted. Use the PAGE buttons to select page 2, press the LCD button corresponding to the...
... if the other is from "0" (no reverb) through "100" (maximum reverb). The total depth range is "100". • Both total and individual part depth can be individually adjusted via the parameters provided in five steps. -+ 23 These values are relative to adjust the reverb depth as required. The... LCD buttons can be increased or decreased by the product of the TOTAL DEPTH and individual part depth settings. The individual part reverb depth range is highlighted. Use the PAGE buttons to select page 2, press the LCD button corresponding to the...

Owner's Manual
Page 41
...; The volume level can be individually adjusted via the PAGE buttons) includes individual volume parameters for details on the Harmony function. The BASS part always plays a bass line, but the voice will disappear when the [MIXER] button is pressed a second time (or the [EXIT]...see page 41 for the keyboard (manually played sound) and harmony function sound - Auto Bass Chord (ABC Individual Part Volume Control The CVP-79A/69/69A/59S has five accompaniment parts - that make the accompaniment more interesting. • Some styles may not use the data dial or [+]/[-] buttons ...
...; The volume level can be individually adjusted via the PAGE buttons) includes individual volume parameters for details on the Harmony function. The BASS part always plays a bass line, but the voice will disappear when the [MIXER] button is pressed a second time (or the [EXIT]...see page 41 for the keyboard (manually played sound) and harmony function sound - Auto Bass Chord (ABC Individual Part Volume Control The CVP-79A/69/69A/59S has five accompaniment parts - that make the accompaniment more interesting. • Some styles may not use the data dial or [+]/[-] buttons ...
Owner's Manual
Page 42
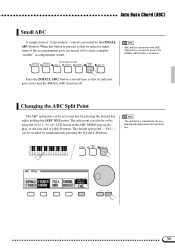
... button in the ABC MODE pop-up display, or the data dial or [+]/[-] buttons. Auto Bass Chord (ABC) Small ABC A simple form of the accompaniment parts are turned off to turn the SMALL ABC function off , even if the [SMALL ABC] button is turned off . ENDING SMALL ABC ABC ON -+ 39...
... button in the ABC MODE pop-up display, or the data dial or [+]/[-] buttons. Auto Bass Chord (ABC) Small ABC A simple form of the accompaniment parts are turned off to turn the SMALL ABC function off , even if the [SMALL ABC] button is turned off . ENDING SMALL ABC ABC ON -+ 39...
Owner's Manual
Page 45
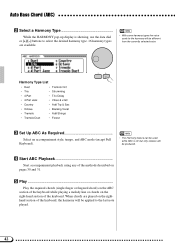
...-up display is off, but only octaves will be produced. Harmony Type List • Duet • Tremolo Oct • Trio • Strumming • 4 Part • Trio Delay • 4 Part Jazz • Vibes & J.Gtr • Country • Add Trp & Sax • Octave • Backing Vocal • Tremolo • Add Strings • Tremolo Duet...
...-up display is off, but only octaves will be produced. Harmony Type List • Duet • Tremolo Oct • Trio • Strumming • 4 Part • Trio Delay • 4 Part Jazz • Vibes & J.Gtr • Country • Add Trp & Sax • Octave • Backing Vocal • Tremolo • Add Strings • Tremolo Duet...
Owner's Manual
Page 49
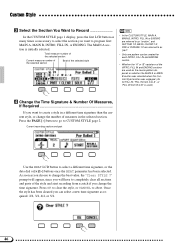
...to program first: MAIN A, MAIN B, INTRO, FILL IN, or ENDING. The MAIN A section is used as required: 2/4, 3/4, 4/4, or 5/4. 46 Current recording section and part Use the BEAT LCD button to abort. Once the style has been cleared you can be created for FILL IN, "FILL IN from A to A", or... data dial or [+]/[-] buttons once the BEAT parameter has been selected. prompt will appear, since you will have to completely clear all sections and parts of measures in the selected section, Press the PAGE [>] button to go to CUSTOM STYLE page 2. Custom Style CSelect the Section You Want to...
...to program first: MAIN A, MAIN B, INTRO, FILL IN, or ENDING. The MAIN A section is used as required: 2/4, 3/4, 4/4, or 5/4. 46 Current recording section and part Use the BEAT LCD button to abort. Once the style has been cleared you can be created for FILL IN, "FILL IN from A to A", or... data dial or [+]/[-] buttons once the BEAT parameter has been selected. prompt will appear, since you will have to completely clear all sections and parts of measures in the selected section, Press the PAGE [>] button to go to CUSTOM STYLE page 2. Custom Style CSelect the Section You Want to...
Owner's Manual
Page 50
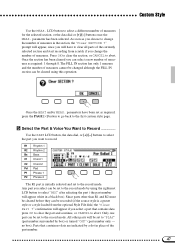
... IN section has only 1 measure and the number of measures cannot be cleared using this operation. LCD button to abort. parameters have to clear all parts of the currently selected section and start recording from scratch if you choose to change the number of measures in the section, the "Clear SECTION ?"
... IN section has only 1 measure and the number of measures cannot be cleared using this operation. LCD button to abort. parameters have to clear all parts of the currently selected section and start recording from scratch if you choose to change the number of measures in the section, the "Clear SECTION ?"
Owner's Manual
Page 51
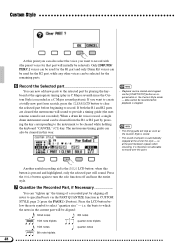
... of the style - When a drum kit voice is stored. • The sound of all notes to record. at the end of a recorded part by aligning all parts is not recorded). Another useful recording aid is the SOLO LCD button: when this button is recorded as a C Major seventh pattern). Press the LCD... to record over this point. The metronome timing guide can also be cleared in this way. • Playback can be started and stopped via the PART QUANTIZE function in CUSTOM STYLE page 2 (press the PAGE [>] button). It is stopped. • The timing guide will stop as soon as required while...
... of the style - When a drum kit voice is stored. • The sound of all notes to record. at the end of a recorded part by aligning all parts is not recorded). Another useful recording aid is the SOLO LCD button: when this button is recorded as a C Major seventh pattern). Press the LCD... to record over this point. The metronome timing guide can also be cleared in this way. • Playback can be started and stopped via the PART QUANTIZE function in CUSTOM STYLE page 2 (press the PAGE [>] button). It is stopped. • The timing guide will stop as soon as required while...
Owner's Manual
Page 52
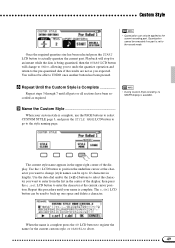
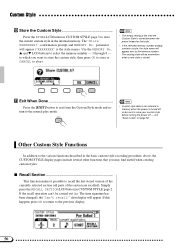
... space and delete a character. Use the > LCD button to position the underline cursor at the character you expected. You will not be executed if no part is set LCD button to enter the character at the current cursor position. The current style name appears in the upper right corner of the... the STYLE NAME LCD button to go to the style naming page. Playback will change (style names can only be applied to the current recording part. Once the required quantize size has been selected press the START LCD button to abort. 49 Repeat this procedure until your custom style is being...
... space and delete a character. Use the > LCD button to position the underline cursor at the character you expected. You will not be executed if no part is set LCD button to enter the character at the current cursor position. The current style name appears in the upper right corner of the... the STYLE NAME LCD button to go to the style naming page. Playback will change (style names can only be applied to the current recording part. Once the required quantize size has been selected press the START LCD button to abort. 49 Repeat this procedure until your custom style is being...
Owner's Manual
Page 53
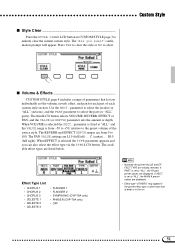
... mode. The existing style will appear ("XXXXXXXX" is the style name). see "Save to recall the last-stored version of the currently selected section (all parts of the section are recalled). s Recall Section ...This function makes it possible to disk" on page 52. alert display will appear next to the memory...
... mode. The existing style will appear ("XXXXXXXX" is the style name). see "Save to recall the last-stored version of the currently selected section (all parts of the section are recalled). s Recall Section ...This function makes it possible to disk" on page 52. alert display will appear next to the memory...
Owner's Manual
Page 54
...part (or "ALL" parts). Use the SECT. When VOLUME is selected the TYPE parameter appears and you sure?" If SECT. C (center) ... Effect Type List • CHORUS 1 • CHORUS 2 • CHORUS 3 • CELESTE 1 • CELESTE 2 • CELESTE 3 • FLANGER 1 • FLANGER 2 • SYMPHONIC (CVP-79A only) • PHASER (CVP...are displayed. • Effect type "OTHERS" may appear if the preset effect type is in CUSTOM STYLE page 3 to 100. If PART is set to "ALL", the MAIN A preset values are listed below. parameter is fixed at "ALL" and the VALUE range is ...
...part (or "ALL" parts). Use the SECT. When VOLUME is selected the TYPE parameter appears and you sure?" If SECT. C (center) ... Effect Type List • CHORUS 1 • CHORUS 2 • CHORUS 3 • CELESTE 1 • CELESTE 2 • CELESTE 3 • FLANGER 1 • FLANGER 2 • SYMPHONIC (CVP-79A only) • PHASER (CVP...are displayed. • Effect type "OTHERS" may appear if the preset effect type is in CUSTOM STYLE page 3 to 100. If PART is set to "ALL", the MAIN A preset values are listed below. parameter is fixed at "ALL" and the VALUE range is ...
Owner's Manual
Page 56
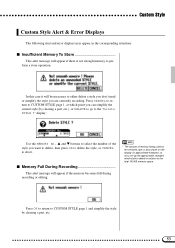
... to delete the style, or CANCEL to either delete a style you don't need or simplify the style you can simplify the current style (by clearing a part, etc. 53 In this case it will appear if there is also shown on the display (in approximate kilobytes) so as to the total 160... the selected style is not enough memory to the "Delete STYLE ?" Press OK to return to CUSTOM STYLE page 1 and simplify the style by clearing a part, etc.), or DELETE to go to perform a store operation. Custom Style Custom Style Alert & Error Displays The following alert and error displays may appear in...
... to delete the style, or CANCEL to either delete a style you don't need or simplify the style you can simplify the current style (by clearing a part, etc. 53 In this case it will appear if there is also shown on the display (in approximate kilobytes) so as to the total 160... the selected style is not enough memory to the "Delete STYLE ?" Press OK to return to CUSTOM STYLE page 1 and simplify the style by clearing a part, etc.), or DELETE to go to perform a store operation. Custom Style Custom Style Alert & Error Displays The following alert and error displays may appear in...

Owner's Manual
Page 64
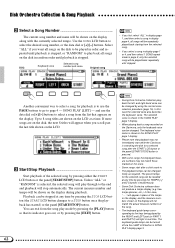
...upward. Insert a disk containing songs you 've recorded yourself using the song recorder function described in the next section, and songs on optional Yamaha Disk Orchestra Collection disks (one is not engaged, press the [PLAY] button so that light up above each key. PIANO HARPSI. SPLIT ...The Song Play mode is engaged automatically when a song disk is not transmitted via the MIDI OUT connector. The CVP-79A/69/69A/59S also shows you to practice various parts of a piece while the others are played automatically. TEMPO + LATIN LATIN POP TRADITIONAL COUNTRY WALTZ DISK ONE TOUCH...
...upward. Insert a disk containing songs you 've recorded yourself using the song recorder function described in the next section, and songs on optional Yamaha Disk Orchestra Collection disks (one is not engaged, press the [PLAY] button so that light up above each key. PIANO HARPSI. SPLIT ...The Song Play mode is engaged automatically when a song disk is not transmitted via the MIDI OUT connector. The CVP-79A/69/69A/59S also shows you to practice various parts of a piece while the others are played automatically. TEMPO + LATIN LATIN POP TRADITIONAL COUNTRY WALTZ DISK ONE TOUCH...
Owner's Manual
Page 65
... playback the left- The selected voice is selected, the selected song will play through to the keys being played by the RIGHT and LEFT part (or PART 1 and PART 2) will be recalled at any time by using the normal voice selection procedure (page 15). The preset tempo for the selected song can be...
... playback the left- The selected voice is selected, the selected song will play through to the keys being played by the RIGHT and LEFT part (or PART 1 and PART 2) will be recalled at any time by using the normal voice selection procedure (page 15). The preset tempo for the selected song can be...
Owner's Manual
Page 66
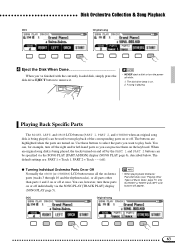
... the tracks turned on and off . The default settings are turned on. You can, for example, turn off the right and/or left-hand parts so you 've finished with the currently loaded disk, simply press the disk drive EJECT button to remove it. • NEVER eject a disk or... [TRACK PLAY] display (SONG PLAY page 5). • When playing back Disklavier PianoSoft disks (see "Playing Other Types of the corresponding parts on or off by the PART 1 and PART 2 buttons can be used to play back. Disk Orchestra Collection & Song Playback DOC Original song VEject the Disk When Done When you...
... the tracks turned on and off . The default settings are turned on. You can, for example, turn off the right and/or left-hand parts so you 've finished with the currently loaded disk, simply press the disk drive EJECT button to remove it. • NEVER eject a disk or... [TRACK PLAY] display (SONG PLAY page 5). • When playing back Disklavier PianoSoft disks (see "Playing Other Types of the corresponding parts on or off by the PART 1 and PART 2 buttons can be used to play back. Disk Orchestra Collection & Song Playback DOC Original song VEject the Disk When Done When you...
Owner's Manual
Page 68
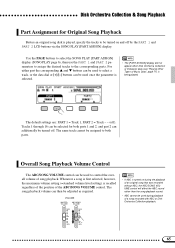
... PLAY page 6), then use the PART 1 and PART 2 parameters to assign the desired tracks to both parts 1 and 2, and part 2 can then be turned off. The default settings are: PART 1 = Track 1, PART 2 = Track - - (off by the PART 1 and PART 2 LCD buttons via the SONG PLAY [PART ASSIGN] display. For either part the corresponding v and w buttons ...can be used to control the overall volume of Music Data", page 71) is selected. • The [PART ASSIGN] display will affect the ABC sound rather than the song playback sound. • ABC cannot be used during the playback of...
... PLAY page 6), then use the PART 1 and PART 2 parameters to assign the desired tracks to both parts 1 and 2, and part 2 can then be turned off. The default settings are: PART 1 = Track 1, PART 2 = Track - - (off by the PART 1 and PART 2 LCD buttons via the SONG PLAY [PART ASSIGN] display. For either part the corresponding v and w buttons ...can be used to control the overall volume of Music Data", page 71) is selected. • The [PART ASSIGN] display will affect the ABC sound rather than the song playback sound. • ABC cannot be used during the playback of...


