
Owner's Manual
Page 4
... fingers, and do not use , tighten them periodically using the included tool. Save the data to the USER tab display (page 26), USB storage device (USB flash memory/floppy disk, etc). • Recorded/Edited Songs (page 42, 143, 158) • Created/Edited Styles (page 117) • Edited Voices (page 99) • Memorized One Touch Settings (page 51) • Edited MIDI settings (page 196) Moreover, the...
... fingers, and do not use , tighten them periodically using the included tool. Save the data to the USER tab display (page 26), USB storage device (USB flash memory/floppy disk, etc). • Recorded/Edited Songs (page 42, 143, 158) • Created/Edited Styles (page 117) • Edited Voices (page 99) • Memorized One Touch Settings (page 51) • Edited MIDI settings (page 196) Moreover, the...

Owner's Manual
Page 5
... transferred in the displays of the Clavinova, are the property of copyright has legal consequences. Also, NF may not play them to use others' copyrights. Any unauthorized use of such programs and contents outside of personal use . • This device is used in this Owner's Manual. • The illustrations and LCD screens as Troubleshooting and Specifications. Data List Voice List, MIDI Data Format, etc. • The models CVP...
... transferred in the displays of the Clavinova, are the property of copyright has legal consequences. Also, NF may not play them to use others' copyrights. Any unauthorized use of such programs and contents outside of personal use . • This device is used in this Owner's Manual. • The illustrations and LCD screens as Troubleshooting and Specifications. Data List Voice List, MIDI Data Format, etc. • The models CVP...

Owner's Manual
Page 7
... Panel Controls 12 Playing the Keyboard 14 Setting Up 16 Music Rest 16 Sheet Music Braces 16 Lid (CVP-409 grand piano type 16 Using Headphones 17 Changing the Display Language 18 Display Settings 18 Handling the Floppy Disk Drive (FDD) and Floppy Disks 21 Handling the USB Storage Device (USB Flash Memory/Floppy Disk, etc 22 Quick Guide 23 Playing the Demos 23 Operations in the Basic Displays 25 Operation of the Main Display 25 Operation of the File Selection Display 26 Operation of the Function Display 27 Playing Voices...
... Panel Controls 12 Playing the Keyboard 14 Setting Up 16 Music Rest 16 Sheet Music Braces 16 Lid (CVP-409 grand piano type 16 Using Headphones 17 Changing the Display Language 18 Display Settings 18 Handling the Floppy Disk Drive (FDD) and Floppy Disks 21 Handling the USB Storage Device (USB Flash Memory/Floppy Disk, etc 22 Quick Guide 23 Playing the Demos 23 Operations in the Basic Displays 25 Operation of the Main Display 25 Operation of the File Selection Display 26 Operation of the Function Display 27 Playing Voices...
Owner's Manual
Page 8
... Voice Creating (Sound Creator 99 Basic Procedure 99 Creating Your Original Organ Flutes Voices ........ 103 Using, Creating and Editing the Auto Accompaniment Styles 107 Style Characteristics 107 Selecting a Chord Fingering Type 107 Playing Only the Rhythm Channels of a Style 108 Style Playback-related Settings 109 Split Point Settings 111 Editing the Volume and Tonal Balance of the Style (MIXING CONSOLE 112 Convenient Music Finder feature 112 Searching the Records 112 Creating a Set of Favorite Records 114 Editing Records...
... Voice Creating (Sound Creator 99 Basic Procedure 99 Creating Your Original Organ Flutes Voices ........ 103 Using, Creating and Editing the Auto Accompaniment Styles 107 Style Characteristics 107 Selecting a Chord Fingering Type 107 Playing Only the Rhythm Channels of a Style 108 Style Playback-related Settings 109 Split Point Settings 111 Editing the Volume and Tonal Balance of the Style (MIXING CONSOLE 112 Convenient Music Finder feature 112 Searching the Records 112 Creating a Set of Favorite Records 114 Editing Records...
Owner's Manual
Page 11
... authentic grand piano sounds and response-instantly. Introduction Playing the Instrument Playing Piano Voices page 28 With just the press of a button, you can reconfigure the entire instrument for learning and practicing pieces. Playing Melodies along with Auto Accompaniment, -Style Playback page 44 Use the Style playback features to automatically produce full backing parts and accompaniment, while you play them, and how long you download Song data from the panel. Guide Lamps...
... authentic grand piano sounds and response-instantly. Introduction Playing the Instrument Playing Piano Voices page 28 With just the press of a button, you can reconfigure the entire instrument for learning and practicing pieces. Playing Melodies along with Auto Accompaniment, -Style Playback page 44 Use the Style playback features to automatically produce full backing parts and accompaniment, while you play them, and how long you download Song data from the panel. Guide Lamps...
Owner's Manual
Page 30
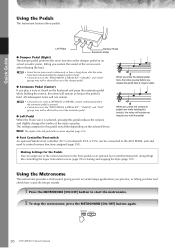
... pedal reduces the volume and slightly changes the timbre of the notes you play . The settings assigned to the three pedals or an optional foot controller/footswitch, doing things like controlling the Super Articulation voices (page 78) or starting and stopping the Style (page 191). Using the Metronome The metronome provides a click sound, giving you an accurate tempo guide when you practice, or letting you hold the pedal. When you sustain...
... pedal reduces the volume and slightly changes the timbre of the notes you play . The settings assigned to the three pedals or an optional foot controller/footswitch, doing things like controlling the Super Articulation voices (page 78) or starting and stopping the Style (page 191). Using the Metronome The metronome provides a click sound, giving you an accurate tempo guide when you practice, or letting you hold the pedal. When you sustain...

Owner's Manual
Page 51
... timings (page 110). ● Memorizing the panel settings to each OTS button will be set to change the Style or turn the power off without executing the Save operation. CVP-409/407 Owner's Manual 51 Quick Guide Helpful hints for OTS changes The One Touch Settings can be lost if you select a different Main section (A-D).To use the OTS Link function, press the [OTS LINK] button. n Setting the timing for using One Touch Setting ● Automatically changing One Touch Settings...
... timings (page 110). ● Memorizing the panel settings to each OTS button will be set to change the Style or turn the power off without executing the Save operation. CVP-409/407 Owner's Manual 51 Quick Guide Helpful hints for OTS changes The One Touch Settings can be lost if you select a different Main section (A-D).To use the OTS Link function, press the [OTS LINK] button. n Setting the timing for using One Touch Setting ● Automatically changing One Touch Settings...

Owner's Manual
Page 78
... memory and some very sophisticated programming. Sweet! They give you 're playing the real thing! Organ Flutes! Any song/ style data you play the sounds, they're not intended for details. 78 CVP-409/407 Owner's Manual S. They are not intended to be played from the keyboard. Articulation! They provide many of the same benefits as songs and styles). Normal Voices use of velocity switching. Drums Various drum and percussion sounds...
... memory and some very sophisticated programming. Sweet! They give you 're playing the real thing! Organ Flutes! Any song/ style data you play the sounds, they're not intended for details. 78 CVP-409/407 Owner's Manual S. They are not intended to be played from the keyboard. Articulation! They provide many of the same benefits as songs and styles). Normal Voices use of velocity switching. Drums Various drum and percussion sounds...

Owner's Manual
Page 80
... use a pedal to play two Voices simultaneously with the Right 1 and 2 parts. 2 Quickly selecting Voices for Right 1 and 2 parts You can play . Play the keyboard. Press and hold one of the [A]-[J] buttons to select a Voice. cally set for the Right 3 2 part. Press the TAB [√] button to select the PRESET display. 3 4 4 Using, Creating and Editing Voices 4 5 Switching the Dual on /off . 80 CVP-409/407 Owner's Manual Playing Different Voices Simultaneously Playing Two Voices Simultaneously (Right 1 and 2 Parts...
... use a pedal to play two Voices simultaneously with the Right 1 and 2 parts. 2 Quickly selecting Voices for Right 1 and 2 parts You can play . Play the keyboard. Press and hold one of the [A]-[J] buttons to select a Voice. cally set for the Right 3 2 part. Press the TAB [√] button to select the PRESET display. 3 4 4 Using, Creating and Editing Voices 4 5 Switching the Dual on /off . 80 CVP-409/407 Owner's Manual Playing Different Voices Simultaneously Playing Two Voices Simultaneously (Right 1 and 2 Parts...

Owner's Manual
Page 110
... Editing the Auto Accompaniment Styles Data that is recorded when recording a Song Please note that both the Voice that is automatically called "Stop Accompaniment"-any of the MAIN A-D sections is not included in which the One Touch Settings change . (The [OTS LINK] button must be called up when you release the keys sooner than the time set here. STYLE The chord played in the chord section of the keyboard with the MAIN...
... Editing the Auto Accompaniment Styles Data that is recorded when recording a Song Please note that both the Voice that is automatically called "Stop Accompaniment"-any of the MAIN A-D sections is not included in which the One Touch Settings change . (The [OTS LINK] button must be called up when you release the keys sooner than the time set here. STYLE The chord played in the chord section of the keyboard with the MAIN...

Owner's Manual
Page 111
... the operation display. [FUNCTION] → [C] STYLE SETTING/SPLIT POINT/CHORD FINGERING → TAB [√][®] SPLIT POINT 2 Use the [F]-[H] buttons to set to On. Specifying the Split Point by using LEFT. Using, Creating and Editing the Auto Accompaniment Styles • Split Point (S)- Setting the Split Point (S) and the Split Point (L) to different notes Split Point (S) Split Point (L) Chord section Voice LEFT Voice RIGHT 1and 2 Press the [H] (S) button or the [G] (L) button and rotate the [DATA ENTRY] dial. RESET All Style Channels are two Split Points) that...
... the operation display. [FUNCTION] → [C] STYLE SETTING/SPLIT POINT/CHORD FINGERING → TAB [√][®] SPLIT POINT 2 Use the [F]-[H] buttons to set to On. Specifying the Split Point by using LEFT. Using, Creating and Editing the Auto Accompaniment Styles • Split Point (S)- Setting the Split Point (S) and the Split Point (L) to different notes Split Point (S) Split Point (L) Chord section Voice LEFT Voice RIGHT 1and 2 Press the [H] (S) button or the [G] (L) button and rotate the [DATA ENTRY] dial. RESET All Style Channels are two Split Points) that...

Owner's Manual
Page 139
... in the Song data are replaced with style channels-allowing you simultaneously start playback. 6 Play chords along with a minimum pause for reading of a measure). If you can "lock" specific parameters (e.g., effect, split point, etc.) to make them selectable only via the panel controls (page 132). ■ Using the Auto Accompaniment Features with the Quick Start function With the default settings, the Quick Start function is turned on the Auto Accompaniment function. 4 Press the STYLE CONTROL [SYNC START] button to the...
... in the Song data are replaced with style channels-allowing you simultaneously start playback. 6 Play chords along with a minimum pause for reading of a measure). If you can "lock" specific parameters (e.g., effect, split point, etc.) to make them selectable only via the panel controls (page 132). ■ Using the Auto Accompaniment Features with the Quick Start function With the default settings, the Quick Start function is turned on the Auto Accompaniment function. 4 Press the STYLE CONTROL [SYNC START] button to the...

Owner's Manual
Page 141
... adjusts the timing of the Song data (page 162). To use the practice function, press the [GUIDE] button. For Songs to which Guide settings have been saved, the Guide function will be automatically turned on and the related settings will be recalled when the Song is selected. 1 Call up the Voice selec- play . Selecting the Guide Function Type Saving the Guide settings in the SONG SETTING dis- The ton in the SONG SETTING display You can save the Guide settings as a part of the Song...
... adjusts the timing of the Song data (page 162). To use the practice function, press the [GUIDE] button. For Songs to which Guide settings have been saved, the Guide function will be automatically turned on and the related settings will be recalled when the Song is selected. 1 Call up the Voice selec- play . Selecting the Guide Function Type Saving the Guide settings in the SONG SETTING dis- The ton in the SONG SETTING display You can save the Guide settings as a part of the Song...

Owner's Manual
Page 173
...] turned off . • VOLUME Adjusts the output volume of the microphone sound. High Setting for growl- You can specify whether the Vocoder effect is turned off and the [LEFT] turned on your voice. OFF Chords are described below. ing and shouting. In all other cases, the mode is also appropriate for lower voice. VOCODER The harmony notes are determined by the Song data (page 172). Using a Microphone CVP-409/407 Owner's Manual...
...] turned off . • VOLUME Adjusts the output volume of the microphone sound. High Setting for growl- You can specify whether the Vocoder effect is turned off and the [LEFT] turned on your voice. OFF Chords are described below. ing and shouting. In all other cases, the mode is also appropriate for lower voice. VOCODER The harmony notes are determined by the Song data (page 172). Using a Microphone CVP-409/407 Owner's Manual...

Owner's Manual
Page 192
... with this display. Switches the HARMONY/ECHO Voice Effect on the pedal functions are played legato style (i.e., a note is played while the preceding note is held ). SONG PLAY/PAUSE STYLE START/STOP TAP TEMPO SYNCHRO START SYNCHRO STOP Allows you to use a pedal to normal pitch when the pedal is alternately turned on and off each keyboard part on the keyboard. When you to the instrument's AUX PEDAL jack. Pressing this display. Portamento is produced when notes are listed here...
... with this display. Switches the HARMONY/ECHO Voice Effect on the pedal functions are played legato style (i.e., a note is played while the preceding note is held ). SONG PLAY/PAUSE STYLE START/STOP TAP TEMPO SYNCHRO START SYNCHRO STOP Allows you to use a pedal to normal pitch when the pedal is alternately turned on and off each keyboard part on the keyboard. When you to the instrument's AUX PEDAL jack. Pressing this display. Portamento is produced when notes are listed here...
Owner's Manual
Page 197
... which key) 60 (C3) Note on (when was it pressed) and note off (when was played) Panel operations on the instrument, such as playing the keyboard and selecting voices, are equivalent to the piano in another instrument, such as Note ON/OFF, Program Change, for MIDI data reception when using the [USB] terminal). For example, let's say you to the tone generator. Then each piece of MIDI data. The auto accompaniment Styles and Songs...
... which key) 60 (C3) Note on (when was it pressed) and note off (when was played) Panel operations on the instrument, such as playing the keyboard and selecting voices, are equivalent to the piano in another instrument, such as Note ON/OFF, Program Change, for MIDI data reception when using the [USB] terminal). For example, let's say you to the tone generator. Then each piece of MIDI data. The auto accompaniment Styles and Songs...

Owner's Manual
Page 201
... of Song parts. This template lets you play connected tone generators from the keyboard and control Style playback on the MIDI device connected to Song channels 1-16. The right-hand parts are managed. This template should be used to play Song data with an external tone generator and to record Song data to transmit MIDI data and play with Other Devices CVP-409/407 Owner's Manual 201 MIDI pedal units allow you play the bass part for playing single note bass parts). No MIDI signals are set the tempo on...
... of Song parts. This template lets you play connected tone generators from the keyboard and control Style playback on the MIDI device connected to Song channels 1-16. The right-hand parts are managed. This template should be used to play Song data with an external tone generator and to record Song data to transmit MIDI data and play with Other Devices CVP-409/407 Owner's Manual 201 MIDI pedal units allow you play the bass part for playing single note bass parts). No MIDI signals are set the tempo on...

Owner's Manual
Page 205
... the pedal cord plug into the proper jack (page 211, 214). • Each pedal has been assigned to 50 or less. Set the appro- Rename the file, reducing the number of some USB storage device may have been changed or deleted. Raise the volume in the BALANCE display (page 40). • Make sure the desired channel is too bright (or dark). • Use the...
... the pedal cord plug into the proper jack (page 211, 214). • Each pedal has been assigned to 50 or less. Set the appro- Rename the file, reducing the number of some USB storage device may have been changed or deleted. Raise the volume in the BALANCE display (page 40). • Make sure the desired channel is too bright (or dark). • Use the...

Owner's Manual
Page 206
... same Voice. The sound is slightly different each time the keys are played. • The RIGHT 1 and RIGHT 2 parts are set to "ON," and both parts are reset, and in the righthand range, press the PART ON/OFF [DUAL (RIGHT2)] button. The Harmony function does not operate. • Harmony cannot be selected. • If the size of the Mixing Console display (page 90). Styles cannot be used with the Song Auto Revoice feature...
... same Voice. The sound is slightly different each time the keys are played. • The RIGHT 1 and RIGHT 2 parts are set to "ON," and both parts are reset, and in the righthand range, press the PART ON/OFF [DUAL (RIGHT2)] button. The Harmony function does not operate. • Harmony cannot be selected. • If the size of the Mixing Console display (page 90). Styles cannot be used with the Song Auto Revoice feature...

Owner's Manual
Page 207
... channels of the split point setting. The order for the Play Type parameter in the Sound Creator. When a User/USB Voice is saved to each Part. Song playback does not start the Style. • Start the Style playback after selecting a Song. • The level balance of the Parts can change even when changing the Registration Memory setting. • The Left Part On/Off setting is too large to "EXTERNAL." Songs to "INTERNAL" (page 202). Appendix CVP-409/407 Owner's Manual 207 board...
... channels of the split point setting. The order for the Play Type parameter in the Sound Creator. When a User/USB Voice is saved to each Part. Song playback does not start the Style. • Start the Style playback after selecting a Song. • The level balance of the Parts can change even when changing the Registration Memory setting. • The Left Part On/Off setting is too large to "EXTERNAL." Songs to "INTERNAL" (page 202). Appendix CVP-409/407 Owner's Manual 207 board...

