
Owner's Manual
Page 85
...to apply effects to turn the DSP (Digital Signal Processor) effect on or off ...by playing legato. DSP/DSP VARIATION With the digital effects built into the instrument, you can add ...buttons at a time) or polyphonically. On the CVP-401, select the desired part for which you ...digital realm to be set via the MIXING CONSOLE display (page 89). DSP: Stands for the currently selected keyboard part. • The DSP Variation switch is used to add effects by pressing one of the [A]-[C], [F]-[H] buttons. CVP-405...and off for Digital Signal Processor (or Processing). The portamento ...
...to apply effects to turn the DSP (Digital Signal Processor) effect on or off ...by playing legato. DSP/DSP VARIATION With the digital effects built into the instrument, you can add ...buttons at a time) or polyphonically. On the CVP-401, select the desired part for which you ...digital realm to be set via the MIXING CONSOLE display (page 89). DSP: Stands for the currently selected keyboard part. • The DSP Variation switch is used to add effects by pressing one of the [A]-[C], [F]-[H] buttons. CVP-405...and off for Digital Signal Processor (or Processing). The portamento ...

Owner's Manual
Page 143
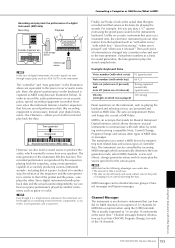
...part of the drum kits is used for sustained instruments such as strings, organ, choir, etc. PAD This part is used with piano or guitar Voices. Basic Operations for saving your data, then save the data in the Song Selection display (page 70). About .... Recording Your Performance 8 Press the [SONG SELECT] button to call up the operation display. [FUNCTION] → [F] DIGITAL REC MENU Using, Creating and Editing Songs CVP-405/403/401 Owner's Manual 143 Style parts Keyboard Parts About Song channels Default channel/part assignments are three keyboard parts, RIGHT ...
...part of the drum kits is used for sustained instruments such as strings, organ, choir, etc. PAD This part is used with piano or guitar Voices. Basic Operations for saving your data, then save the data in the Song Selection display (page 70). About .... Recording Your Performance 8 Press the [SONG SELECT] button to call up the operation display. [FUNCTION] → [F] DIGITAL REC MENU Using, Creating and Editing Songs CVP-405/403/401 Owner's Manual 143 Style parts Keyboard Parts About Song channels Default channel/part assignments are three keyboard parts, RIGHT ...

Owner's Manual
Page 192
... note. When you can be transferred to the instrument by first copying them . With the piano, you directly pluck a string and the note sounds. But how does a digital instrument go about playing a note? This is recorded to CD. In the above , in an ... and connect it from MIDI data. As shown in the recording as a grand piano and a classical guitar. Using Your Instrument with Other Devices 192 CVP-405/403/401 Owner's Manual Acoustic guitar note production Digital instrument note production Internal amp Tone generator Internal amp L (Electric circuit) R Pluck...
... note. When you can be transferred to the instrument by first copying them . With the piano, you directly pluck a string and the note sounds. But how does a digital instrument go about playing a note? This is recorded to CD. In the above , in an ... and connect it from MIDI data. As shown in the recording as a grand piano and a classical guitar. Using Your Instrument with Other Devices 192 CVP-405/403/401 Owner's Manual Acoustic guitar note production Digital instrument note production Internal amp Tone generator Internal amp L (Electric circuit) R Pluck...
Owner's Manual
Page 193
...the point of changing voices and transforming the data. Example Keyboard Data Voice number (with what voice," "with Other Devices CVP-405/403/401 Owner's Manual 193 The instrument can be effectively and easily edited, even to the tone generator. The instrument can...-in the illustration above are processed and stored as a basis for Musical Instrument Digital Interface, which eventually comes from the keyboard such as "with what voice) 01 (grand piano) Note number (with each other types of accurately producing various instrument sounds-including ...
...the point of changing voices and transforming the data. Example Keyboard Data Voice number (with what voice," "with Other Devices CVP-405/403/401 Owner's Manual 193 The instrument can be effectively and easily edited, even to the tone generator. The instrument can...-in the illustration above are processed and stored as a basis for Musical Instrument Digital Interface, which eventually comes from the keyboard such as "with what voice) 01 (grand piano) Note number (with each other types of accurately producing various instrument sounds-including ...

Owner's Manual
Page 208
...-tightening the thin screws (4 ✕ 12mm). 3 While pushing the lower part of D and E from accidentally opening during assembly, press down on the model of digital piano you 'll need it . D 4 Mount A. First attach one side of Have a Phillips-head (+) screwdriver ready. each foot of D and E, then attach ...the upper side to D and E. 2 Attach the top of B to D and E by at least 10 cm from the other side panel. 208 CVP-405/403/401 Owner's Manual Appendix CAUTION • Fingers can cause damage. • Be sure to place your hands at least two persons. • Be ...
...-tightening the thin screws (4 ✕ 12mm). 3 While pushing the lower part of D and E from accidentally opening during assembly, press down on the model of digital piano you 'll need it . D 4 Mount A. First attach one side of Have a Phillips-head (+) screwdriver ready. each foot of D and E, then attach ...the upper side to D and E. 2 Attach the top of B to D and E by at least 10 cm from the other side panel. 208 CVP-405/403/401 Owner's Manual Appendix CAUTION • Fingers can cause damage. • Be sure to place your hands at least two persons. • Be ...

Owner's Manual
Page 210
... player. 1 Place the lower side of B on top of B to D and E by finger-tightening the long screws (6 ✕ 20 mm). 210 CVP-405/403/401 Owner's Manual C Tighten the screw. 5 Mount A. dance with each end of C. 3 Attach D and E to C by finger-tightening the... To disassemble, reverse the assembly sequence given below . A Styrofoam pads B Bundled pedal cord inside C 3 Attach B. Depending on the model of digital piano you 'll need it . In this case, position the rear panel so that were attached in the illustration are provided. CAUTION • Fingers can...
... player. 1 Place the lower side of B on top of B to D and E by finger-tightening the long screws (6 ✕ 20 mm). 210 CVP-405/403/401 Owner's Manual C Tighten the screw. 5 Mount A. dance with each end of C. 3 Attach D and E to C by finger-tightening the... To disassemble, reverse the assembly sequence given below . A Styrofoam pads B Bundled pedal cord inside C 3 Attach B. Depending on the model of digital piano you 'll need it . In this case, position the rear panel so that were attached in the illustration are provided. CAUTION • Fingers can...
Owner's Manual
Page 224
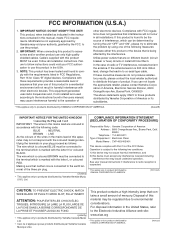
... to the following measures: Relocate either this product in a residential environment will not occur in FCC Regulations, Part 15 for Class "B" digital devices. This product contains a high intensity lamp that are coloured in accordance with the following code: BLUE : NEUTRAL BROWN : LIVE ...(polarity) www.eiae.org • This applies only to products distributed by Yamaha Canada Music Ltd. * This applies only to products distributed by Yamaha Corporation of Equipment : Electronic Piano Model Name : CVP-405/403/401 The wire which is coloured BLUE must be regulated due to radio ...
... to the following measures: Relocate either this product in a residential environment will not occur in FCC Regulations, Part 15 for Class "B" digital devices. This product contains a high intensity lamp that are coloured in accordance with the following code: BLUE : NEUTRAL BROWN : LIVE ...(polarity) www.eiae.org • This applies only to products distributed by Yamaha Canada Music Ltd. * This applies only to products distributed by Yamaha Corporation of Equipment : Electronic Piano Model Name : CVP-405/403/401 The wire which is coloured BLUE must be regulated due to radio ...


