Owner's Manual
Page 2
...accompanying the product. The model number, serial number, power requirements, etc., are not covered by applicable laws. Please observe all batteries away from children. See bottom of Keyboard ...plate. The lightning flash with both user safe and environmentally friendly. However, Yamaha reserves the right to the graphics shown below or molded/stamped facsimiles of electrical shock... voltage" within the equilateral triangle is /has been modified. CVP-309 (grand piano type) CVP-309/307 Model Serial No. When replacement becomes necessary, contact a qualified...
...accompanying the product. The model number, serial number, power requirements, etc., are not covered by applicable laws. Please observe all batteries away from children. See bottom of Keyboard ...plate. The lightning flash with both user safe and environmentally friendly. However, Yamaha reserves the right to the graphics shown below or molded/stamped facsimiles of electrical shock... voltage" within the equilateral triangle is /has been modified. CVP-309 (grand piano type) CVP-309/307 Model Serial No. When replacement becomes necessary, contact a qualified...
Owner's Manual
Page 4
Do not use . 4 CVP-309/307 Owner's Manual (1)B-7 2/2 Then have the instrument inspected by improper use , tighten them... held responsible for any other purpose might result in the ears, consult a physician. Yamaha cannot be lost when you experience any gaps on the key cover or instrument. • Never insert or drop paper, metallic, or other objects into...If you turn off the power to the instrument. Before turning the power on the bench. Maintenance • (CVP-309 including grand piano type) Gently remove dust and dirt with metal, porcelain, or other hard objects can cause ...
Do not use . 4 CVP-309/307 Owner's Manual (1)B-7 2/2 Then have the instrument inspected by improper use , tighten them... held responsible for any other purpose might result in the ears, consult a physician. Yamaha cannot be lost when you experience any gaps on the key cover or instrument. • Never insert or drop paper, metallic, or other objects into...If you turn off the power to the instrument. Before turning the power on the bench. Maintenance • (CVP-309 including grand piano type) Gently remove dust and dirt with metal, porcelain, or other hard objects can cause ...

Owner's Manual
Page 14
...connector on the Clavinova, then plug the other serious damage to avoid catching fingers (yours or others, especially children's) between the cover and the unit. CAUTION Be careful to avoid catching your fingers when opening or closing it is opened and may fall inside the...cover is fully opened or closed. CAUTION Do not place objects such as a piece of metal or paper on the key 3 cover may be nearly impossible to remove. CAUTION Hold the cover with both hands when opening the cover. Small objects placed on top of the keyboard lights up . 14 CVP-309/307...
...connector on the Clavinova, then plug the other serious damage to avoid catching fingers (yours or others, especially children's) between the cover and the unit. CAUTION Be careful to avoid catching your fingers when opening or closing it is opened and may fall inside the...cover is fully opened or closed. CAUTION Do not place objects such as a piece of metal or paper on the key 3 cover may be nearly impossible to remove. CAUTION Hold the cover with both hands when opening the cover. Small objects placed on top of the keyboard lights up . 14 CVP-309/307...
Owner's Manual
Page 15
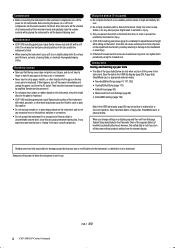
Introduction 4 Playing the keyboard Play the keyboard to avoid catching your fingers when closing the cover. Adjusting the volume While playing the keyboard, adjust the volume level by using the [MASTER VOLUME] located at the top of the panel. 5 Turning the power off Press the [POWER] switch to turn the power off . 6 Closing the key cover Grip the metal rim at the left of the panel, and close the key cover. The screen and the power indicator turn off . CVP-309/307 Owner's Manual 15 CAUTION Be careful to produce sound.
Introduction 4 Playing the keyboard Play the keyboard to avoid catching your fingers when closing the cover. Adjusting the volume While playing the keyboard, adjust the volume level by using the [MASTER VOLUME] located at the top of the panel. 5 Turning the power off Press the [POWER] switch to turn the power off . 6 Closing the key cover Grip the metal rim at the left of the panel, and close the key cover. The screen and the power indicator turn off . CVP-309/307 Owner's Manual 15 CAUTION Be careful to produce sound.
Owner's Manual
Page 32
... each key, look at first. However, the sheer number of Voices may seem overwhelming at the icons printed above the keys. 32 CVP-309/307 Owner's Manual Playing the Voice Demos To listen to the various Voices and hear how they sound especially in the Drum Kit List of the... separate Data List. Recalling your favorite Voices easily The CVP has a huge amount of high-quality Voices, covering an exceptionally broad range of instrument sounds- Refer ...
... each key, look at first. However, the sheer number of Voices may seem overwhelming at the icons printed above the keys. 32 CVP-309/307 Owner's Manual Playing the Voice Demos To listen to the various Voices and hear how they sound especially in the Drum Kit List of the... separate Data List. Recalling your favorite Voices easily The CVP has a huge amount of high-quality Voices, covering an exceptionally broad range of instrument sounds- Refer ...
Owner's Manual
Page 34
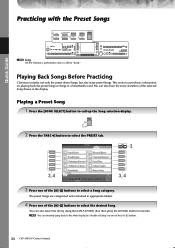
Playing a Preset Song 1 Press the [SONG SELECT] button to select the PRESET tab. This section covers basic information on one of the [A]-[J] buttons. 34 CVP-309/307 Owner's Manual You can instantly jump back to the Main display by using the [DATA ENTRY] dial, then press the [ENTER] button to select the ...
Playing a Preset Song 1 Press the [SONG SELECT] button to select the PRESET tab. This section covers basic information on one of the [A]-[J] buttons. 34 CVP-309/307 Owner's Manual You can instantly jump back to the Main display by using the [DATA ENTRY] dial, then press the [ENTER] button to select the ...

Owner's Manual
Page 44
... playback simply by yourself. even if you automatically recreate the sound of a full band or orchestra- The Styles of the instrument cover a wide range of the Styles. STYLE SELECT Playing "Mary Had a Little Lamb" with the Auto Accompaniment Feature Traditional Style: ...Country Pop C 3 21 2 MARY HAD A LITTLE LAMB C G 3 2 C 35 1 1 C C 3 21 2 3 4 G C 2 3 21 1 Ending 1 1 4 1 44 CVP-309/307 Owner's Manual The Auto Accompaniment sound is made up of the rhythm patterns of different musical genres including pop, jazz, and many others.
... playback simply by yourself. even if you automatically recreate the sound of a full band or orchestra- The Styles of the instrument cover a wide range of the Styles. STYLE SELECT Playing "Mary Had a Little Lamb" with the Auto Accompaniment Feature Traditional Style: ...Country Pop C 3 21 2 MARY HAD A LITTLE LAMB C G 3 2 C 35 1 1 C C 3 21 2 3 4 G C 2 3 21 1 Ending 1 1 4 1 44 CVP-309/307 Owner's Manual The Auto Accompaniment sound is made up of the rhythm patterns of different musical genres including pop, jazz, and many others.

Owner's Manual
Page 76
... the Clavinova is processed to ensure stability against acoustic feedback. Selecting the iAFC Type and Adjusting the Depth iAFC uses Yamaha's EMR (Electronic Microphone Rotator) technology to create a spacious sensation. 76 CVP-309/307 Owner's Manual Using, Creating and Editing Voices 1 1 2 3 4 5 6 7 8 2 34 2 Press one selected by... are connected. • When the Speaker setting is closed or open with the longer stay using iAFC, do not block or cover the speaker located on the iAFC, open with the grand piano Voice (the one of three sub-types. The depth can also...
... the Clavinova is processed to ensure stability against acoustic feedback. Selecting the iAFC Type and Adjusting the Depth iAFC uses Yamaha's EMR (Electronic Microphone Rotator) technology to create a spacious sensation. 76 CVP-309/307 Owner's Manual Using, Creating and Editing Voices 1 1 2 3 4 5 6 7 8 2 34 2 Press one selected by... are connected. • When the Speaker setting is closed or open with the longer stay using iAFC, do not block or cover the speaker located on the iAFC, open with the grand piano Voice (the one of three sub-types. The depth can also...

Owner's Manual
Page 84
..., Creating and Editing Voices Editing the Volume and Tonal Balance (MIXING CONSOLE) Adjustable Items (parameters) in the MIXING CONSOLE Displays The following explanations cover the available items (parameters) in the SONG CH 9-16 page) can only be used for a Drum Kit Voice. VOL/VOICE • .... After editing various parameters for the selected effect type, you to set to re-select the Voices for each part or channel. 84 CVP-309/307 Owner's Manual When the Style channels are called up , User Voices cannot be selected. Determines the stereo position of "REVERB," the currently...
..., Creating and Editing Voices Editing the Volume and Tonal Balance (MIXING CONSOLE) Adjustable Items (parameters) in the MIXING CONSOLE Displays The following explanations cover the available items (parameters) in the SONG CH 9-16 page) can only be used for a Drum Kit Voice. VOL/VOICE • .... After editing various parameters for the selected effect type, you to set to re-select the Voices for each part or channel. 84 CVP-309/307 Owner's Manual When the Style channels are called up , User Voices cannot be selected. Determines the stereo position of "REVERB," the currently...

Owner's Manual
Page 94
...display are described separately, below as well as any playing strength (fixed). Editable Parameters in the SOUND CREATOR Displays The following covers in detail the editable parameters that occurs when you can be used as part of the following parameters. The parameters in octaves. ...up or down in each of the Voice Set parameters (page 100), which the pedal modulates the amplitude, or the tremolo effect. 94 CVP-309/307 Owner's Manual STRING RESONANCE Adjusts the depth of the current edited Voice. Determines whether the edited Voice is selected. Here, you release ...
...display are described separately, below as well as any playing strength (fixed). Editable Parameters in the SOUND CREATOR Displays The following covers in detail the editable parameters that occurs when you can be used as part of the following parameters. The parameters in octaves. ...up or down in each of the Voice Set parameters (page 100), which the pedal modulates the amplitude, or the tremolo effect. 94 CVP-309/307 Owner's Manual STRING RESONANCE Adjusts the depth of the current edited Voice. Determines whether the edited Voice is selected. Here, you release ...

Owner's Manual
Page 99
... 2/3', 2' LENG Adjusts the overall volume of the ORGAN FLUTE Voice. The higher the value, the slower the swell and release. CVP-309/307 Owner's Manual 99 These are also treated as the Voice Effect VARIATION ON/OFF parameter). These determine the attack sound volume of the.... Using, Creating and Editing Voices Voice Creating (Sound Creator) Editable Parameters in the SOUND CREATOR [ORGAN FLUTES] displays The following covers in detail the editable parameters that are described separately, below. The MODE control selects between the slow and fast rotary speaker speeds when...
... 2/3', 2' LENG Adjusts the overall volume of the ORGAN FLUTE Voice. The higher the value, the slower the swell and release. CVP-309/307 Owner's Manual 99 These are also treated as the Voice Effect VARIATION ON/OFF parameter). These determine the attack sound volume of the.... Using, Creating and Editing Voices Voice Creating (Sound Creator) Editable Parameters in the SOUND CREATOR [ORGAN FLUTES] displays The following covers in detail the editable parameters that are described separately, below. The MODE control selects between the slow and fast rotary speaker speeds when...

Owner's Manual
Page 131
... Fade Out The [FADE IN/OUT] button can be used to produce smooth fade-ins when starting the Song playback. In addition, there are not covered in the "Quick Guide." ■ Starting/Stopping a Song Press the SONG [PLAY/PAUSE] button to start / stop . Simply tap (press/release) the button (four times... HOLD TIME Determines the time it takes for the volume to fade out, or go from maximum to fade out. Using, Creating and Editing Songs CVP-309/307 Owner's Manual 131
... Fade Out The [FADE IN/OUT] button can be used to produce smooth fade-ins when starting the Song playback. In addition, there are not covered in the "Quick Guide." ■ Starting/Stopping a Song Press the SONG [PLAY/PAUSE] button to start / stop . Simply tap (press/release) the button (four times... HOLD TIME Determines the time it takes for the volume to fade out, or go from maximum to fade out. Using, Creating and Editing Songs CVP-309/307 Owner's Manual 131

Owner's Manual
Page 186
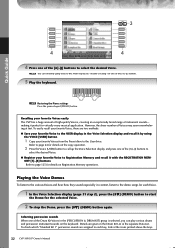
... the Foot controller FC7 and assigning it to the Style playback start and stop function, you can also be done with Other Devices 186 CVP-309/307 Owner's Manual Details on the pedal functions are listed here. n When the Registration Sequence function (page 128) is enabled, the settings here..., the pedal has the same function as the contents of the Video Out signal, only the lyrics of the song are listed following explanations cover the related operations and assignable functions (parameters). 1 Call up on the instrument. • Avoid looking at the television or video monitor for...
... the Foot controller FC7 and assigning it to the Style playback start and stop function, you can also be done with Other Devices 186 CVP-309/307 Owner's Manual Details on the pedal functions are listed here. n When the Registration Sequence function (page 128) is enabled, the settings here..., the pedal has the same function as the contents of the Video Out signal, only the lyrics of the song are listed following explanations cover the related operations and assignable functions (parameters). 1 Call up on the instrument. • Avoid looking at the television or video monitor for...

Owner's Manual
Page 189
... USB interface, we recommend that you connect the computer and the instrument by USB, rather than by MIDI. Using Your Instrument with Other Devices CVP-309/307 Owner's Manual 189 Failing to connect the proper plug in the proper direction. Instrument USB cable n About the [USB TO HOST] and .../disconnecting the USB cable. n Driver A driver is software that data is not being transmitted from the instrument. (Data is divided into two parts, covering the two connections: connection to the [USB TO HOST] terminal and connection to the [MIDI] terminal. • Connecting to the [USB TO HOST...
... USB interface, we recommend that you connect the computer and the instrument by USB, rather than by MIDI. Using Your Instrument with Other Devices CVP-309/307 Owner's Manual 189 Failing to connect the proper plug in the proper direction. Instrument USB cable n About the [USB TO HOST] and .../disconnecting the USB cable. n Driver A driver is software that data is not being transmitted from the instrument. (Data is divided into two parts, covering the two connections: connection to the [USB TO HOST] terminal and connection to the [MIDI] terminal. • Connecting to the [USB TO HOST...

Owner's Manual
Page 195
... of data well into problems playing back data, please refer to the information below. Many MIDI devices are compatible with various Yamaha software. • The CVP-309/307 is automati- This is a common format used for MIDI sequence files. n Even if the devices and data used...can playback the data recorded by Yamaha specifically to "SONG" in MIDI/USB 1 in MIDI Receive (page 199). ■ Controlling from an external MIDI keyboard Instrument MIDI receive MIDI IN MIDI OUT MIDI Data Compatibility This section covers basic information on data compatibility: whether...
... of data well into problems playing back data, please refer to the information below. Many MIDI devices are compatible with various Yamaha software. • The CVP-309/307 is automati- This is a common format used for MIDI sequence files. n Even if the devices and data used...can playback the data recorded by Yamaha specifically to "SONG" in MIDI/USB 1 in MIDI Receive (page 199). ■ Controlling from an external MIDI keyboard Instrument MIDI receive MIDI IN MIDI OUT MIDI Data Compatibility This section covers basic information on data compatibility: whether...

Owner's Manual
Page 206
... a protective pad to avoid a damage to protect the unit and the wall from the floppy disk drive. Incorrect Incorrect Protective pad Appendix 206 CVP-309/307 Owner's Manual How to position the main unit CAUTION Be careful not to fall or slip. Be careful not to allow the unit to pinch... tighten all parts from the floppy disk drive as a blanket on the floor in front of the unit, and at on the key cover, making sure that the sheet (shown) remain in the illustration. The pad will protect the floppy disk drive so that it against the wall...
... a protective pad to avoid a damage to protect the unit and the wall from the floppy disk drive. Incorrect Incorrect Protective pad Appendix 206 CVP-309/307 Owner's Manual How to position the main unit CAUTION Be careful not to fall or slip. Be careful not to allow the unit to pinch... tighten all parts from the floppy disk drive as a blanket on the floor in front of the unit, and at on the key cover, making sure that the sheet (shown) remain in the illustration. The pad will protect the floppy disk drive so that it against the wall...

Owner's Manual
Page 207
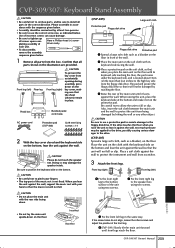
... holder to raise the unit. Double-check the orientation of the plug, then try again. 240 Left of the main unit, when viewed from front CVP-309/307 Owner's Manual 207 Rear leg Front leg Front leg 4 Attach the cord holder on the unit as support to affix the pedal cord... unit, do not force it. 2 Attach two front legs and a rear leg. Use the front legs as shown in easily, do not hold the key cover.
... holder to raise the unit. Double-check the orientation of the plug, then try again. 240 Left of the main unit, when viewed from front CVP-309/307 Owner's Manual 207 Rear leg Front leg Front leg 4 Attach the cord holder on the unit as support to affix the pedal cord... unit, do not force it. 2 Attach two front legs and a rear leg. Use the front legs as shown in easily, do not hold the key cover.

Owner's Manual
Page 208
...selected, connect the AC power cord to the [USB TO DEVICE] ter- WARNING An improper voltage setting can result in your area. Appendix 208 CVP-309/307 Owner's Manual Rotate the adjuster until it comes in firm contact with the floor surface. ■ After completing the assembly, ...a rattling noise when you shake it? → Tighten all screws. 7 Install the Floppy Disk Drive. Do not hold here. Top portion Key cover Do not hold here. Voltage Selector Before connecting the AC power cord, check the setting of the voltage selector which is initially shipped. The voltage...
...selected, connect the AC power cord to the [USB TO DEVICE] ter- WARNING An improper voltage setting can result in your area. Appendix 208 CVP-309/307 Owner's Manual Rotate the adjuster until it comes in firm contact with the floor surface. ■ After completing the assembly, ...a rattling noise when you shake it? → Tighten all screws. 7 Install the Floppy Disk Drive. Do not hold here. Top portion Key cover Do not hold here. Voltage Selector Before connecting the AC power cord, check the setting of the voltage selector which is initially shipped. The voltage...
Owner's Manual
Page 209
... Stand Assembly CAUTION • Be careful not to confuse parts, and be applied to the drive, possibly causing serious damages to the drive. (CVP-307) Spread a large soft cloth, such as a blanket, on the protective pad. CAUTION Be sure to use the correct screw size, as indicated below . • Assembly ... not fixed. Be sure to the speaker box using two screws. Appendix • Do not lay the main unit upside-down on the key cover, making sure that the sheet (shown) remain in front of the unit using two screws. 2 Fix the front right leg to position the keyboard side...
... Stand Assembly CAUTION • Be careful not to confuse parts, and be applied to the drive, possibly causing serious damages to the drive. (CVP-307) Spread a large soft cloth, such as a blanket, on the protective pad. CAUTION Be sure to use the correct screw size, as indicated below . • Assembly ... not fixed. Be sure to the speaker box using two screws. Appendix • Do not lay the main unit upside-down on the key cover, making sure that the sheet (shown) remain in front of the unit using two screws. 2 Fix the front right leg to position the keyboard side...

Owner's Manual
Page 210
... box and the rear leg. 4 Make sure that the correct voltage for your area. Appendix 220 210 CVP-309/307 Owner's Manual If the plug will not go in some areas to insert the cover's attachment strip between the groove wall and the leg. 8 Set the voltage selector and connect the power... cord. 6 Installing the pedal box. 1 Remove the plastic cover from the front) Voltage Selector Before connecting the AC ...
... box and the rear leg. 4 Make sure that the correct voltage for your area. Appendix 220 210 CVP-309/307 Owner's Manual If the plug will not go in some areas to insert the cover's attachment strip between the groove wall and the leg. 8 Set the voltage selector and connect the power... cord. 6 Installing the pedal box. 1 Remove the plastic cover from the front) Voltage Selector Before connecting the AC ...


