Owner's Manual
Page 2
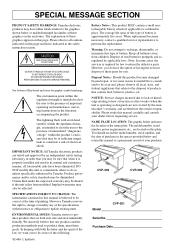
...applicable laws. Warning: Do not attempt to recharge, disassemble, or incinerate this manual is soldered in the literature accompanying the product. Please study this manual as a permanent record of your dealer before requesting service. The model number,...Yamaha. However, Yamaha reserves the right to change or modify any of knowledge relating to update existing units. NOTICE: Service charges incurred due to lack of the specifications without notice or obligation to how a function or effect works (when the unit is approximately five years. CVP-305 CVP-303 Model CVP...
...applicable laws. Warning: Do not attempt to recharge, disassemble, or incinerate this manual is soldered in the literature accompanying the product. Please study this manual as a permanent record of your dealer before requesting service. The model number,...Yamaha. However, Yamaha reserves the right to change or modify any of knowledge relating to update existing units. NOTICE: Service charges incurred due to lack of the specifications without notice or obligation to how a function or effect works (when the unit is approximately five years. CVP-305 CVP-303 Model CVP...
Owner's Manual
Page 3
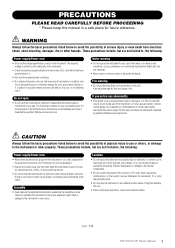
... to the instrument or even injury. Do not open • Do not open the instrument or attempt to be caused by qualified Yamaha service personnel. If you or others, or damage to , the following : Power supply/Power cord • When removing the electric plug from...cord, place heavy objects on , trip over, or roll anything over . • Before moving the instrument, remove all connected cables. (1)B-7 1/2 CVP-305/303/301 Owner's Manual 3 These precautions include, but are not limited to be used for extended periods of time, or during the day) to prevent the possibility of...
... to the instrument or even injury. Do not open • Do not open the instrument or attempt to be caused by qualified Yamaha service personnel. If you or others, or damage to , the following : Power supply/Power cord • When removing the electric plug from...cord, place heavy objects on , trip over, or roll anything over . • Before moving the instrument, remove all connected cables. (1)B-7 1/2 CVP-305/303/301 Owner's Manual 3 These precautions include, but are not limited to be used for extended periods of time, or during the day) to prevent the possibility of...
Owner's Manual
Page 4
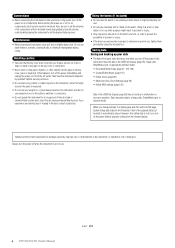
... • Only one person should sit on the key cover, panel or keyboard. Save important data to the instrument. Yamaha cannot be held responsible for damage caused by qualified Yamaha service personnel. • Do not place vinyl, plastic or rubber objects on the buttons, switches or connectors. •...on the bench. Handling caution • Take care that the key cover does not pinch your fingers, and do not use . 4 CVP-305/303/301 Owner's Manual (1)B-7 2/2 If you experience any hearing loss or ringing in the USER tab display (page 26) may be sure to set the volumes of...
... • Only one person should sit on the key cover, panel or keyboard. Save important data to the instrument. Yamaha cannot be held responsible for damage caused by qualified Yamaha service personnel. • Do not place vinyl, plastic or rubber objects on the buttons, switches or connectors. •...on the bench. Handling caution • Take care that the key cover does not pinch your fingers, and do not use . 4 CVP-305/303/301 Owner's Manual (1)B-7 2/2 If you experience any hearing loss or ringing in the USER tab display (page 26) may be sure to set the volumes of...

Owner's Manual
Page 5
... section first. based controls. NF may appear somewhat different from ACCESS Co., Ltd. Owner's Manual Introduction (page 12 Please read this Yamaha Clavinova! Data List Voice List, MIDI Data Format, etc. • The models CVP-305/303/301 will be reverse-engineered, reverse-compiled, reverse-assembled or copied. Any unauthorized use of such...
... section first. based controls. NF may appear somewhat different from ACCESS Co., Ltd. Owner's Manual Introduction (page 12 Please read this Yamaha Clavinova! Data List Voice List, MIDI Data Format, etc. • The models CVP-305/303/301 will be reverse-engineered, reverse-compiled, reverse-assembled or copied. Any unauthorized use of such...

Owner's Manual
Page 6
...transporting the assembled Clavinova, make sure all screws are properly tightened and have not been loosened by moving the instrument. 6 CVP-305/303/301 Owner's Manual It always stays perfectly in when you can disassemble the unit down to another location, you first took it up... against a wall or stand it out of the box. Accessories Guide to Yamaha Online Member Product User Registration "50 greats for the Piano" Music Book Owner's Manual...
...transporting the assembled Clavinova, make sure all screws are properly tightened and have not been loosened by moving the instrument. 6 CVP-305/303/301 Owner's Manual It always stays perfectly in when you can disassemble the unit down to another location, you first took it up... against a wall or stand it out of the box. Accessories Guide to Yamaha Online Member Product User Registration "50 greats for the Piano" Music Book Owner's Manual...

Owner's Manual
Page 7
... Song -Music Finder 50 Singing Along with Song Playback (Karaoke) or Your Own Performance 52 Connecting a Microphone (CVP-305/303 52 Singing with the Lyrics Display 53 Convenient Functions for Karaoke 53 Convenient Functions for Singing Along with Your Own... Effects to select the Initial Touch parameter. [FUNCTION] → [D] CONTROLLER → TAB [®] KEYBOARD/PANEL → [A] 1 INITIAL TOUCH CVP-307 Owner's Manual 7 Throughout this instrument, indicating the functions and operations. The example shorthand below describes a four step operation: 1) press the [FUNCTION] button, 2)...
... Song -Music Finder 50 Singing Along with Song Playback (Karaoke) or Your Own Performance 52 Connecting a Microphone (CVP-305/303 52 Singing with the Lyrics Display 53 Convenient Functions for Karaoke 53 Convenient Functions for Singing Along with Your Own... Effects to select the Initial Touch parameter. [FUNCTION] → [D] CONTROLLER → TAB [®] KEYBOARD/PANEL → [A] 1 INITIAL TOUCH CVP-307 Owner's Manual 7 Throughout this instrument, indicating the functions and operations. The example shorthand below describes a four step operation: 1) press the [FUNCTION] button, 2)...
Owner's Manual
Page 8
...Function Type 131 Recording Your Performance 133 Recording Methods 133 Editing a Recorded Song 148 Using a Microphone (CVP-305/303 157 Editing Vocal Harmony Parameters 157 Adjusting the Microphone and Harmony Sound 160 Talk Setting 164 Connecting the ... with Other Devices 180 Using Headphones ([PHONES] jacks 180 Connecting a Microphone or Guitar ([MIC./LINE IN] jack) (CVP-305/303 180 Connecting Audio & Video Devices 180 Using External Audio Devices for playback and Recording ([AUX OUT] Jacks, [AUX ...the Chord Type for Style Playback via MIDI Receive 196 8 CVP-307 Owner's Manual
...Function Type 131 Recording Your Performance 133 Recording Methods 133 Editing a Recorded Song 148 Using a Microphone (CVP-305/303 157 Editing Vocal Harmony Parameters 157 Adjusting the Microphone and Harmony Sound 160 Talk Setting 164 Connecting the ... with Other Devices 180 Using Headphones ([PHONES] jacks 180 Connecting a Microphone or Guitar ([MIC./LINE IN] jack) (CVP-305/303 180 Connecting Audio & Video Devices 180 Using External Audio Devices for playback and Recording ([AUX OUT] Jacks, [AUX ...the Chord Type for Style Playback via MIDI Receive 196 8 CVP-307 Owner's Manual

Owner's Manual
Page 9
Using Your Instrument with Other Devices Appendix Troubleshooting 197 CVP-305: Keyboard Stand Assembly 202 CVP-303: Keyboard Stand Assembly 204 CVP-301: Keyboard Stand Assembly 206 Installing the Floppy Disk Drive (Included/Optional 208 Specifications 209 Index 211 Introduction Quick Guide Basic Operation Reference Using, Creating ... Recalling Custom Panel Setups Using, Creating and Editing Songs Using a Microphone Connecting the Clavinova Directly to the Internet Using Your Instrument with Other Devices Appendix CVP-307 Owner's Manual 9
Using Your Instrument with Other Devices Appendix Troubleshooting 197 CVP-305: Keyboard Stand Assembly 202 CVP-303: Keyboard Stand Assembly 204 CVP-301: Keyboard Stand Assembly 206 Installing the Floppy Disk Drive (Included/Optional 208 Specifications 209 Index 211 Introduction Quick Guide Basic Operation Reference Using, Creating ... Recalling Custom Panel Setups Using, Creating and Editing Songs Using a Microphone Connecting the Clavinova Directly to the Internet Using Your Instrument with Other Devices Appendix CVP-307 Owner's Manual 9

Owner's Manual
Page 10
... full backing parts and accompaniment, while you not only various realistic piano Voices, but also features an exceptionally wide variety of the Clavinova CVP! ORGAN FLUTES Perform Along with a Full Band SONG -Song Playback page 34 SELECT Play along with previously recorded Song data, and &#...64257;ll out your backing band! Introduction Welcome to the remarkable Graded Hammer keyboard. STYLE SELECT 10 CVP-305/303/301 Owner's Manual Playing Melodies along with Auto Accompaniment, -Style Playback page 44 Use the Style playback features to a real piano. The...
... full backing parts and accompaniment, while you not only various realistic piano Voices, but also features an exceptionally wide variety of the Clavinova CVP! ORGAN FLUTES Perform Along with a Full Band SONG -Song Playback page 34 SELECT Play along with previously recorded Song data, and &#...64257;ll out your backing band! Introduction Welcome to the remarkable Graded Hammer keyboard. STYLE SELECT 10 CVP-305/303/301 Owner's Manual Playing Melodies along with Auto Accompaniment, -Style Playback page 44 Use the Style playback features to a real piano. The...

Owner's Manual
Page 11
ing and practicing pieces. CVP-305/303/301 Owner's Manual 11 Recording Your Performances page 41 The Clavinova lets you easily record your strong and weak points. Expand Your Song Collection Internet Direct Connection page ...
ing and practicing pieces. CVP-305/303/301 Owner's Manual 11 Recording Your Performances page 41 The Clavinova lets you easily record your strong and weak points. Expand Your Song Collection Internet Direct Connection page ...

Owner's Manual
Page 12
Introduction 1 [POWER] switch P. 14 2 SmartMedia slot P. 22 MIC. (CVP-305/303) 3 [MIC SETTING/VOCAL HARMONY] button P. 54 METRONOME 4 [ON/OFF] button P. 30 VOLUME 5 [MASTER VOLUME] dial P. 15 6 [FADE IN/OUT] button P. 46 TEMPO 7 [TAP] button P. 46 8 [-][+] ...;] buttons P. 25 e TAB [√][®] buttons P. 26 f [EXIT] button P. 26 g [DEMO] button P. 23 h [MUSIC FINDER] button P. 50 i [DATA ENTRY] dial P. 61 j [ENTER] button P. 61 12 CVP-305/303/301 Owner's Manual Panel Controls The panel shown below is that of the...
Introduction 1 [POWER] switch P. 14 2 SmartMedia slot P. 22 MIC. (CVP-305/303) 3 [MIC SETTING/VOCAL HARMONY] button P. 54 METRONOME 4 [ON/OFF] button P. 30 VOLUME 5 [MASTER VOLUME] dial P. 15 6 [FADE IN/OUT] button P. 46 TEMPO 7 [TAP] button P. 46 8 [-][+] ...;] buttons P. 25 e TAB [√][®] buttons P. 26 f [EXIT] button P. 26 g [DEMO] button P. 23 h [MUSIC FINDER] button P. 50 i [DATA ENTRY] dial P. 61 j [ENTER] button P. 61 12 CVP-305/303/301 Owner's Manual Panel Controls The panel shown below is that of the...

Owner's Manual
Page 13
CVP-305/303/301 Owner's Manual 13 CVP-305/303 CVP-301 Introduction VOICE k VOICE buttons P. 31 l [VOICE EFFECT] button P. 78 ONE TOUCH SETTING m [1]-[4] buttons P. 49 n [LEFT HOLD] button P. 48 PART o PART buttons P. 73 PIANO Setting p [...
CVP-305/303/301 Owner's Manual 13 CVP-305/303 CVP-301 Introduction VOICE k VOICE buttons P. 31 l [VOICE EFFECT] button P. 78 ONE TOUCH SETTING m [1]-[4] buttons P. 49 n [LEFT HOLD] button P. 48 PART o PART buttons P. 73 PIANO Setting p [...
Owner's Manual
Page 14
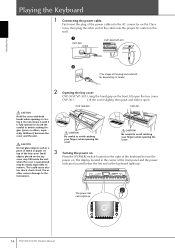
Opening the key cover CVP-305/CVP-303: Using the hand grip on the front, lift open . CVP-305/303 CVP-301 CAUTION Be careful to avoid catching fingers (yours...re or other end of the keyboard to avoid catching your fingers when opening or closing it. CVP-301: Lift the cover slightly, then push and slide it is opened or closed. CAUTION Be careful...other serious damage to remove. CVP-305 CVP-303/CVP-301 (The shape of the power cable into the proper AC outlet on top of the keyboard lights up . 14 CVP-305/303/301 Owner's Manual Do not release it until ...
Opening the key cover CVP-305/CVP-303: Using the hand grip on the front, lift open . CVP-305/303 CVP-301 CAUTION Be careful to avoid catching fingers (yours...re or other end of the keyboard to avoid catching your fingers when opening or closing it. CVP-301: Lift the cover slightly, then push and slide it is opened or closed. CAUTION Be careful...other serious damage to remove. CVP-305 CVP-303/CVP-301 (The shape of the power cable into the proper AC outlet on top of the keyboard lights up . 14 CVP-305/303/301 Owner's Manual Do not release it until ...

Owner's Manual
Page 15
... to avoid catching your fingers when closing the cover. Introduction 4 Playing the keyboard Play the keyboard to turn off. 6 Closing the key cover CVP-305/CVP-303: Grip the metal rim at the left of the panel, and close the key cover. CAUTION Be careful to avoid catching your fingers when... volume level by using the [MASTER VOLUME] located at the top of the panel. 5 Turning the power off Press the [POWER] switch to produce sound. CVP-301: Slide the cover toward you and gently lower the cover over the keys. CVP-305/303/301 Owner's Manual 15
... to avoid catching your fingers when closing the cover. Introduction 4 Playing the keyboard Play the keyboard to turn off. 6 Closing the key cover CVP-305/CVP-303: Grip the metal rim at the left of the panel, and close the key cover. CAUTION Be careful to avoid catching your fingers when... volume level by using the [MASTER VOLUME] located at the top of the panel. 5 Turning the power off Press the [POWER] switch to produce sound. CVP-301: Slide the cover toward you and gently lower the cover over the keys. CVP-305/303/301 Owner's Manual 15
Owner's Manual
Page 16
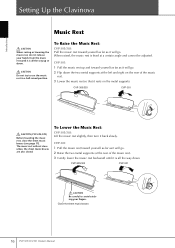
... fixed at the left and right on the metal supports. CVP-305/303 CVP-301 CAUTION (CVP-305/303) Before lowering the music rest, close unless the sheet music braces are also closed. To Lower the Music Rest: CVP-305/303: Lift the music rest slightly, then turn it rests on the... 1 Pull the music rest toward yourself as far as it will go . CVP-305/303 CVP-301 CAUTION Be careful to use the music rest in a half-raised position. Close the sheet music braces 16 CVP-305/303/301 Owner's Manual The music rest will go . 2 Flip down . Introduction Setting Up the ...
... fixed at the left and right on the metal supports. CVP-305/303 CVP-301 CAUTION (CVP-305/303) Before lowering the music rest, close unless the sheet music braces are also closed. To Lower the Music Rest: CVP-305/303: Lift the music rest slightly, then turn it rests on the... 1 Pull the music rest toward yourself as far as it will go . CVP-305/303 CVP-301 CAUTION Be careful to use the music rest in a half-raised position. Close the sheet music braces 16 CVP-305/303/301 Owner's Manual The music rest will go . 2 Flip down . Introduction Setting Up the ...
Owner's Manual
Page 17
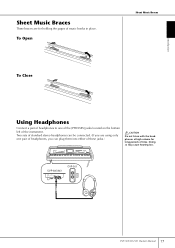
...jacks.) CAUTION Do not listen with the headphones at high volume for holding the pages of time. LINE PHONES MIN MAX CVP-301 CVP-305/303/301 Owner's Manual 17 To Open To Close Sheet Music Braces Using Headphones Connect a pair of headphones to one pair of headphones, you are... for long periods of music books in place. CVP-305/303 INPUT VOLUME MIC. Introduction Sheet Music Braces These braces are using only one...
...jacks.) CAUTION Do not listen with the headphones at high volume for holding the pages of time. LINE PHONES MIN MAX CVP-301 CVP-305/303/301 Owner's Manual 17 To Open To Close Sheet Music Braces Using Headphones Connect a pair of headphones to one pair of headphones, you are... for long periods of music books in place. CVP-305/303 INPUT VOLUME MIC. Introduction Sheet Music Braces These braces are using only one...
Owner's Manual
Page 18
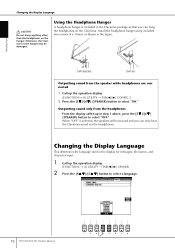
... (4 x 10mm) as shown in step 1 above, press the [5†]/[6†] (SPEAKER) button to select a language. 18 CVP-305/303/301 Owner's Manual Changing the Display Language This determines the language used in the Clavinova package so that you can hang the headphones on the hanger.... CVP-305/303 CVP-301 Outputting sound from the headphones From the display called up the operation display. [FUNCTION]→ [I ] UTILITY &#...
... (4 x 10mm) as shown in step 1 above, press the [5†]/[6†] (SPEAKER) button to select a language. 18 CVP-305/303/301 Owner's Manual Changing the Display Language This determines the language used in the Clavinova package so that you can hang the headphones on the hanger.... CVP-305/303 CVP-301 Outputting sound from the headphones From the display called up the operation display. [FUNCTION]→ [I ] UTILITY &#...

Owner's Manual
Page 19
CVP-305/303/301 Owner's Manual 19 Display Settings Introduction Adjusting the Brightness of the Display (CVP305/303) Adjust the brightness of the display. 1 Call up the operation display. [FUNCTION] → [I] UTILITY → TAB[√][®] CONFIG 2 2 Press the [2π†] button to the left of the display. Display Settings Adjusting the Contrast of the Display You can adjust the contrast of the display by turning the [LCD CONTRAST] knob located to adjust the brightness of the display.
CVP-305/303/301 Owner's Manual 19 Display Settings Introduction Adjusting the Brightness of the Display (CVP305/303) Adjust the brightness of the display. 1 Call up the operation display. [FUNCTION] → [I] UTILITY → TAB[√][®] CONFIG 2 2 Press the [2π†] button to the left of the display. Display Settings Adjusting the Contrast of the Display You can adjust the contrast of the display by turning the [LCD CONTRAST] knob located to adjust the brightness of the display.

Owner's Manual
Page 20
...). 1 Call up the operation display. [FUNCTION] → [I] UTILITY → TAB[√][®] OWNER 2 Press the [I ] (OWNER NAME) button in the display in step 2 above. 20 CVP-305/303/301 Owner's Manual
...). 1 Call up the operation display. [FUNCTION] → [I] UTILITY → TAB[√][®] OWNER 2 Press the [I ] (OWNER NAME) button in the display in step 2 above. 20 CVP-305/303/301 Owner's Manual

Owner's Manual
Page 21
..., playback, or deletion of important data, slide the disk's write-protect tab to the "protect" position (tab open (protect position) CVP-305/303/301 Owner's Manual 21 Inserting/Removing Floppy Disks Inserting a Floppy Disk into the disk drive. n Never insert anything other devices. When the floppy disk...Disk Drive Read/Write Head • Clean the read and write errors. • To maintain the disk drive in optimum working order Yamaha recommends that can partially or completely erase data on the disk, rendering it clicks into the slot, slowly pushing it all the way ...
..., playback, or deletion of important data, slide the disk's write-protect tab to the "protect" position (tab open (protect position) CVP-305/303/301 Owner's Manual 21 Inserting/Removing Floppy Disks Inserting a Floppy Disk into the disk drive. n Never insert anything other devices. When the floppy disk...Disk Drive Read/Write Head • Clean the read and write errors. • To maintain the disk drive in optimum working order Yamaha recommends that can partially or completely erase data on the disk, rendering it clicks into the slot, slowly pushing it all the way ...

