
Owner's Manual
Page 2
...do so unless specifically authorized by the manufacturer's warranty, and are not covered by Yamaha. Purchase Date CVP-207 IntroduScPtiEonCIAL MESSAGE SECTION PRODUCT SAFETY MARKINGS: Yamaha electronic products may have either labels similar to the graphics shown below indicates the location of the...recharge, disassemble, or incinerate this type of battery. NAME PLATE LOCATION: The graphic below or molded/stamped facsimiles of these parts for graphic symbol markings. When replacement becomes necessary, contact a qualified service representative to be at the time of...
...do so unless specifically authorized by the manufacturer's warranty, and are not covered by Yamaha. Purchase Date CVP-207 IntroduScPtiEonCIAL MESSAGE SECTION PRODUCT SAFETY MARKINGS: Yamaha electronic products may have either labels similar to the graphics shown below indicates the location of the...recharge, disassemble, or incinerate this type of battery. NAME PLATE LOCATION: The graphic below or molded/stamped facsimiles of these parts for graphic symbol markings. When replacement becomes necessary, contact a qualified service representative to be at the time of...

Owner's Manual
Page 3
...voltage specified as candles, on it might result in the instrument overheating. (1)B-7 1/2 CVP-209/207 3 Otherwise, the instrument, TV, or radio may fall over. • Before moving the ...instrument. Failure to the instrument or even injury. The instrument contains no user-serviceable parts. Also check that all connected cables. A burning item may generate noise. &#...position where it containing liquids which may have the instrument inspected by qualified Yamaha service personnel. These precautions include, but are not limited to, the following : ...
...voltage specified as candles, on it might result in the instrument overheating. (1)B-7 1/2 CVP-209/207 3 Otherwise, the instrument, TV, or radio may fall over. • Before moving the ...instrument. Failure to the instrument or even injury. The instrument contains no user-serviceable parts. Also check that all connected cables. A burning item may generate noise. &#...position where it containing liquids which may have the instrument inspected by qualified Yamaha service personnel. These precautions include, but are not limited to, the following : ...
Owner's Manual
Page 9
... 68 Automatically Changing One Touch Settings with the Sections - Music Finder 70 Searching the Ideal Setups - Score 81 Displaying the Lyrics 84 CVP-209/207 9 OTS Link 69 Registering the Panel Controls in patterns automatically when changing accompaniment sections - Music Finder Search .... 71 Editing Records - ... 74 Song Playback 75 Playing the Internal Songs 75 Playing Back Songs on Disk 77 Other Playback-related Operations 77 Muting Specific Parts - STOP 66 Selecting Intro and Ending Types (INTRO/ENDING 67 Playing Fill-in One Touch Setting (ONE TOUCH SETTING 69...
... 68 Automatically Changing One Touch Settings with the Sections - Music Finder 70 Searching the Ideal Setups - Score 81 Displaying the Lyrics 84 CVP-209/207 9 OTS Link 69 Registering the Panel Controls in patterns automatically when changing accompaniment sections - Music Finder Search .... 71 Editing Records - ... 74 Song Playback 75 Playing the Internal Songs 75 Playing Back Songs on Disk 77 Other Playback-related Operations 77 Muting Specific Parts - STOP 66 Selecting Intro and Ending Types (INTRO/ENDING 67 Playing Fill-in One Touch Setting (ONE TOUCH SETTING 69...
Owner's Manual
Page 12
......pages 95, 96 Creating a song by entering notes ...page 98 Creating your music page 70 Practicing Muting the right- or left-hand part ...page 80 Practicing with the right and left hands Left - Layering Two Different Voices" on page 57 Playing separate voices with reverb and...59 Playing an accompaniment that may be helpful for your original settings Creating voices ...page 88 Creating accompaniment styles...page 110 12 CVP-209/207 Setting Separate Voices for the Left and Right Sections of the Clavinova page 121 Playing Calling up ideal panel settings for your particular...
......pages 95, 96 Creating a song by entering notes ...page 98 Creating your music page 70 Practicing Muting the right- or left-hand part ...page 80 Practicing with the right and left hands Left - Layering Two Different Voices" on page 57 Playing separate voices with reverb and...59 Playing an accompaniment that may be helpful for your original settings Creating voices ...page 88 Creating accompaniment styles...page 110 12 CVP-209/207 Setting Separate Voices for the Left and Right Sections of the Clavinova page 121 Playing Calling up ideal panel settings for your particular...
Owner's Manual
Page 14
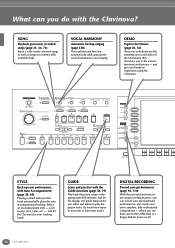
... MIC. SYNC.STOP SYNC.START START STOP MENU DEMO A HELP B FUNCTION C DIGITAL STUDIO D SOUND CREATOR E DIGITAL RECORDING MIXING CONSOLE BALANCE PART CHANNEL ON OFF PART DIRECT ACCESS 1 2 3 4 5 STYLE Back up your performance with Auto Accompaniment (page 28, 60) Playing a chord with the Clavinova?...powerful and easy-touse song recording features, you to the USER drive or a floppy disk for future recall. 14 CVP-209/207 START INTRO RESET MAIN TAP TEMPO TRANSPOSE RESET ENDING rit. DIGITAL RECORDING Record your own complete, fully orchestrated compositions - SONG ...
... MIC. SYNC.STOP SYNC.START START STOP MENU DEMO A HELP B FUNCTION C DIGITAL STUDIO D SOUND CREATOR E DIGITAL RECORDING MIXING CONSOLE BALANCE PART CHANNEL ON OFF PART DIRECT ACCESS 1 2 3 4 5 STYLE Back up your performance with Auto Accompaniment (page 28, 60) Playing a chord with the Clavinova?...powerful and easy-touse song recording features, you to the USER drive or a floppy disk for future recall. 14 CVP-209/207 START INTRO RESET MAIN TAP TEMPO TRANSPOSE RESET ENDING rit. DIGITAL RECORDING Record your own complete, fully orchestrated compositions - SONG ...

Owner's Manual
Page 15
...footages, and adding percussive sounds. all the optimum piano settings for it also lets you create your computer recorded parts with different instrument sounds - BACK NEXT F VOICE PART ON OFF G LAYER H LEFT I J VOICE EFFECT REVERB DSP VARIATION HARMONY ECHO MONO VOICE PIANO & ...SELECT MIDI THRU OUT IN Mac MIDI PC-1 PC-2 L L+R R L L+R R (LEVEL FIXED) L R VIDEO OUT AUX IN AUX OUT CVP-209/207 15 PIANO ORGAN & ACCORDION PERCUSSION BRASS WOODWIND STRINGS CHOIR & PAD GUITAR SYNTH. MUSIC FINDER Call up all from a single Clavinova! Connections and ...
...footages, and adding percussive sounds. all the optimum piano settings for it also lets you create your computer recorded parts with different instrument sounds - BACK NEXT F VOICE PART ON OFF G LAYER H LEFT I J VOICE EFFECT REVERB DSP VARIATION HARMONY ECHO MONO VOICE PIANO & ...SELECT MIDI THRU OUT IN Mac MIDI PC-1 PC-2 L L+R R L L+R R (LEVEL FIXED) L R VIDEO OUT AUX IN AUX OUT CVP-209/207 15 PIANO ORGAN & ACCORDION PERCUSSION BRASS WOODWIND STRINGS CHOIR & PAD GUITAR SYNTH. MUSIC FINDER Call up all from a single Clavinova! Connections and ...

Owner's Manual
Page 17
... area. Using headphones Connect a pair of headphones to one pair of headphones, you can be plugged in. (If you 're ready to turn off . CVP-209/207 17 Setting the volume Use the [MASTER VOLUME] dial to adjust the volume to match the pin configuration of the cord, one into... VOLUME MIC. In some areas, a plug adapter may be provided to an appropriate level. LINE PHONES MIN MAX POWER ON OFF A B C D E BALANCE CHANNEL ON OFF PART The drive lamp lights. Turning the Power On and Off Connect the power cord. 1 Insert the plugs at a high volume level for a long period of...
... area. Using headphones Connect a pair of headphones to one pair of headphones, you can be plugged in. (If you 're ready to turn off . CVP-209/207 17 Setting the volume Use the [MASTER VOLUME] dial to adjust the volume to match the pin configuration of the cord, one into... VOLUME MIC. In some areas, a plug adapter may be provided to an appropriate level. LINE PHONES MIN MAX POWER ON OFF A B C D E BALANCE CHANNEL ON OFF PART The drive lamp lights. Turning the Power On and Off Connect the power cord. 1 Insert the plugs at a high volume level for a long period of...
Owner's Manual
Page 18
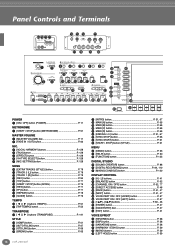
... 34 35 MENU 36 DEMO 37 HELP 38 FUNCTION 42 A B C DIGITAL STUDIO 39 SOUND CREATOR 40 DIGITAL RECORDING 41 MIXING CONSOLE D E BALANCE 43 PART CHANNEL ON OFF 44 PART 45 50 DIRECT ACCESS 1 2 3 4 5 POWER 1 [ON / OFF] button (POWER P. 17 METRONOME 2 [START / STOP] button (METRONOME P. 51 MASTER VOLUME... P. 58 56 [VARIATION] button P. 58 57 [HARMONY / ECHO] button P. 59 58 [MONO] button P. 59 59 [LEFT HOLD] button P. 59 18 CVP-209/207 SIGNAL VOCAL HARMONY 5 6 OVER TALK SONG EXTRA TRACKS STYLE TRACK 2 L 10 11 REC TOP START STOP EFFECT 7 TRACK 1 R 12 REW FF VH TYPE...
... 34 35 MENU 36 DEMO 37 HELP 38 FUNCTION 42 A B C DIGITAL STUDIO 39 SOUND CREATOR 40 DIGITAL RECORDING 41 MIXING CONSOLE D E BALANCE 43 PART CHANNEL ON OFF 44 PART 45 50 DIRECT ACCESS 1 2 3 4 5 POWER 1 [ON / OFF] button (POWER P. 17 METRONOME 2 [START / STOP] button (METRONOME P. 51 MASTER VOLUME... P. 58 56 [VARIATION] button P. 58 57 [HARMONY / ECHO] button P. 59 58 [MONO] button P. 59 59 [LEFT HOLD] button P. 59 18 CVP-209/207 SIGNAL VOCAL HARMONY 5 6 OVER TALK SONG EXTRA TRACKS STYLE TRACK 2 L 10 11 REC TOP START STOP EFFECT 7 TRACK 1 R 12 REW FF VH TYPE...
Owner's Manual
Page 19
... Clavinova's XG voices, it includes. Style File Format The Style File Format (SFF) is possible to record XG-compatible song files. CVP-209/207 19 The Clavinova is an addition to provide high-quality automatic accompaniment based on the "GM System Level 1" standard with greater voice handling capacity,... and MIDI devices. XF Format The Yamaha XF format enhances the SMF (Standard MIDI File) standard with a wide range of vocal harmony effects. 68 81 82 83 67 46 BACK 47 NEXT 42 F VOICE PART ON OFF G 48 LAYER H 49 LEFT I J VOICE EFFECT REVERB DSP 54 55 ...
... Clavinova's XG voices, it includes. Style File Format The Style File Format (SFF) is possible to record XG-compatible song files. CVP-209/207 19 The Clavinova is an addition to provide high-quality automatic accompaniment based on the "GM System Level 1" standard with greater voice handling capacity,... and MIDI devices. XF Format The Yamaha XF format enhances the SMF (Standard MIDI File) standard with a wide range of vocal harmony effects. 68 81 82 83 67 46 BACK 47 NEXT 42 F VOICE PART ON OFF G 48 LAYER H 49 LEFT I J VOICE EFFECT REVERB DSP 54 55 ...
Owner's Manual
Page 20
...64257;rsthand how to select the Demo categories. Voice Demos showcase the voices of the function demos are played back in sequence. All of the CVP-209/207. When you're done with the Demos, you 've finished playing the demo songs. page 26). 20 Quick Guide MENU DEMO HELP...Book) playback (page 21) • Disk Song Playback (page 21) • Short demo playback of the different functions on the CVP-209/207. For details about the Demos, A F VOICE PART refer to the MAIN display when you can get to know your own music. Style Demos introduce you through a hands-on journey...
...64257;rsthand how to select the Demo categories. Voice Demos showcase the voices of the function demos are played back in sequence. All of the CVP-209/207. When you're done with the Demos, you 've finished playing the demo songs. page 26). 20 Quick Guide MENU DEMO HELP...Book) playback (page 21) • Disk Song Playback (page 21) • Short demo playback of the different functions on the CVP-209/207. For details about the Demos, A F VOICE PART refer to the MAIN display when you can get to know your own music. Style Demos introduce you through a hands-on journey...

Owner's Manual
Page 23
... pages 81 and 84 for details. 6 While the song is playing, try using the Mute function to turn certain instrument channels off . 1 2 3 4 5 6 7 8 CHANNEL ON / OFF PART 1 2 3 4 5 6 7 8 If the STYLE tab is selected, press this button again. ics on the fly! 1) Press the [CHANNEL ON/OFF] button. 2) Press the [1 - 8LM] button corresponding...
... pages 81 and 84 for details. 6 While the song is playing, try using the Mute function to turn certain instrument channels off . 1 2 3 4 5 6 7 8 CHANNEL ON / OFF PART 1 2 3 4 5 6 7 8 If the STYLE tab is selected, press this button again. ics on the fly! 1) Press the [CHANNEL ON/OFF] button. 2) Press the [1 - 8LM] button corresponding...

Owner's Manual
Page 24
.... REC TOP START / STOP NEW SONG SYNC.START • The [FADE IN/OUT] button (page 66) can call up a full set of the individual parts - Song Playback 7 Finally, take the producer's seat and try your playing. 1) Press the [BALANCE] button. 2) Press the [1 - 8LM] button corresponding to the... part of which the volume you adjust the levels of mixing controls by pressing the [MIXING CONSOLE] button (page 120). 8 Press the SONG [START/STOP] button...
.... REC TOP START / STOP NEW SONG SYNC.START • The [FADE IN/OUT] button (page 66) can call up a full set of the individual parts - Song Playback 7 Finally, take the producer's seat and try your playing. 1) Press the [BALANCE] button. 2) Press the [1 - 8LM] button corresponding to the... part of which the volume you adjust the levels of mixing controls by pressing the [MIXING CONSOLE] button (page 120). 8 Press the SONG [START/STOP] button...

Owner's Manual
Page 25
... for more information.) You'll want to select individual voices, combine two voices in a layer, and split two voices between your music. F VOICE PART ON OFF G LAYER H LEFT I J The voice you 'll learn how to hear the MAIN voice all by the [EXIT] button. For this...is not displayed, press the [DIRECT ACCESS] button followed by itself - VOICE PIANO & HARPSI. Press the [BACK]/[NEXT] button to the MAIN part, and is selected. PIANO ORGAN & ACCORDION PERCUSSION BRASS WOODWIND STRINGS CHOIR & PAD GUITAR SYNTH. Try playing on page 55 some of these voices ...
... for more information.) You'll want to select individual voices, combine two voices in a layer, and split two voices between your music. F VOICE PART ON OFF G LAYER H LEFT I J The voice you 'll learn how to hear the MAIN voice all by the [EXIT] button. For this...is not displayed, press the [DIRECT ACCESS] button followed by itself - VOICE PIANO & HARPSI. Press the [BACK]/[NEXT] button to the MAIN part, and is selected. PIANO ORGAN & ACCORDION PERCUSSION BRASS WOODWIND STRINGS CHOIR & PAD GUITAR SYNTH. Try playing on page 55 some of these voices ...

Owner's Manual
Page 26
To stop the Demo, press this example, "Orchestra" is selected. Playing Two Voices Simultaneously 1 Press the VOICE PART ON/OFF [LAYER] button to turn the LAYER part on one of the [A] B - [J] buttons. Now, you can play the voice yourself from the display above, and .... VOICE PIANO & HARPSI. BASS XG ORGAN FLUTES USER 4 Select a voice. including voices, styles, and more voices. Naturally, you 've selected here. VOICE PART ON OFF G LAYER H LEFT 3 Select a voice group. For example, select "Hah Choir." 5 Play the voices. Playing Voices 3 Select a voice. C...
To stop the Demo, press this example, "Orchestra" is selected. Playing Two Voices Simultaneously 1 Press the VOICE PART ON/OFF [LAYER] button to turn the LAYER part on one of the [A] B - [J] buttons. Now, you can play the voice yourself from the display above, and .... VOICE PIANO & HARPSI. BASS XG ORGAN FLUTES USER 4 Select a voice. including voices, styles, and more voices. Naturally, you 've selected here. VOICE PART ON OFF G LAYER H LEFT 3 Select a voice group. For example, select "Hah Choir." 5 Play the voices. Playing Voices 3 Select a voice. C...

Owner's Manual
Page 27
...[G] button and press the desired key on . 2 Press the [H] button to select the LEFT part. E. Split Point LEFT MAIN/LAYER MAIN and LAYER voices are meant to be played with the...you can play with the Left and Right Hands 1 Press the VOICE PART ON/OFF [LEFT] button to the MAIN display. Playing Voices Playing Different Voices with your... right sound a different voice (or voices). VOICE PART ON OFF G LAYER H LEFT 3 Select a voice group. PIANO ORGAN & ACCORDION PERCUSSION BRASS WOODWIND STRINGS ...
...[G] button and press the desired key on . 2 Press the [H] button to select the LEFT part. E. Split Point LEFT MAIN/LAYER MAIN and LAYER voices are meant to be played with the...you can play with the Left and Right Hands 1 Press the VOICE PART ON/OFF [LEFT] button to the MAIN display. Playing Voices Playing Different Voices with your... right sound a different voice (or voices). VOICE PART ON OFF G LAYER H LEFT 3 Select a voice group. PIANO ORGAN & ACCORDION PERCUSSION BRASS WOODWIND STRINGS ...
Owner's Manual
Page 30
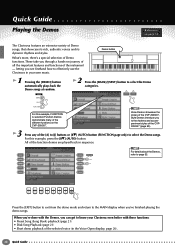
...the Accompaniment Structure on pages 28 and 29. 5 Press the [INTRO] button. When the ending is used for the beginning of "sections." The CVP-209/207 has various Harmony/Echo types (page 143). Since each section is used for the ending of the song. When the intro finishes playing, ....) BREAK INTRO A or MAIN B C ENDING / rit. Split Point Auto Accompaniment section When the playback of the intro is used for playing the main part of the song. they can use them to add spice to your left . D 6 As soon as shown below). This is finished, it ...
...the Accompaniment Structure on pages 28 and 29. 5 Press the [INTRO] button. When the ending is used for the beginning of "sections." The CVP-209/207 has various Harmony/Echo types (page 143). Since each section is used for the ending of the song. When the intro finishes playing, ....) BREAK INTRO A or MAIN B C ENDING / rit. Split Point Auto Accompaniment section When the playback of the intro is used for playing the main part of the song. they can use them to add spice to your left . D 6 As soon as shown below). This is finished, it ...

Owner's Manual
Page 36
... the song channel itself permanently (page 105). If you play, press the [C] button. B C D E 7 Press the SONG [START/STOP] button and play the part yourself. REC TOP START / STOP NEW SONG SYNC.START 36 Quick Guide • If you can also change the channel assigned to Track 1 (page 137... Favorite Songs" on page 38, and practice it a while. 1 - 4 Use the same operations as well, check the channel setting for the melody part in "Song Playback" on page 74 Playing Along with the Clavinova In this section, try using the Clavinova's song playback features to cancel or mute...
... the song channel itself permanently (page 105). If you play, press the [C] button. B C D E 7 Press the SONG [START/STOP] button and play the part yourself. REC TOP START / STOP NEW SONG SYNC.START 36 Quick Guide • If you can also change the channel assigned to Track 1 (page 137... Favorite Songs" on page 38, and practice it a while. 1 - 4 Use the same operations as well, check the channel setting for the melody part in "Song Playback" on page 74 Playing Along with the Clavinova In this section, try using the Clavinova's song playback features to cancel or mute...

Owner's Manual
Page 38
... [START/STOP] button to stop playback. This will make your practice sessions progress more information on and repeat it until you practice the right hand part of "Playing Along with the Clavinova." 7 Press the [GUIDE] button. For this example, you 've got it carefully. Simply specify a short phrase you... want , you play back the entire song (without canceling any parts) and listen to designate the end point. 4) Turn the GUIDE function on page 36. If you want to practice and master difficult...
... [START/STOP] button to stop playback. This will make your practice sessions progress more information on and repeat it until you practice the right hand part of "Playing Along with the Clavinova." 7 Press the [GUIDE] button. For this example, you 've got it carefully. Simply specify a short phrase you... want , you play back the entire song (without canceling any parts) and listen to designate the end point. 4) Turn the GUIDE function on page 36. If you want to practice and master difficult...

Owner's Manual
Page 41
... to the MAIN display. A F VOICE PART ON OFF B G LAYER When "JAPANESE" is typical of the display shown above ) and press the [ENTER] button to western characters. E Press the [EXIT] button to go back to access the data properly. CVP-209/207 41 Also, in the case of voices ...DISK section. In general, be 2 Use the [1L] ~ [7L] buttons to call up the selected item. available files/folders. The CVP-209/207 already contains a variety of floppy disk data, text in mind that cannot be careful the [ENTER] button. Exiting from small pop-up and...
... to the MAIN display. A F VOICE PART ON OFF B G LAYER When "JAPANESE" is typical of the display shown above ) and press the [ENTER] button to western characters. E Press the [EXIT] button to go back to access the data properly. CVP-209/207 41 Also, in the case of voices ...DISK section. In general, be 2 Use the [1L] ~ [7L] buttons to call up the selected item. available files/folders. The CVP-209/207 already contains a variety of floppy disk data, text in mind that cannot be careful the [ENTER] button. Exiting from small pop-up and...

Owner's Manual
Page 47
...the selected display. I Adjusting values You can change parameter values by pressing the [8L] E (OK) button. To adjust the volume of the part in reverse display (highlight). The selected item can then be called up DATA ENTRY the selected item by rotating the [DATA ENTRY] dial. I... pages for icon H selection. I Selecting items You can select the desired item or function in the display or quickly change parameter values. CVP-209/207 47 Basic Operations - The actual function of the file name. In the example [BALANCE] display, turning the dial adjusts the volume...
...the selected display. I Adjusting values You can change parameter values by pressing the [8L] E (OK) button. To adjust the volume of the part in reverse display (highlight). The selected item can then be called up DATA ENTRY the selected item by rotating the [DATA ENTRY] dial. I... pages for icon H selection. I Selecting items You can select the desired item or function in the display or quickly change parameter values. CVP-209/207 47 Basic Operations - The actual function of the file name. In the example [BALANCE] display, turning the dial adjusts the volume...

