

Owner's Manual
Page 2
... over and cause a fire. If it should appear to be caused by it inspected by Yamaha) only. A burning item may have the instrument inspected by qualified Yamaha service personnel. 2 CP33 Owner's Manual (3)-9 1/2 Water warning • Do not expose the instrument to , the following: Power supply/AC...place heavy objects on it, or place it . If you notice any way. PRECAUTIONS PLEASE READ CAREFULLY BEFORE PROCEEDING * Please keep this manual in any abnormality • If the AC adaptor cord or plug becomes frayed or damaged, or if there is printed on the unit. ...
... over and cause a fire. If it should appear to be caused by it inspected by Yamaha) only. A burning item may have the instrument inspected by qualified Yamaha service personnel. 2 CP33 Owner's Manual (3)-9 1/2 Water warning • Do not expose the instrument to , the following: Power supply/AC...place heavy objects on it, or place it . If you notice any way. PRECAUTIONS PLEASE READ CAREFULLY BEFORE PROCEEDING * Please keep this manual in any abnormality • If the AC adaptor cord or plug becomes frayed or damaged, or if there is printed on the unit. ...
Owner's Manual
Page 3
...Before moving the instrument, remove all volume levels to minimum. Before turning the power on or off for damage caused by qualified Yamaha service personnel. • Do not place vinyl, plastic or rubber objects on the panel or keyboard. Maintenance • When cleaning the ...limited to, the following: Power supply/AC power adaptor • When removing the electric plug from the wall AC outlet. (3)-9 2/2 CP33 Owner's Manual 3 Always turn off the power switch and disconnect the plug from the AC outlet. CAUTION Always follow the basic precautions listed below to ...
...Before moving the instrument, remove all volume levels to minimum. Before turning the power on or off for damage caused by qualified Yamaha service personnel. • Do not place vinyl, plastic or rubber objects on the panel or keyboard. Maintenance • When cleaning the ...limited to, the following: Power supply/AC power adaptor • When removing the electric plug from the wall AC outlet. (3)-9 2/2 CP33 Owner's Manual 3 Always turn off the power switch and disconnect the plug from the AC outlet. CAUTION Always follow the basic precautions listed below to ...

Owner's Manual
Page 4
... how to use others' copyrights. DON'T MAKE, DISTRIBUTE OR USE ILLEGAL COPIES. We recommend that you for choosing the Yamaha Stage Piano CP33. About this section while you wish to this Owner's Manual This manual consists of three main sections: Introduction, Reference and Appendix. Refer to use such data for instructional purposes only, and...
... how to use others' copyrights. DON'T MAKE, DISTRIBUTE OR USE ILLEGAL COPIES. We recommend that you for choosing the Yamaha Stage Piano CP33. About this section while you wish to this Owner's Manual This manual consists of three main sections: Introduction, Reference and Appendix. Refer to use such data for instructional purposes only, and...
Owner's Manual
Page 5
... effect, plus an enormous variety of 64 notes. Introduction Supplied Accessories • Yamaha PA-3C Power Adaptor* • Foot Pedal (FC3) • Owner's Manual * May not be included depending on your fingers from the keys. Using AWM, the CP33 has 28 original voices-including a variety of ultra-realistic piano and other devices...
... effect, plus an enormous variety of 64 notes. Introduction Supplied Accessories • Yamaha PA-3C Power Adaptor* • Foot Pedal (FC3) • Owner's Manual * May not be included depending on your fingers from the keys. Using AWM, the CP33 has 28 original voices-including a variety of ultra-realistic piano and other devices...
Owner's Manual
Page 6
Introduction Contents Introduction ...4 Application Index ...7 Before Using the CP33 ...8 Power Supply Connections ...8 Connecting to Speakers or Headphones ...9 Turning the Power On ...9 Adjusting the Sound ...10 Using the Pedals ...11 Reference ...12 Control Names and ... ...49 Master mode ...50 Message List ...50 MIDI Data Format ...51 MIDI Implementation Chart (Voice 55 MIDI Implementation Chart (Master 56 Specifications ...57 Index ...58 6 CP33 Owner's Manual
Introduction Contents Introduction ...4 Application Index ...7 Before Using the CP33 ...8 Power Supply Connections ...8 Connecting to Speakers or Headphones ...9 Turning the Power On ...9 Adjusting the Sound ...10 Using the Pedals ...11 Reference ...12 Control Names and ... ...49 Master mode ...50 Message List ...50 MIDI Data Format ...51 MIDI Implementation Chart (Voice 55 MIDI Implementation Chart (Master 56 Specifications ...57 Index ...58 6 CP33 Owner's Manual
Owner's Manual
Page 7
...Sound [VARIATION]/[BRILLIANCE]/[REVERB]/[EFFECT]" on page 16 Settings • Making detailed settings for the entire CP33 Detailed Settings-[FUNCTION]" on page 31 • Making settings for Master function Master Settings-Master Edit" on page 27 ...Connecting the CP33 to other devices • What is MIDI About MIDI" on page 42 • Connecting to multiple MIDI...About the display messages Message List" on page 50 • Troubleshooting Troubleshooting" on page 46 CP33 Owner's Manual 7
...Sound [VARIATION]/[BRILLIANCE]/[REVERB]/[EFFECT]" on page 16 Settings • Making detailed settings for the entire CP33 Detailed Settings-[FUNCTION]" on page 31 • Making settings for Master function Master Settings-Master Edit" on page 27 ...Connecting the CP33 to other devices • What is MIDI About MIDI" on page 42 • Connecting to multiple MIDI...About the display messages Message List" on page 50 • Troubleshooting Troubleshooting" on page 46 CP33 Owner's Manual 7
Owner's Manual
Page 8
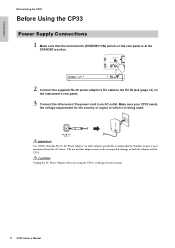
... from the AC mains. CAUTION Unplug the AC Power Adaptor when not using the CP33, or during electrical storms. 8 CP33 Owner's Manual Introduction Before Using the CP33 Before Using the CP33 Power Supply Connections 1 Make sure that the instrument's [STANDBY/ON] switch on the... instrument's rear panel. 3 Connect the other end of other adaptor specifically recommended by Yamaha) to both the adaptor and the CP33...
... from the AC mains. CAUTION Unplug the AC Power Adaptor when not using the CP33, or during electrical storms. 8 CP33 Owner's Manual Introduction Before Using the CP33 Before Using the CP33 Power Supply Connections 1 Make sure that the instrument's [STANDBY/ON] switch on the... instrument's rear panel. 3 Connect the other end of other adaptor specifically recommended by Yamaha) to both the adaptor and the CP33...
Owner's Manual
Page 9
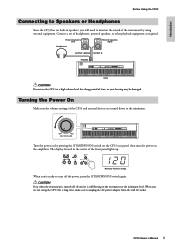
... no built-in the center of the front panel lights up. CP33 Owner's Manual 9 Connect a set of the instrument by pressing the [STANDBY/ON] switch on the CP33 rear panel, then turn off , electricity is still flowing to the instrument at a high volume level for a long time, ... NORMAL MELLOW ROOM HALL 1 HALL 2 STAGE CHORUS PHASER TREMOLO ROTARY SP HARD MEDIUM SOFT BRILLIANCE REVERB EFFECT TOUCH PANEL LOCK CP33 CAUTION Do not use the CP33 at the minimum level. OUTPUT R L/MONO MIDI PHONES USB STANDBY ON FOOT PEDAL IN OUT SUSTAIN AUX Normally indicates tempo....
... no built-in the center of the front panel lights up. CP33 Owner's Manual 9 Connect a set of the instrument by pressing the [STANDBY/ON] switch on the CP33 rear panel, then turn off , electricity is still flowing to the instrument at a high volume level for a long time, ... NORMAL MELLOW ROOM HALL 1 HALL 2 STAGE CHORUS PHASER TREMOLO ROTARY SP HARD MEDIUM SOFT BRILLIANCE REVERB EFFECT TOUCH PANEL LOCK CP33 CAUTION Do not use the CP33 at the minimum level. OUTPUT R L/MONO MIDI PHONES USB STANDBY ON FOOT PEDAL IN OUT SUSTAIN AUX Normally indicates tempo....
Owner's Manual
Page 10
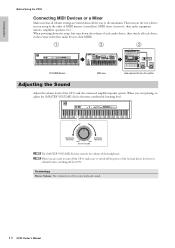
... slave Audio equipment (first mixer, then amplifier) Adjusting the Sound Adjust the volume levels of the entire keyboard sound. 10 CP33 Owner's Manual Introduction Before Using the CP33 Connecting MIDI Devices or a Mixer Make sure that all the way to the minimum. PIANO 2 CHORD VIBRAPHONE VARIATION 1 CHURCH ORGAN 2 JAZZ ORGAN...
... slave Audio equipment (first mixer, then amplifier) Adjusting the Sound Adjust the volume levels of the entire keyboard sound. 10 CP33 Owner's Manual Introduction Before Using the CP33 Connecting MIDI Devices or a Mixer Make sure that all the way to the minimum. PIANO 2 CHORD VIBRAPHONE VARIATION 1 CHURCH ORGAN 2 JAZZ ORGAN...
Owner's Manual
Page 11
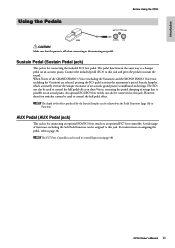
... assigning the pedal, refer to this jack. The FC3 can also be used to this jack. For instructions on an acoustic piano. CP33 Owner's Manual 11 Introduction Before Using the CP33 Using the Pedals FOOT PEDAL FC3 SUSTAIN AUX CAUTION Make sure that is off when connecting or disconnecting any pedal. Sustain Pedal...
... assigning the pedal, refer to this jack. The FC3 can also be used to this jack. For instructions on an acoustic piano. CP33 Owner's Manual 11 Introduction Before Using the CP33 Using the Pedals FOOT PEDAL FC3 SUSTAIN AUX CAUTION Make sure that is off when connecting or disconnecting any pedal. Sustain Pedal...

Owner's Manual
Page 12
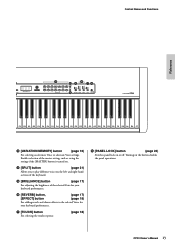
... a master keyboard. 7 [MASTER EDIT] button (page 27) Enables selection of a singer or other instruments. 6 [MASTER] button (page 26) Turning on the [MASTER] button switches the CP33 to two). Control Names and Functions Reference Control Names and Functions Front Panel DC-IN 12 FOOT PEDAL AUX SUSTAIN STANDBY ON USB PHONES MIDI... you easily match the pitch of the keyboard to the range of the settings for each button if the [MASTER] button is turned on. 12 CP33 Owner's Manual
... a master keyboard. 7 [MASTER EDIT] button (page 27) Enables selection of a singer or other instruments. 6 [MASTER] button (page 26) Turning on the [MASTER] button switches the CP33 to two). Control Names and Functions Reference Control Names and Functions Front Panel DC-IN 12 FOOT PEDAL AUX SUSTAIN STANDBY ON USB PHONES MIDI... you easily match the pitch of the keyboard to the range of the settings for each button if the [MASTER] button is turned on. 12 CP33 Owner's Manual
Owner's Manual
Page 13
.../MASTER $ 14 % ^ &* BRIGHT NORMAL MELLOW ROOM HALL 1 HALL 2 STAGE CHORUS PHASER TREMOLO ROTARY SP HARD MEDIUM SOFT BRILLIANCE REVERB EFFECT TOUCH PANEL LOCK STAGE PIANO CP33 F3 G3 A3 B3 C4 D4 E4 F4 G4 A4 B4 C5 D5 E5 F5 G5 A5 B5 C6 D6 E6 F6 G6 A6 B6... C7 # [VARIATION/MEMORY] button (page 16) For selecting an alternate Voice or alternate Voice settings. CP33 Owner's Manual 13 Enables selection of the selected Voice for your keyboard performance. & [TOUCH] button For selecting the touch response. (page 18) * [PANEL LOCK] button (page...
.../MASTER $ 14 % ^ &* BRIGHT NORMAL MELLOW ROOM HALL 1 HALL 2 STAGE CHORUS PHASER TREMOLO ROTARY SP HARD MEDIUM SOFT BRILLIANCE REVERB EFFECT TOUCH PANEL LOCK STAGE PIANO CP33 F3 G3 A3 B3 C4 D4 E4 F4 G4 A4 B4 C5 D5 E5 F5 G5 A5 B5 C6 D6 E6 F6 G6 A6 B6... C7 # [VARIATION/MEMORY] button (page 16) For selecting an alternate Voice or alternate Voice settings. CP33 Owner's Manual 13 Enables selection of the selected Voice for your keyboard performance. & [TOUCH] button For selecting the touch response. (page 18) * [PANEL LOCK] button (page...
Owner's Manual
Page 14
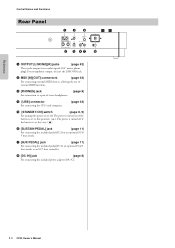
..., allowing the use of various MIDI functions. 3 [PHONES] jack (page 9) For connection to a pair of stereo headphones. 4 [USB] connector For connecting the CP33 and computer. (page 44) 5 [STANDBY/ON] switch (page 8, 9) For turning the power on if the button is set to this way: ( ). 6... FC4/5 foot switch or an FC7 foot controller. 8 [DC IN] jack (page 8) For connecting the included power adaptor (PA-3C). 14 CP33 Owner's Manual Reference Control Names and Functions Rear Panel 13 5 OUTPUT R L/MONO MIDI PHONES USB STANDBY ON FOOT PEDAL IN OUT 2 SUSTAIN AUX 4 67 ...
..., allowing the use of various MIDI functions. 3 [PHONES] jack (page 9) For connection to a pair of stereo headphones. 4 [USB] connector For connecting the CP33 and computer. (page 44) 5 [STANDBY/ON] switch (page 8, 9) For turning the power on if the button is set to this way: ( ). 6... FC4/5 foot switch or an FC7 foot controller. 8 [DC IN] jack (page 8) For connecting the included power adaptor (PA-3C). 14 CP33 Owner's Manual Reference Control Names and Functions Rear Panel 13 5 OUTPUT R L/MONO MIDI PHONES USB STANDBY ON FOOT PEDAL IN OUT 2 SUSTAIN AUX 4 67 ...
Owner's Manual
Page 15
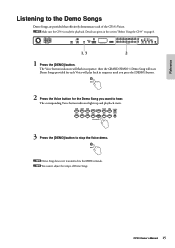
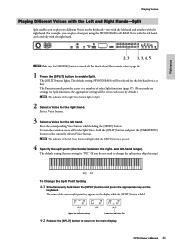
...GRAND PIANO 1 GRAND PIANO 2 MONO PIANO E. CLAVIE. The Voice button indicators will start. n You cannot adjust the tempo of the CP33's Voices. PIANO 1 E. The corresponding Voice button indicator lights up and playback starts. PIANO 1 E. BASS MEMORY SPLIT 8 9 10 ... the [DEMO] button. BASS MEMORY SPLIT 8 9 10 11 12 13 14 VOICE/MASTER 3 Press the [DEMO] button to stop the Voice demo. CP33 Owner's Manual 15 Demo Songs provided for each of Demo Songs. PIANO 2 CHORD VIBRAPHONE VARIATION 1 CHURCH ORGAN 2 JAZZ ORGAN 3 HARPSICHORD 4 STRINGS/ CHOIR 5 GUITAR ...
...GRAND PIANO 1 GRAND PIANO 2 MONO PIANO E. CLAVIE. The Voice button indicators will start. n You cannot adjust the tempo of the CP33's Voices. PIANO 1 E. The corresponding Voice button indicator lights up and playback starts. PIANO 1 E. BASS MEMORY SPLIT 8 9 10 ... the [DEMO] button. BASS MEMORY SPLIT 8 9 10 11 12 13 14 VOICE/MASTER 3 Press the [DEMO] button to stop the Voice demo. CP33 Owner's Manual 15 Demo Songs provided for each of Demo Songs. PIANO 2 CHORD VIBRAPHONE VARIATION 1 CHURCH ORGAN 2 JAZZ ORGAN 3 HARPSICHORD 4 STRINGS/ CHOIR 5 GUITAR ...
Owner's Manual
Page 16
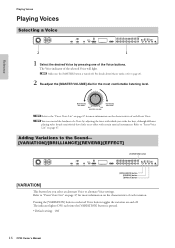
PIANO 1 E. n Make sure the [MASTER] button is pressed. • Default setting: Off 16 CP33 Owner's Manual BASS MEMORY SPLIT 8 9 10 11 12 13 14 VOICE/MASTER BRIGHT NORMAL MELLOW ROOM HALL 1 HALL 2 STAGE CHORUS PHASER TREMOLO ROTARY SP HARD MEDIUM SOFT ...
PIANO 1 E. n Make sure the [MASTER] button is pressed. • Default setting: Off 16 CP33 Owner's Manual BASS MEMORY SPLIT 8 9 10 11 12 13 14 VOICE/MASTER BRIGHT NORMAL MELLOW ROOM HALL 1 HALL 2 STAGE CHORUS PHASER TREMOLO ROTARY SP HARD MEDIUM SOFT ...
Owner's Manual
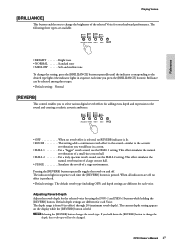
Page 17
... by using the [NO/-] and [YES/+] buttons while holding the [REVERB] button. If you would hear in sequence each time you press the [BRILLIANCE] button). CP33 Owner's Manual 17
... by using the [NO/-] and [YES/+] buttons while holding the [REVERB] button. If you would hear in sequence each time you press the [BRILLIANCE] button). CP33 Owner's Manual 17
Owner's Manual
Page 18
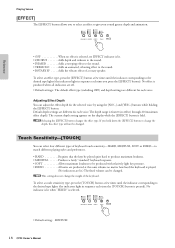
... MELLOW ROOM HALL 1 HALL 2 STAGE CHORUS PHASER TREMOLO ROTARY SP HARD MEDIUM SOFT BRILLIANCE REVERB EFFECT TOUCH PANEL LOCK • Default setting: MEDIUM 18 CP33 Owner's Manual Default depth settings are produced at the same volume no effect) through 20 (maximum effect depth). n This setting does not change the depth, the effect...
... MELLOW ROOM HALL 1 HALL 2 STAGE CHORUS PHASER TREMOLO ROTARY SP HARD MEDIUM SOFT BRILLIANCE REVERB EFFECT TOUCH PANEL LOCK • Default setting: MEDIUM 18 CP33 Owner's Manual Default depth settings are produced at the same volume no effect) through 20 (maximum effect depth). n This setting does not change the depth, the effect...
Owner's Manual
Page 19
... 1 CHURCH ORGAN 2 JAZZ ORGAN 3 HARPSICHORD 4 STRINGS/ CHOIR 5 GUITAR 6 WOOD BASS 7 E. BASS MEMORY SPLIT 8 9 10 11 12 13 14 VOICE/MASTER The CP33 Function provides access to create a thicker sound. CP33 Owner's Manual 19 If you hold the [TOUCH] button. In this way, you do not set the Dual functions, the appropriate setting will...
... 1 CHURCH ORGAN 2 JAZZ ORGAN 3 HARPSICHORD 4 STRINGS/ CHOIR 5 GUITAR 6 WOOD BASS 7 E. BASS MEMORY SPLIT 8 9 10 11 12 13 14 VOICE/MASTER The CP33 Function provides access to create a thicker sound. CP33 Owner's Manual 19 If you hold the [TOUCH] button. In this way, you do not set the Dual functions, the appropriate setting will...

Owner's Manual
Page 20
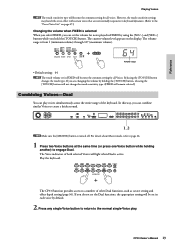
... ORGAN 3 HARPSICHORD 4 STRINGS/ CHOIR 5 GUITAR 6 WOOD BASS 7 E. BASS 8 9 10 11 12 13 14 VOICE/MASTER Press two Voice buttons at the same time. 20 CP33 Owner's Manual CLAVIE. PIANO 1 E. According to the Voice numbering priority shown in the diagram below, the lower value Voice number will be designated as Voice 2). CLAVIE. When...
... ORGAN 3 HARPSICHORD 4 STRINGS/ CHOIR 5 GUITAR 6 WOOD BASS 7 E. BASS 8 9 10 11 12 13 14 VOICE/MASTER Press two Voice buttons at the same time. 20 CP33 Owner's Manual CLAVIE. PIANO 1 E. According to the Voice numbering priority shown in the diagram below, the lower value Voice number will be designated as Voice 2). CLAVIE. When...
Owner's Manual
Page 21
... pressed. 4 Specify the split point (the border between the right- The [SPLIT] button lights. Press the corresponding Voice button while holding the [SPLIT] button. CP33 Owner's Manual 21 The default setting (WOOD BASS) will be set in Split. 2 Select a Voice for Split functions, the appropriate setting will light while the [SPLIT] button...
... pressed. 4 Specify the split point (the border between the right- The [SPLIT] button lights. Press the corresponding Voice button while holding the [SPLIT] button. CP33 Owner's Manual 21 The default setting (WOOD BASS) will be set in Split. 2 Select a Voice for Split functions, the appropriate setting will light while the [SPLIT] button...

