

Owner's Manual
Page 5
... (1)B-9 2/2 CP300 Owner's Manual 5 Saving data Saving and backing up your weight on, or place heavy objects on the instrument, and do not use excessive force on the buttons, switches or connectors. • Do not operate the instrument for all volume levels to minimum. Yamaha cannot be held... responsible for all components at a high or uncomfortable volume level, since this might discolor the panel or keyboard. • Do not rest your data • Current memory data (see page...
... (1)B-9 2/2 CP300 Owner's Manual 5 Saving data Saving and backing up your weight on, or place heavy objects on the instrument, and do not use excessive force on the buttons, switches or connectors. • Do not operate the instrument for all volume levels to minimum. Yamaha cannot be held... responsible for all components at a high or uncomfortable volume level, since this might discolor the panel or keyboard. • Do not rest your data • Current memory data (see page...

Owner's Manual
Page 7
...-instrument arrangements and Songs-up to four external tone generators. • Comprehensive selection of 128 notes. Using AWM, the CP300 has 50 original Voices-including a variety of ultra-realistic piano and other keyboard Voices, plus a wealth of authentic sounds of virtually every instrument type. • High-grade five-band Master EQ...
...-instrument arrangements and Songs-up to four external tone generators. • Comprehensive selection of 128 notes. Using AWM, the CP300 has 50 original Voices-including a variety of ultra-realistic piano and other keyboard Voices, plus a wealth of authentic sounds of virtually every instrument type. • High-grade five-band Master EQ...
Owner's Manual
Page 8
...Introduction 6 Application Index 10 Before Using the CP300 11 Power Supply Connections 11 Using the Pedals 11 Using Headphones 12 Turning the Power On 12 Adjusting the Brightness of the Display 13 Setting the Volume 13 Playing the keyboard 14 Playing the Sounds 14 Basic Operation 15 ...Display Settings-Basic Operation 15 Restoring the Factory-programmed Settings of the CP300 16 Basic Instructions 18 Basic Operation 20 Control Names and Functions 20 ...
...Introduction 6 Application Index 10 Before Using the CP300 11 Power Supply Connections 11 Using the Pedals 11 Using Headphones 12 Turning the Power On 12 Adjusting the Brightness of the Display 13 Setting the Volume 13 Playing the keyboard 14 Playing the Sounds 14 Basic Operation 15 ...Display Settings-Basic Operation 15 Restoring the Factory-programmed Settings of the CP300 16 Basic Instructions 18 Basic Operation 20 Control Names and Functions 20 ...

Owner's Manual
Page 13
... you start playing, re-adjust the [MASTER VOLUME] dial to the right of the LCD. CP300 Owner's Manual 13 n The [MASTER VOLUME] dial also controls the volume of the entire keyboard sound. Introduction Before Using the CP300 Adjusting the Brightness of the Display You can adjust the contrast of the display by turning...
... you start playing, re-adjust the [MASTER VOLUME] dial to the right of the LCD. CP300 Owner's Manual 13 n The [MASTER VOLUME] dial also controls the volume of the entire keyboard sound. Introduction Before Using the CP300 Adjusting the Brightness of the Display You can adjust the contrast of the display by turning...

Owner's Manual
Page 14
...PIANO E. To change the Voice, press any one of the Voice group buttons located at the right of the realistic and dynamic CP300 sounds from the keyboard now. PIANO 1 E. STRINGS CHOIR/PAD GUITAR BASS XG 9 10 11 12 13 14 15 16 VOICE/PERFORMANCE Voice group ...buttons Play the keyboard and enjoy the sound. 14 CP300 Owner's Manual PIANO 2 E. PIANO 3 CLAVI. VIBES 1 2 3 4 5 6 7 8 ORGAN 1 ORGAN 2 HARPSI. A Grand Piano 1 B NO YES C D In this condition,...
...PIANO E. To change the Voice, press any one of the Voice group buttons located at the right of the realistic and dynamic CP300 sounds from the keyboard now. PIANO 1 E. STRINGS CHOIR/PAD GUITAR BASS XG 9 10 11 12 13 14 15 16 VOICE/PERFORMANCE Voice group ...buttons Play the keyboard and enjoy the sound. 14 CP300 Owner's Manual PIANO 2 E. PIANO 3 CLAVI. VIBES 1 2 3 4 5 6 7 8 ORGAN 1 ORGAN 2 HARPSI. A Grand Piano 1 B NO YES C D In this condition,...

Owner's Manual
Page 16
...A B FactorySet Execute?--> NO YES MemoryFileIncluded C D Indicates memory files are maintained. This lets you can restore the CP300's memory to "Factory Setting List" on the keyboard). Refer to the factory default settings: 1) Set the "Factory Set" parameter in the Song File menu does not change (...page 84). 16 CP300 Owner's Manual n The "Character Code" parameter in the Other Settings menu, or 2) Turn...
...A B FactorySet Execute?--> NO YES MemoryFileIncluded C D Indicates memory files are maintained. This lets you can restore the CP300's memory to "Factory Setting List" on the keyboard). Refer to the factory default settings: 1) Set the "Factory Set" parameter in the Song File menu does not change (...page 84). 16 CP300 Owner's Manual n The "Character Code" parameter in the Other Settings menu, or 2) Turn...

Owner's Manual
Page 17
... area enables you will see the message "Executing" during processing. Turning the power off while this state may cause the system to the CP300. In this time, simultaneously hold down the rightmost white key (C7) and black key (Bb6) together and press the [POWER] switch..., a "Completed" message appears and operation returns to execute the job. Method 2 Simultaneously hold down the white key on the right end of the keyboard (C7), and press the [POWER] switch to turn on the power to save Performance files and recorded Songs. Introduction Basic Operation 4 Press ...
... area enables you will see the message "Executing" during processing. Turning the power off while this state may cause the system to the CP300. In this time, simultaneously hold down the rightmost white key (C7) and black key (Bb6) together and press the [POWER] switch..., a "Completed" message appears and operation returns to execute the job. Method 2 Simultaneously hold down the white key on the right end of the keyboard (C7), and press the [POWER] switch to turn on the power to save Performance files and recorded Songs. Introduction Basic Operation 4 Press ...

Owner's Manual
Page 18
... Power On First, turn the power on the Keyboard The CP300 allows you to play several different Voices together in virtually any musical style. ON OFF Selecting and Playing a Voice The CP300 features an exceptionally wide variety of the CP300 before playing. • Before Using the CP300 (pages 11 and 12) POWER ON! VIBES 1 ...GUITAR BASS XG 9 10 11 12 13 14 15 16 VOICE/PERFORMANCE Combining Voices and Playing Them on and set up the keyboard before being shipped from the factory. Try searching through the Voices to find your own original Voices. • Detailed ...
... Power On First, turn the power on the Keyboard The CP300 allows you to play several different Voices together in virtually any musical style. ON OFF Selecting and Playing a Voice The CP300 features an exceptionally wide variety of the CP300 before playing. • Before Using the CP300 (pages 11 and 12) POWER ON! VIBES 1 ...GUITAR BASS XG 9 10 11 12 13 14 15 16 VOICE/PERFORMANCE Combining Voices and Playing Them on and set up the keyboard before being shipped from the factory. Try searching through the Voices to find your own original Voices. • Detailed ...

Owner's Manual
Page 19
... parts separately-and lets you build up to sixteen independent parts, letting you can save these to a Performance as a Master Keyboard The Master mode of the instrument enables you to record up a complete, multi-instrument Song by recording each part one-by-one... VIBES 1 2 3 4 5 6 7 8 ORGAN 1 ORGAN 2 HARPSI. PIANO 3 CLAVI. PIANO 2 E. This effectively lets you to store and recall the entire CP300 settings all together. These include the Dual/Split settings, Voice and effect parameters, MIDI transmit/receive channel settings and Master Edit settings. Once you've...
... parts separately-and lets you build up to sixteen independent parts, letting you can save these to a Performance as a Master Keyboard The Master mode of the instrument enables you to record up a complete, multi-instrument Song by recording each part one-by-one... VIBES 1 2 3 4 5 6 7 8 ORGAN 1 ORGAN 2 HARPSI. PIANO 3 CLAVI. PIANO 2 E. This effectively lets you to store and recall the entire CP300 settings all together. These include the Dual/Split settings, Voice and effect parameters, MIDI transmit/receive channel settings and Master Edit settings. Once you've...

Owner's Manual
Page 20
... 40) ! [PERFORM.FILE] button (page 76) Enables selection of stereo headphones. 4 [POWER] switch (page 12) For turning the power on the [MASTER] button switches the CP300 to four). NEW SONG # % SYNCHRO START ^ SONG * TEMPO ¡ ™ A C £ 3 PHONES A-1 B-1 C0 D0 E0 F0 G0 A0 B0 C1 D1 E1 F1 G1 A1... PLAY/PAUSE SONG SETTING DOWN UP 9! The power is turned on if the button is set to a pair of Performance File settings, such as a Master keyboard. 9 [MASTER EDIT] button (page 53) Enables selection of the settings for Performance files. 20...
... 40) ! [PERFORM.FILE] button (page 76) Enables selection of stereo headphones. 4 [POWER] switch (page 12) For turning the power on the [MASTER] button switches the CP300 to four). NEW SONG # % SYNCHRO START ^ SONG * TEMPO ¡ ™ A C £ 3 PHONES A-1 B-1 C0 D0 E0 F0 G0 A0 B0 C1 D1 E1 F1 G1 A1... PLAY/PAUSE SONG SETTING DOWN UP 9! The power is turned on if the button is set to a pair of Performance File settings, such as a Master keyboard. 9 [MASTER EDIT] button (page 53) Enables selection of the settings for Performance files. 20...

Owner's Manual
Page 21
...; [PANEL LOCK] button (page 51) Switches panel lock on the button disables the panel operations. ¡ TEMPO [UP]/[DOWN] buttons Adjusts the tempo. (page 38) CP300 Owner's Manual 21 PIANO 2 E. PIANO 3 CLAVI. ¶• VIBES VOICE EDIT SPLIT , ¤› REVERB CHORUS SPEAKER MIDI SETTING 1 2 3 4 5 6...64257;ed track as required so you can practice the corresponding track (the track that is turned off ) on the keyboard. % SONG [REC] button For recording your keyboard performance. (page 42) ^ SONG [PLAY/PAUSE], [STOP] buttons (page 49) Plays back the Preset Songs or ...
...; [PANEL LOCK] button (page 51) Switches panel lock on the button disables the panel operations. ¡ TEMPO [UP]/[DOWN] buttons Adjusts the tempo. (page 38) CP300 Owner's Manual 21 PIANO 2 E. PIANO 3 CLAVI. ¶• VIBES VOICE EDIT SPLIT , ¤› REVERB CHORUS SPEAKER MIDI SETTING 1 2 3 4 5 6...64257;ed track as required so you can practice the corresponding track (the track that is turned off ) on the keyboard. % SONG [REC] button For recording your keyboard performance. (page 42) ^ SONG [PLAY/PAUSE], [STOP] buttons (page 49) Plays back the Preset Songs or ...

Owner's Manual
Page 22
... you select from an audio device, connect to the sound. For monophonic output, use of various MIDI functions. 4 [USB] connector For connecting the CP300 and computer. (page 92) 5 OUTPUT [L][R] jacks (page 88) These jacks output balanced audio signals, and are for the Master Equalizer. ¤... groups of Voices, including grand piano. You can be reproduced via these phone jacks (1/4" mono phone plug). and right-hand sections of the keyboard. ª VARIATION [▼][▲] buttons (page 25) Enables selection of alternate Voices in speakers on or off. (page 52) ‹...
... you select from an audio device, connect to the sound. For monophonic output, use of various MIDI functions. 4 [USB] connector For connecting the CP300 and computer. (page 92) 5 OUTPUT [L][R] jacks (page 88) These jacks output balanced audio signals, and are for the Master Equalizer. ¤... groups of Voices, including grand piano. You can be reproduced via these phone jacks (1/4" mono phone plug). and right-hand sections of the keyboard. ª VARIATION [▼][▲] buttons (page 25) Enables selection of alternate Voices in speakers on or off. (page 52) ‹...
Owner's Manual
Page 25
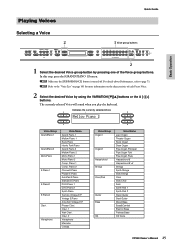
...Slow Strings Choir Slow Choir Scat Synth Pad 1 Synth Pad 2 Nylon Guitar Steel Guitar Wood Bass Bass&Cymbal Electric Bass Fretless Bass XG Voice CP300 Owner's Manual 25 In this step, press the [GRAND PIANO 1] button. Piano 1 Comp. n Refer to page 73. Indicates the ... Piano 1 Rock Piano Honky Tonk Piano Grand Piano 2 Mellow Piano 2 Mono Piano 1 Mono Piano 2 Comp. The currently selected Voice will sound when you play the keyboard. PIANO 1 E. VIBES VOICE EDIT SPLIT 1 2 3 4 5 6 7 8 ORGAN 1 ORGAN 2 HARPSI. Vintage E.Piano Amp.Sim.Vintage E.P. Clavi. 1 Wah Clavi. ...
...Slow Strings Choir Slow Choir Scat Synth Pad 1 Synth Pad 2 Nylon Guitar Steel Guitar Wood Bass Bass&Cymbal Electric Bass Fretless Bass XG Voice CP300 Owner's Manual 25 In this step, press the [GRAND PIANO 1] button. Piano 1 Comp. n Refer to page 73. Indicates the ... Piano 1 Rock Piano Honky Tonk Piano Grand Piano 2 Mellow Piano 2 Mono Piano 1 Mono Piano 2 Comp. The currently selected Voice will sound when you play the keyboard. PIANO 1 E. VIBES VOICE EDIT SPLIT 1 2 3 4 5 6 7 8 ORGAN 1 ORGAN 2 HARPSI. Vintage E.Piano Amp.Sim.Vintage E.P. Clavi. 1 Wah Clavi. ...

Owner's Manual
Page 26
... 12 13 14 15 16 VOICE/PERFORMANCE 2-2 Simultaneously press the [-] [+] buttons located beside the XG Voice name display, to select a specific Voice. 3 Play the keyboard. 26 CP300 Owner's Manual PIANO 1 E. PIANO 3 CLAVI. Voice group name A PIANO 00:GrandPiano Indicates that an XG Voice is selected B XG NO YES C D Voice name The...
... 12 13 14 15 16 VOICE/PERFORMANCE 2-2 Simultaneously press the [-] [+] buttons located beside the XG Voice name display, to select a specific Voice. 3 Play the keyboard. 26 CP300 Owner's Manual PIANO 1 E. PIANO 3 CLAVI. Voice group name A PIANO 00:GrandPiano Indicates that an XG Voice is selected B XG NO YES C D Voice name The...
Owner's Manual
Page 27
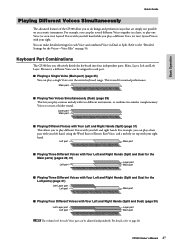
...part Left part Layer part Main part n The volume level for normal performance. CP300 Owner's Manual 27 Main part ■ Playing Two Voices Simultaneously (Dual) (page 29) This lets you effectively divide the keyboard into four independent parts: Main, Layer, Left and Left Layer. You can...For details, refer to play a different Voice (or two) layered Voices with your right. For example, you can be adjusted independently. Keyboard Part Combinations The CP300 lets you play a bass part with your left hand, using the Wood Bass or Electric Bass Voice, and a melody on an acoustic...
...part Left part Layer part Main part n The volume level for normal performance. CP300 Owner's Manual 27 Main part ■ Playing Two Voices Simultaneously (Dual) (page 29) This lets you effectively divide the keyboard into four independent parts: Main, Layer, Left and Left Layer. You can...For details, refer to play a different Voice (or two) layered Voices with your right. For example, you can be adjusted independently. Keyboard Part Combinations The CP300 lets you play a bass part with your left hand, using the Wood Bass or Electric Bass Voice, and a melody on an acoustic...

Owner's Manual
Page 28
...this case, the [ZONE 2], [ZONE 3] and [ZONE 4] sliders have no effect on page 39. MASTER PERFORMANCE MASTER EDIT PERFORM.FILE 28 CP300 Owner's Manual Moving a slider up increases the volume while pulling the slider down decreases it. Left Layer part Left part Layer part Main part ...ZONE 1: Main part ZONE 2: Left part ZONE 3: Layer part ZONE 4: Left Layer part n When you play a single Voice (Main part), you play the keyboard. Refer to the "Using the Master Mode" on the volume. Turning on the [MASTER] button switches the function assigned to the [ZONE CONTROL] sliders. Basic...
...this case, the [ZONE 2], [ZONE 3] and [ZONE 4] sliders have no effect on page 39. MASTER PERFORMANCE MASTER EDIT PERFORM.FILE 28 CP300 Owner's Manual Moving a slider up increases the volume while pulling the slider down decreases it. Left Layer part Left part Layer part Main part ...ZONE 1: Main part ZONE 2: Left part ZONE 3: Layer part ZONE 4: Left Layer part n When you play a single Voice (Main part), you play the keyboard. Refer to the "Using the Master Mode" on the volume. Turning on the [MASTER] button switches the function assigned to the [ZONE CONTROL] sliders. Basic...

Owner's Manual
Page 31
...The [SPLIT] button lights. 2 Select a Voice for the Main parts C D Left part To divide the keyboard into Main, Layer and Left Layer parts, simultaneously hold down the [SPLIT] button and pressing one of the ...Left parts Grand Piano 1 NO YES Strings E.Bass C Left part D Left Layer part To divide the keyboard into Main, Layer and Left parts, press two Voice group buttons at the same time (or press one... Scat B NO YES Split C D Left part To divide the keyboard into four parts-Main, Layer, Left and Left Layer-perform both the above operations (last two sentences)...
...The [SPLIT] button lights. 2 Select a Voice for the Main parts C D Left part To divide the keyboard into Main, Layer and Left Layer parts, simultaneously hold down the [SPLIT] button and pressing one of the ...Left parts Grand Piano 1 NO YES Strings E.Bass C Left part D Left Layer part To divide the keyboard into Main, Layer and Left parts, press two Voice group buttons at the same time (or press one... Scat B NO YES Split C D Left part To divide the keyboard into four parts-Main, Layer, Left and Left Layer-perform both the above operations (last two sentences)...
Owner's Manual
Page 32
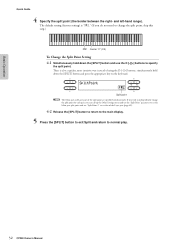
... C D Split point n The Main part and Layer part of using the D [-][+] buttons, simultaneously hold down the [SPLIT] button and press the appropriate key on the keyboard. There is "F#2." (If you do not need to change the split point for each part, you wish to independently change the split point, skip this... the Other Settings menu and use the "Split Point" parameter to set the Main part split point and use the D [-][+] buttons to normal play. 32 CP300 Owner's Manual
... C D Split point n The Main part and Layer part of using the D [-][+] buttons, simultaneously hold down the [SPLIT] button and press the appropriate key on the keyboard. There is "F#2." (If you do not need to change the split point for each part, you wish to independently change the split point, skip this... the Other Settings menu and use the "Split Point" parameter to set the Main part split point and use the D [-][+] buttons to normal play. 32 CP300 Owner's Manual

Owner's Manual
Page 33
... the "Pedal 1/Pedal 2/Pedal 3/Pedal 4" parameter in the Other Settings menu (page 69). CP300 Owner's Manual 33 If you can be adjusted via the "Soft Pedal Depth" parameter in the same way as a damper pedal on the keyboard and press the sostenuto pedal while holding the note(s), the notes will sustain as...
... the "Pedal 1/Pedal 2/Pedal 3/Pedal 4" parameter in the Other Settings menu (page 69). CP300 Owner's Manual 33 If you can be adjusted via the "Soft Pedal Depth" parameter in the same way as a damper pedal on the keyboard and press the sostenuto pedal while holding the note(s), the notes will sustain as...

Owner's Manual
Page 34
This wheel is to ensure the most natural sound on the keyboard. The more you start playing. 34 CP300 Owner's Manual Maximum Minimum Modulation wheel n Keep in the Voice Edit menu (page 62). n To avoid accidentally applying Modulation or other effects to the current ... wheel applies vibrato to normal pitch when released. Refer to the "Modulation" parameter in mind that is set with various Preset Voices while playing the keyboard. Basic Operation Quick Guide Bending Notes-Pitch Bend Wheel Use the Pitch Bend wheel to bend notes up , the greater the effect that many of...
This wheel is to ensure the most natural sound on the keyboard. The more you start playing. 34 CP300 Owner's Manual Maximum Minimum Modulation wheel n Keep in the Voice Edit menu (page 62). n To avoid accidentally applying Modulation or other effects to the current ... wheel applies vibrato to normal pitch when released. Refer to the "Modulation" parameter in mind that is set with various Preset Voices while playing the keyboard. Basic Operation Quick Guide Bending Notes-Pitch Bend Wheel Use the Pitch Bend wheel to bend notes up , the greater the effect that many of...


