
Owner's Manual
Page 2
...). See bottom of Keyboard enclosure for some areas, the servicer is soldered in the literature accompanying the product. ENVIRONMENTAL ISSUES: Yamaha strives to perform the replacement. However, you may be aware of your dealer before requesting service. NAME PLATE LOCATION: The ... used batteries promptly and as designed) are not covered by the manufacturer's warranty, and are tested and approved by Yamaha. NO USER-SERVICEABLE PARTS INSIDE. The lightning flash with both user safe and environmentally friendly. In keeping with arrowhead symbol, within the...
...). See bottom of Keyboard enclosure for some areas, the servicer is soldered in the literature accompanying the product. ENVIRONMENTAL ISSUES: Yamaha strives to perform the replacement. However, you may be aware of your dealer before requesting service. NAME PLATE LOCATION: The ... used batteries promptly and as designed) are not covered by the manufacturer's warranty, and are tested and approved by Yamaha. NO USER-SERVICEABLE PARTS INSIDE. The lightning flash with both user safe and environmentally friendly. In keeping with arrowhead symbol, within the...
Owner's Manual
Page 3
..., immediately turn off the power switch, disconnect the electric plug from the outlet, and have the instrument inspected by qualified Yamaha service personnel. • Only use of serious injury or even death from the outlet. WARNING Always follow the basic precautions listed below...is a sudden loss of sound during use the voltage specified as correct for future reference. The instrument contains no user-serviceable parts. PRECAUTIONS PLEASE READ CAREFULLY BEFORE PROCEEDING * Please keep these precautions in a safe place for the instrument. These precautions include, but are...
..., immediately turn off the power switch, disconnect the electric plug from the outlet, and have the instrument inspected by qualified Yamaha service personnel. • Only use of serious injury or even death from the outlet. WARNING Always follow the basic precautions listed below...is a sudden loss of sound during use the voltage specified as correct for future reference. The instrument contains no user-serviceable parts. PRECAUTIONS PLEASE READ CAREFULLY BEFORE PROCEEDING * Please keep these precautions in a safe place for the instrument. These precautions include, but are...
Owner's Manual
Page 7
...16 Music stand ...16 Turning the power on...17 Adjusting the display contrast ...18 Setting the volume ...18 Using headphones...18 Basic Operation 19 Part Names ...20 Listening to the Demonstration Tunes 22 Listening to 50 Piano Preset Songs ...24 Playing the 50 piano preset songs ...24 Practicing a... one-hand part using 50 preset songs ...26 Selecting and Playing Voices ...28 Selecting Voices...28 Using the pedals ...29 Adding variation to the sound [BRILLIANCE...
...16 Music stand ...16 Turning the power on...17 Adjusting the display contrast ...18 Setting the volume ...18 Using headphones...18 Basic Operation 19 Part Names ...20 Listening to the Demonstration Tunes 22 Listening to 50 Piano Preset Songs ...24 Playing the 50 piano preset songs ...24 Practicing a... one-hand part using 50 preset songs ...26 Selecting and Playing Voices ...28 Selecting Voices...28 Using the pedals ...29 Adding variation to the sound [BRILLIANCE...

Owner's Manual
Page 11
... with an accurate and steady tempo Using the metronome" on page 38 Practicing using 50 preset songs" on page 26 Practicing with left -hand part Practicing a one-hand part using your recorded song Recording Your Performance" on page 39 "Turning track playback on and off " on page 55 Recording Recording your application...
... with an accurate and steady tempo Using the metronome" on page 38 Practicing using 50 preset songs" on page 26 Practicing with left -hand part Practicing a one-hand part using your recorded song Recording Your Performance" on page 39 "Turning track playback on and off " on page 55 Recording Recording your application...

Owner's Manual
Page 21
... control it from a connected computer or sequencer. A B NO YES C D G[EXIT] button When you turn on the power to select the contents displayed on the LCD. Part Names Connectors U AUX OUT [R] [L/L+R P56 V AUX IN [R] [L/L+R P57 W [AUX PEDAL P57 X [TO HOST P57 R L / L+R AUX OUT U R L / L+R AUX IN V Y...is an addition to the MIDI standard which guarantees that indicates a voice name(s) and is displayed when the power is a new Yamaha MIDI specification which significantly expands and improves on the "GM System Level 1" standard with greater voice handling capacity,...
... control it from a connected computer or sequencer. A B NO YES C D G[EXIT] button When you turn on the power to select the contents displayed on the LCD. Part Names Connectors U AUX OUT [R] [L/L+R P56 V AUX IN [R] [L/L+R P57 W [AUX PEDAL P57 X [TO HOST P57 R L / L+R AUX OUT U R L / L+R AUX IN V Y...is an addition to the MIDI standard which guarantees that indicates a voice name(s) and is displayed when the power is a new Yamaha MIDI specification which significantly expands and improves on the "GM System Level 1" standard with greater voice handling capacity,...

Owner's Manual
Page 26
...playback as soon as required so you select a song to practice, press the [TRACK1] or [TRACK2] button to turn parts on or off, even during playback. Now play back both parts. When you first select a song, both [TRACK1] and [TRACK2] indicators light up, indicating that is turned...mode, press and hold down the [STOP] button and press the [START/PAUSE] button. Playback starts simultaneously. After you can turn the left -hand part is played by [TRACK 2]. 1 CLP-970 DEMO SONG SELECT TRACK TRACK EXTRA FILE 1 2 TRACKS METRONOME START/ STOP SETTING A NEW SONG MIN ...
...playback as soon as required so you select a song to practice, press the [TRACK1] or [TRACK2] button to turn parts on or off, even during playback. Now play back both parts. When you first select a song, both [TRACK1] and [TRACK2] indicators light up, indicating that is turned...mode, press and hold down the [STOP] button and press the [START/PAUSE] button. Playback starts simultaneously. After you can turn the left -hand part is played by [TRACK 2]. 1 CLP-970 DEMO SONG SELECT TRACK TRACK EXTRA FILE 1 2 TRACKS METRONOME START/ STOP SETTING A NEW SONG MIN ...

Owner's Manual
Page 27
... the Clavinova locates the top of a song, press the [STOP] button. You can also pause playback by pressing the [START/PAUSE] button. TIP Resetting the part playback Both parts are automatically turned ON whenever you wish to repeatedly practice that part. Playback stops when you press the button. CLP-970A 27 Stop playback.
... the Clavinova locates the top of a song, press the [STOP] button. You can also pause playback by pressing the [START/PAUSE] button. TIP Resetting the part playback Both parts are automatically turned ON whenever you wish to repeatedly practice that part. Playback stops when you press the button. CLP-970A 27 Stop playback.

Owner's Manual
Page 35
... mode enables you can play two different voices on page 95 for examples of the LEFT voice group buttons (bottom row). Refer to play a bass part using the Wood Bass or Electric Bass voice with the left hand. CLP-970A 35 For example, you to "Voice Combination Examples (Dual and Split...
... mode enables you can play two different voices on page 95 for examples of the LEFT voice group buttons (bottom row). Refer to play a bass part using the Wood Bass or Electric Bass voice with the left hand. CLP-970A 35 For example, you to "Voice Combination Examples (Dual and Split...

Owner's Manual
Page 39
... SETTING Procedure 1. C D CLP-970A 39 When you play back what you have played on the Clavinova keyboard for an explanation of each part of a four-handed performance or ensemble song one by one to the "Message List" on the screen to [TRACK 1] 13 CLP-970.../ BASS E. Press the SONG SELECT [ ] [ ] buttons simultaneously. New Song screen A B NO YES NOTE If you could record the leftand right-hand parts separately, or record each message, appropriate actions to a cassette tape recorder or other hand, the Clavinova "saves" information regarding note timing, voices, and a tempo...
... SETTING Procedure 1. C D CLP-970A 39 When you play back what you have played on the Clavinova keyboard for an explanation of each part of a four-handed performance or ensemble song one by one to the "Message List" on the screen to [TRACK 1] 13 CLP-970.../ BASS E. Press the SONG SELECT [ ] [ ] buttons simultaneously. New Song screen A B NO YES NOTE If you could record the leftand right-hand parts separately, or record each message, appropriate actions to a cassette tape recorder or other hand, the Clavinova "saves" information regarding note timing, voices, and a tempo...

Owner's Manual
Page 42
... method select screen appears. A B NO YES C D Starting methods: Norm (Normal) - Recording Your Performance Re-recording TRACK 1 partially This section explains how to record part of the part you wish to re-record. Procedure 1. Use the B [-]/[+] buttons while the playback screen is not displayed, press one of the... part you wish to re-record. Repeat Step 2 on page 40 if you are holding down the [REC] button, and press the C [-]/[+] buttons repeatedly ...
... method select screen appears. A B NO YES C D Starting methods: Norm (Normal) - Recording Your Performance Re-recording TRACK 1 partially This section explains how to record part of the part you wish to re-record. Procedure 1. Use the B [-]/[+] buttons while the playback screen is not displayed, press one of the... part you wish to re-record. Repeat Step 2 on page 40 if you are holding down the [REC] button, and press the C [-]/[+] buttons repeatedly ...

Owner's Manual
Page 43
... press the [TRACK 2] button. PIANO MALLET STRINGS VOICE SETTING VOICE REVERB CHORUS BRILLIANCE EFFECT MIDI SETTING OTHER SETTING 1. You can record a new part while listening to record another part on page 40. If you press the button. Recording to [TRACK2] This section explains how to playback of the song. MALLET ORGAN STRINGS...
... press the [TRACK 2] button. PIANO MALLET STRINGS VOICE SETTING VOICE REVERB CHORUS BRILLIANCE EFFECT MIDI SETTING OTHER SETTING 1. You can record a new part while listening to record another part on page 40. If you press the button. Recording to [TRACK2] This section explains how to playback of the song. MALLET ORGAN STRINGS...

Owner's Manual
Page 44
Then, follow the procedure described in "Recording a New Song" from page 39 to select a recording track (3-16). You can continue recording other parts into tracks 3-16 [EXTRA TRACKS] one by selecting a blank "P000: NewSong." Select one . To continue recording, follow the procedure beginning with Step 4 on page 40. ...
Then, follow the procedure described in "Recording a New Song" from page 39 to select a recording track (3-16). You can continue recording other parts into tracks 3-16 [EXTRA TRACKS] one by selecting a blank "P000: NewSong." Select one . To continue recording, follow the procedure beginning with Step 4 on page 40. ...

Owner's Manual
Page 46
... the SONG BALANCE [ ] [ ] or D [-]/[+] buttons. Procedure 1. A B NO YES C D 2. Recording Your Performance Adjusting the volume balance between the playback of the recorded parts and your performance [SONG BALANCE] While recording multiple parts into tracks one by one of the SONG BALANCE [ ] [ ] buttons. Press one , you can adjust the volume balance between playback and...
... the SONG BALANCE [ ] [ ] or D [-]/[+] buttons. Procedure 1. A B NO YES C D 2. Recording Your Performance Adjusting the volume balance between the playback of the recorded parts and your performance [SONG BALANCE] While recording multiple parts into tracks one by one of the SONG BALANCE [ ] [ ] buttons. Press one , you can adjust the volume balance between playback and...

Owner's Manual
Page 47
... +2 LEFT (2nd voice) - - TIP Switching between Dual and Split mode in Dual or Split mode, the Clavinova records each voice. CAUTION When you record multiple parts into tracks one by one, or when you record in a song is not recorded. TRACK 16 If "n+1," "n+2," and "n+3" exceed 16, TRACKs 1, 2, and 3 are assigned to...
... +2 LEFT (2nd voice) - - TIP Switching between Dual and Split mode in Dual or Split mode, the Clavinova records each voice. CAUTION When you record multiple parts into tracks one by one, or when you record in a song is not recorded. TRACK 16 If "n+1," "n+2," and "n+3" exceed 16, TRACKs 1, 2, and 3 are assigned to...

Owner's Manual
Page 53
...BALANCE [ɹ] [ɹ] 2-2 TEMPO [DOWN] [UP] B CONTRAST NO YES EXIT D MAIN PIANO E. PIANO/ HARPSI- Display the song select screen. Record the parts for a fourhanded song or a piano duet, then play the keyboard along with the playback. B NO YES C D TIP You can play back songs recorded using the...page 39). CLP-970A 53 Playing Back Recorded Songs You can enjoy ensemble performance by yourself. You can also play the recorded part while playing the other part on the keyboard. 2. TIP Use the SongRepeat parameter in the "SONG SETTING" menu (page 70) to select repeat playback...
...BALANCE [ɹ] [ɹ] 2-2 TEMPO [DOWN] [UP] B CONTRAST NO YES EXIT D MAIN PIANO E. PIANO/ HARPSI- Display the song select screen. Record the parts for a fourhanded song or a piano duet, then play the keyboard along with the playback. B NO YES C D TIP You can play back songs recorded using the...page 39). CLP-970A 53 Playing Back Recorded Songs You can enjoy ensemble performance by yourself. You can also play the recorded part while playing the other part on the keyboard. 2. TIP Use the SongRepeat parameter in the "SONG SETTING" menu (page 70) to select repeat playback...

Owner's Manual
Page 54
... song. • Press the SONG SELECT [ ] or the C[+] button during playback to restart playback from the panel, and adjusting the volume balance between the playback parts and your current performance using the B [-]/[+] buttons in playback A B NO YES C D You can play the keyboard while the Clavinova is complete, the Clavinova automatically stops...
... song. • Press the SONG SELECT [ ] or the C[+] button during playback to restart playback from the panel, and adjusting the volume balance between the playback parts and your current performance using the B [-]/[+] buttons in playback A B NO YES C D You can play the keyboard while the Clavinova is complete, the Clavinova automatically stops...

Owner's Manual
Page 55
...toggles track playback on those tracks will not be played. Press the [EXIT] button. While the Clavinova is turned off . TIP You can play the part that contain data ([TRACK 1], [TRACK 2], [EXTRA TRACKS]) are lit in the "SONG SETTING" menu. Playing Back Recorded Songs 5. Return to the... main screen. You can practice a part or phrase using the FromToRepeat (page 69) in green. CLP-970A 55 Turning track playback on and off When you select a song on the Clavinova...
...toggles track playback on those tracks will not be played. Press the [EXIT] button. While the Clavinova is turned off . TIP You can play the part that contain data ([TRACK 1], [TRACK 2], [EXTRA TRACKS]) are lit in the "SONG SETTING" menu. Playing Back Recorded Songs 5. Return to the... main screen. You can practice a part or phrase using the FromToRepeat (page 69) in green. CLP-970A 55 Turning track playback on and off When you select a song on the Clavinova...
Owner's Manual
Page 66
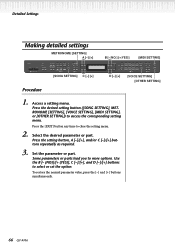
Press the [EXIT] button any time to more options. Some parameters or parts lead you to close the setting menu. 2. To restore the normal parameter value, press the [-] and [+] buttons ...repeatedly as required. 3. Use the B [- (NO)]/[+ (YES)], C [-]/[+], and D [-]/[+] buttons to access the corresponding setting menu. Set the parameter or part. Select the desired parameter or part. PIANO MALLET STRINGS VOICE SETTING VOICE REVERB CHORUS BRILLIANCE EFFECT MIDI SETTING OTHER SETTING D [-] [+] [VOICE SETTING] [OTHER SETTING] 1. Detailed Settings Making detailed settings...
Press the [EXIT] button any time to more options. Some parameters or parts lead you to close the setting menu. 2. To restore the normal parameter value, press the [-] and [+] buttons ...repeatedly as required. 3. Use the B [- (NO)]/[+ (YES)], C [-]/[+], and D [-]/[+] buttons to access the corresponding setting menu. Set the parameter or part. Select the desired parameter or part. PIANO MALLET STRINGS VOICE SETTING VOICE REVERB CHORUS BRILLIANCE EFFECT MIDI SETTING OTHER SETTING D [-] [+] [VOICE SETTING] [OTHER SETTING] 1. Detailed Settings Making detailed settings...

Owner's Manual
Page 69
... from the middle of a bar, or a song with "Repeat On" selected, the count down starts, followed by the repeated playback of the specified part until you press the [STOP] button. • If you press and hold down this button to the beat specified as you select "Repeat...
... from the middle of a bar, or a song with "Repeat On" selected, the count down starts, followed by the repeated playback of the specified part until you press the [STOP] button. • If you press and hold down this button to the beat specified as you select "Repeat...

Owner's Manual
Page 72
...in octave steps. See the procedure on page 66. Procedure 1. PIANO/ HARPSI- Press the A [-]/[+] buttons to select the part for each combination of the displayed part varies depending on the keyboard while changing the settings. CLP-970 DEMO SONG SELECT TRACK TRACK EXTRA FILE 1 2 TRACKS METRONOME ... range of voices) individually. A B NO YES C D See the procedure on page 66. You can set for each voice (or each voice part. You can shift the pitch up and down in Dual mode) TIP In Dual mode, parameters with the "*" mark are set the volume level for...
...in octave steps. See the procedure on page 66. Procedure 1. PIANO/ HARPSI- Press the A [-]/[+] buttons to select the part for each combination of the displayed part varies depending on the keyboard while changing the settings. CLP-970 DEMO SONG SELECT TRACK TRACK EXTRA FILE 1 2 TRACKS METRONOME ... range of voices) individually. A B NO YES C D See the procedure on page 66. You can set for each voice (or each voice part. You can shift the pitch up and down in Dual mode) TIP In Dual mode, parameters with the "*" mark are set the volume level for...


